
A simple try of Facial Recognition
Facial recognition is a technology capable of identifying or verifying a person from a digital image or a video frame from a video source. It is widely used in Security Surveillance and Smart Phone industries.
To use facial recognition techniques, we have to understand the format of graphs first. In our computer, a graph comprises many pixels which pixel is usually stored as a number in our computer and then be converted to its corresponding color in the monitor. There are some common formats in representing color:
- Grey Color Model: a number from 0 to 255 stands for a color sequence from black to white. 0 stands for Black while 255 stands for White
- RGB Color Model: it follows a principle of addition. Any color can be decomposited to a combination of Red, Green, and Blue.
To simplify, I would like to use Grey Color Model interpreting the methods we use below.
We use a faces database from the Cambridge Computer Laboratory http://www.cl.cam.ac.uk/research/dtg/attarchive/facedatabase.html. It consists of 40 persons'faces and 10 pictures for each person. And each picture is stored as PGM format which consists of 112X92 pixels. We can use the MATLAB to see the matrix of the picture.(Use imread function)

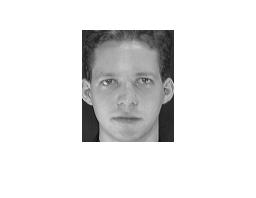
The matrix can be visualized by the function imshow in MATLAB. And we can get the original figure below. It is a picture of a man. And now we would like to introduce Singular Value Decompostion for the purpose of image processing.
Singular Value Decompostion
Singular Value Decomposion(Hereinafter SVD) is a mtrix decomposition technique which is very useful in signal processing and image processing. Suppose there is a \(m\times n\) matrix \(M\), by the theorem, it can be decomposited by the product of three different matrices.
where \(U\) is a \(m\times m\) matrix; \(\Sigma\) is a \(m\times n\) non-negative diagonal matrix
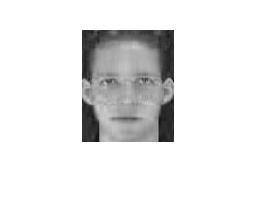
We can use SVD to extract the features of a picture. Take figure above as an instance, we adopt a SVD for the picture and use the top 10 features to reconstruct the figure. We can obtain below. Although the picture is more vague then the original one, we can recognize the person just use the top 10 features.
By the way, in statistics, there are some other matrix decompostion techniques such as Eigendecompostion(https://en.wikipedia.org/wiki/Spectral_theorem). The difference between SVD and eigendecompostion is that SVD can be applied to any form of matrix while the eigendecomposition can only be used in \(n \times n\) matrix. So we adopt the SVD in this article.
Generally, there are several facial recognition techniques
- Whole face identification
- Feature identification: usually finding some representative features like nose, eyes, and use these features to identify
- Eigenface: the classfication methods I used is more close to this one
Classification
We will use several classification methods to identify people. As for the input data, since we already adopted a SVD, we would like to use the matrix \(V\) to serve as a feature in facial recognition.
import pandas as pd
import numpy as np
import matplotlib.pyplot as plt
import seaborn as sns
%matplotlib inline
data = pd.read_csv('Person_Eig.csv')
data.head()
| Person | Eig1 | Eig2 | Eig3 | Eig4 | Eig5 | Eig6 | Eig7 | Eig8 | Eig9 | ... | Eig83 | Eig84 | Eig85 | Eig86 | Eig87 | Eig88 | Eig89 | Eig90 | Eig91 | Eig92 | |
|---|---|---|---|---|---|---|---|---|---|---|---|---|---|---|---|---|---|---|---|---|---|
| 0 | 0 | 13779.37383 | 2247.336970 | 1049.002379 | 956.738455 | 654.588766 | 548.002509 | 451.575872 | 385.562062 | 344.153187 | ... | 9.239198 | 9.041727 | 8.628335 | 7.031938 | 6.577775 | 6.194635 | 6.148816 | 5.093492 | 4.623030 | 3.953724 |
| 1 | 0 | 15340.41688 | 1553.408085 | 1371.755401 | 1031.667930 | 552.650137 | 450.484926 | 392.921822 | 338.646425 | 330.735912 | ... | 9.355131 | 8.501988 | 7.853769 | 7.098766 | 6.830705 | 6.491931 | 5.855014 | 5.143551 | 4.481052 | 3.605516 |
| 2 | 0 | 14138.40561 | 2301.036911 | 1092.336417 | 905.101612 | 747.632797 | 571.115630 | 506.351751 | 419.166080 | 375.984882 | ... | 11.117401 | 10.140447 | 9.052646 | 8.704376 | 7.276731 | 6.648230 | 6.458411 | 5.289283 | 4.332025 | 3.889263 |
| 3 | 0 | 14901.81058 | 2261.702716 | 1217.075631 | 995.019605 | 817.795178 | 473.360050 | 415.456569 | 335.305574 | 299.558577 | ... | 9.356644 | 9.160757 | 7.788434 | 7.527639 | 6.456186 | 6.357908 | 6.142226 | 5.076837 | 4.023712 | 3.685070 |
| 4 | 0 | 15071.80288 | 1688.835918 | 1141.039038 | 772.902013 | 727.460497 | 576.925069 | 475.365662 | 416.615547 | 367.352596 | ... | 8.402915 | 7.757034 | 7.454080 | 6.985483 | 6.423255 | 5.991992 | 5.399954 | 4.657608 | 4.135701 | 3.743385 |
5 rows × 93 columns
A stratified sampling will be applied to split the training and testing sample. I will take 9 out of 10 pictures of each person to construct a training sample while the rest constitute a testing sample.
X = data.drop('Person',axis = 1)
y = data['Person']
flag_test = np.arange(0,400,10) + np.random.randint(low = 0, high = 10, size = 40)
train_sample = lambda x:x not in flag_test
flag_train = list(filter(train_sample, np.arange(0,400)))

X_train = X.iloc[flag_train]
y_train = y.iloc[flag_train]
X_test = X.iloc[flag_test]
y_test = y.iloc[flag_test]
K-NN
It is vital to preprocess the data before using KNN because KNN takes distance into consideration.
from sklearn.neighbors import KNeighborsClassifier
from sklearn.preprocessing import StandardScaler
scaler = StandardScaler()
scaler.fit(X)
scaler_X = scaler.transform(X)

knn = KNeighborsClassifier(n_neighbors = 6)
knn.fit(scaler_X[flag_train], y_train)
KNeighborsClassifier(algorithm='auto', leaf_size=30, metric='minkowski',
           metric_params=None, n_jobs=1, n_neighbors=6, p=2,
           weights='uniform')
y_pred_knn = knn.predict(scaler_X[flag_test])
y_pred_knn
array([ 0,  1,  2,  3,  4,  5,  6,  7,  8,  9, 10, 11, 12, 13, 14, 11,  2,
       17, 18, 19, 20, 21, 22, 20, 18,  8, 26, 16, 28, 29, 30, 31, 32, 33,
        7, 11, 14, 37, 37, 37], dtype=int64)
accuracy_knn = sum(y_test.values == y_pred_knn)/len(y_test)
print('\nUsing KNN to identify people, the accuracy is',accuracy_knn)
Using KNN to identify people, the accuracy is 0.725
Random Forest
from sklearn.ensemble import RandomForestClassifier
rfc = RandomForestClassifier(n_estimators=100)
rfc.fit(X_train,y_train)
y_pred_RandomForest = rfc.predict(X_test)
y_pred_RandomForest
array([ 0,  1, 17,  3,  4,  5,  6,  7,  8,  9, 35, 11, 12, 13, 14, 11,  2,
       17, 18, 19, 20, 21, 22, 20, 18, 25, 26, 27, 28,  4, 30, 31, 32, 33,
       34,  1, 36, 37, 38, 37], dtype=int64)
accuracy_RandomForest = sum(y_test.values == y_pred_RandomForest)/len(y_test)
print('\nUsing RandomForest to identify people, the accuracy is',accuracy_RandomForest)
Using RandomForest to identify people, the accuracy is 0.775
DNN
from tensorflow.contrib.learn import DNNClassifier
import tensorflow as tf
feature_columns = [tf.contrib.layers.real_valued_column("", dimension=92)]
classifier = DNNClassifier(hidden_units=[10, 20, 10], n_classes=40, feature_columns = feature_columns)
classifier.fit(scaler_X[flag_train], y_train, steps = 200)
INFO:tensorflow:Using default config.
WARNING:tensorflow:Using temporary folder as model directory: C:\Users\rmissh\AppData\Local\Temp\tmpvluwpj5h
INFO:tensorflow:Using config: {'_task_type': None, '_task_id': 0, '_cluster_spec': <tensorflow.python.training.server_lib.ClusterSpec object at 0x000000000537C668>, '_master': '', '_num_ps_replicas': 0, '_num_worker_replicas': 0, '_environment': 'local', '_is_chief': True, '_evaluation_master': '', '_train_distribute': None, '_tf_config': gpu_options {
  per_process_gpu_memory_fraction: 1.0
}
, '_tf_random_seed': None, '_save_summary_steps': 100, '_save_checkpoints_secs': 600, '_log_step_count_steps': 100, '_session_config': None, '_save_checkpoints_steps': None, '_keep_checkpoint_max': 5, '_keep_checkpoint_every_n_hours': 10000, '_model_dir': 'C:\\Users\\rmissh\\AppData\\Local\\Temp\\tmpvluwpj5h'}
WARNING:tensorflow:float64 is not supported by many models, consider casting to float32.
INFO:tensorflow:Create CheckpointSaverHook.
INFO:tensorflow:Graph was finalized.
INFO:tensorflow:Running local_init_op.
INFO:tensorflow:Done running local_init_op.
INFO:tensorflow:Saving checkpoints for 1 into C:\Users\rmissh\AppData\Local\Temp\tmpvluwpj5h\model.ckpt.
INFO:tensorflow:loss = 3.6785312, step = 1
INFO:tensorflow:global_step/sec: 187.951
INFO:tensorflow:loss = 2.8292058, step = 101 (0.534 sec)
INFO:tensorflow:Saving checkpoints for 200 into C:\Users\rmissh\AppData\Local\Temp\tmpvluwpj5h\model.ckpt.
INFO:tensorflow:Loss for final step: 1.9069765.


DNNClassifier(params={'head': <tensorflow.contrib.learn.python.learn.estimators.head._MultiClassHead object at 0x000000000537C518>, 'hidden_units': [10, 20, 10], 'feature_columns': (_RealValuedColumn(column_name='', dimension=92, default_value=None, dtype=tf.float32, normalizer=None),), 'optimizer': None, 'activation_fn': <function relu at 0x000000001B5D2A60>, 'dropout': None, 'gradient_clip_norm': None, 'embedding_lr_multipliers': None, 'input_layer_min_slice_size': None})
y_pred_DNN = classifier.predict(scaler_X[flag_test])
y_pred_DNN = list(y_pred_DNN)
accuracy_DNN = sum(y_test.values == y_pred_DNN)/len(y_test)
print('\nUsing DNN to identify people, the accuracy is',accuracy_DNN)
WARNING:tensorflow:float64 is not supported by many models, consider casting to float32.
INFO:tensorflow:Graph was finalized.
INFO:tensorflow:Restoring parameters from C:\Users\rmissh\AppData\Local\Temp\tmpvluwpj5h\model.ckpt-200
INFO:tensorflow:Running local_init_op.
INFO:tensorflow:Done running local_init_op.

Using DNN to identify people, the accuracy is 0.3
Reference:
