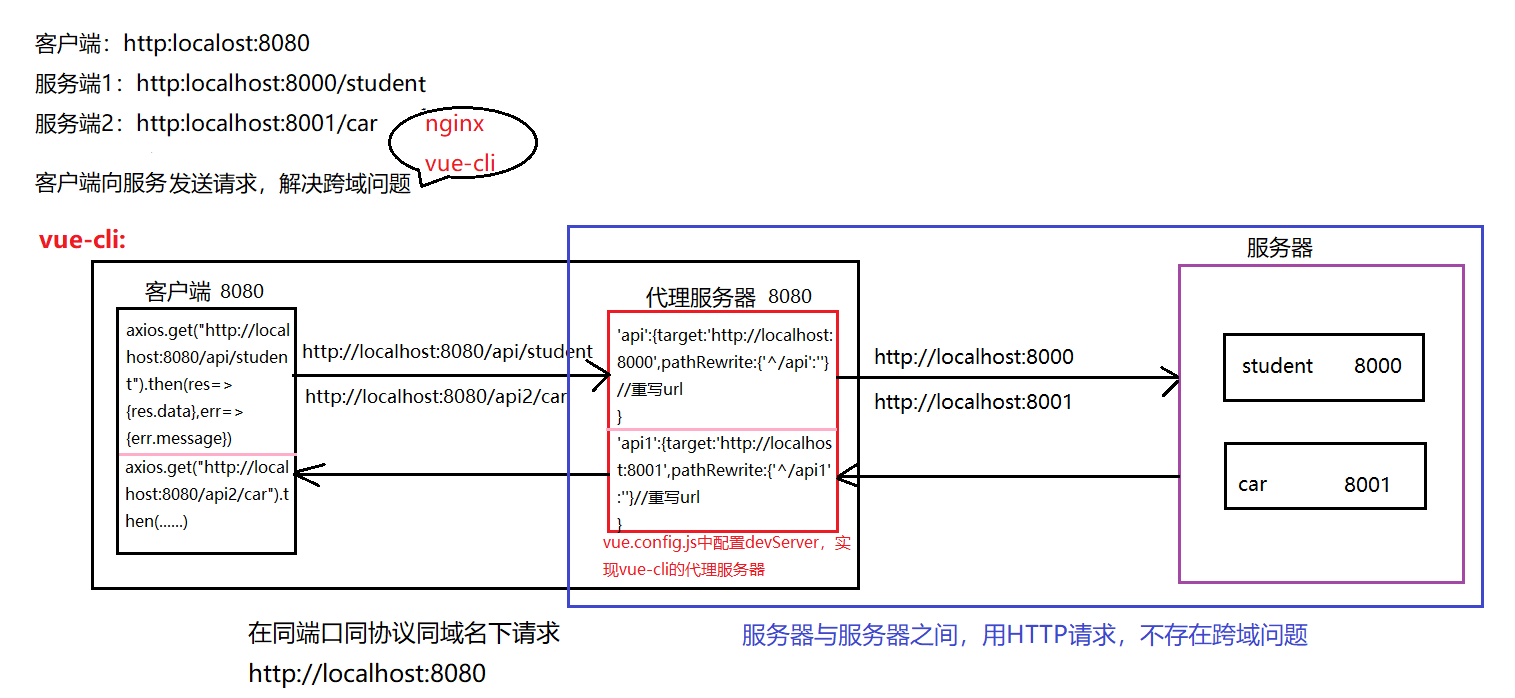
vue脚手架配置代理
方法一
在vue.config.js中添加如下配置:
/*
  1、不能配置多个代理服务
  2、当自己项目public中有请求的资源文件时,将不会将请求发送给代理服务器,再去服务器上请求数据。请求的是public中的资源文件
  */
devServer:{
    proxy:'http://127.0.0.1:8000'
},
说明:
- 优点:配置简单,请求资源时直接发给前端8080即可
- 缺点:不能配置多个代理,不能灵活的控制请求是否走代理
- 工作方式:若按照上述配置代理,当请求了前端不存在的资源时,那么该请求会转发给服务器(优先匹配前端资源)
方法二
编写vue.config.js配置具体代理规则
devServer: {
    proxy: {
      // api是请求前缀
      'api': {
        target: 'http://127.0.0.1:8000',
        // 重写路径
        pathRewrite: {
          '^/api': ''
        },
        // 以下两个配置,默认true
        // 用于支持websocket
        // ws: true,
        // 用于控制请求头中的host值。
        /*为true,代理服务器向服务器发送端口与服务器相匹配的地址(撒谎)不传递真的Host,服务器收到的请求头中的host为:localhost:8000。
为false,服务器收到的请求头中host为localhost:8080
        */
        // changeOrigin: true
      },
      'api2':{ //匹配所有以/demo开头的请求路径
        target:'http://127.0.0.1:8001', //代理目标的基础路径
        pathRewrite:{'^/api2':''}
      }
    }
说明:
- 优点:可以配置多个代理,且可以灵活的控制请求是否走代理
- 缺点:配置略微繁琐,请求资源时必须加前缀
使用

服务端:
安装node环境的前提下
-
mkdir serve_test
-
npm init --yes
-
npm install express
-
创建数据文件
//student.json [ { "name": "Tom", "age": "19", "gender": "男" }, { "name": "Lisa", "age": "18", "gender": "女" }, { "name": "Rose", "age": "19", "gender": "女" }, { "name": "Jeery", "age": "19", "gender": "男" }, { "name": "小明", "age": "19", "gender": "男" } ] //car.json [ { "name": "奔驰", "price": "30万", "color": "white" }, { "name": "奥迪", "price": "40万", "color": "black" }, { "name": "大众", "price": "16万", "color": "gray" } ] -
创建server1.js server2.js文件
//server1.js //1、引入express const express = require('express'); const fs = require('fs') //创建应用对象 const app = express(); const data = fs.readFileSync('student.json') app.use((request, response, next) => { console.log('有人请求服务器1'); //验证 console.log('请求的资源是:', request.url); console.log('请求来自于', request.get('Host')); next(); }) //3、创建路由规则 //request 是对请求报文的封装 //response 时对响应报文的封装 app.get('/student', (request, response) => { //设置响应 response.send(data.toString()); }); //4、监听端口启动服务 app.listen(8000, () => { console.log("服务器1启动成功,请求学生信息地址为:http://localhost:8000/student"); }) //server2.js //1、引入express const express = require('express'); const fs = require('fs'); //创建应用对象 const app = express(); const data = fs.readFileSync('car.json') app.use((request, response, next) => { console.log('有人请求服务器2'); //验证 //console.log('请求的资源是:', request.url); //console.log('请求来自于', request.get('Host')); next(); }) //3、创建路由规则 //request 是对请求报文的封装 //response 时对响应报文的封装 app.get('/car', (request, response) => { //设置响应 response.send(data.toString()); }); //4、监听端口启动服务 app.listen(8001, () => { console.log("服务器2启动成功,请求学生信息地址为:http://localhost:8001/car"); }) -
node 文件名,开启服务
客户端
-
创建项目
vue create xxx -
按钮点击发送请求
       //App.vue
       <template>
         <div>
           <button @click="getStudents">获取学生信息</button>
           <button @click="getCars">获取汽车信息</button>
         </div>
       </template>

       <script>
       import axios from "axios";
       export default {
         name: "App",
         methods: {
           getStudents() {
             axios.get("http://localhost:8080/api/student").then(
               (response) => {
                 console.log("success:", response.data);
               },
               (error) => {
                 console.log("error:", error.message);
               }
             );
           },
           getCars() {
             axios.get("http://localhost:8080/api2/car").then(
               (response) => {
                 console.log("success:", response.data);
               },
               (error) => {
                 console.log("error:", error.message);
               }
             );
           },
         },
       };
       </script>

       <style></style>
-
配置代理服务器
创建vue.config.js文件,添加devServer的配置项
//vue.config.js module.exports = { pages: { index: { // 入口 entry: 'src/main.js' } }, lintOnSave: false, //关闭语法检查 // 开启代理服务器 方式一 /* 1、不能配置多个代理服务 2、当自己项目public中有请求的资源文件时,将不会将请求发送给代理服务器,再去服务器上请求数据。请求的是public中的资源文件 */ /* devServer:{ proxy:'http://localhost:8000' }, */ // 开启代理服务器 (方式二) devServer: { proxy: { // api是请求前缀,紧跟端口名 'api': { target: 'http://localhost:8000', // 重写路径 pathRewrite: { '^/api': '' }, // 以下两个配置,默认true // 用于支持websocket // ws: true, // 用于控制请求头中的host值。为true,代理服务器向服务器发送端口与服务器相匹配的地址,撒谎,不传递真的Host // changeOrigin: true }, 'api2': { target: 'http://localhost:8001', pathRewrite: { '^/api2': '' } } } } } -
npm run serve
打开页面点击对应按钮,即可在控制台输出,请求到的数据。


