
【0095】【项目实战】-【开源中国】-【01】【初始化svn仓库】【ButterKnife的使用】【自定义ActionBar样式】【给ActionBar添加Menu】【图标下载的网站】【解析xml到bean】【FragmentTabHost的使用】【中间的Tab的处理】【BaseViewPagerFragment的封装思路】
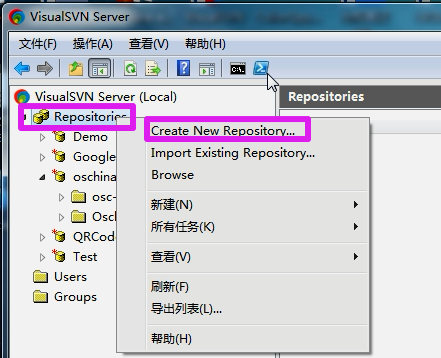
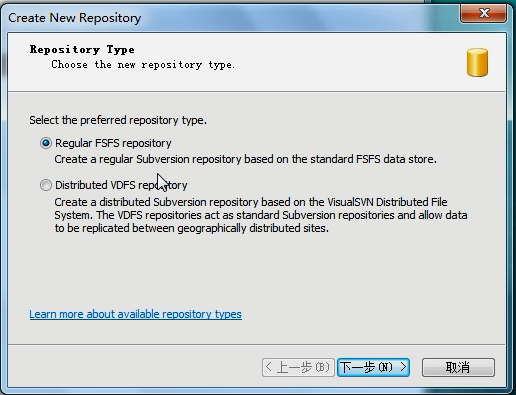
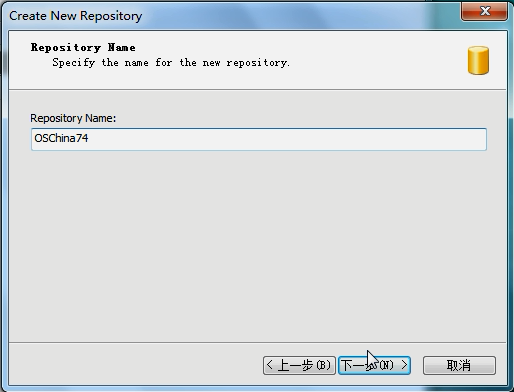
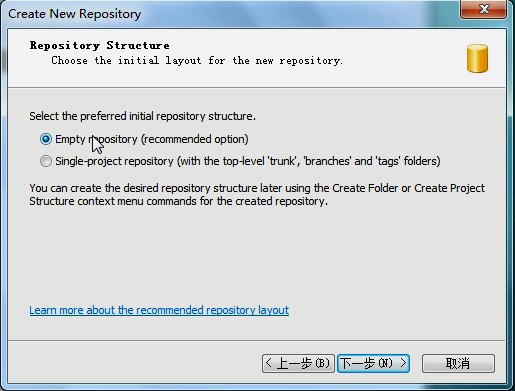
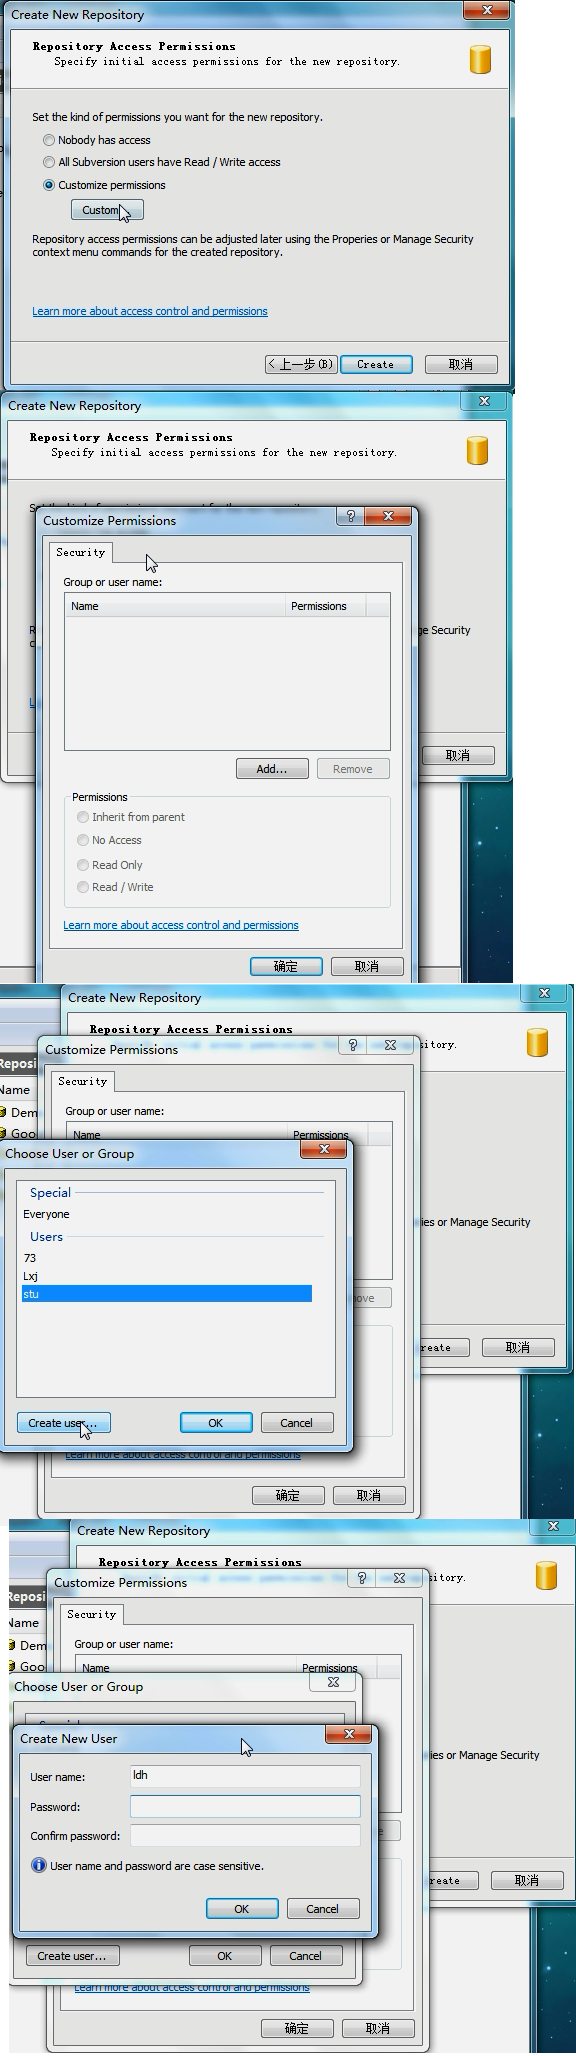
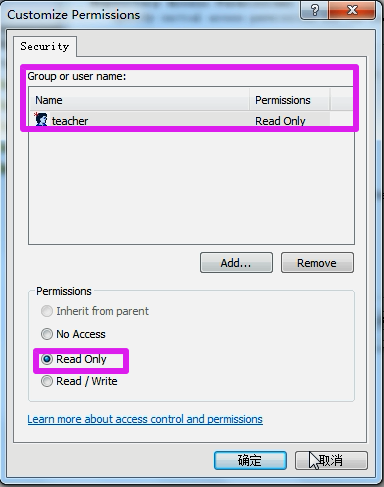
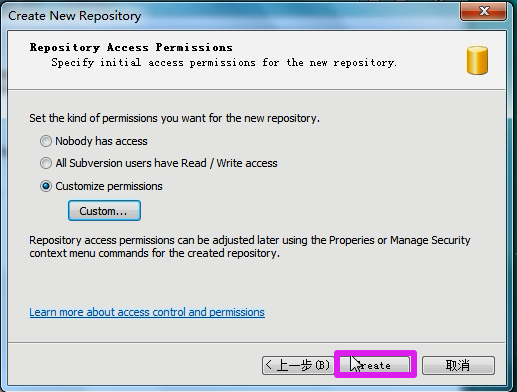
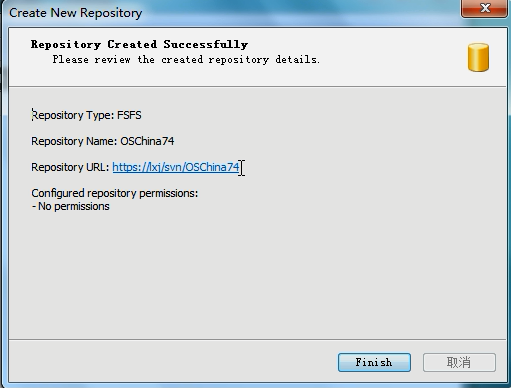
1.初始化svn仓库
2.ButterKnife的使用
2.1 使用方法
【说明】这是一个非常优秀的注解类库,省去了findViewById的麻烦;
【用法1】找到xml的控件;
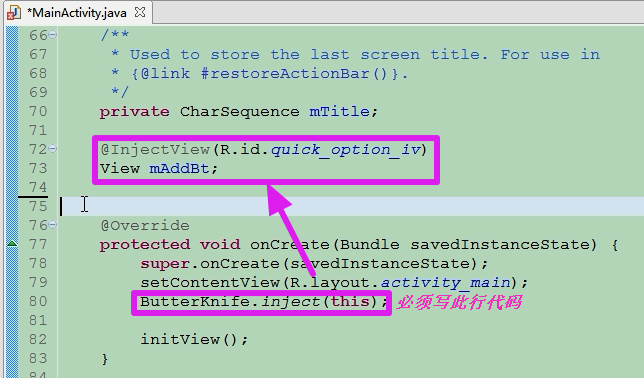
【用法2】给某个控件注册点击事件
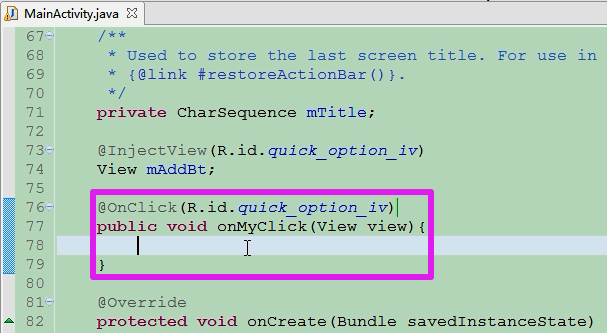
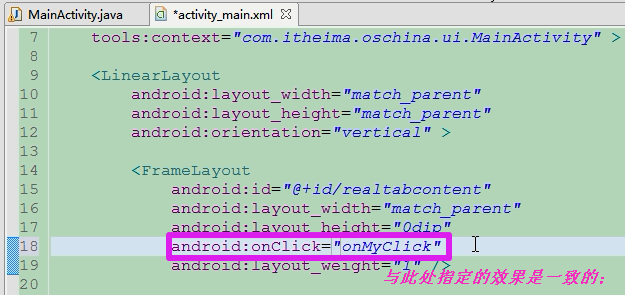
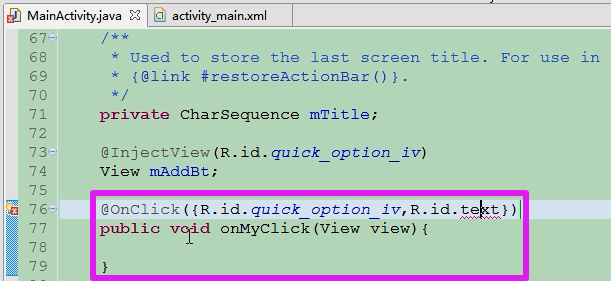
【用法3】支持注册多个控件点击之后使用一个方法进行响应;
【语法】使用大括号包裹,逗号间隔;
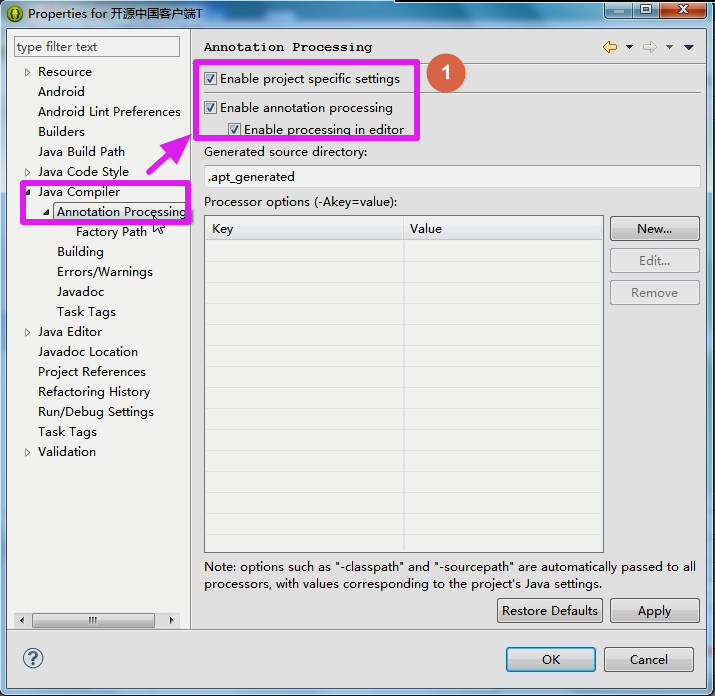
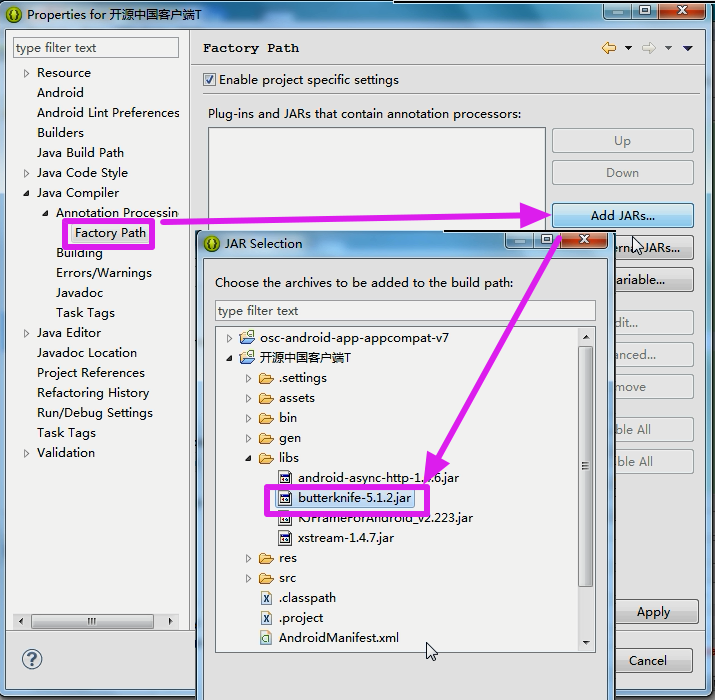
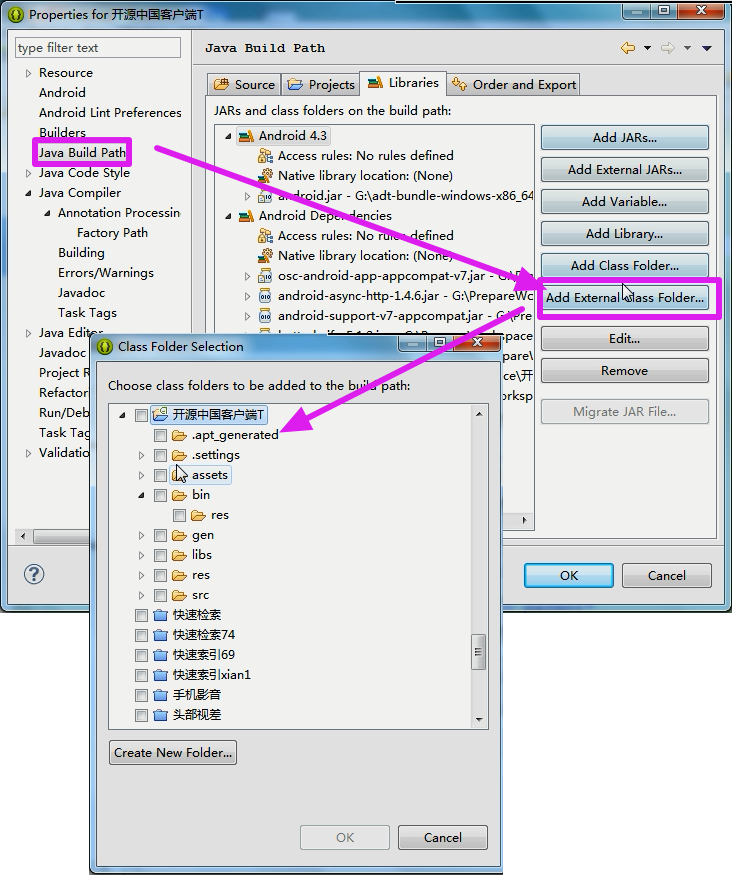
2.2【改jar包的使用设置】
2.3 区别
【区别】Xutils:运行时注解;butterKnife:编译时注解;
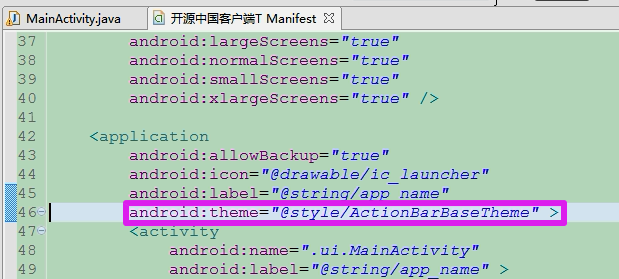
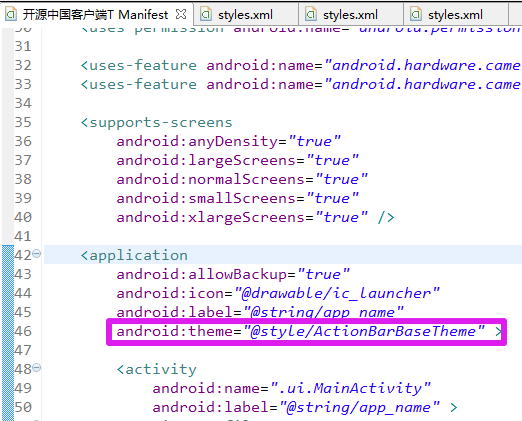
3.自定义ActionBar样式
3.1修改ActionBar的两种方法
【效果】点击之后的背景色的改变
【方法1】在源码中修改,在此处没有测试出效果来;
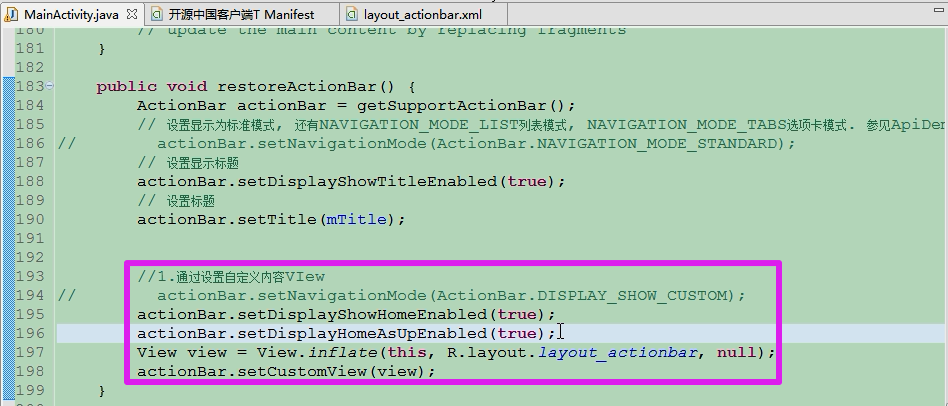
【方法2】直接修改Application主题样式
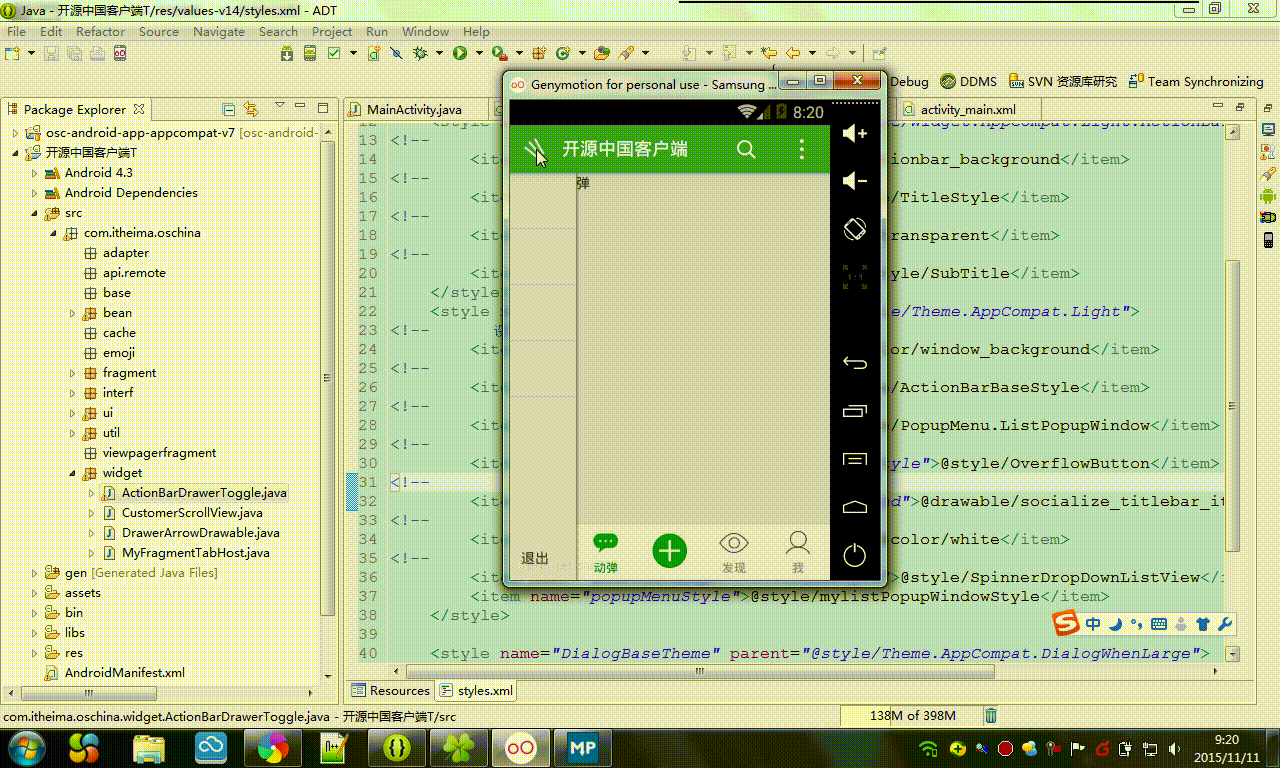
3.2 样式主题的注解
【本文的注解】
 1 <resources>
 2
 3     <!--
 4         Base application theme for API 14+. This theme completely replaces
 5         AppBaseTheme from BOTH res/values/styles.xml and
 6         res/values-v11/styles.xml on API 14+ devices.
 7     -->
 8     <style name="AppBaseTheme" parent="android:Theme.Holo.Light.DarkActionBar">
 9         <!-- API 14 theme customizations can go here. -->
10     </style>
11     <!--  -->
12      <style name="ActionBarBaseStyle" parent="@style/Widget.AppCompat.Light.ActionBar">
13 <!--         ActionBar 背景, 绿色#40AA53 -->
14         <item name="android:background">@color/actionbar_background</item>
15 <!--         ActionBar 标题文字样式, 白色 -->
16         <item name="android:titleTextStyle">@style/TitleStyle</item>
17 <!--         ActionBar 图标, 透明 -->
18         <item name="android:icon">@android:color/transparent</item>
19 <!--         ActionBar 副标题样式, 白色 -->
20         <item name="android:subtitleTextStyle">@style/SubTitle</item>
21     </style>
22     <style name="ActionBarBaseTheme" parent="@style/Theme.AppCompat.Light">
23 <!--             设置应用程序背景色#EBEBEB 灰色 -->
24         <item name="android:windowBackground">@color/window_background</item>
25 <!--         设置ActionBar样式 -->
26         <item name="android:actionBarStyle">@style/ActionBarBaseStyle</item>
27 <!--         弹出菜单的样式 -->
28         <item name="android:popupMenuStyle">@style/PopupMenu.ListPopupWindow</item>
29 <!--         更多菜单的按钮样式 , 针对没有菜单按键的设备-->
30         <item name="android:actionOverflowButtonStyle">@style/OverflowButton</item>
31 <!--         ActionBar条目背景选择器 -->
32         <item name="android:actionBarItemBackground">@drawable/socialize_titlebar_item_background_selector</item>
33 <!--         ActionBar条目菜单文本颜色-->
34         <item name="android:actionMenuTextColor">@color/white</item>
35 <!--         弹出菜单ListView的样式 -->
36         <item name="android:dropDownListViewStyle">@style/SpinnerDropDownListView</item>
37         <item name="popupMenuStyle">@style/mylistPopupWindowStyle</item>
38     </style>
39
40     <style name="DialogBaseTheme" parent="@style/Theme.AppCompat.DialogWhenLarge">
41     </style>
42
43
44     <style name="ActionBarBaseTheme.Preview" parent="@style/ActionBarBaseTheme">
45         <item name="android:windowBackground">@android:color/black</item>
46         <item name="android:actionBarStyle">@style/ActionBarBaseStyle.Transparent</item>
47         <item name="android:windowActionBarOverlay">true</item>
48     </style>
49 </resources>
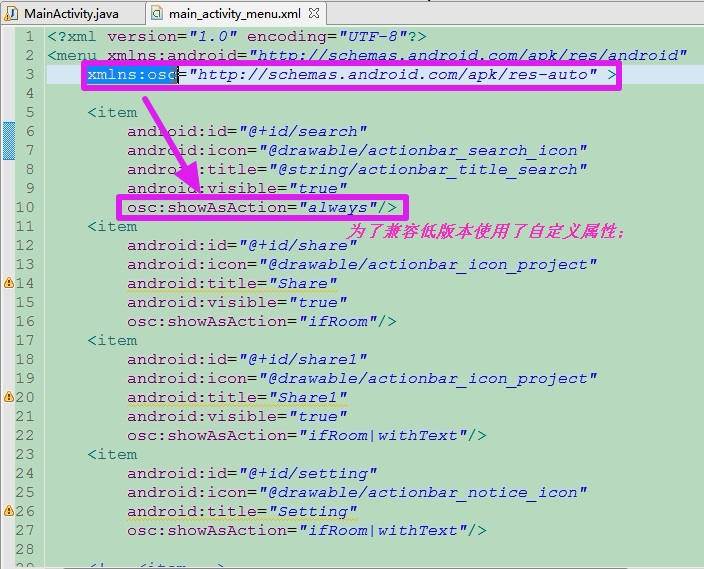
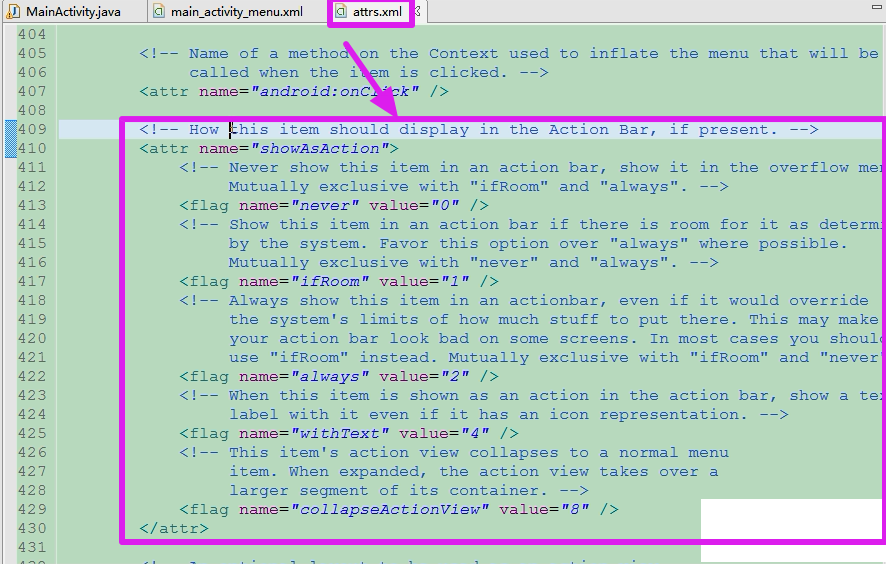
4.给ActionBar添加Menu
【题外话】箭头旋转与返回键的切换--没讲明白
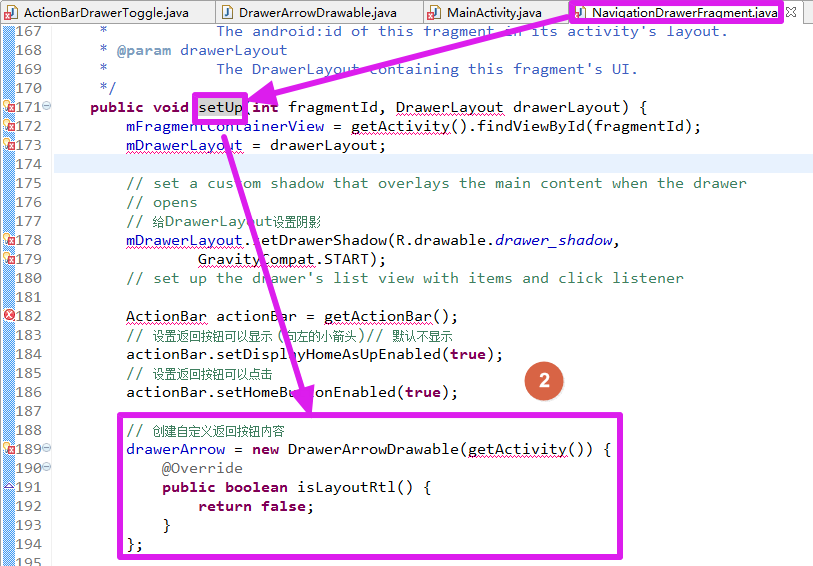
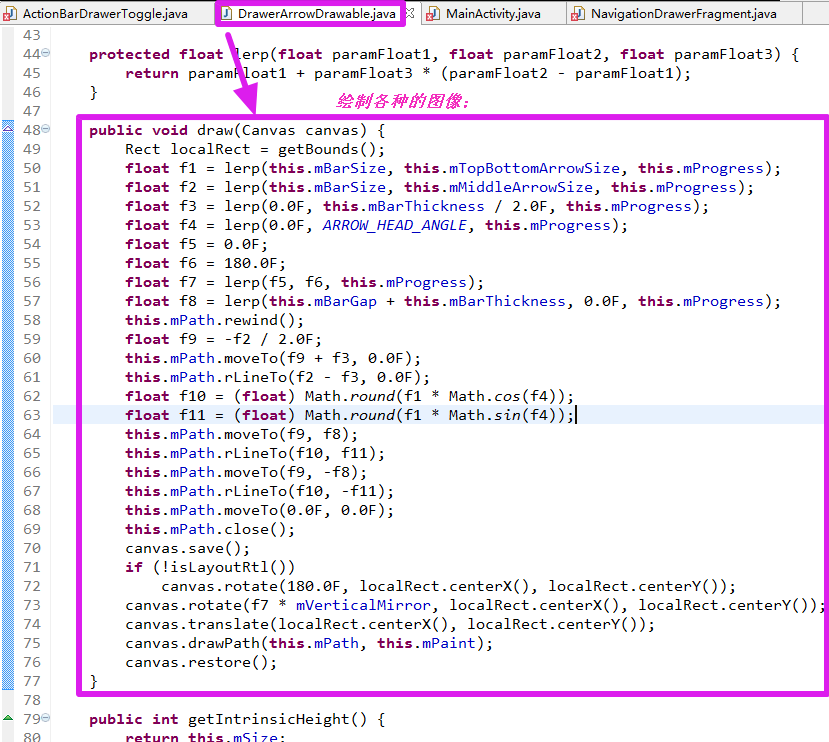
【自定义了一个Drable图片】进行三道横到箭头的绘制;
4.1 给ActionBar添加Menu
【说明】通过加载的布局进行设置和显示;
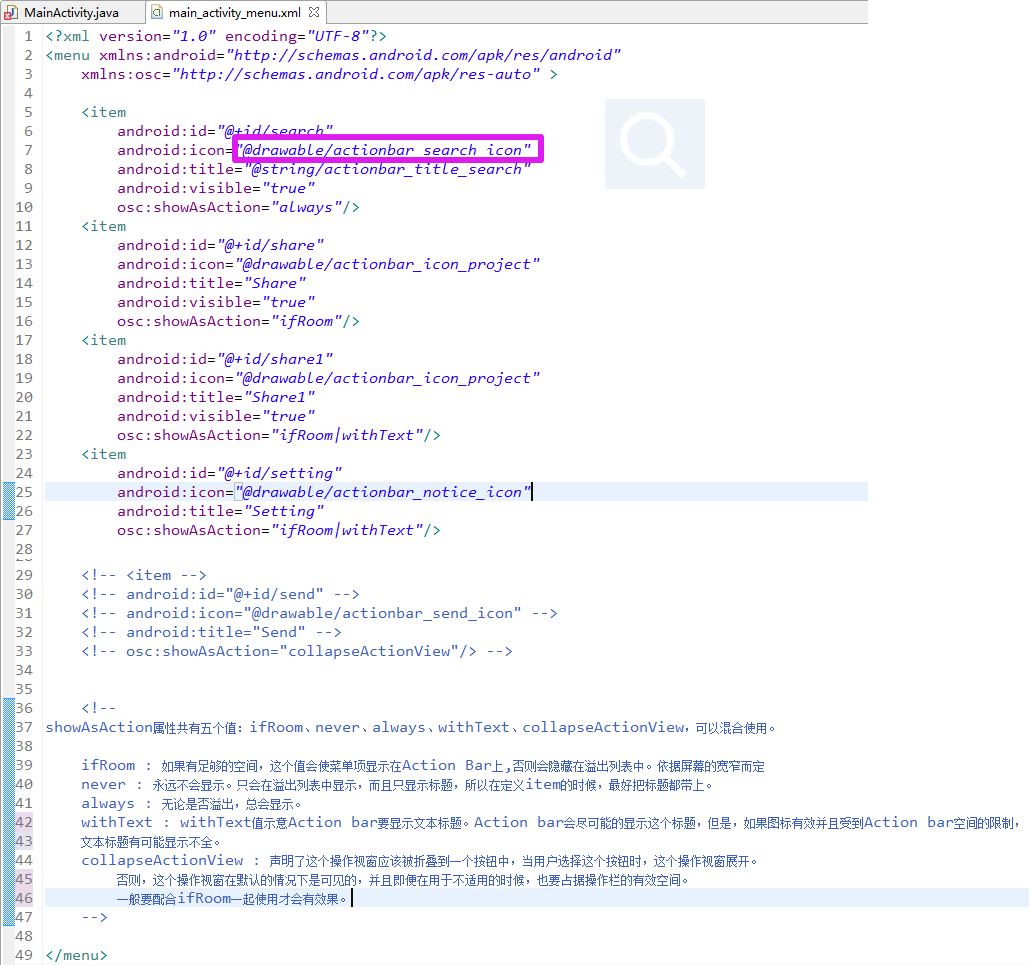
【兼容低版本的属性】在设置文本和图标的连带空间的时候,为了兼容低版本,使用了V7包下的 自定义属性;
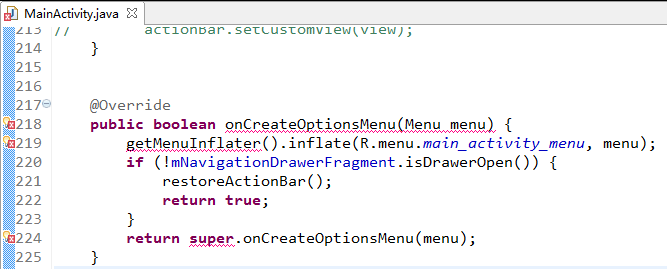
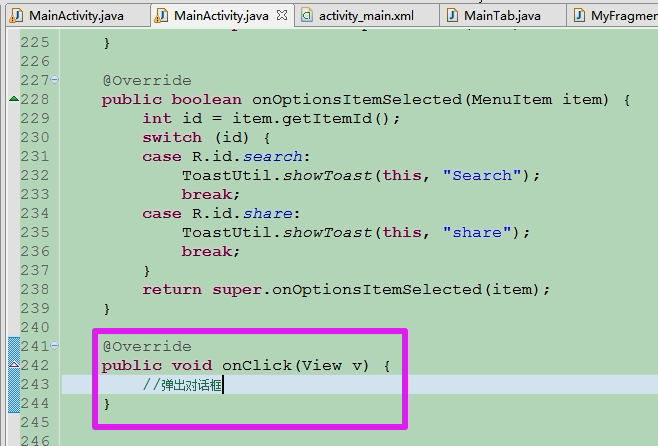
4.2 处理菜单的点击事件
【连续弹出的吐司】
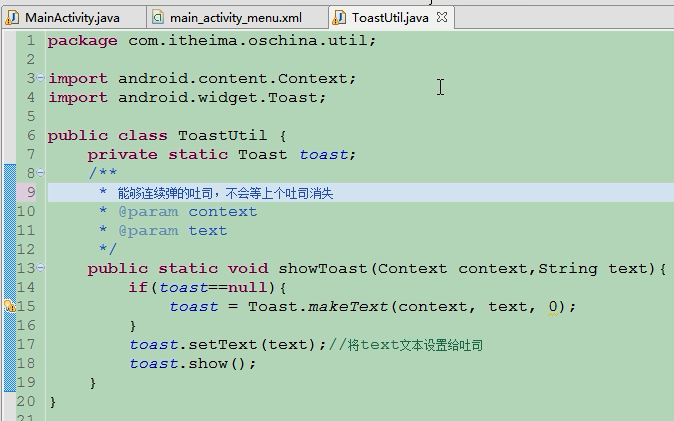
【点击事件通过复写方法onOptionsItemSelected方法】
5.图标下载的网站
【图标下载的网站】可以在该网站上找到各种图标;各种像素的图标;

6.解析xml到bean
【服务器上的xml数据】

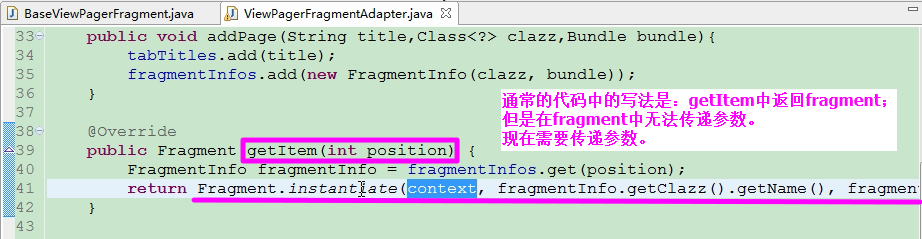
【解析】得到了数据集合,可以使用了;
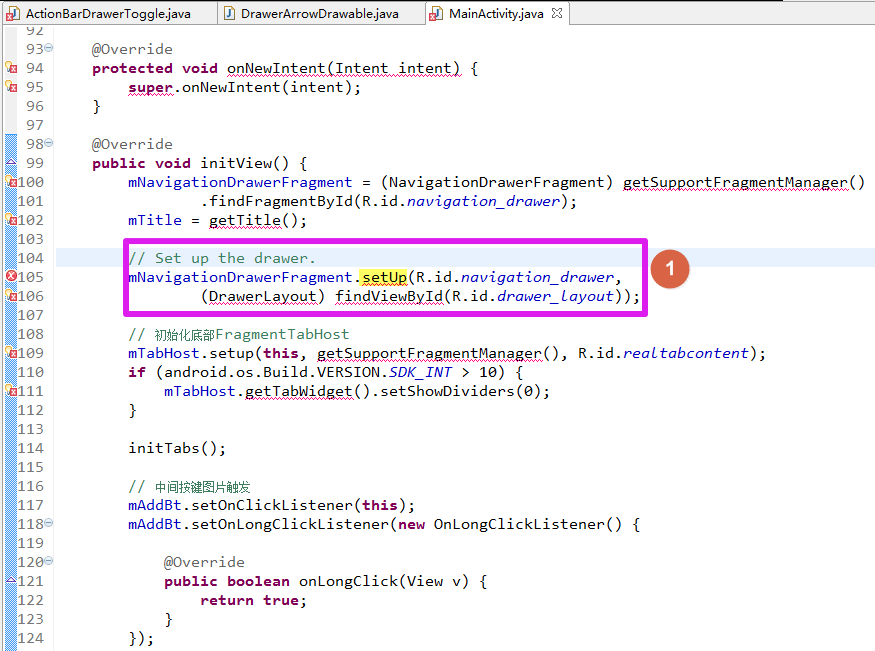
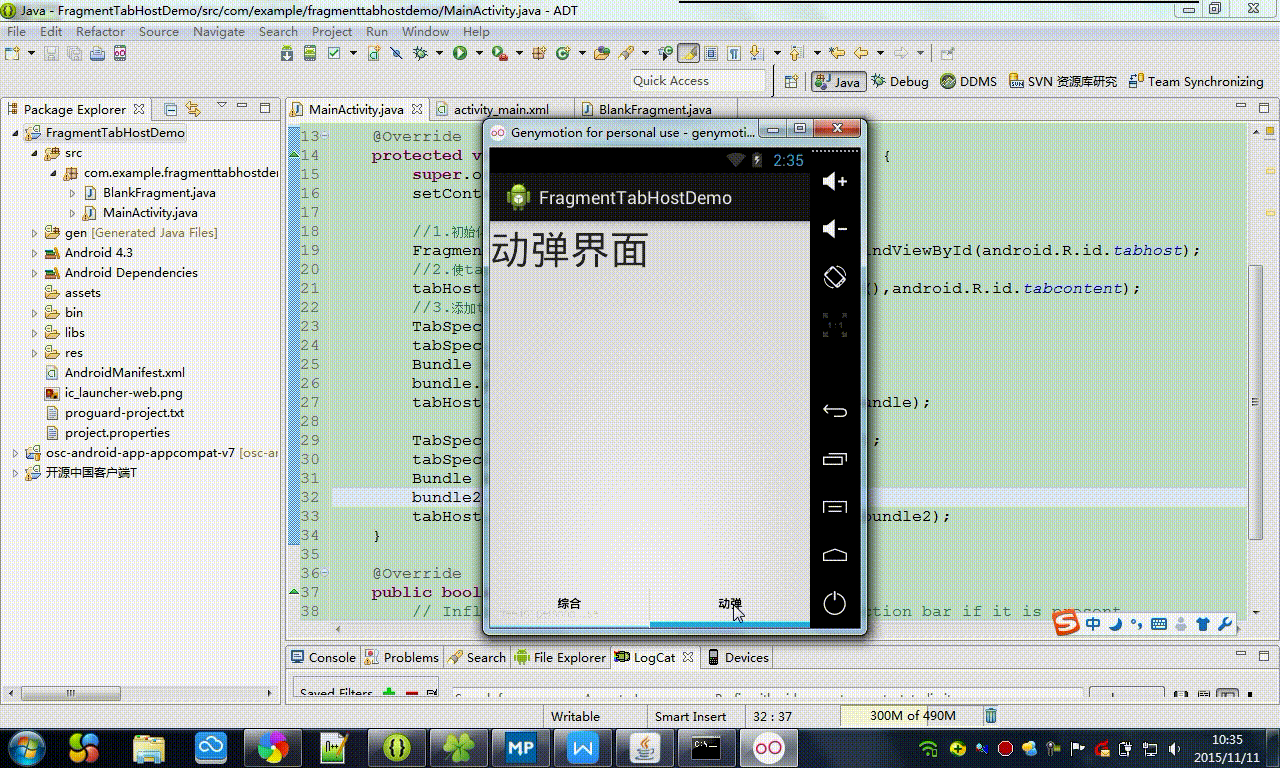
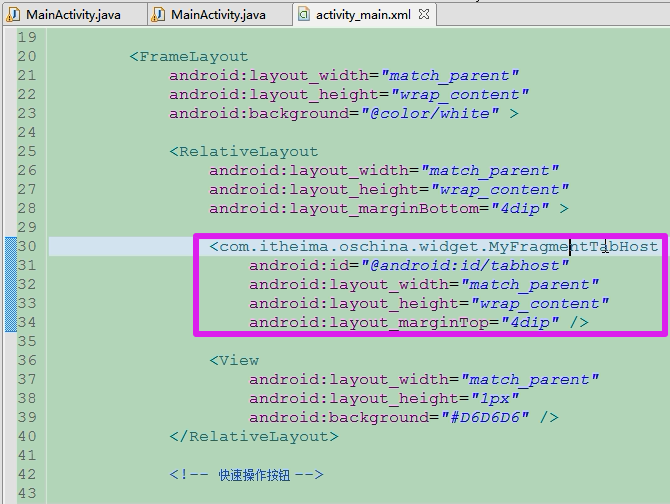
7.FragmentTabHost的使用
【说明】书写一个demo;
7.1【布局】
【说明】Android为这两个空间都专门定义了id,但是可以使用我们自己定义的id;

【初始化TabHost并绑定FrameLayout】

【新建空白的fragment】
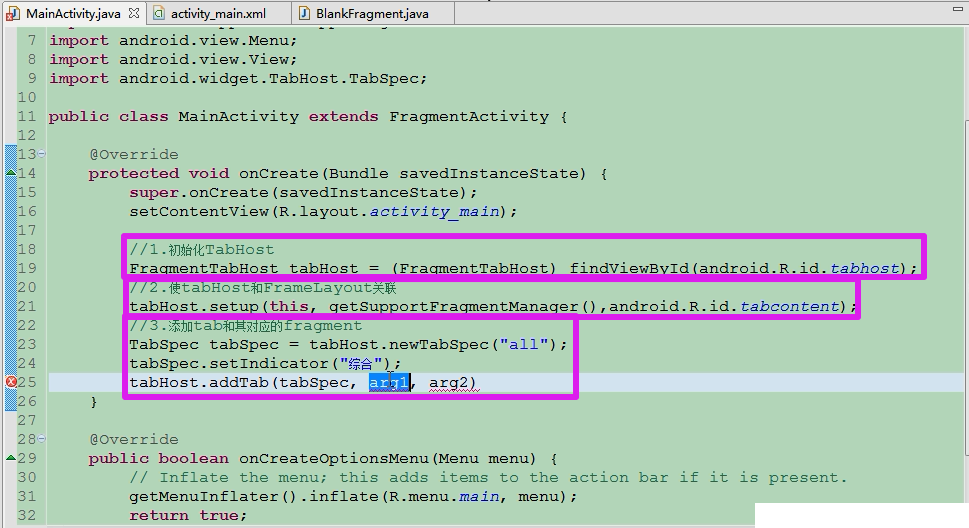
【TabHost添加对应的fragment】
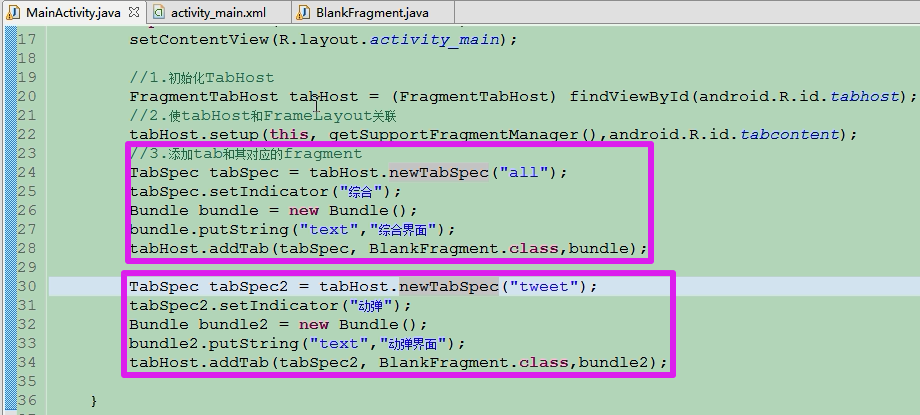
【测试】
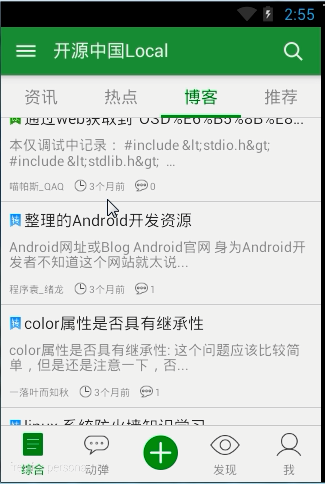
【总结】使用此空间的好处就是在在页面A切换到页面B,可以不必保存页面A数据的缓存,从页面B切换回页面A之后,页面的位置还是原来的位置;
【事例】从博客页面滑动到了item(整理...)切换到推荐,然后从推荐切换回来之后还是保留在(整理...)的位置;
【说明】此控件会自动保存该页面的内容;
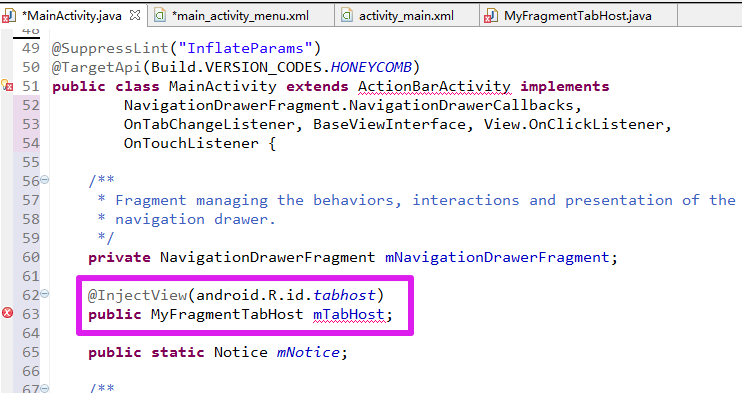
7.3 项目中的使用
【自定义了一个FragmentTabHost】
【源码】/开源中国客户端T/res/layout/activity_main.xml
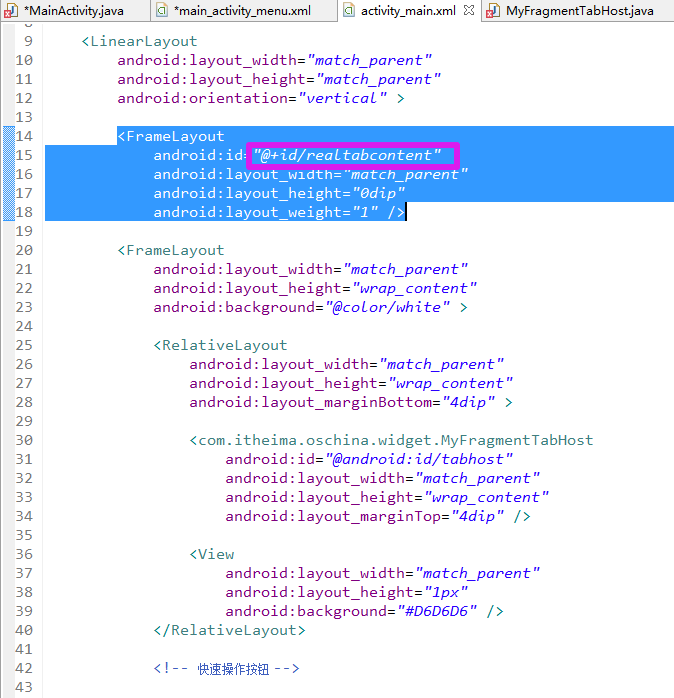
 1 <!-- A DrawerLayout is intended to be used as the top-level content view using match_parent for both width and height to consume the full space available. -->
 2 <android.support.v4.widget.DrawerLayout xmlns:android="http://schemas.android.com/apk/res/android"
 3     xmlns:tools="http://schemas.android.com/tools"
 4     android:id="@+id/drawer_layout"
 5     android:layout_width="match_parent"
 6     android:layout_height="match_parent"
 7     tools:context="com.itheima.oschina.ui.MainActivity" >
 8
 9     <LinearLayout
10         android:layout_width="match_parent"
11         android:layout_height="match_parent"
12         android:orientation="vertical" >
13
14         <FrameLayout
15             android:id="@+id/realtabcontent"
16             android:layout_width="match_parent"
17             android:layout_height="0dip"
18             android:layout_weight="1" />
19
20         <FrameLayout
21             android:layout_width="match_parent"
22             android:layout_height="wrap_content"
23             android:background="@color/white" >
24
25             <RelativeLayout
26                 android:layout_width="match_parent"
27                 android:layout_height="wrap_content"
28                 android:layout_marginBottom="4dip" >
29
30                 <com.itheima.oschina.widget.MyFragmentTabHost
31                     android:id="@android:id/tabhost"
32                     android:layout_width="match_parent"
33                     android:layout_height="wrap_content"
34                     android:layout_marginTop="4dip" />
35
36                 <View
37                     android:layout_width="match_parent"
38                     android:layout_height="1px"
39                     android:background="#D6D6D6" />
40             </RelativeLayout>
41
42             <!-- 快速操作按钮 -->
43
44             <ImageView
45                 android:id="@+id/quick_option_iv"
46                 android:layout_width="wrap_content"
47                 android:layout_height="wrap_content"
48                 android:layout_gravity="center"
49                 android:contentDescription="@null"
50                 android:src="@drawable/btn_quickoption_selector" />
51         </FrameLayout>
52     </LinearLayout>
53
54     <!-- 左侧侧滑菜单 -->
55     <!--
56          android:layout_gravity="start" tells DrawerLayout to treat
57          this as a sliding drawer on the left side for left-to-right
58          languages and on the right side for right-to-left languages.
59          If you're not building against API 17 or higher, use
60          android:layout_gravity="left" instead.
61     -->
62     <!--
63          The drawer is given a fixed width in dp and extends the full height of
64          the container.
65     -->
66     <fragment
67         android:id="@+id/navigation_drawer"
68         android:name="com.itheima.oschina.ui.NavigationDrawerFragment"
69         android:layout_width="@dimen/navigation_drawer_width"
70         android:layout_height="match_parent"
71         android:layout_gravity="start"
72         tools:layout="@layout/fragment_navigation_drawer" />
73
74 </android.support.v4.widget.DrawerLayout>
【初始化TabHost】
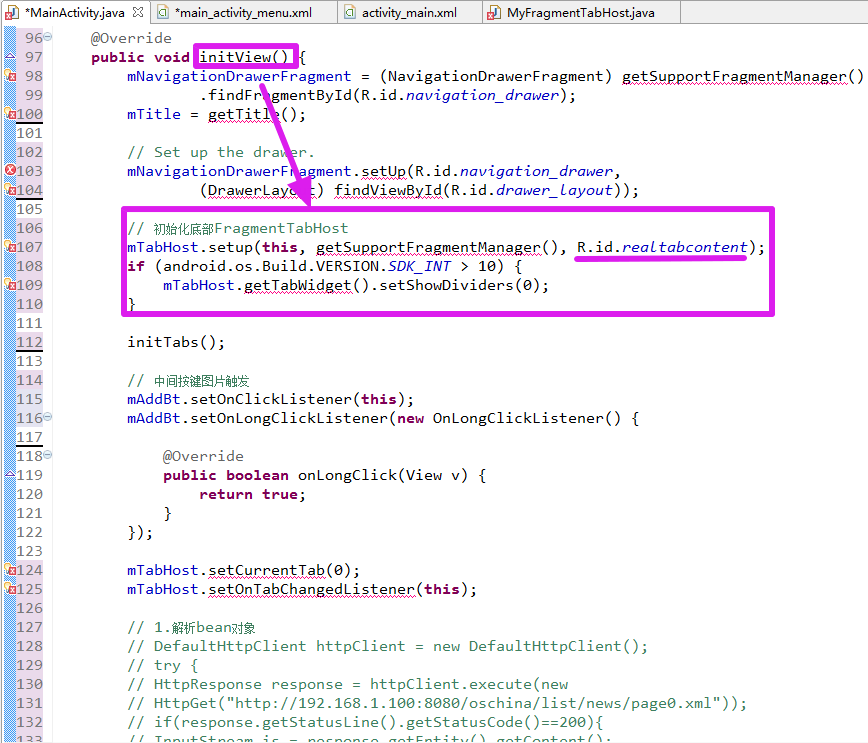
【说明】在setUp中找到的是布局中的FrameLayout布局;
【设置程序起始的默认页面和点击事件的监听】
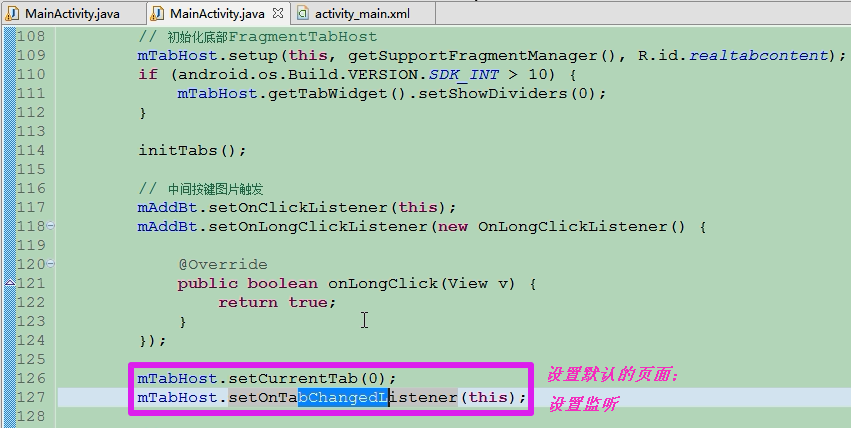
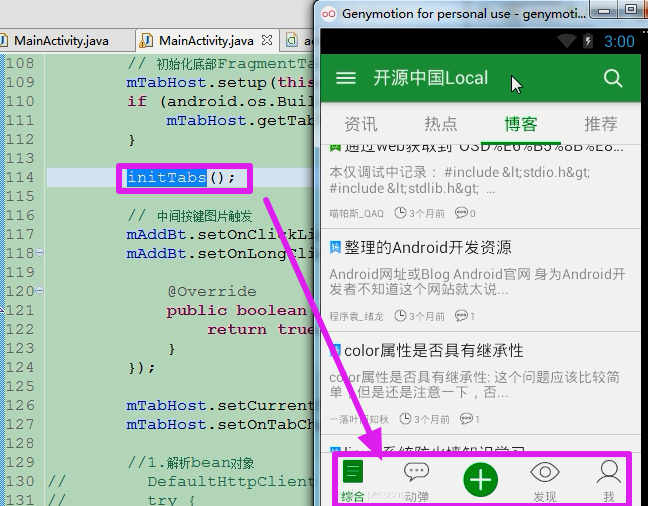
【初始化5个Tab】
【源码】
【1】获取数组中的数据
【2】找到每一个枚举的Fragment对象
【3】创建一个新的选项卡,此出的id就是枚举当中的传递的字符串的资源;
【4】把新的选项卡添加到TabHost中,
mainTab.getClz() 传递的是枚举当中默认的布局;
bundle是现成new了一个;
 1 private void initTabs() {
 2         MainTab[] tabs = MainTab.values(); //获取数组中的数据
 3         final int size = tabs.length;
 4         for (int i = 0; i < size; i++) {
 5             // 找到每一个枚举的Fragment对象
 6             MainTab mainTab = tabs[i];
 7
 8             // 1. 创建一个新的选项卡
 9             TabSpec tab = mTabHost.newTabSpec(getString(mainTab.getResName()));
10
11             // ------------------------------------------------- 自定义选项卡 ↓
12             View indicator = LayoutInflater.from(getApplicationContext())
13                     .inflate(R.layout.tab_indicator, null);
14             TextView title = (TextView) indicator.findViewById(R.id.tab_title);
15             Drawable drawable = this.getResources().getDrawable(
16                     mainTab.getResIcon());
17             title.setCompoundDrawablesWithIntrinsicBounds(null, drawable, null,
18                     null);23             title.setText(getString(mainTab.getResName()));
24             tab.setIndicator(indicator);
25             // tab.setContent(new TabContentFactory() {
26             //
27             // @Override
28             // public View createTabContent(String tag) {
29             // return new View(MainActivity.this);
30             // }
31             // });
32             // ------------------------------------------------- 以上 ↑
33
34             Bundle bundle = new Bundle();
35             bundle.putString("key",
36                     "content: " + getString(mainTab.getResName()));
37             // 2. 把新的选项卡添加到TabHost中
38             mTabHost.addTab(tab, mainTab.getClz(), bundle);
39
40             mTabHost.getTabWidget().getChildAt(i).setOnTouchListener(this);
41         }
42     }
【源码】MainTab.java;枚举:
 1 package com.itheima.oschina.ui;
 2
 3 import com.itheima.oschina.R;
 4 import com.itheima.oschina.fragment.DefaultFragment;
 5
 6 public enum MainTab {//枚举
 7
 8     NEWS(0, R.string.main_tab_name_news, R.drawable.tab_icon_new,
 9             DefaultFragment.class),
10
11     TWEET(1, R.string.main_tab_name_tweet, R.drawable.tab_icon_tweet,
12             DefaultFragment.class),
13
14     QUICK(2, R.string.main_tab_name_quick, R.drawable.tab_icon_new,
15             null),
16
17     EXPLORE(3, R.string.main_tab_name_explore, R.drawable.tab_icon_explore,
18             DefaultFragment.class),
19
20     ME(4, R.string.main_tab_name_my, R.drawable.tab_icon_me,
21             DefaultFragment.class);
22
23     private int idx;
24     private int resName;
25     private int resIcon;
26     private Class<?> clz;
27
28     private MainTab(int idx, int resName, int resIcon, Class<?> clz) { //传递第i个Tab;名字;资源图片;默认的页面;
29         this.idx = idx;
30         this.resName = resName;
31         this.resIcon = resIcon;
32         this.clz = clz;
33     }
34
35     public int getIdx() {
36         return idx;
37     }
38
39     public void setIdx(int idx) {
40         this.idx = idx;
41     }
42
43     public int getResName() {
44         return resName;
45     }
46
47     public void setResName(int resName) {
48         this.resName = resName;
49     }
50
51     public int getResIcon() {
52         return resIcon;
53     }
54
55     public void setResIcon(int resIcon) {
56         this.resIcon = resIcon;
57     }
58
59     public Class<?> getClz() {
60         return clz;
61     }
62
63     public void setClz(Class<?> clz) {
64         this.clz = clz;
65     }
66 }
【5】传递自定义的布局给单个的Tab;
tab.setIndicator(indicator);
 1 // ------------------------------------------------- 自定义选项卡 ↓
 2             View indicator = LayoutInflater.from(getApplicationContext())
 3                     .inflate(R.layout.tab_indicator, null);
 4             TextView title = (TextView) indicator.findViewById(R.id.tab_title);
 5             Drawable drawable = this.getResources().getDrawable(
 6                     mainTab.getResIcon());
 7             title.setCompoundDrawablesWithIntrinsicBounds(null, drawable, null,
 8                     null);
 9             title.setText(getString(mainTab.getResName()));
10             tab.setIndicator(indicator);
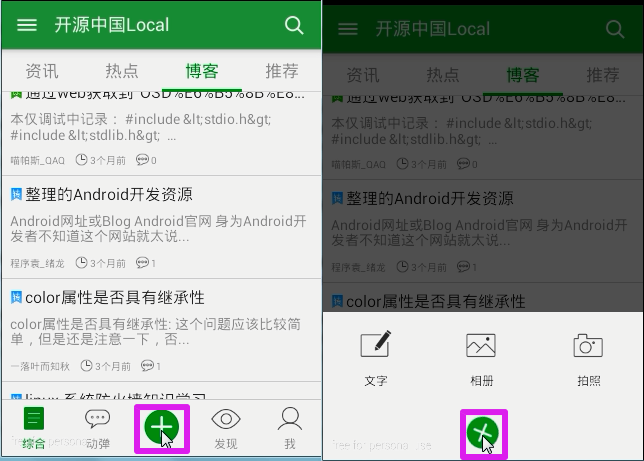
8.中间的Tab的处理
8.1 隐藏原有的fragment
【隐藏】中间Tab的处理,在点击的时候没有弹出默认的Fragment;
【源码】/开源中国客户端T/src/com/itheima/oschina/ui/MainTab.java 片段
 1 public enum MainTab {
 2
 3     NEWS(0, R.string.main_tab_name_news, R.drawable.tab_icon_new,
 4             DefaultFragment.class),
 5
 6     TWEET(1, R.string.main_tab_name_tweet, R.drawable.tab_icon_tweet,
 7             DefaultFragment.class),
 8     //中间的Tab的处理,没有设置默认的页面;
 9     QUICK(2, R.string.main_tab_name_quick, R.drawable.tab_icon_new,
10             null),
11
12     EXPLORE(3, R.string.main_tab_name_explore, R.drawable.tab_icon_explore,
13             DefaultFragment.class),
【隐藏布局】
【测试Tag】重写了onTabChanged方法,巧妙的避开mNoChangedTag;

8.2 加载出来对话框
【布局】布局中增加一个图片的按钮;
【逻辑处理】增加此按钮的点击事件
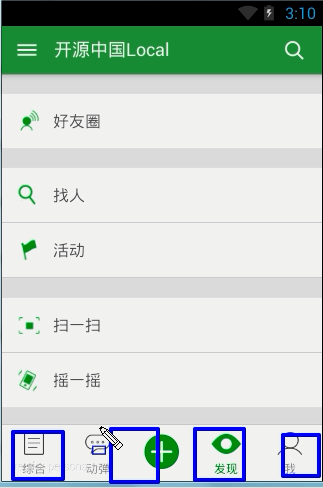
8.3 设置5个Tab的原因
【原因】如果是4个Tab,会平分下面的权重,给中间的快捷按钮无法预留空间了;
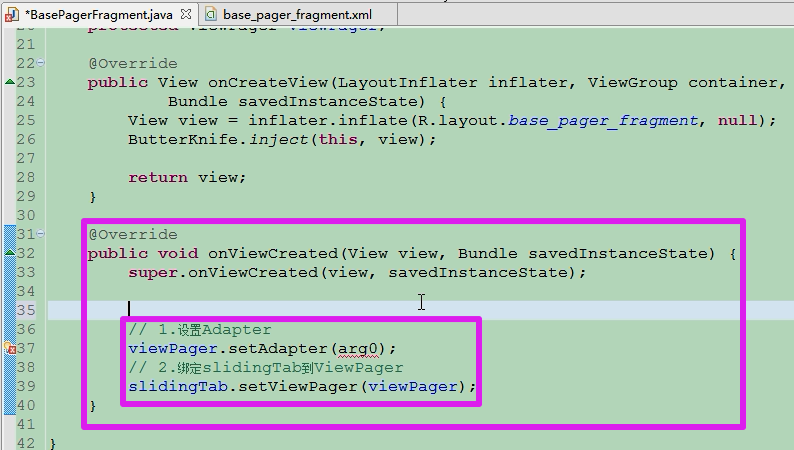
9.BaseViewPagerFragment的封装思路
9.1 布局和绑定的封装
【说明】抽取其中的共同的东西封装成为了一个基类。
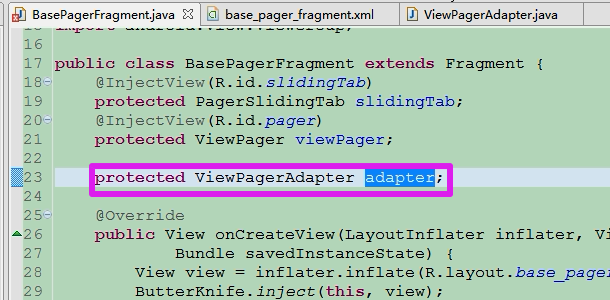
【新建类】
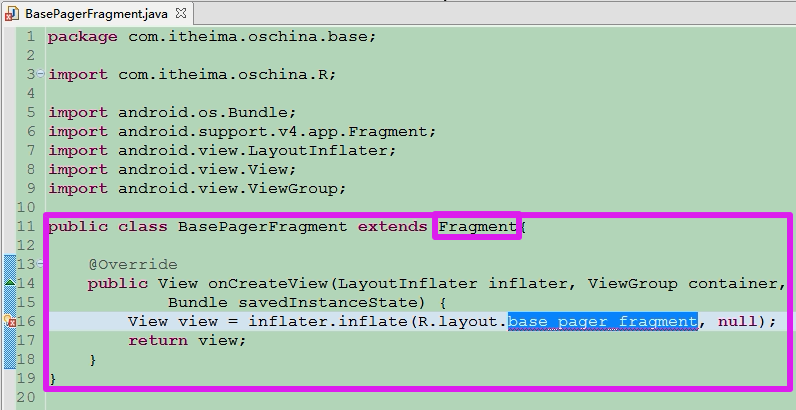
【布局并找到该控件】
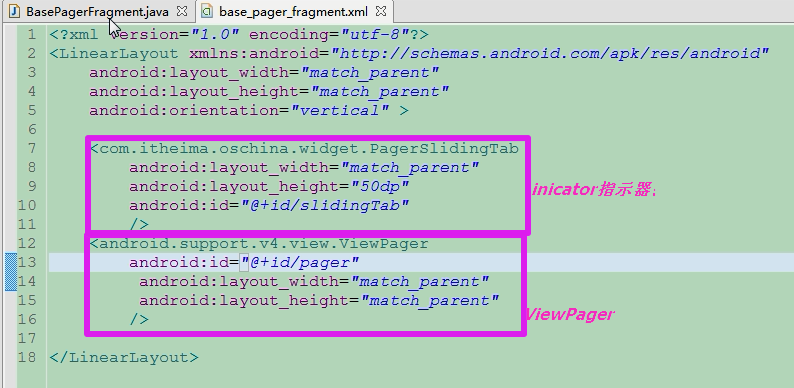
【查找控件】
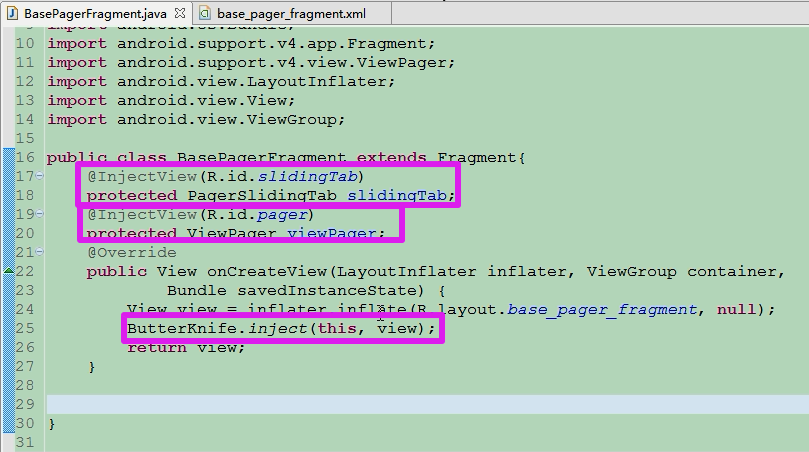
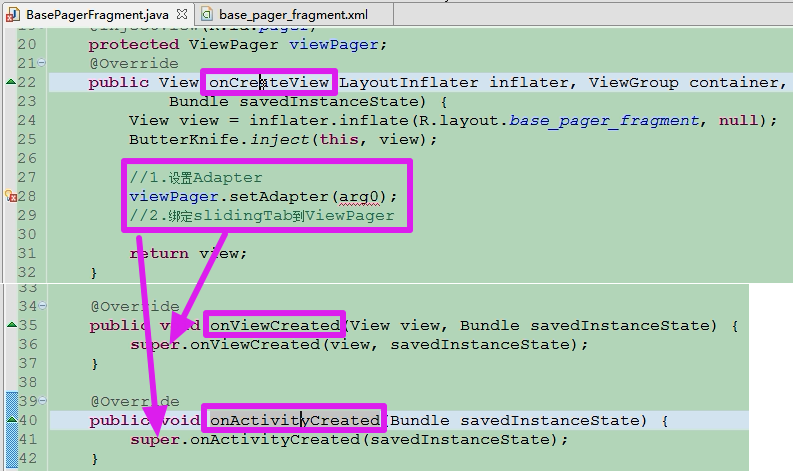
【设置ViewPager的适配器并绑定inicator的指针】
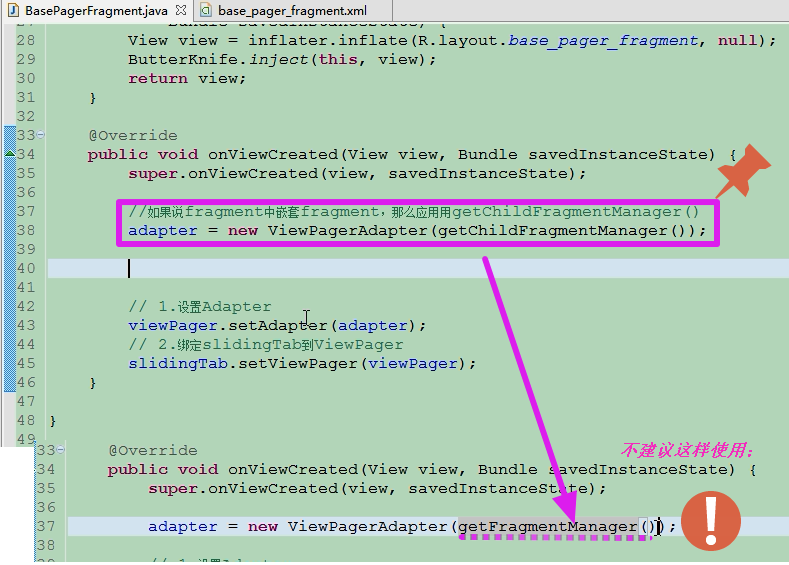
【设置和绑定的时机】要在onViewCreated或者onActivityCreated中完成;
【部分源码】封装ViewPagerFragmentAdapter.java
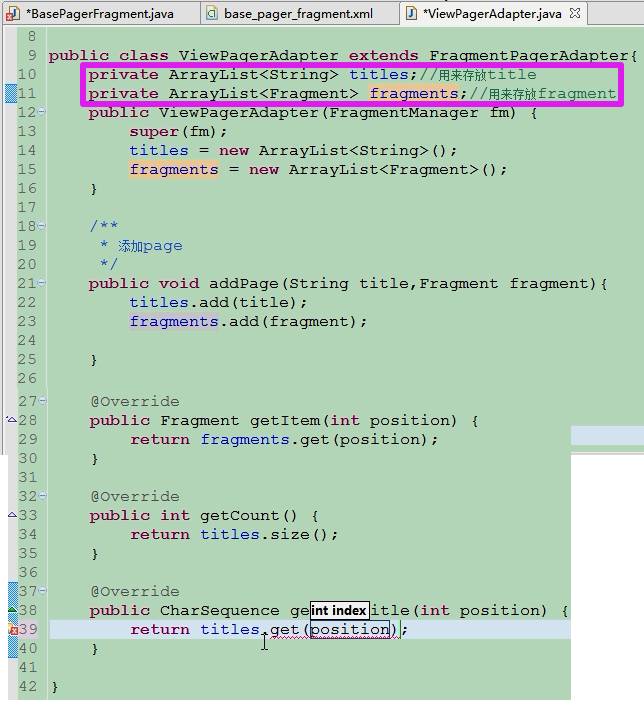
【创建的adapter的使用】
【预留接口给子类实现page的添加】只有子类才知道该添加什么样的page;
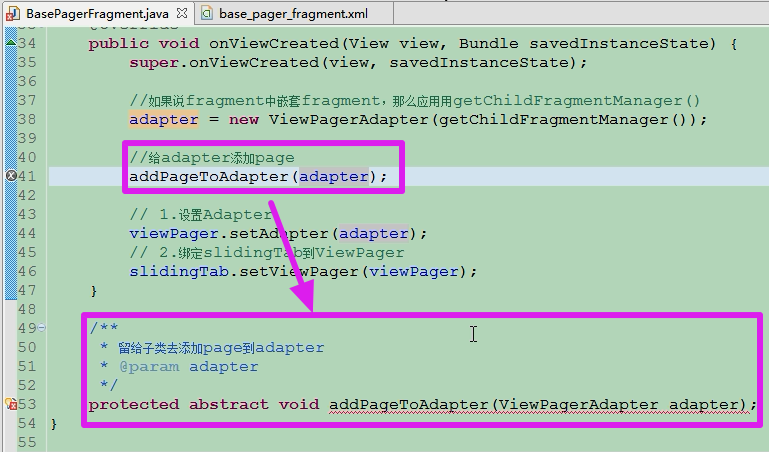
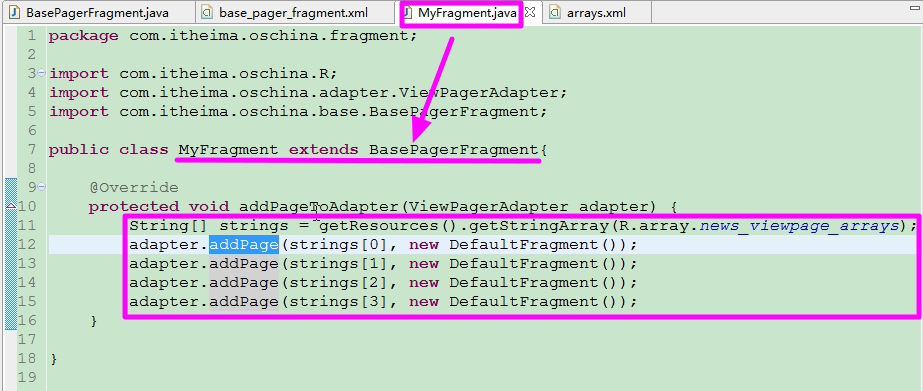
【子类实现父类添加各自数据的类】
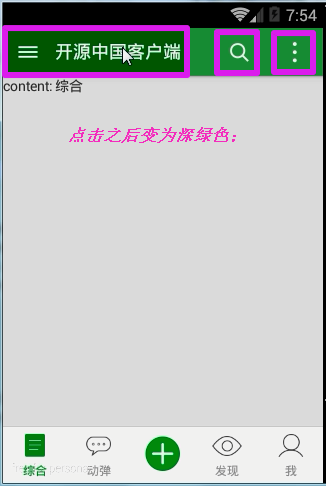
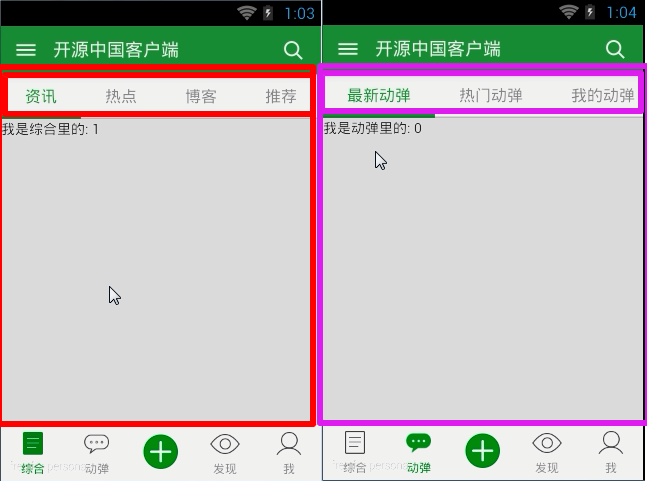
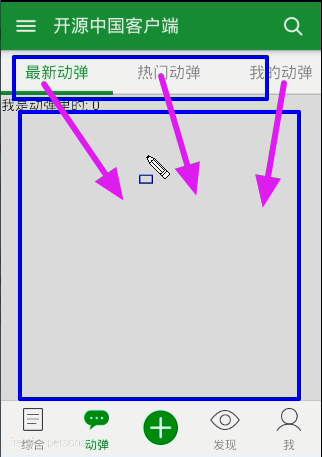
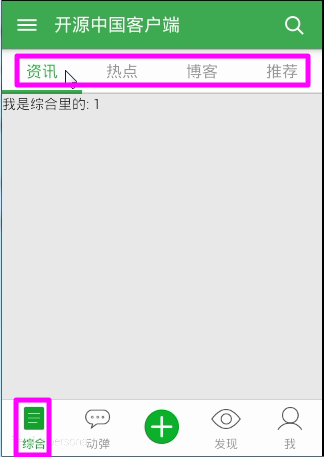
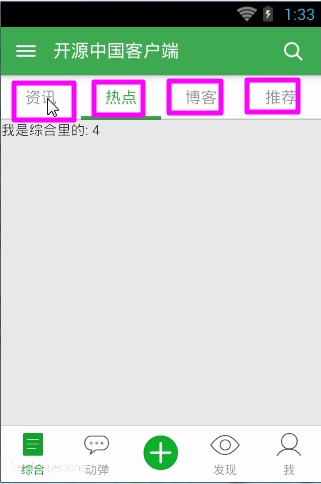
[页面的标签]对应的综合页面的中的指针标签。
9.2.在实际的项目中封装的类
【封装的基类的源码】/开源中国客户端T/src/com/itheima/oschina/base/BaseViewPagerFragment.java
 1 package com.itheima.oschina.base;
 2
 3 import android.os.Bundle;
 4 import android.support.v4.app.Fragment;
 5 import android.support.v4.view.ViewPager;
 6 import android.view.LayoutInflater;
 7 import android.view.View;
 8 import android.view.ViewGroup;
 9 import butterknife.ButterKnife;
10 import butterknife.InjectView;
11
12 import com.itheima.oschina.R;
13 import com.itheima.oschina.adapter.ViewPagerFragmentAdapter;
14 import com.itheima.oschina.widget.PagerSlidingTab;
15
16 /**
17  * 带有导航条的基类
18  *
19  * @author FireAnt(http://my.oschina.net/LittleDY)
20  * @created 2014年11月6日 下午4:59:50
21  *
22  */
23 public abstract class BaseViewPagerFragment extends Fragment {
24
25     @InjectView(R.id.pager_tabstrip)
26     protected PagerSlidingTab mTabStrip; // ViewPager顶部的导航条
27     @InjectView(R.id.pager)
28     protected ViewPager mViewPager; // 展示内容用的滚动布局ViewPager
29     protected ViewPagerFragmentAdapter mTabsAdapter; // 封装了数据集合的ViewPager适配器
30
31     @Override
32     public View onCreateView(LayoutInflater inflater, ViewGroup container,
33             Bundle savedInstanceState) {
34         // 填充并返回一个公共的包含导航条和ViewPager的界面
35         View view = inflater.inflate(R.layout.base_viewpage_fragment, null);
36         ButterKnife.inject(this, view);
37         return view;
38     }
39
40     @Override
41     public void onActivityCreated(Bundle savedInstanceState) {
42         super.onActivityCreated(savedInstanceState);
43         // 1.封装adapter, 注意这里是继承的FragmentPagerAdapter,
44         // 并且传入的是getChildFragmentManager()
45         mTabsAdapter = new ViewPagerFragmentAdapter(getActivity(),getChildFragmentManager());
46         //2.添加page页
47         addPageToAdapter(mTabsAdapter);
48
49         //3.设置adapter
50         mViewPager.setAdapter(mTabsAdapter);
51         //4.绑定viewPager到Indicator
52         mTabStrip.setViewPager(mViewPager);
53
54         setScreenPageLimit(mViewPager);
55     }
56
57     /**
58      * 设置ViewPager能够缓存的页数
59      */
60     protected void setScreenPageLimit(ViewPager mViewPager) {
61         mViewPager.setOffscreenPageLimit(mViewPager.getAdapter().getCount()-1);
62     }
63
64     /**
65      * 往Adapter中添加page,子类需要实现的接口
66      *
67      * @param fragmentAdapter
68      */
69     protected abstract void addPageToAdapter(
70             ViewPagerFragmentAdapter fragmentAdapter);
71
72 }
【设置ViewPager缓存的页数】setScreenPageLimit,最坏的情况是将所有的页数全部缓存下来;

【适配器封装的源码】
 1 package com.itheima.oschina.adapter;
 2
 3 import java.util.ArrayList;
 4
 5 import android.content.Context;
 6 import android.os.Bundle;
 7 import android.support.v4.app.Fragment;
 8 import android.support.v4.app.FragmentManager;
 9 import android.support.v4.app.FragmentPagerAdapter;
10 import android.support.v4.app.FragmentStatePagerAdapter;
11 import android.support.v4.view.ViewPager;
12 import android.util.Log;
13
14 import com.itheima.oschina.widget.PagerSlidingTab;
15
16 public class ViewPagerFragmentAdapter extends FragmentPagerAdapter {
17     private ArrayList<String> tabTitles;
18     private ArrayList<FragmentInfo> fragmentInfos; //此处的集合中放置的是要加载的fragment页面的信息
19     private Context context;
20     public ViewPagerFragmentAdapter(Context context,FragmentManager fm) {
21         super(fm);
22         this.context = context;
23         fragmentInfos = new ArrayList<FragmentInfo>();
24         tabTitles = new ArrayList<String>();
25     }
26
27     /**
28      * 添加一页
29      * @param title
30      * @param clazz
31      * @param bundle
32      */
33     public void addPage(String title,Class<?> clazz,Bundle bundle){
34         tabTitles.add(title);
35         fragmentInfos.add(new FragmentInfo(clazz, bundle)); //在集合中添加数据的时候,需要传递的参数。
36     }
37
38     @Override  //需要传递参数
39     public Fragment getItem(int position) {
40         FragmentInfo fragmentInfo = fragmentInfos.get(position);
41         return Fragment.instantiate(context, fragmentInfo.getClazz().getName(), fragmentInfo.getBundle());
42     }
43
44     @Override
45     public int getCount() {
46         return tabTitles.size();
47     }
48
49     @Override
50     public CharSequence getPageTitle(int position) {
51         return tabTitles.get(position);
52     }
53
54     /**
55      * 封装每一页的fragment的信息
56      * @author Administrator
57      *
58      */
59     public class FragmentInfo{
60         private Class<?> clazz;
61         private Bundle bundle;
62         public FragmentInfo(Class<?> clazz, Bundle bundle) {
63             super();
64             this.clazz = clazz;
65             this.bundle = bundle;
66         }
67         public Class<?> getClazz() {
68             return clazz;
69         }
70         public void setClazz(Class<?> clazz) {
71             this.clazz = clazz;
72         }
73         public Bundle getBundle() {
74             return bundle;
75         }
76         public void setBundle(Bundle bundle) {
77             this.bundle = bundle;
78         }
79     }
80 }
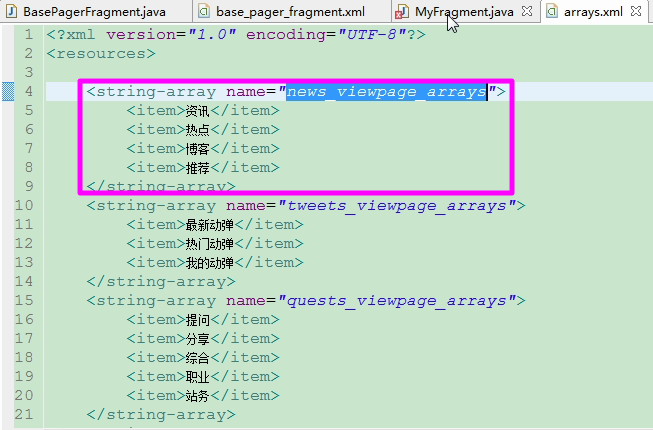
【子类实现fragment源码】NewsPagerFragment-综合Tab实现
 1 package com.itheima.oschina.viewpagerfragment;
 2
 3 import android.os.Bundle;
 4 import android.support.v4.view.ViewPager;
 5 import com.itheima.oschina.R;
 6 import com.itheima.oschina.adapter.ViewPagerFragmentAdapter;
 7 import com.itheima.oschina.base.BaseListFragment;
 8 import com.itheima.oschina.base.BaseViewPagerFragment;
 9 import com.itheima.oschina.bean.BlogList;
10 import com.itheima.oschina.bean.NewsList;
11 import com.itheima.oschina.fragment.DefaultFragment;
12 import com.itheima.oschina.fragment.NewsFragment;
13
14 public class NewsPagerFragment extends BaseViewPagerFragment {
15
16     @Override
17     protected void addPageToAdapter(ViewPagerFragmentAdapter fragmentAdapter) {
18         String[] titles = getActivity().getResources().getStringArray(
19                 R.array.news_viewpage_arrays);
20         //添加page,并给fragment传入对应的bundle参数,在请求接口的时候用 ,此处传递参数与之前的 项目中的参数居多;
21         fragmentAdapter.addPage(titles[0], DefaultFragment.class, getBundle(NewsList.CATALOG_ALL));
22         fragmentAdapter.addPage(titles[1], DefaultFragment.class, getBundle(NewsList.CATALOG_WEEK));
23         fragmentAdapter.addPage(titles[2], DefaultFragment.class, getBundle(BlogList.CATALOG_LATEST));
24         fragmentAdapter.addPage(titles[3], DefaultFragment.class, getBundle(BlogList.CATALOG_RECOMMEND));
25     }
26
27     private Bundle getBundle(int newType) {
28         Bundle bundle = new Bundle();
29         bundle.putInt(BaseListFragment.BUNDLE_KEY_CATALOG, newType); //将数据信息放入到Bundle中;
30         bundle.putString("key", "我是综合里的: " + newType);
31         return bundle;
32     }
33
34     /**
35      * 基类会根据不同的catalog展示相应的数据
36      *
37      * @param catalog
38      *            要显示的数据类别
39      * @return
40      */
41     private Bundle getBundle(String catalog) {
42         Bundle bundle = new Bundle();
43         // bundle.putString(BlogFragment.BUNDLE_BLOG_TYPE, catalog);
44         bundle.putString("key", "我是综合里的: " + catalog);
45         return bundle;
46     }
47
48 }
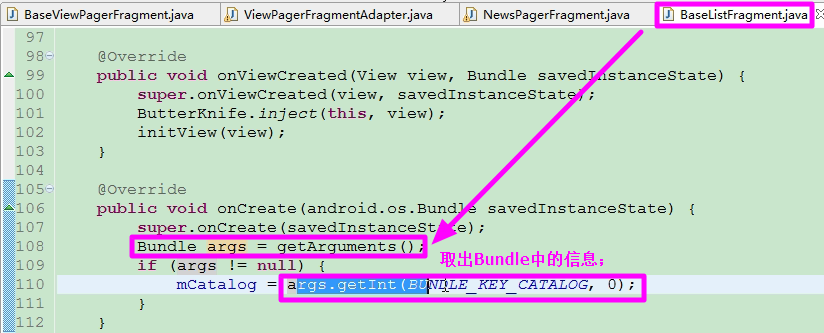
【Bundle的作用】 在获取不同的url的页面的时候,在url后面的地址的拼接的字段是不一样的,可以通过Bundle的数据进行区分;
【动弹页面的实现】/开源中国客户端T/src/com/itheima/oschina/viewpagerfragment/TweetPagerFragment.java
 1 package com.itheima.oschina.viewpagerfragment;
 2
 3 import android.os.Bundle;
 4 import com.itheima.oschina.R;
 5 import com.itheima.oschina.adapter.ViewPagerFragmentAdapter;
 6 import com.itheima.oschina.base.BaseListFragment;
 7 import com.itheima.oschina.base.BaseViewPagerFragment;
 8 import com.itheima.oschina.bean.TweetsList;
 9 import com.itheima.oschina.fragment.DefaultFragment;
10
11 public class TweetPagerFragment extends BaseViewPagerFragment {
12
13     @Override
14     protected void addPageToAdapter(ViewPagerFragmentAdapter fragmentAdapter) {
15         String[] titles = getActivity().getResources().getStringArray(
16                 R.array.tweets_viewpage_arrays);
17         //添加page,并给fragment传入对应的bundle参数,在请求接口的时候用
18         fragmentAdapter.addPage(titles[0], DefaultFragment.class, getBundle(TweetsList.CATALOG_LATEST));
19         fragmentAdapter.addPage(titles[1], DefaultFragment.class, getBundle(TweetsList.CATALOG_HOT));
20         fragmentAdapter.addPage(titles[2], DefaultFragment.class, getBundle(TweetsList.CATALOG_ME));
21     }
22
23     private Bundle getBundle(int newType) {
24         Bundle bundle = new Bundle();
25         bundle.putInt(BaseListFragment.BUNDLE_KEY_CATALOG, newType);
26         bundle.putString("key", "我是动弹里的: " + newType);
27         return bundle;
28     }
29
30
31 }
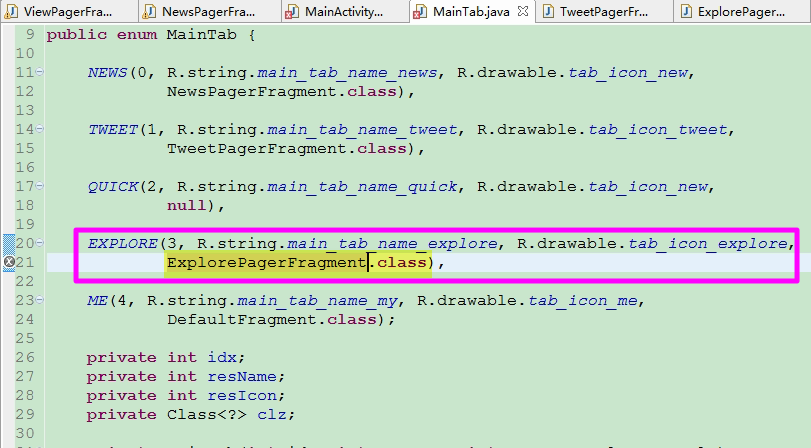
【增加一个新的页面】新建一个类,重写addPageToAdapter方法;

[修改枚举中要加载的类]


 浙公网安备 33010602011771号