

九宫格图片制作
1.原理及说明
九宫格图片就是将一张图片分成9份,再拼成一个完整的图片,如图:

原理:创建9个正方形容器,利用背景图定位,每个容器只显示其中的一部分,最终拼接成一张完整的图片
实现思路:
(1)使用flex布局,让9个子元素以 3*3 的形式摆放
(2)因为图片有纵向和横向两种可能,所以要对图片的宽高比进行判断,以此来判断图片的方向,并根据图片的方向决定背景图定位信息。
(3)将图片的url放入文本框中,通过按钮点击事件将url对应的图片设置成容器的背景图
(4)使用FileReader()读取本地选中的图片时,会花费1-2s的时间,在此时间内显示一个蒙版遮罩,用来提示用户“加载中...”
(5)为了美化按钮,使用了bootstrap
2.HTML代码
HTML代码分为3个部分:
(1)操作区,包括文本输入框和按钮
(2)九宫格图片区,用于显示背景图
(3)蒙版遮罩
<!DOCTYPE html>
<html lang="en">
<head>
    <meta charset="UTF-8">
    <meta name="viewport" content="width=device-width, initial-scale=1.0">
    <meta http-equiv="X-UA-Compatible" content="ie=edge">
    <!-- 引入bootstrap -->
    <link rel="stylesheet" href="https://cdn.staticfile.org/twitter-bootstrap/3.3.7/css/bootstrap.min.css">
    <link rel="stylesheet" href="index.css">
    <title>九宫格图片</title>
</head>
<body>
    <!-- 操作区 -->
    <div id="imgInfo">
        <input type="text" id="imgUrl" placeholder="请输入图片url">
        <button id="fileBtn" class="btn btn-info">浏览本地图库</button>
        <br>
        <button id="updateUrl"class="btn btn-primary">更新九宫格图片</button>
        <button id="clearInput"class="btn btn-default">清空输入框</button>
        <br>
        <input type="file" name="image" id="file" style="display: none;" accept="image/*">
        <div id="paddingCtrBox">
            <input type="range" max="10" min="0" id="paddingCtr" title="滑动控制间隙的大小">
        </div>
    </div>
    <!-- 九宫格图片 -->
    <div class="wrap">
        <div class="box"></div>
        <div class="box"></div>
        <div class="box"></div>
        <div class="box"></div>
        <div class="box"></div>
        <div class="box"></div>
        <div class="box"></div>
        <div class="box"></div>
        <div class="box"></div>
    </div>
    <!-- 蒙版 -->
    <div id="mask" class="hidden">
        <h3 class="text-center">加载中...</h3>
    </div>
</body>
<!-- 引入js文件 -->
<script src="index.js"></script>
</html>
3.css文件
(1)为了美化按钮,引用了bootstrap中的类
(2)九宫格使用了flex布局
(3)蒙版使用了bootstrap中的类,用于显示/隐藏蒙版
/* 按钮容器 */
#imgInfo{
    margin: 20px;
    text-align: center;
}
#imgUrl{
    width: 700px;
    height: 30px;
    line-height: 30px;
    margin-bottom: 10px;
}
#imgUrl::placeholder{
    color:red;
    text-align: center;
}
#paddingCtrBox{
    width: 150px;
    margin: 10px auto;
}

/* 九宫格  */
.wrap{
    width: 456px;
    height: 456px;
    margin: 0 auto;
    display: flex;
    flex-wrap: wrap;
    justify-content: space-between;
    align-content: space-between;
    /* border: 1px solid black; */
}
.wrap > .box{
    width: 150px;
    height: 150px;
    background-repeat: no-repeat;
    /* background-color: #eee; */
}
/* 纵向 */
.wrap > .vertical{
    background-size: auto 300%;
}
/* 横向 */
.wrap > .transverse{
    background-size: 300% auto;
}

/* 蒙版 */
#mask{
    width: 100%;
    height: 100%;
    position: fixed;
    top: 0;
    left: 0;
    z-index: 99;
    background-color: rgba(210, 210, 210, 0.5);
    padding-top: 150px;
}
4.js文件
(1)先根据图片的宽高比来判断图片的方向(纵向/横向)
(2)监听按钮点击,将文本框的url赋给容器的背景图
(3)根据图片的方向来设置背景图的定位信息
(4)使用普通的按钮来模拟文件域按钮的点击,并使用FileReader()存储选中的图片
(5)设置蒙版
//计算原图的宽高比
function getImgProportion(url,cb){
    var img = new Image()
    img.src = url
    img.onload = function(){
        var Proportion = img.width/img.height
        cb(Proportion,url)
    }
}

//根据格子的大小设置背景图的大小
function setBgc(Proportion,url){
    //Proportion<1 纵向
    //Proportion>1 横向

    //获取所有格子
    var box = document.getElementsByClassName('box')
    //为每个容器设置背景图的url
    for(var i=0;i<box.length;i++){
        box[i].style.backgroundImage = `url(${url})`
    }


    //判断图片的方向
    if(Proportion<1){
        //计算宽高差距
        var disparity = box[0].offsetWidth*3 * (1-Proportion)
        //添加纵向的类
        for(var i=0;i<box.length;i++){
            box[i].className = 'box vertical'
        }
        //左右两侧背景图片进行横向偏移
        box[0].style.backgroundPosition = `${disparity/2}px 0`
        box[1].style.backgroundPosition = '50% 0'
        box[2].style.backgroundPosition = `${disparity/2 - box[0].offsetWidth*2}px 0`
        box[3].style.backgroundPosition = `${disparity/2}px 50%`
        box[4].style.backgroundPosition = '50% 50%'
        box[5].style.backgroundPosition = `${disparity/2 - box[0].offsetWidth*2}px 50%`
        box[6].style.backgroundPosition = `${disparity/2}px ${-box[0].offsetWidth*2}px`
        box[7].style.backgroundPosition = `50% ${-box[0].offsetWidth*2}px`
        box[8].style.backgroundPosition = `${disparity/2 - box[0].offsetWidth*2}px ${-box[0].offsetWidth*2}px`
    }else{
        //计算宽高差距
        var disparity = box[0].offsetHeight*3*(1-1/Proportion)
        //添加横向的类
        for(var i=0;i<box.length;i++){
            box[i].className = 'box transverse'
        }
        //上下两侧背景图片进行纵向偏移
        box[0].style.backgroundPosition = `0 ${disparity/2}px`
        box[1].style.backgroundPosition = `50% ${disparity/2}px`
        box[2].style.backgroundPosition = `${-box[0].offsetWidth*2}px ${disparity/2}px`
        box[3].style.backgroundPosition = `0 50%`
        box[4].style.backgroundPosition = '50% 50%'
        box[5].style.backgroundPosition = `${-box[0].offsetWidth*2}px 50%`
        box[6].style.backgroundPosition = `0 ${disparity/2 - box[0].offsetWidth*2}px`
        box[7].style.backgroundPosition = `50% ${disparity/2 - box[0].offsetWidth*2}px`
        box[8].style.backgroundPosition = `${-box[0].offsetWidth*2}px ${disparity/2 - box[0].offsetWidth*2}px`
    }
}

//九宫格的函数
function jiuGongGe(){
    var imgUrl = document.querySelector('#imgUrl').value
    //设置背景图
    getImgProportion(imgUrl,setBgc)
}

window.onload = function(){
    //获取元素
    var updateBtn = document.querySelector('#updateUrl')
    var clearBtn = document.querySelector('#clearInput')
    var fileBtn = document.querySelector('#fileBtn')
    var fileInput = document.querySelector('#file')
    var maskBox = document.querySelector("#mask")
    var paddingCtr = document.querySelector("#paddingCtr")
    //监听 更新 按钮的点击
    updateBtn.onclick = function(){
        jiuGongGe()
    }
    //监听 清空 按钮的点击
    clearBtn.onclick = function(){
        document.querySelector('#imgUrl').value = ''
    }
    //监听 浏览本地图库 按钮的点击
    fileBtn.onclick = function(){
        //触发fileInput的点击事件
        fileInput.click()
    }
    //监听fileInput的change事件
    fileInput.onchange = function(){
        //显示遮罩(去除hidden类)
        maskBox.classList.remove('hidden')
        var reader = new FileReader()
        reader.readAsDataURL(document.querySelector('#file').files[0])
        reader.onload = function() {
            //文件已读取完毕 将结果赋值给文本框
            document.querySelector('#imgUrl').value = reader.result
            //去除遮罩(添加hidden类)
            maskBox.classList.add('hidden')
        }
    }
    //监听滑块change事件
    paddingCtr.onchange = function(){
        //获取大容器
        var wrap = document.querySelector("#wrap")
        //设置最小值
        var min = 450
        //获取当前滑块对应的值
        var value = Number(paddingCtr.value) * 2
        //设置大容器的宽高
        wrap.style.width = (min+value) + 'px'
        wrap.style.height = (min+value) + 'px'
    }
}
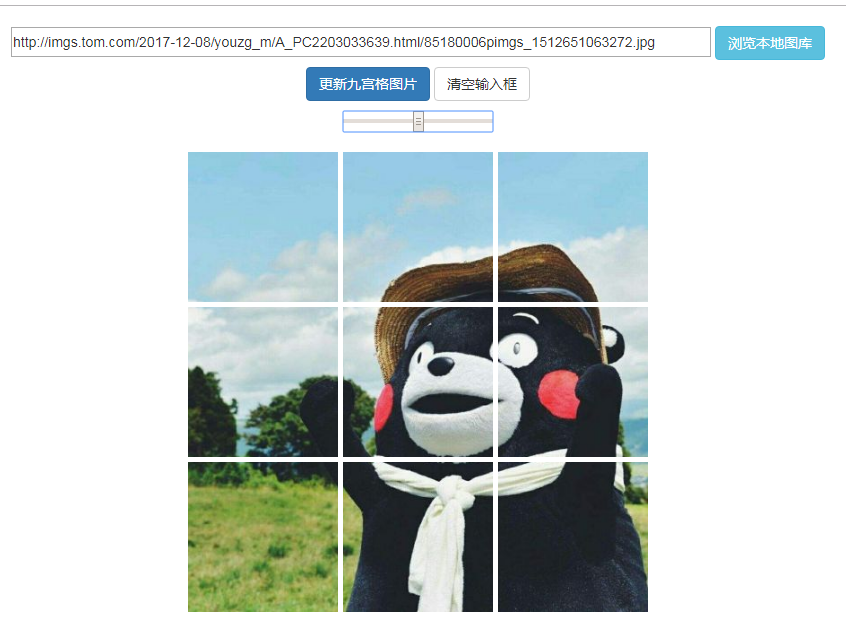
5.效果图


【推荐】国内首个AI IDE,深度理解中文开发场景,立即下载体验Trae
【推荐】编程新体验,更懂你的AI,立即体验豆包MarsCode编程助手
【推荐】抖音旗下AI助手豆包,你的智能百科全书,全免费不限次数
【推荐】轻量又高性能的 SSH 工具 IShell:AI 加持,快人一步
· 基于Microsoft.Extensions.AI核心库实现RAG应用
· Linux系列:如何用heaptrack跟踪.NET程序的非托管内存泄露
· 开发者必知的日志记录最佳实践
· SQL Server 2025 AI相关能力初探
· Linux系列:如何用 C#调用 C方法造成内存泄露
· Manus爆火,是硬核还是营销?
· 终于写完轮子一部分:tcp代理 了,记录一下
· 别再用vector<bool>了!Google高级工程师:这可能是STL最大的设计失误
· 单元测试从入门到精通
· 震惊!C++程序真的从main开始吗?99%的程序员都答错了