k8s之configmap应用
前言
ConfgMap主要用于为容器中的应用提供配置数据,以达到应用程序的配置内容定制化。
ConfigMap的本质上是键值对,基于键值对将应用的配置信息传递给Pod。
一、配置方法

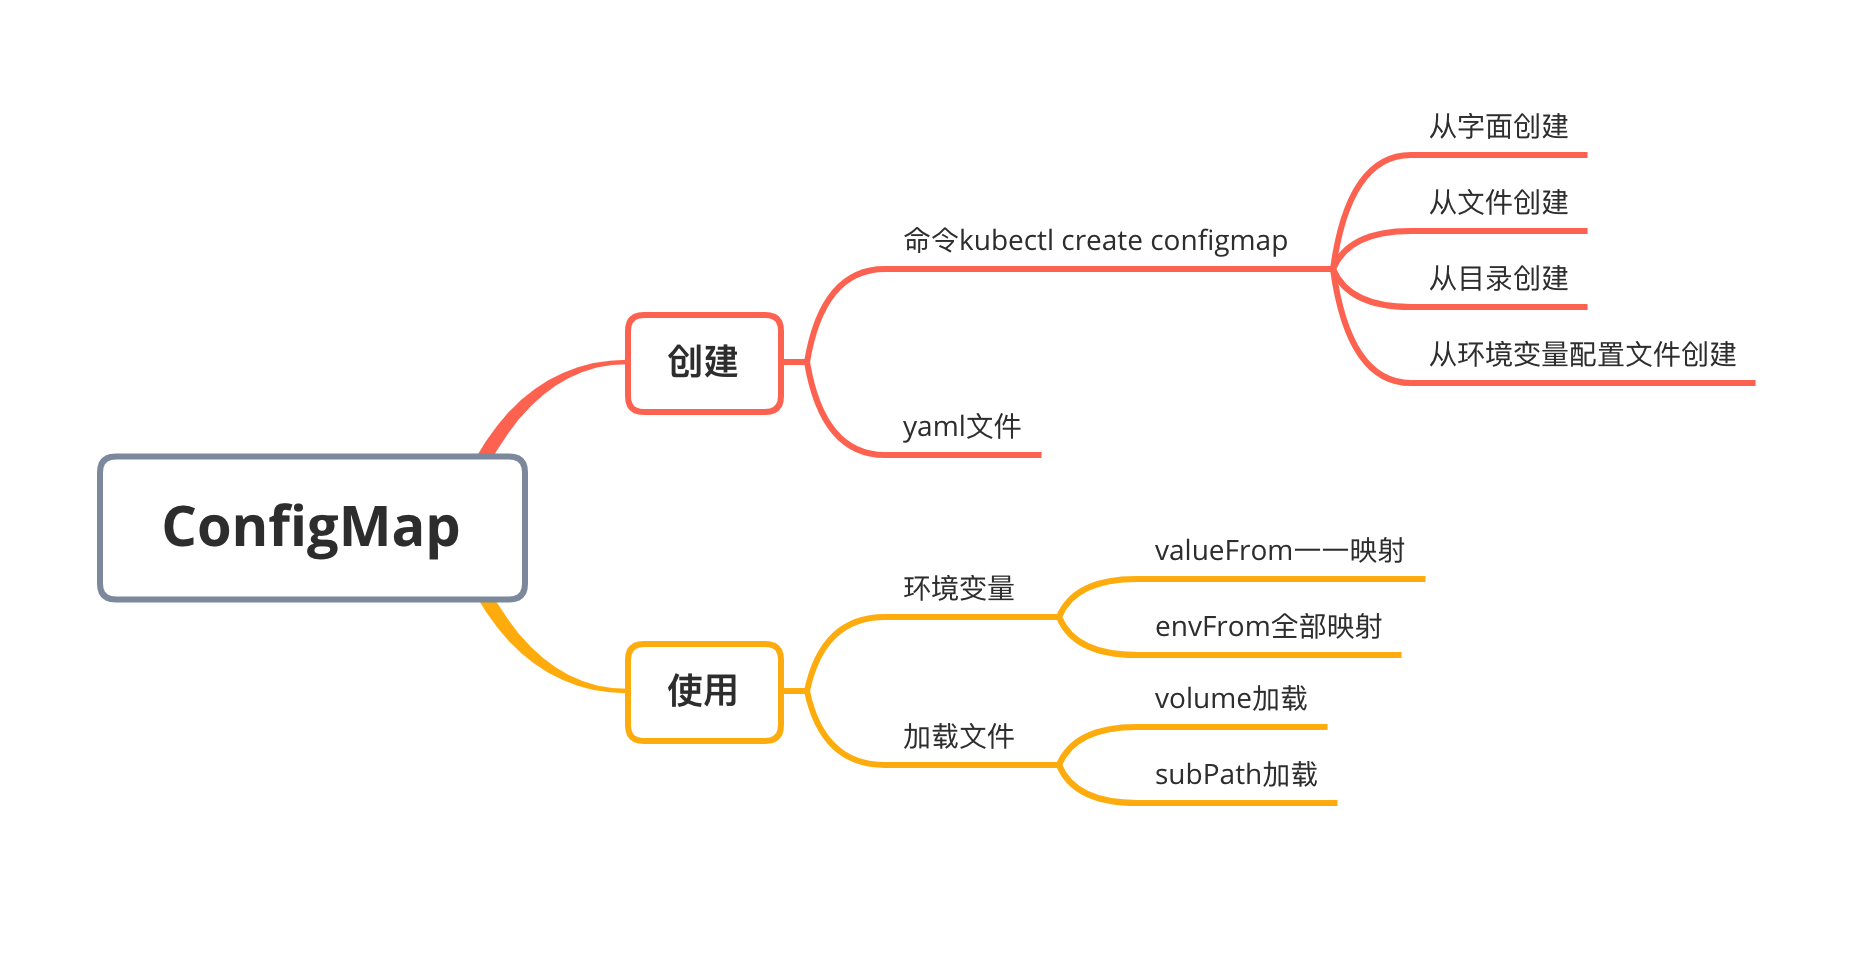
按大类可分为两种方式,细分共有五种方式:
1、kubectl create configmap创建
- 通过命令行参数字面直接创建
- 通过指定文件创建
- 通过指定目录创建
- 通过指定环境变量配置文件创建
2、yaml文件创建
二、创建configmap
1、基于命令创建configmap
通过参数--from-literal直接指定键值对。这种方式比较适用于临时测试使用,而且不适合配置很多的情况
root@k8s-master01:~# kubectl create configmap demoapp-cfg --from-literal=listen.port=8080 --from-literal=listen.address='127.0.0.1'
configmap/demoapp-cfg created
root@k8s-master01:~# kubectl get cm
NAME               DATA   AGE
demoapp-cfg        2      7s
kube-root-ca.crt   1      35h

root@k8s-master01:~# kubectl get cm demoapp-cfg -oyaml
apiVersion: v1
data:
  listen.address: 127.0.0.1
  listen.port: "8080"
kind: ConfigMap
metadata:
  creationTimestamp: "2024-01-20T00:55:59Z"
  name: demoapp-cfg
  namespace: default
  resourceVersion: "273698"
  uid: 1df08044-46c7-4672-a328-7f81174e27d8
2、基于文件创建nginx-configmap
通过参数--from-file来指定文件。
准备nginx配置文件
root@k8s-master01:~/learning-k8s/examples/configmaps_and_secrets# pwd
/root/learning-k8s/examples/configmaps_and_secrets
root@k8s-master01:~/learning-k8s/examples/configmaps_and_secrets# ls nginx-conf.d/
myserver-gzip.cfg  myserver-status.cfg  myserver.conf
root@k8s-master01:~/learning-k8s/examples/configmaps_and_secrets#
root@k8s-master01:~/learning-k8s/examples/configmaps_and_secrets# ls nginx-conf.d/
myserver-gzip.cfg  myserver-status.cfg  myserver.conf
root@k8s-master01:~/learning-k8s/examples/configmaps_and_secrets# cat nginx-conf.d/myserver-gzip.cfg
gzip on;
gzip_comp_level 5;
gzip_proxied     expired no-cache no-store private auth;
gzip_types text/plain text/css application/xml text/javascript;
root@k8s-master01:~/learning-k8s/examples/configmaps_and_secrets# cat nginx-conf.d/myserver-status.cfg
location /nginx-status {
    stub_status on;
    access_log off;
}
root@k8s-master01:~/learning-k8s/examples/configmaps_and_secrets# cat nginx-conf.d/myserver.conf
server {
    listen 8080;
    server_name www.ik8s.io;

    include /etc/nginx/conf.d/myserver-*.cfg;

    location / {
        root /usr/share/nginx/html;
    }
}
root@k8s-master01:~/learning-k8s/examples/configmaps_and_secrets# kubectl create configmap nginx-cfg --from-file=./nginx-conf.d/myserver.conf  --from-file=./nginx-conf.d/myserver-status.cfg --from-file=./nginx-conf.d/myserver-gzip.cfg --dry-run=client -oyaml
apiVersion: v1
data:
  myserver-gzip.cfg: |
    gzip on;
    gzip_comp_level 5;
    gzip_proxied     expired no-cache no-store private auth;
    gzip_types text/plain text/css application/xml text/javascript;
  myserver-status.cfg: |
    location /nginx-status {
        stub_status on;
        access_log off;
    }
  myserver.conf: |
    server {
        listen 8080;
        server_name www.ik8s.io;

        include /etc/nginx/conf.d/myserver-*.cfg;

        location / {
            root /usr/share/nginx/html;
        }
    }
kind: ConfigMap
metadata:
  creationTimestamp: null
  name: nginx-cfg
3、基于目录创建
上一种方式没有太大差别,只是--from-file后面的参数是目录,而不是文件。
root@k8s-master01:~/learning-k8s/examples/configmaps_and_secrets# kubectl create configmap nginx-cfg --from-file=./nginx-conf.d/ --dry-run=client -oyaml
apiVersion: v1
data:
  myserver-gzip.cfg: |
    gzip on;
    gzip_comp_level 5;
    gzip_proxied     expired no-cache no-store private auth;
    gzip_types text/plain text/css application/xml text/javascript;
  myserver-status.cfg: |
    location /nginx-status {
        stub_status on;
        access_log off;
    }
  myserver.conf: |
    server {
        listen 8080;
        server_name www.ik8s.io;

        include /etc/nginx/conf.d/myserver-*.cfg;

        location / {
            root /usr/share/nginx/html;
        }
    }
kind: ConfigMap
metadata:
  creationTimestamp: null
  name: nginx-cfg
4、从环境变量配置文件创建
这种方式如之前的从文件创建很不一样。它的(key, value)不是(文件名,文件内容),而是文件中一个个的配置。
配置文件pkslow.env内容如下:
PKSLOW_NAME=Larry
PKSLOW_AGE=18
PKSLOW_WEBSITE=www.pkslow.com
创建命令如下:
$ kubectl create configmap pkslow-env --from-env-file=pkslow.env
查看内容如下:
kubectl get configmaps pkslow-env -o yaml

apiVersion: v1
data:
  PKSLOW_AGE: "18"
  PKSLOW_NAME: Larry
  PKSLOW_WEBSITE: www.pkslow.com
kind: ConfigMap
metadata:
  name: pkslow-env
  namespace: default
5、通过yaml文件创建
通过yaml文件创建就很常规了,跟普通的kubernetes资源创建没有什么区别。
apiVersion: v1
kind: ConfigMap
metadata:
  name: pkslow-yaml
data:
  PKSLOW_AGE: "18"
  PKSLOW_NAME: Larry
  PKSLOW_WEBSITE: www.pkslow.com
  application-uat.yaml: |-
    server:
      port: 8080
    pkslow:
      name: LarryDpk
      age: 20
      webSite: https://www.pkslow.com
  application.yaml: |-
    server:
      port: 8080
    pkslow:
      name: Larry
      age: 18
      webSite: www.pkslow.com
再通过以下文件创建:
$ kubectl apply -f configmap.yaml
三、在Pod上使用ConfigMap
在Pod中使用ConfigMap有以下四种方式
- 在容器命令和参数内;
- 容器的环境变量;
- 在只读卷里面添加一个文件,让应用来读取;
- 编写代码在 Pod 中运行,使用 Kubernetes API 来读取 ConfigMap;
其中第1种和第2种方式类似,只是启动命令添加环境变量,所以还是要把ConfigMap映射为容器的环境变量。第4种方式要访问API,可以使用相关的库,如Spring Cloud Kubernetes.
-
环境变量
将configmap对象上的某key的值赋值给(valueFrom)指定的环境变量,不支持动态加载。 -
卷
在Pod上基于configMap卷插件引用configmap对象,支持动态加载。
在Container上挂载configMap卷
每个kv会分别被映射为一个文件,文件名同key,value将成为文件内容
注意:
- 通过环境变量引用在Pod创建的时候完成赋值,configmap更改不生效。
- 通过卷挂载,基于卷引用,configmap可以动态加载。
3.1、通过环境变量引用configmap
把ConfigMap的值映射到环境变量,主要有两种方式,valueFrom和envFrom。
3.1.1 valueFrom一一映射
通过valueFrom来配置环境变量,Pod的环境变量名与ConfigMap不必相同。
root@k8s-master01:~/learning-k8s/examples/configmaps_and_secrets# cat configmaps-env-demo.yaml
---
apiVersion: v1
kind: ConfigMap
metadata:
  name: demoapp-config
  namespace: default
data:
  demoapp.port: "8080"
  demoapp.host: 127.0.0.1
---
apiVersion: v1
kind: Pod
metadata:
  name: configmaps-env-demo
  namespace: default
spec:
  containers:
  - image: ikubernetes/demoapp:v1.0
    name: demoapp
    env:
    - name: PORT
      valueFrom:
        configMapKeyRef:
          name: demoapp-config
          key: demoapp.port
          optional: false
    - name: HOST
      valueFrom:
        configMapKeyRef:
          name: demoapp-config
          key: demoapp.host
          optional: true
root@k8s-master01:~/learning-k8s/examples/configmaps_and_secrets# kubectl apply -f configmaps-env-demo.yaml
configmap/demoapp-config created
pod/configmaps-env-demo created
root@k8s-master01:~/learning-k8s/examples/configmaps_and_secrets# kubectl get cm
NAME               DATA   AGE
demoapp-cfg        2      24m
demoapp-config     2      6s
kube-root-ca.crt   1      35h
root@k8s-master01:~/learning-k8s/examples/configmaps_and_secrets# kubectl get pod
NAME                  READY   STATUS    RESTARTS   AGE
configmaps-env-demo   1/1     Running   0          7m27s
3.1.2 envFrom全部映射
通过envFrom会把ConfigMap的所有键值对都映射到Pod的环境变量中去。
apiVersion: v1
kind: Pod
metadata:
  name: pkslow-env-env-from
spec:
  containers:
    - name: test-container
      image: busybox
      command: [ "/bin/sh", "-c", "env" ]
      envFrom:
        - configMapRef:
            name: pkslow-yaml
  restartPolicy: Never
查看环境变量如下:
$ kubectl logs -f pkslow-env-env-from
PKSLOW_WEBSITE=www.pkslow.com
PKSLOW_AGE=18
PKSLOW_NAME=Larry
application.yaml=server:
  port: 8080
pkslow:
  name: Larry
  age: 18
  webSite: www.pkslow.com
application-uat.yaml=server:
  port: 8080
pkslow:
  name: LarryDpk
  age: 20
  webSite: https://www.pkslow.com
显然看起来这种方式更简便,不用每个环境变量都配一遍,但它可能会带来脏数据,就看怎么使用了。
3.2、通过卷挂载configmap
可以通过volume的方式把ConfigMap加载进Pod。
- 创建configmap
root@k8s-master01:~/learning-k8s/examples/configmaps_and_secrets# kubectl create configmap nginx-config-files --from-file=./nginx-conf.d/
configmap/nginx-config-files created
root@k8s-master01:~/learning-k8s/examples/configmaps_and_secrets# kubectl get cm
NAME                 DATA   AGE
demoapp-cfg          2      38m
demoapp-config       2      13m
kube-root-ca.crt     1      36h
nginx-config-files   3      6s
- 创建nginx pod将configmap作为配置文件挂载到指定目录下
root@k8s-master01:~/learning-k8s/examples/configmaps_and_secrets# cat configmaps-volume-demo.yaml
apiVersion: v1
kind: Pod
metadata:
  name: configmaps-volume-demo
  namespace: default
spec:
  containers:
  - image: nginx:1.22
    name: nginx-server
    volumeMounts:
    - name: ngxconfs
      mountPath: /etc/nginx/conf.d/
      readOnly: true
  volumes:
  - name: ngxconfs
    configMap:
      name: nginx-config-files
      optional: false
root@k8s-master01:~/learning-k8s/examples/configmaps_and_secrets# kubectl apply -f configmaps-volume-demo.yaml
pod/configmaps-volume-demo created
root@k8s-master01:~/learning-k8s/examples/configmaps_and_secrets# kubectl get pod
NAME                     READY   STATUS    RESTARTS   AGE
configmaps-env-demo      1/1     Running   0          23m
configmaps-volume-demo   1/1     Running   0          5m16s
root@k8s-master01:~/learning-k8s/examples/configmaps_and_secrets# kubectl exec -it configmaps-volume-demo bash
kubectl exec [POD] [COMMAND] is DEPRECATED and will be removed in a future version. Use kubectl exec [POD] -- [COMMAND] instead.
root@configmaps-volume-demo:/# ls /etc/nginx/conf.d/
myserver-gzip.cfg  myserver-status.cfg  myserver.conf
root@configmaps-volume-demo:/# nginx -T
...
# configuration file /etc/nginx/conf.d/myserver.conf:
server {
    listen 8080;
    server_name www.ik8s.io;

    include /etc/nginx/conf.d/myserver-*.cfg;

    location / {
        root /usr/share/nginx/html;
    }
}

# configuration file /etc/nginx/conf.d/myserver-gzip.cfg:
gzip on;
gzip_comp_level 5;
gzip_proxied     expired no-cache no-store private auth;
gzip_types text/plain text/css application/xml text/javascript;

# configuration file /etc/nginx/conf.d/myserver-status.cfg:
location /nginx-status {
    stub_status on;
    access_log off;
}
...
- 访问nginx服务
root@k8s-master01:~/learning-k8s/examples/configmaps_and_secrets# kubectl get pod -o wide
NAME                     READY   STATUS    RESTARTS   AGE   IP            NODE         NOMINATED NODE   READINESS GATES
configmaps-env-demo      1/1     Running   0          28m   10.244.2.24   k8s-node01   <none>           <none>
configmaps-volume-demo   1/1     Running   0          10m   10.244.2.25   k8s-node01   <none>           <none>
root@k8s-master01:~/learning-k8s/examples/configmaps_and_secrets# curl 10.244.2.25:8080
<!DOCTYPE html>
<html>
<head>
<title>Welcome to nginx!</title>
<style>
html { color-scheme: light dark; }
body { width: 35em; margin: 0 auto;
font-family: Tahoma, Verdana, Arial, sans-serif; }
</style>
</head>
<body>
<h1>Welcome to nginx!</h1>
<p>If you see this page, the nginx web server is successfully installed and
working. Further configuration is required.</p>

<p>For online documentation and support please refer to
<a href="http://nginx.org/">nginx.org</a>.<br/>
Commercial support is available at
<a href="http://nginx.com/">nginx.com</a>.</p>

<p><em>Thank you for using nginx.</em></p>
</body>
</html>
好文推荐


 浙公网安备 33010602011771号