在 ASP.NET CORE 中使用 SESSION (转载)
Session 是保存用户和 Web 应用的会话状态的一种方法,ASP.NET Core 提供了一个用于管理会话状态的中间件。在本文中我将会简单介绍一下 ASP.NET Core 中的 Session 的使用方法。
安装配置 Session
nuget 添加引用 Microsoft.AspNetCore.Session
Session 是基于 IDistributedCache 构建的,所以必须引用一种 IDistributedCache 的实现,ASP.NET Core 提供了多种 IDistributedCache 的实现 (Redis、SQL Server、In-memory)
In-memory
services.AddDistributedMemoryCache();
services.AddSession();
SQL Server
nuget 添加引用 Microsoft.Extensions.Caching.SqlServer
SqlServerCache实现允许分布式缓存使用SQL Server数据库作为其后备存储。要创建SQL Server表,您可以使用sql-cache工具,该工具将使用您指定的名称和模式创建一个表。
要使用sql-cache工具,请添加SqlConfig.Tools到.csproj文件的<ItemGroup>元素并运行dotnet恢复。
<ItemGroup>
  <DotNetCliToolReference Include="Microsoft.Extensions.Caching.SqlConfig.Tools" Version="1.0.0-msbuild3-final" />
</ItemGroup>
通过运行以下命令来测试SqlConfig.Tools
C:\DistCacheSample\src\DistCacheSample>dotnet sql-cache create --help
sql-cache工具将显示用法,选项和命令帮助,现在你可以创建表到sql server中,运行“sql-cache create”命令:
C:\DistCacheSample\src\DistCacheSample>dotnet sql-cache create "Data Source=(localdb)\v11.0;Initial Catalog=DistCache;Integrated Security=True;" dbo TestCache
   info: Microsoft.Extensions.Caching.SqlConfig.Tools.Program[0]
       Table and index were created successfully.
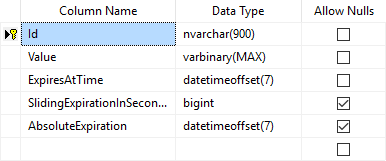
创建的表格具有以下架构:

注意的ConnectionString(以及可选地,SchemaName和TableName)通常应该被存储的源控制(如UserSecrets)以外,因为它们可能包含凭证。
像所有的缓存实现一样,你的应用程序应该使用一个实例来获取和设置缓存值IDistributedCache,而不是SqlServerCache。该示例SqlServerCache在Production环境中实现(因此已配置ConfigureProductionServices)。
// Microsoft SQL Server implementation of IDistributedCache.
// Note that this would require setting up the session state database.
services.AddDistributedSqlServerCache(o =>
{
  o.ConnectionString = "Server=.;Database=ASPNET5SessionState;Trusted_Connection=True;";
  o.SchemaName = "dbo";
  o.TableName = "Sessions";
});
services.AddSession();
Redis
nuget 添加引用 Microsoft.Extensions.Caching.Redis
Redis是一款开源的内存数据存储,通常用作分布式缓存。您可以在本地使用它,并且可以为Azure托管的ASP.NET Core应用程序配置Azure Redis缓存。您的ASP.NET Core应用程序使用RedisDistributedCache实例配置缓存实施。
您可以ConfigureServices通过请求一个实例IDistributedCache(参见上面的代码)来配置Redis实现并在您的应用代码中访问它。
在示例代码中,RedisCache当为服务器配置Staging环境时使用实现。因此该ConfigureStagingServices方法配置RedisCache:
services.AddDistributedRedisCache(options => { options.Configuration = "localhost"; options.InstanceName = "SampleInstance"; });
接着在 Startup.cs 的 Config 方法中配置使用 Session 中间件,所有中间件的配置顺序非常重要,必须在 UseSession 调用后才能访问 Session 。
// 必须在 UseMvc 之前调用
app.UseSession();

app.UseMvc(routes =>
{
    routes.MapRoute(
        name: "default",
        template: "{controller=Home}/{action=Index}/{id?}");
});
在 AddSession 和 UseSession 方法中可以传入一个 SessionOptions 参数,通过该参数可以设置 Session 的 Cookie name, Cookie path 等信息。
配置完成后,就可以使用 Session 保存数据了。
具体实现redis实现:.NetCore Session.Redis
使用 Session 存储数据
Session 安装配置好就可以通过 HttpContext.Session 来保存和读取数据了。由于 Session 是基于 IDistributedCache 构建的,因此 Session 只能存储 byte[] 数据,这样使用起来很不方便,好在有很多扩展方法可以用来直接读取和保存 string、int 等类型数据。
一个 Session 使用的简单示例:
public IActionResult Index()
{
    HttpContext.Session.SetString("SessionStartedTime", "Session started time:" + DateTime.Now.ToString());
    return View();
}

public IActionResult About()
{
    ViewData["CurrentTime"] = "Current time:" + DateTime.Now.ToString();
    ViewData["SessionStartedTime"] = HttpContext.Session.GetString("SessionStartedTime");

    return View();
}
或者设置一个扩展类也可以直接将实体类序列化成json存储
public static class SessionExtensions
{
    public static void Set<T>(this ISession session, string key, T value)
    {
        session.SetString(key, JsonConvert.SerializeObject(value));
    }

    public static T Get<T>(this ISession session, string key)
    {
        var value = session.GetString(key);
        return value == null ? default(T) :
                                JsonConvert.DeserializeObject<T>(value);
    }
}
Session的弊端
使用Session会导致Http请求加锁的问题,详情请见:asp.net mvc session锁问题


 浙公网安备 33010602011771号