
04-HighLevelAPI入门
八、HighLevelAPI
8.1、RestAPI介绍&项目导入
8.1.1、RestAPI介绍
- ES官方提供了各种不同语言的客户端,用来操作ES。这些客户端的本质就是组装DSL语句,通过http请求发送给ES
- 官方文档地址
- 其中的Java Rest Client又包括两种
- Java Low Level Rest Client
- Java High Level Rest Client
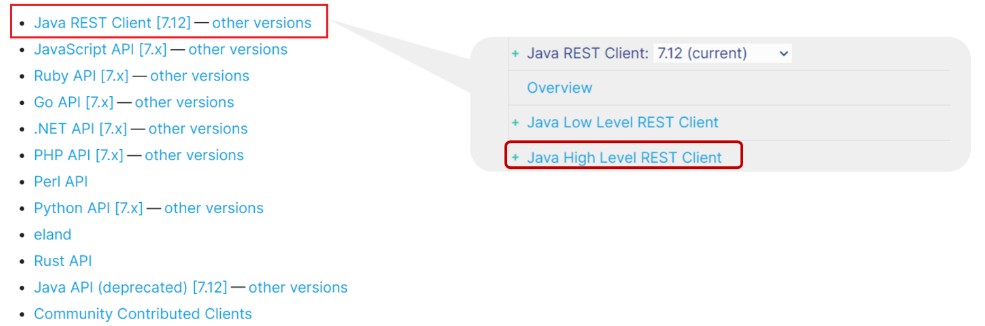
本次学习的是HighLevel版本
8.1.2、项目导入
有需要的可以直接联系本人
①、数据库数据导入
- 导入自定义的数据即可;
②、创建初始工程
-
初始工程创建成功后,目录结构如下所示
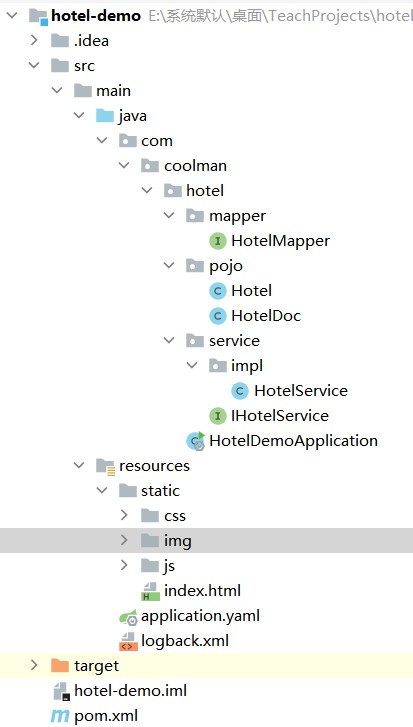
- 其中
HotelDoc后续会说到
-
配置application.yml
-
在spring层级下添加es的服务端路径配置
-
elasticsearch: rest: uris: - http://192.168.222.135:9200
-
-
导入相关依赖
-
<?xml version="1.0" encoding="UTF-8"?> <project xmlns="http://maven.apache.org/POM/4.0.0" xmlns:xsi="http://www.w3.org/2001/XMLSchema-instance" xsi:schemaLocation="http://maven.apache.org/POM/4.0.0 https://maven.apache.org/xsd/maven-4.0.0.xsd"> <modelVersion>4.0.0</modelVersion> <parent> <groupId>org.springframework.boot</groupId> <artifactId>spring-boot-starter-parent</artifactId> <version>2.3.8.RELEASE</version> <relativePath/> <!-- lookup parent from repository --> </parent> <groupId>com.coolman.hotel</groupId> <artifactId>hotel-demo</artifactId> <name>hotel-demo</name> <description>Demo project for Spring Boot</description> <properties> <java.version>1.8</java.version> </properties> <dependencies> <dependency> <groupId>org.springframework.boot</groupId> <artifactId>spring-boot-starter-web</artifactId> </dependency> <dependency> <groupId>com.baomidou</groupId> <artifactId>mybatis-plus-boot-starter</artifactId> <version>3.1.1</version> </dependency> <dependency> <groupId>mysql</groupId> <artifactId>mysql-connector-java</artifactId> <version>8.0.27</version> <scope>runtime</scope> </dependency> <dependency> <groupId>org.projectlombok</groupId> <artifactId>lombok</artifactId> <optional>true</optional> </dependency> <dependency> <groupId>org.springframework.boot</groupId> <artifactId>spring-boot-starter-test</artifactId> <scope>test</scope> </dependency> <dependency> <groupId>org.apache.commons</groupId> <artifactId>commons-lang3</artifactId> </dependency> <!--es的RestAPI依赖--> <dependency> <groupId>org.elasticsearch.client</groupId> <artifactId>elasticsearch-rest-high-level-client</artifactId> </dependency> </dependencies> <build> <plugins> <plugin> <groupId>org.springframework.boot</groupId> <artifactId>spring-boot-maven-plugin</artifactId> <configuration> <excludes> <exclude> <groupId>org.projectlombok</groupId> <artifactId>lombok</artifactId> </exclude> </excludes> </configuration> </plugin> </plugins> </build> </project>
-
-
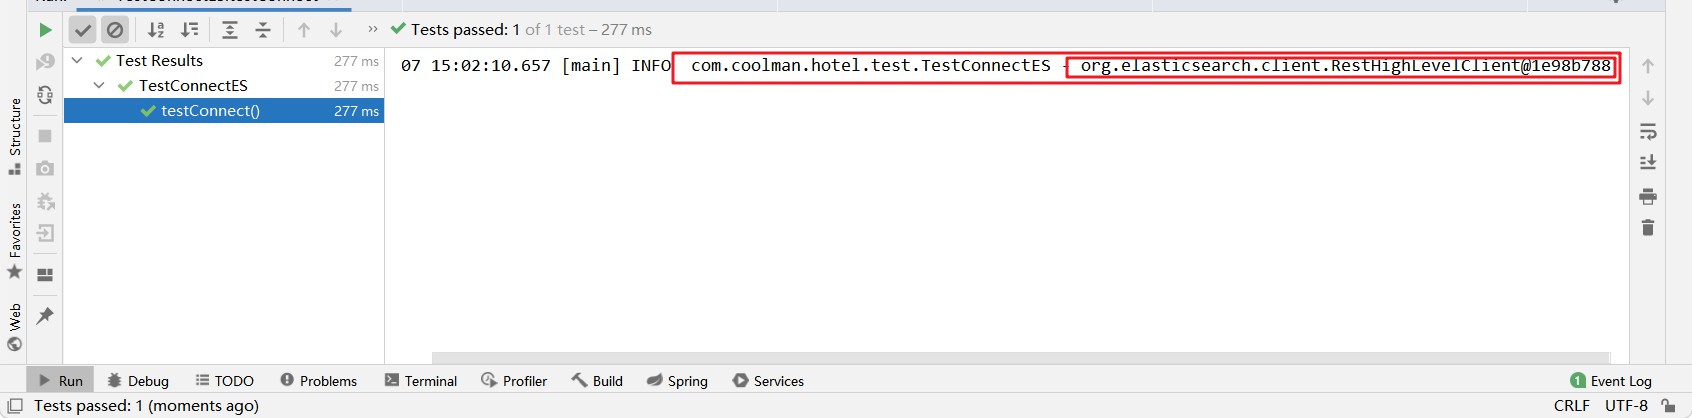
编写测试类,验证是否可以正常连接
-
package com.coolman.hotel.test; import lombok.extern.slf4j.Slf4j; import org.elasticsearch.client.RestHighLevelClient; import org.junit.jupiter.api.Test; import org.springframework.beans.factory.annotation.Autowired; import org.springframework.boot.test.context.SpringBootTest; @SpringBootTest @Slf4j public class TestConnectES { @Autowired private RestHighLevelClient restHighLevelClient; @Test public void testConnect() { log.info(restHighLevelClient + ""); } } -
-
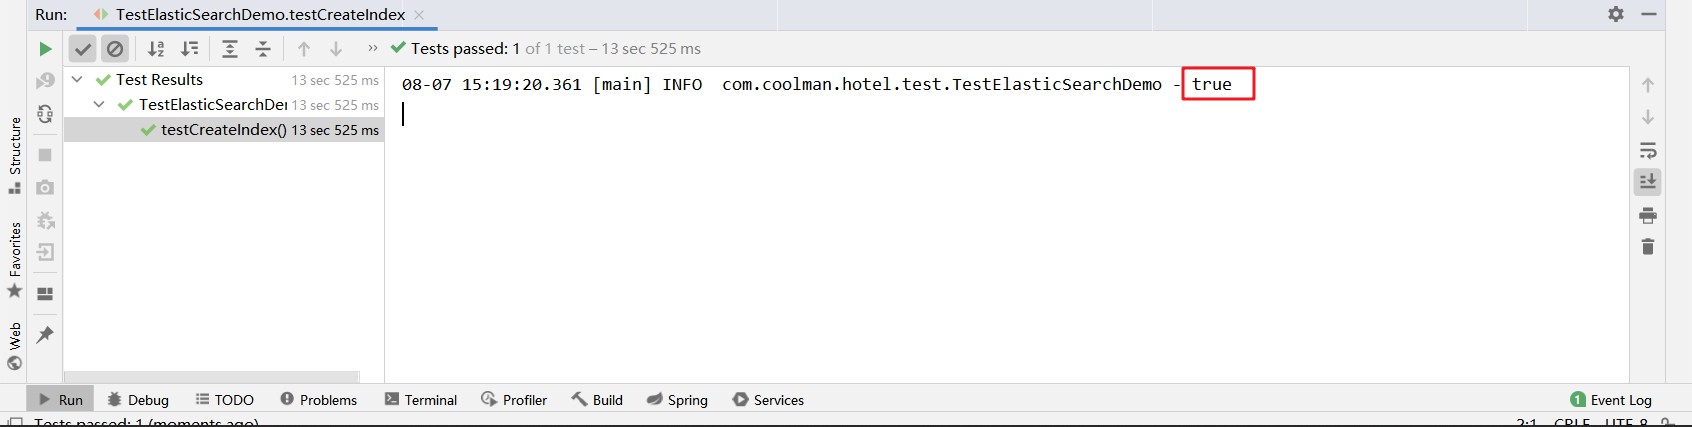
8.2、创建索引
-
代码如下所示
-
/** * 创建索引测试 */ @Test public void testCreateIndex() throws IOException { // 1. 获取索引操作对象 IndicesClient indicesClient = restHighLevelClient.indices(); // 2. 创建索引对象 CreateIndexRequest request = new CreateIndexRequest("hotel");// 相当于DSL语句的 PUT hotel 请求,但是还没执行 // 3. 执行操作 CreateIndexResponse response = indicesClient.create(request, RequestOptions.DEFAULT); // 4. 获取结果 log.info(response.isAcknowledged() + ""); }
-
-
运行结果如下所示
-
Kibana验证

8.3、添加映射
-
代码如下所示
-
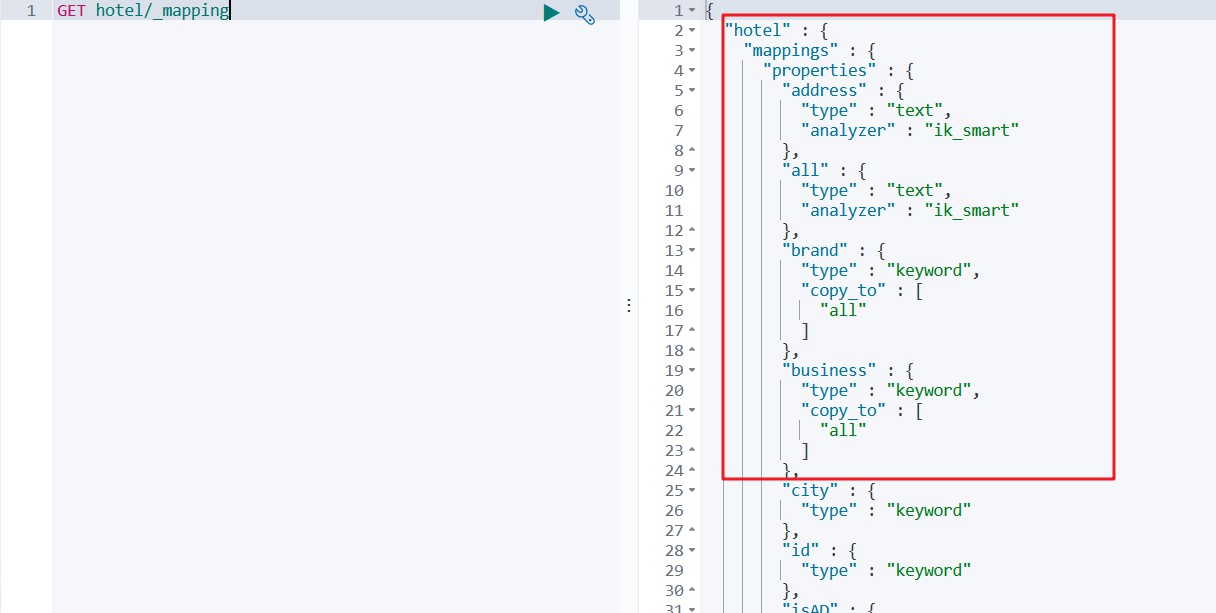
因为创建映射需要DSL语句,所以先在kibana编写如下语句
-
DELETE hotel GET hotel/_mapping # 分析hotel索引库的映射结构 # index属性:是否建立索引,默认值true,如果该字段不用查询,则设置false # copy_to: 把指定字段的值拷贝到另一个字段上 PUT hotel { "mappings": { "properties": { "id": { "type": "keyword" }, "name": { "type": "text", "analyzer": "ik_smart", "copy_to": "all" }, "address": { "type": "text", "analyzer": "ik_smart" }, "price": { "type": "integer" }, "score": { "type": "integer" }, "brand": { "type": "keyword", "copy_to": "all" }, "city": { "type": "keyword" }, "starName": { "type": "keyword" }, "business": { "type": "keyword", "copy_to": "all" }, "location": { "type": "geo_point" }, "pic": { "type": "keyword", "index": false }, "isAD": { "type": "boolean" }, "all": { "type": "text", "analyzer": "ik_smart" } } } }
-
-
创建成功后,再删除,将mappings中的字段复制到Java代码中
-
/** * 添加映射测试 */ @Test public void testAddMapping() throws IOException { // 1. 创建索引操作对象 IndicesClient indicesClient = restHighLevelClient.indices(); // 2. 创建索引 CreateIndexRequest request = new CreateIndexRequest("hotel"); // 3. 定义mapping语句 String mapping = "{\n" + " \"properties\": {\n" + " \"id\": {\n" + " \"type\": \"keyword\"\n" + " },\n" + " \"name\": {\n" + " \"type\": \"text\",\n" + " \"analyzer\": \"ik_smart\",\n" + " \"copy_to\": \"all\"\n" + " },\n" + " \"address\": {\n" + " \"type\": \"text\",\n" + " \"analyzer\": \"ik_smart\"\n" + " },\n" + " \"price\": {\n" + " \"type\": \"integer\"\n" + " },\n" + " \"score\": {\n" + " \"type\": \"integer\"\n" + " },\n" + " \"brand\": {\n" + " \"type\": \"keyword\",\n" + " \"copy_to\": \"all\"\n" + " },\n" + " \"city\": {\n" + " \"type\": \"keyword\"\n" + " },\n" + " \"starName\": {\n" + " \"type\": \"keyword\"\n" + " },\n" + " \"business\": {\n" + " \"type\": \"keyword\",\n" + " \"copy_to\": \"all\"\n" + " },\n" + " \"location\": {\n" + " \"type\": \"geo_point\"\n" + " },\n" + " \"pic\": {\n" + " \"type\": \"keyword\",\n" + " \"index\": false\n" + " },\n" + " \"isAD\": {\n" + " \"type\": \"boolean\"\n" + " },\n" + " \"all\": {\n" + " \"type\": \"text\",\n" + " \"analyzer\": \"ik_smart\"\n" + " }\n" + " }\n" + " }"; request.mapping(mapping, XContentType.JSON); // 设置mappings字段,并指定其内容为json格式 // 4. 执行操作 CreateIndexResponse response = indicesClient.create(request, RequestOptions.DEFAULT); // 5. 获取结果 log.info(response.isAcknowledged() + ""); } -
-
-
运行结果如下所示
-
Kibana验证

8.4、删除索引
-
代码如下所示
-
/** * 删除索引测试 */ @Test public void testDeleteIndex() throws IOException { // 1. 获取索引操作对象 IndicesClient indicesClient = restHighLevelClient.indices(); // 2. 获取索引对象 DeleteIndexRequest request = new DeleteIndexRequest("hotel"); // DELETE hotel // 3. 执行操作 AcknowledgedResponse response = indicesClient.delete(request, RequestOptions.DEFAULT); // 4. 获取结果 log.info("" + response.isAcknowledged()); }
-
-
比较简单,自行验证即可
8.5、添加文档
-
代码如下所示
-
/** * 添加文档测试 */ // Jackson private ObjectMapper objectMapper = new ObjectMapper(); @Test public void testAddDocument() throws IOException { // 先获取 指定的 hotel数据 Hotel hotel = hotelMapper.selectById(36934); HotelDoc hotelDoc = new HotelDoc(hotel); // 1. 创建请求对象 IndexRequest request = new IndexRequest("hotel").id(hotelDoc.getId().toString()); // 2. 填充文档内容 String json = objectMapper.writeValueAsString(hotelDoc); request.source(json, XContentType.JSON); // 3. 执行请求体对象 IndexResponse response = restHighLevelClient.index(request, RequestOptions.DEFAULT); // 4. 获取结果 log.info(response.getId() + ""); }
-
-
Kibana验证
8.6、修改、查询、删除文档
8.6.1、修改文档
修改文档和添加文档操作一样,需要注意的是修改文档必须是已经存在的ID
-
代码如下所示
-
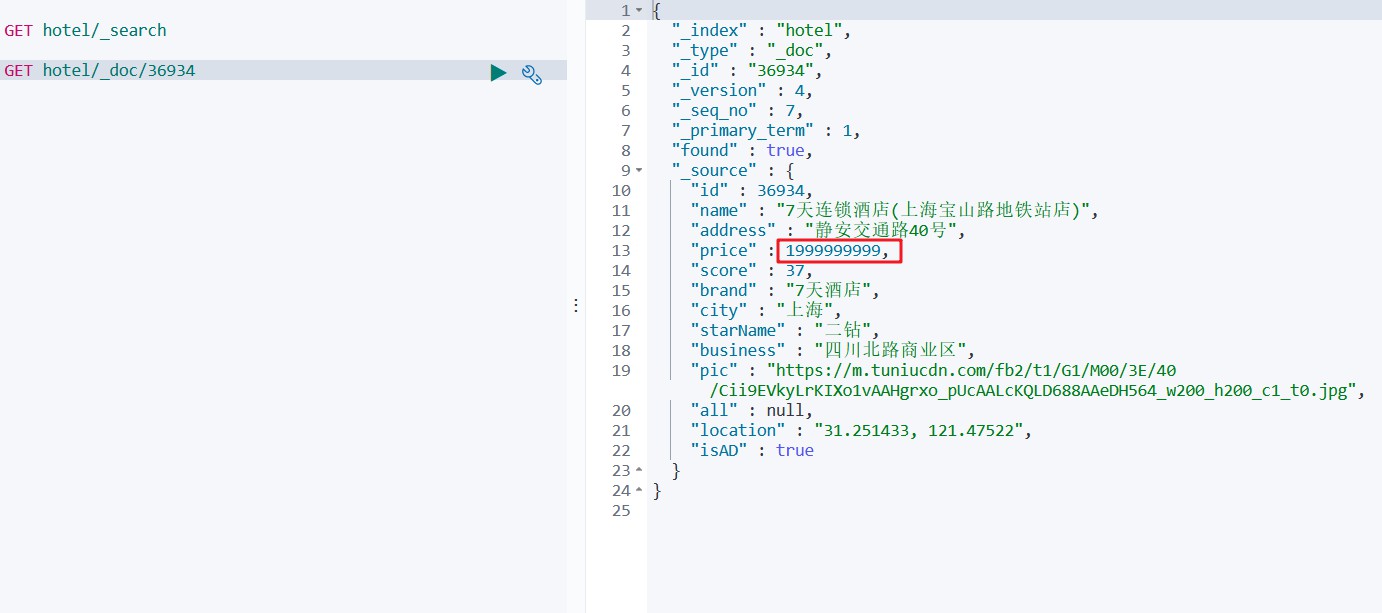
/** * 修改文档 */ @Test public void testUpdateDocument() throws IOException { // 1. 先获取 指定的 hotel 数据 Hotel hotel = hotelMapper.selectById(36934L); HotelDoc hotelDoc = new HotelDoc(hotel); // 2. 修改数据,如价格 hotelDoc.setPrice(1999999999); // 3. 将 hotelDoc 对象转换为 JSON格式的数据 String json = objectMapper.writeValueAsString(hotelDoc); // 4. 创建请求对象 IndexRequest request = new IndexRequest("hotel").id(hotelDoc.getId().toString()); request.source(json, XContentType.JSON); // 5. 执行操作 IndexResponse response = restHighLevelClient.index(request, RequestOptions.DEFAULT); log.info(response.getId()); }
-
-
Kibana验证
8.6.2、查询文档
-
代码如下所示
-
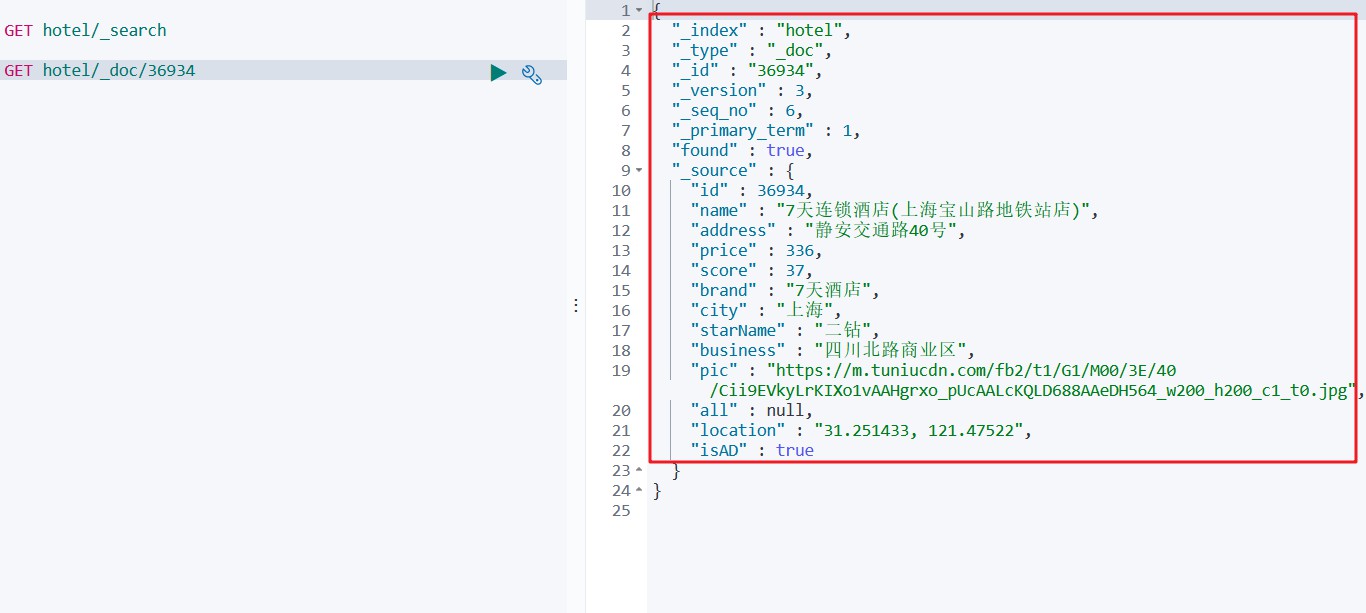
/** * 查询文档 */ @Test public void testSearchDocument() throws IOException { Long id = 36934L; // 1. 创建请求 GetRequest request = new GetRequest("hotel").id(id.toString()); // 2. 执行请求 GetResponse response = restHighLevelClient.get(request, RequestOptions.DEFAULT); // 3. 取出结果 String hotelDocJson = response.getSourceAsString(); HotelDoc hotelDoc = objectMapper.readValue(hotelDocJson, HotelDoc.class); log.info(hotelDoc.toString()); }
-
-
运行结果如下所示

8.6.3、删除文档
-
代码如下所示
-
/** * 删除文档 */ @Test public void testDeleteDocument() throws IOException { Long id = 36934L; // 1. 创建请求 DeleteRequest request = new DeleteRequest("hotel").id(id.toString()); // 2. 执行请求 DeleteResponse response = restHighLevelClient.delete(request, RequestOptions.DEFAULT); log.info(response.getId()); }
-
-
Kibana验证

8.7、批量添加
-
Bulk批量操作是将文档的增删改查一些列操作,通过一次请求全都做完。减少网络传输次数 -
应用场景
- ES索引库数据初始化的时候,可以将数据库的数据查询出来通过批量操作导入到索引库中
-
代码如下所示
-
/** * 批量添加文档 */ @Test public void testBatchAddDocument() throws IOException { // 1. 获取需要导入的数据 List<Hotel> hotelList = hotelMapper.selectList(null); if(CollectionUtils.isNotEmpty(hotelList)) { // 2. 创建批量操作请求对象 BulkRequest bulkRequest = new BulkRequest(); // 4. 获取文档映射的对象数据 for (Hotel hotel : hotelList) { HotelDoc hotelDoc = new HotelDoc(hotel); // 5. 创建请求对象 IndexRequest request = new IndexRequest("hotel").id(hotelDoc.getId().toString());; // 6. 填充内容 String json = objectMapper.writeValueAsString(hotelDoc); request.source(json, XContentType.JSON); // 7. 将数据添加到批量操作对象中 bulkRequest.add(request); } // 8. 一次性执行批量操作 BulkResponse response = restHighLevelClient.bulk(bulkRequest, RequestOptions.DEFAULT); log.info(response.status().toString()); } }
-
-
运行结果如下所示
-
Kibana验证


【推荐】国内首个AI IDE,深度理解中文开发场景,立即下载体验Trae
【推荐】编程新体验,更懂你的AI,立即体验豆包MarsCode编程助手
【推荐】抖音旗下AI助手豆包,你的智能百科全书,全免费不限次数
【推荐】轻量又高性能的 SSH 工具 IShell:AI 加持,快人一步
· DeepSeek 开源周回顾「GitHub 热点速览」
· 物流快递公司核心技术能力-地址解析分单基础技术分享
· .NET 10首个预览版发布:重大改进与新特性概览!
· AI与.NET技术实操系列(二):开始使用ML.NET
· 单线程的Redis速度为什么快?