
基于SpringBoot搭建极光推送安卓和IOS消息的Demo
一、SpringBoot环境的搭建
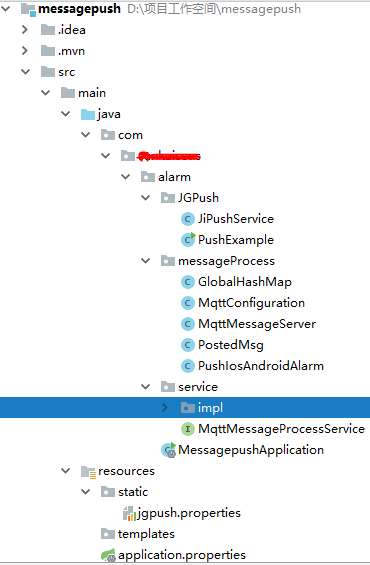
首先是使用IntelliJ IDEA创建一个SpringBoot的工程,具体怎么创建可以自行百度,项目结构如下图所示:
二、程序的处理流程和编码
程序启动和开始接收mqtt服务器的消息,然后接收之后推送给安卓或者IOS客户端等,就是一个简单的接收消息并推送的小Demo。
接收MQTT消息的代码如下:
   private static Logger logger = LoggerFactory.getLogger(MqttMessageServer.class);
    private static MqttClient mqttClient = null;
    private static int allQos = 2;
    private  MemoryPersistence persistence = new MemoryPersistence();

      private final BlockingQueue<PostedMsg> messageQueue = new LinkedBlockingQueue<PostedMsg>();

      @Resource
      private MqttConfiguration mqttConfiguration;
      @Resource
    private MqttMessageProcessService mqttMessageProcessService;

      @Override
      public void run(ApplicationArguments args) throws Exception {
        String clientUrl = mqttConfiguration.getClientUrl();
        String clientTopic = mqttConfiguration.getClientTopic();
        String clientId = mqttConfiguration.getClientId();
        //初始化参数
        MqttConnectOptions connOpts = new MqttConnectOptions();
        connOpts.setCleanSession(true);
        connOpts.setConnectionTimeout(30);
        connOpts.setKeepAliveInterval(60);
        connOpts.setAutomaticReconnect(true);
        try {
            mqttClient = new MqttClient(clientUrl, clientId, persistence);
            mqttClient.setCallback(new MqttCallbackExtended() {
                @Override
                public void connectComplete(boolean arg0, String arg1) {
                    //订阅主题
                    subscribeInformation(mqttClient,clientTopic, allQos);
                    logger.info(">>>>>>>>订阅所有主题成功>>>>>>>>");
                }

                @Override
                public void connectionLost(Throwable throwable) {
                    logger.info(">>>>>>>>MQTT服务器失去连接!!!>>>>>>>>");
                }

                @Override
                public void messageArrived(String topic, MqttMessage mqttMessage) throws Exception {
                    System.err.println("========================");
                    logger.info(">>>>>>>>接收到MQTT推送的消息:" + topic);
                    logger.info(">>>>>>>>接收到MQTT推送的消息内容:" + new String(mqttMessage.getPayload(), 0, mqttMessage.getPayload().length,"UTF-8"));
                    PostedMsg postedMsg = new PostedMsg(mqttMessage,topic);
                    messageQueue.offer(postedMsg);
                }

                @Override
                public void deliveryComplete(IMqttDeliveryToken iMqttDeliveryToken) {
                    logger.info("deliveryComplete:" + iMqttDeliveryToken.getMessageId());
                }
            });
            mqttClient.connect(connOpts);
            logger.info(">>>>>>>>连接MQTT服务器成功!!!,连接信息:"+clientUrl);

            Executors.newSingleThreadExecutor().execute(new Runnable() {
                @Override
                public void run() {
                    while (true) {
                        try {
                            PostedMsg msg = (PostedMsg) messageQueue.take();
                            if (msg != null) {
                                MqttMessage mqttMessage = (MqttMessage) msg.getMsg();
                                String strRevMsg = null;
                                try {
                                    strRevMsg = new String(mqttMessage.getPayload(), 0, mqttMessage.getPayload().length,"UTF-8");
                                } catch (UnsupportedEncodingException e) {
                                    e.printStackTrace();
                                }
                                mqttMessageProcessService.processMqttMsg(msg.getTopic(), strRevMsg);
                            }
                        } catch (Exception e) {
                            e.printStackTrace();
                        }
                    }
                }
            });
            //缓存MqttClient实例在Map中
            GlobalHashMap.mqttClientMap.put("mqttClient", mqttClient);
        } catch (MqttException e) {
            e.printStackTrace();
        }
    }

    private void subscribeInformation(MqttClient mqttClient,String allTopics,int allQos) {
        try {
            mqttClient.subscribe(allTopics, allQos);
        } catch (MqttException e) {
            e.printStackTrace();
        }
    }

    /**
     * PUSH消息MQTT
     */
    public void sendMqttMessage(String content, int qos, String topic) {
        try {
            MqttMessage message = new MqttMessage(content.getBytes("UTF-8"));
            message.setQos(qos);
            message.setRetained(false);
            mqttClient.publish(topic, message);
        } catch (Exception e) {
            e.printStackTrace();
        }
    }
接下来就是怎么处理推送到极光服务器的问题了
这里我贴出一篇写了如何使用极光推送的文章,可以参考看看:https://blog.csdn.net/qq_35860097/article/details/75117323
然后就是我写的极光推送的工具类,需要引入的maven依赖可以查看官方文档。文档地址:https://docs.jiguang.cn/jpush/server/push/rest_api_v3_push/
代码如下:
  /**
     * 向所有平台所有用户推送消息
     */
    public static PushPayload buildPushObject_android_and_ios(String notification_title, String msg_title,
            String msg_content) {
        logger.info(">>>>>>>>向所有平台所有用户推送消息中>>>>>>>>");
        return PushPayload.newBuilder()
                .setPlatform(Platform.android_ios())
                .setAudience(Audience.all())
                .setNotification(
                    Notification.newBuilder()
                    .setAlert(notification_title)
                    .addPlatformNotification(
                        AndroidNotification.newBuilder()
                        .setAlert(msg_content)
                        .setTitle(notification_title)
                        // 此字段为透传字段,不会显示在通知栏。用户可以通过此字段来做一些定制需求,如特定的key传要指定跳转的页面(value)
                        .build())
                    .addPlatformNotification(
                        IosNotification.newBuilder()
                        // 传一个IosAlert对象,指定apns title、title、subtitle等
                        .setAlert(notification_title)
                        // 直接传alert
                        // 此项是指定此推送的badge自动加1
                        .incrBadge(1)
                        // 此字段的值default表示系统默认声音;传sound.caf表示此推送以项目里面打包的sound.caf声音来提醒,
                        // 如果系统没有此音频则以系统默认声音提醒;此字段如果传空字符串,iOS9及以上的系统是无声音提醒,以下的系统是默认声音
                        .setSound("default")
                        // 此项说明此推送是一个background推送,想了解background看:http://docs.jpush.io/client/ios_tutorials/#ios-7-background-remote-notification
                        // .setContentAvailable(true)
                        .build())
                    .build())
                // Platform指定了哪些平台就会像指定平台中符合推送条件的设备进行推送。 jpush的自定义消息,
                // sdk默认不做任何处理,不会有通知提示。建议看文档http://docs.jpush.io/guideline/faq/的
                // [通知与自定义消息有什么区别?]了解通知和自定义消息的区别
                .setMessage(Message.newBuilder().setMsgContent(msg_content).setTitle(msg_title).build())
                .setOptions(Options.newBuilder()
                    // 此字段的值是用来指定本推送要推送的apns环境,false表示开发,true表示生产;对android和自定义消息无意义
                    .setApnsProduction(ApnsProduction)
                    // 此字段是给开发者自己给推送编号,方便推送者分辨推送记录
                    .setSendno(1)
                    // 此字段的值是用来指定本推送的离线保存时长,如果不传此字段则默认保存一天,最多指定保留十天,单位为秒
                    .setTimeToLive(86400).build())
                .build();
    }
到此,极光推送的小Demo基本上就算完成了,最近也是比较忙,等想到写什么的时候再更新下一篇博客吧。。。

 浙公网安备 33010602011771号