
JS逆向—RSA逆向分析
JS逆向—RSA逆向分析
一. 分析思路
- 抓包分析定位关键字段
- 逆向分析找到加密函数和参数实现
- 编写脚本模拟发包实现
二. 具体实现
1. 抓包分析
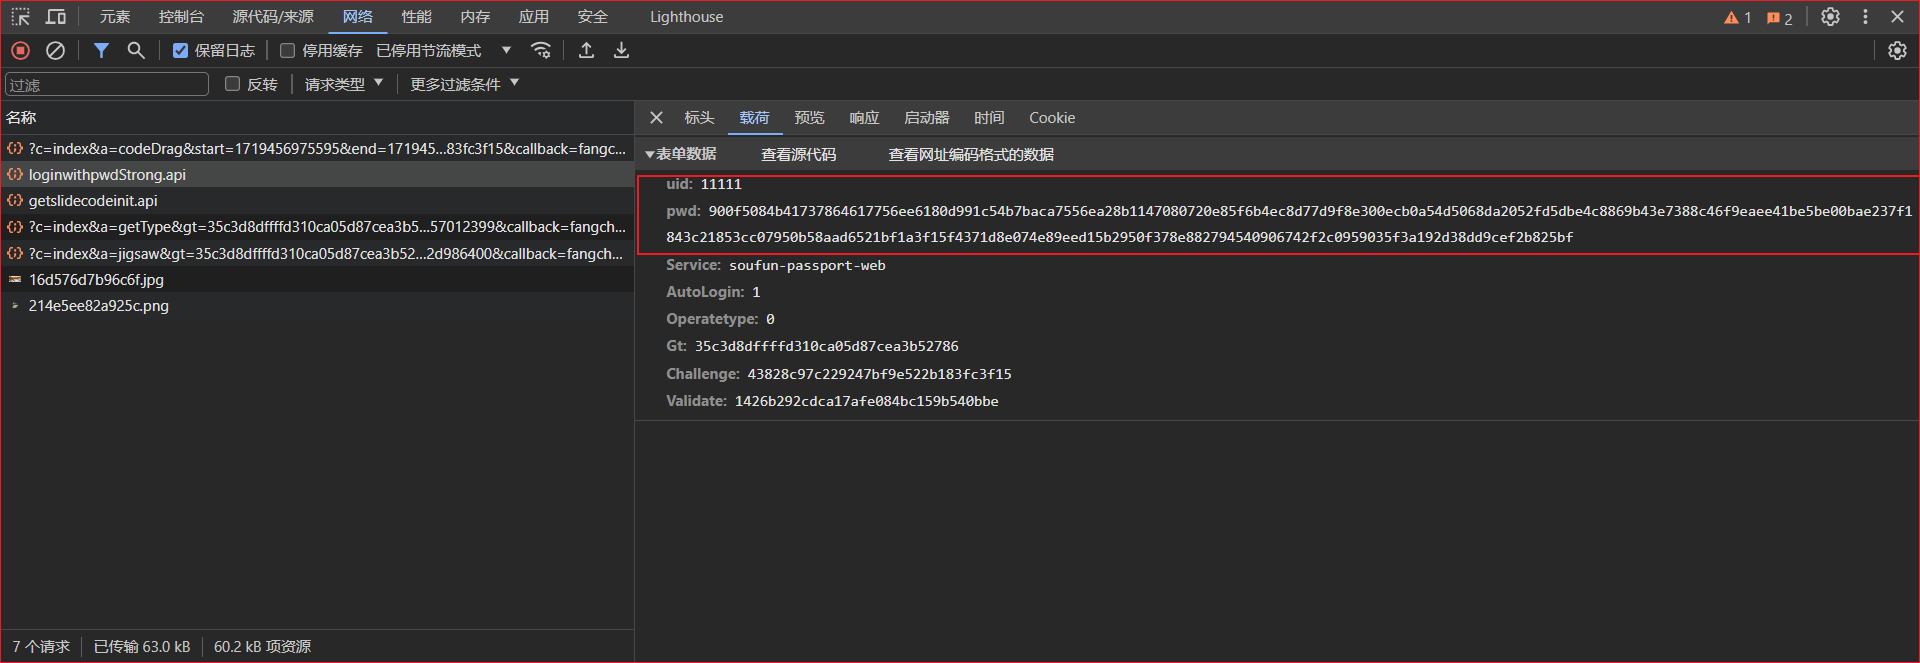
得到关键字段uid和pwd,其中uid为用户名,pwd为加密编码后的结果
2. 加密代码逆向
搜索pwd得到关键的ajax代码
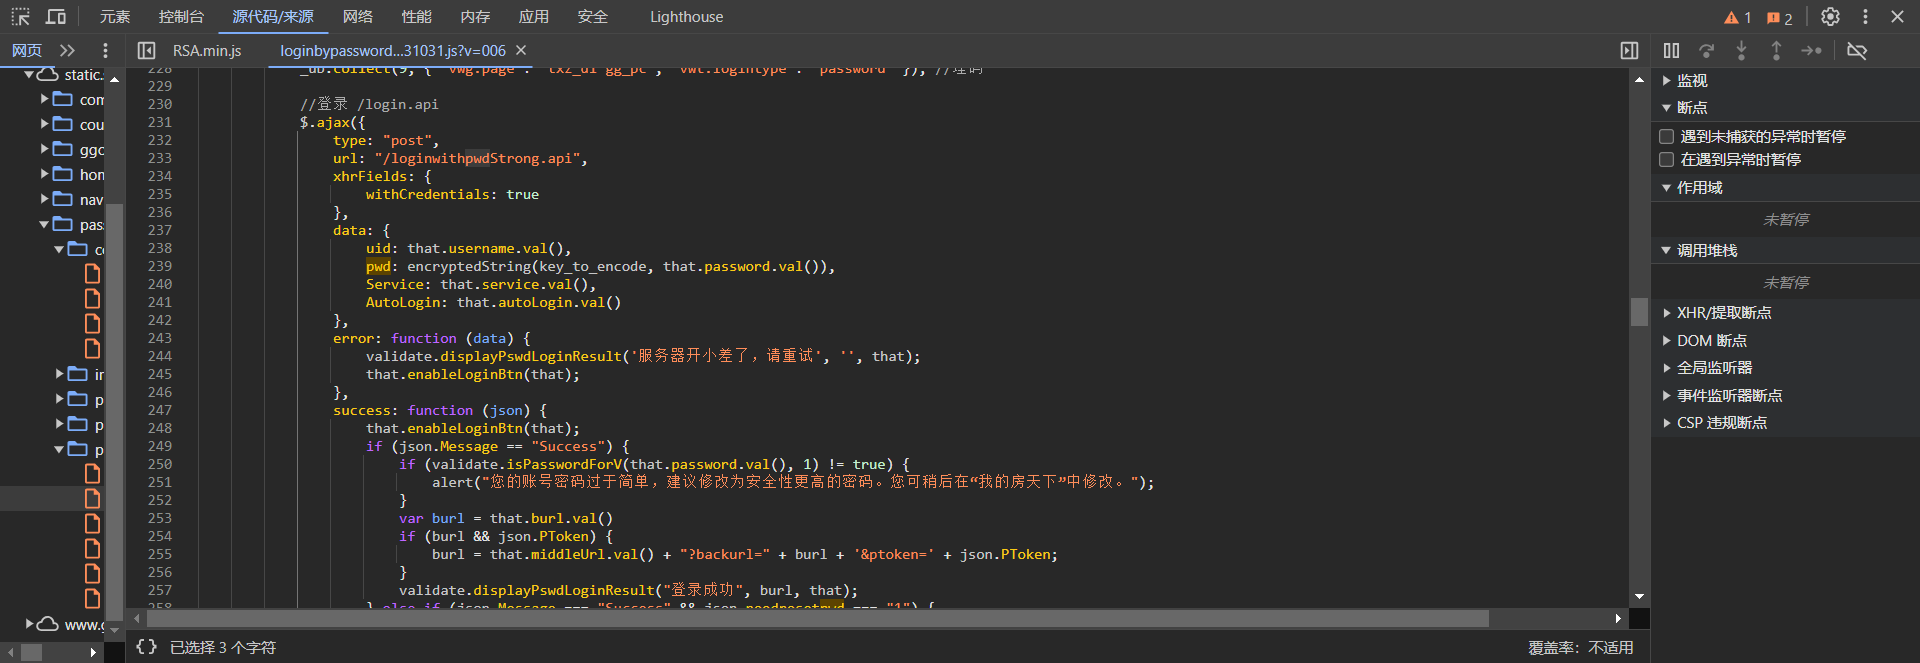
找到关键函数encryptedString和参数key_to_encode,password.val(),其中password.val()为输入的密码明文,key_to_encode是随机产生的参数。
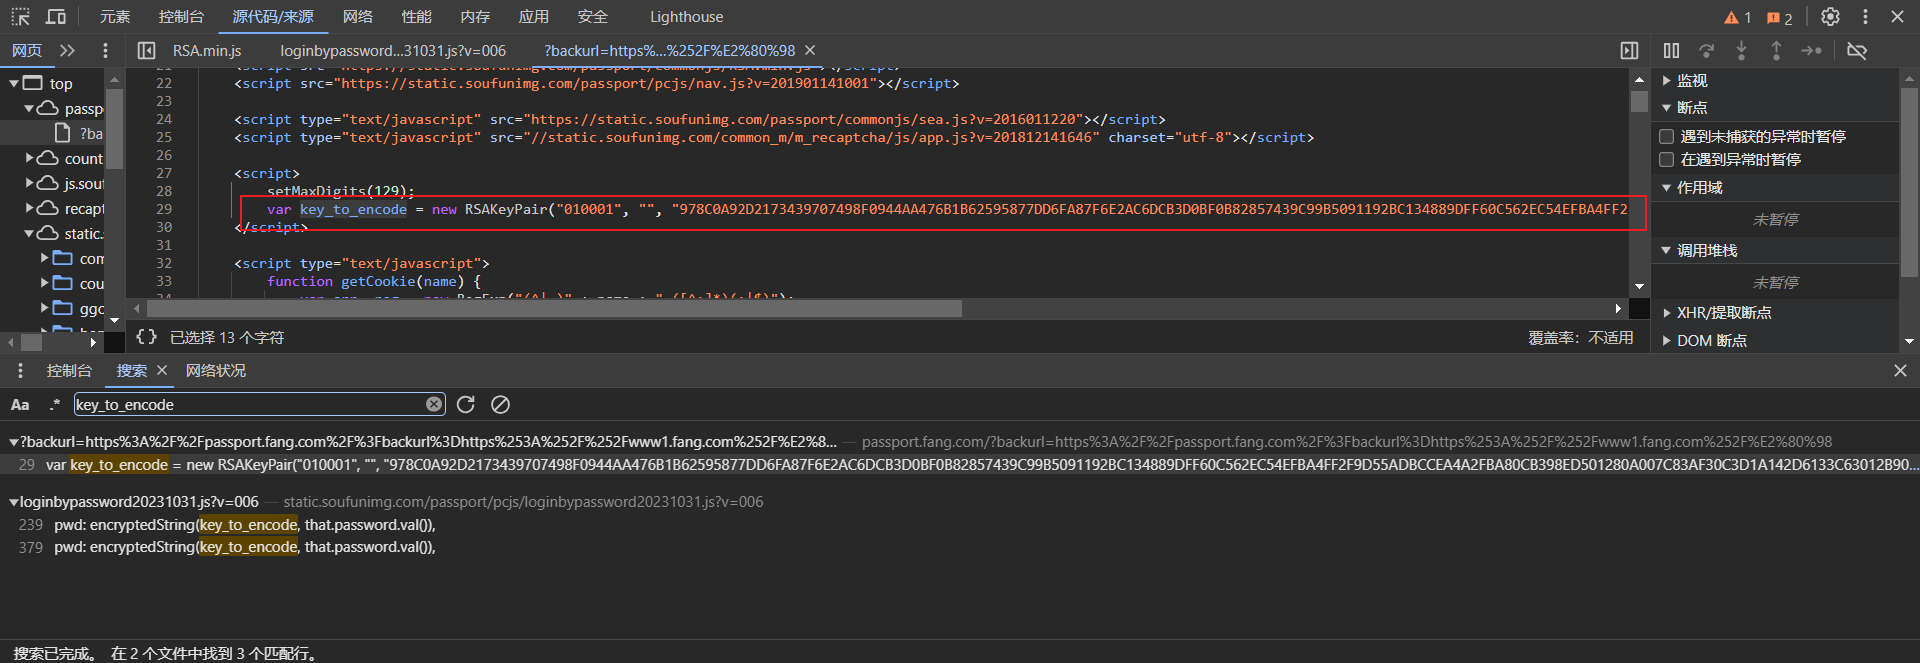
在源码当中定位得到key_to_encode的生成,使用js脚本生成,显然是RSA加密
继续跟踪定位得到encryptedString函数,是用了一个RSA库实现,非常清晰。
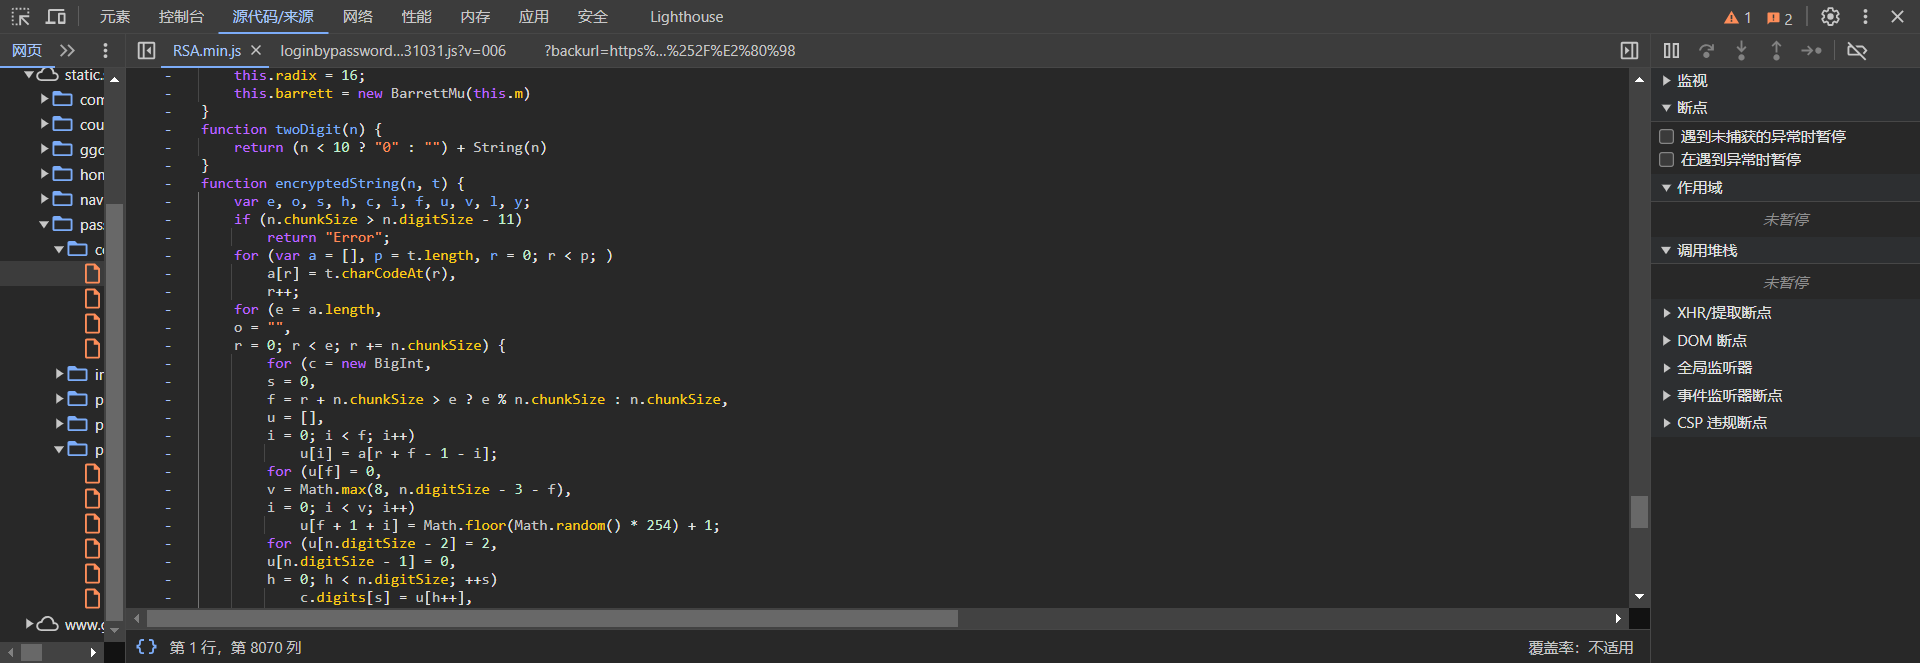
至此,加密算法逆向分析结束。
三. python模拟
1. 加密算法模拟
from Crypto.PublicKey import RSA
from Crypto.Cipher import PKCS1_OAEP
from Crypto.Util.number import bytes_to_long, long_to_bytes

# 假设的公钥组件
n_hex = "978C0A92D2173439707498F0944AA476B1B62595877DD6FA87F6E2AC6DCB3D0BF0B82857439C99B5091192BC134889DFF60C562EC54EFBA4FF2F9D55ADBCCEA4A2FBA80CB398ED501280A007C83AF30C3D1A142D6133C63012B90AB26AC60C898FB66EDC3192C3EC4FF66925A64003B72496099F4F09A9FB72A2CF9E4D770C41"
e = 65537  # 常见的RSA指数值

# 从十六进制字符串转换模数n到整数
n = int(n_hex, 16)

# 创建一个RSA公钥对象
rsa_key = RSA.construct((n, e))

# 加密函数
def encrypt_string(key, password):
    cipher = PKCS1_OAEP.new(key)  # 使用OAEP填充
    encrypted_bytes = cipher.encrypt(password.encode('utf-8'))  # 加密字符串
    return encrypted_bytes.hex()  # 返回加密后的十六进制字符串

# 假设password是待加密的字符串
password = "1234567"
encrypted = encrypt_string(rsa_key.publickey(), password)
print(f"Encrypted: {encrypted}")
2. 模拟登录
from Crypto.PublicKey import RSA
from Crypto.Cipher import PKCS1_OAEP
from Crypto.Util.number import bytes_to_long, long_to_bytes
import requests

# 假设的公钥组件
n_hex = "978C0A92D2173439707498F0944AA476B1B62595877DD6FA87F6E2AC6DCB3D0BF0B82857439C99B5091192BC134889DFF60C562EC54EFBA4FF2F9D55ADBCCEA4A2FBA80CB398ED501280A007C83AF30C3D1A142D6133C63012B90AB26AC60C898FB66EDC3192C3EC4FF66925A64003B72496099F4F09A9FB72A2CF9E4D770C41"
e = 65537  # 常见的RSA指数值

# 从十六进制字符串转换模数n到整数
n = int(n_hex, 16)

# 创建一个RSA公钥对象
rsa_key = RSA.construct((n, e))

# 加密函数
def encrypt_string(key, password):
    cipher = PKCS1_OAEP.new(key)  # 使用OAEP填充
    encrypted_bytes = cipher.encrypt(password.encode('utf-8'))  # 加密字符串
    return encrypted_bytes.hex()  # 返回加密后的十六进制字符串

# 假设password是待加密的字符串
password = "1234567"
pwd = encrypt_string(rsa_key.publickey(), password)

# 构造请求头
headers = {
    'Host': 'passport.fang.com',
    'Cookie': 'g_sourcepage=txz_dl%5Egg_pc; global_cookie=o8zi3zwj7kyir93uvavm8vi8m1rlxwnyfoe; unique_cookie=U_o8zi3zwj7kyir93uvavm8vi8m1rlxwnyfoe*4; otherid=ddc7e676246bbe8e0a58210fd7d61042; token=903c85d9c3f4445192b474395a826940; __utma=147393320.1125698195.1719456429.1719456429.1719459272.2; __utmc=147393320; __utmz=147393320.1719456429.1.1.utmcsr=www1.fang.com|utmccn=(referral)|utmcmd=referral|utmcct=/; __utmb=147393320.2.10.1719459272; __utmt_t0=1; __utmt_t1=1',
    'User-Agent': 'Mozilla/5.0 (Windows NT 10.0; Win64; x64; rv:127.0) Gecko/20100101 Firefox/127.0',
    'Accept': '*/*',
    'Accept-Language': 'zh-CN,zh;q=0.8,zh-TW;q=0.7,zh-HK;q=0.5,en-US;q=0.3,en;q=0.2',
    'Accept-Encoding': 'gzip, deflate',
    'Content-Type': 'application/x-www-form-urlencoded; charset=UTF-8',
    'X-Requested-With': 'XMLHttpRequest',
    'Origin': 'https://passport.fang.com',
    'Referer': 'https://passport.fang.com/?backurl=https%3A%2F%2Fpassport.fang.com%2F%3Fbackurl%3Dhttps%253A%252F%252Fwww1.fang.com%252F%E2%80%98',
    'Sec-Fetch-Dest': 'empty',
    'Sec-Fetch-Mode': 'cors',
    'Sec-Fetch-Site': 'same-origin',
    'Priority': 'u=1',
    'Te': 'trailers',
    # 注意:'Connection': 'close' 通常在requests库中不需要显式设置,因为requests会处理连接
}
uid = '121212'
data = {
    'uid': '121212',
    'pwd': '7111ead865ca918a83ffe93a925caf04064b549f4f9429945100b5c526e06db058ef0b7f58bce0b7ca14ea63bc9bbc601982d629fa63d2fad3c6b05648773ca609a9afba73dcac019004fa0746886948671d93d9aa3df078d771e9f689855e26d53199c6330f35d871cf7057aab28e25221d809272ab25e071242378e907ba91',
    'Service': 'soufun-passport-web',
    'AutoLogin': '1'
}

# 发送POST请求
response = requests.post(
    'https://passport.fang.com/loginwithpwdStrong.api',
    headers=headers,
    data=data
)

# 打印响应内容
print(response.text)
由于使用了验证码进行反爬,因此需要进一步分析验证码的破解,不在这里进行详细说明。
本文作者:ONE_ZJ
本文链接:https://www.cnblogs.com/ONEZJ/p/18271113/js-reverse----rsa-reverse-analysis-z2pxfem
版权声明:本作品采用知识共享署名-非商业性使用-禁止演绎 2.5 中国大陆许可协议进行许可。


【推荐】国内首个AI IDE,深度理解中文开发场景,立即下载体验Trae
【推荐】编程新体验,更懂你的AI,立即体验豆包MarsCode编程助手
【推荐】抖音旗下AI助手豆包,你的智能百科全书,全免费不限次数
【推荐】轻量又高性能的 SSH 工具 IShell:AI 加持,快人一步