Angular10 组件之间的通讯
1 父组件和子组件之间的通讯
2 利用中间组件实现两个组件之间的通讯
3 利用服务实现两个组件之间的通讯
2017年8月26日20:09:13
待更新...
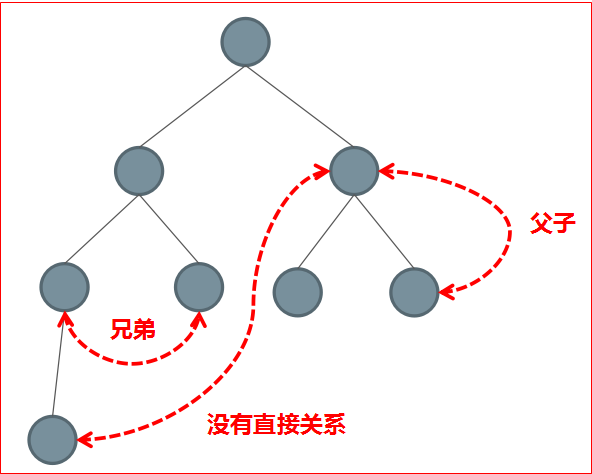
1 组件之间的关系图
1.1 父子关系
1.2 兄弟关系
1.3 没啥关系
2 组件之间有以下几种典型的通讯方案
2.1 直接父子关系
2.1.1 父组件直接访问子组件的 public 属性和方法
技巧01:父组件的视图中调用子组件的方法需要利用模板变量
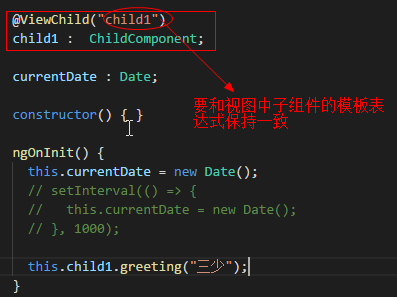
技巧02:父组件的类中调用子组件的方法需利用@ViewChild装饰器
2.1.2 借助于 @Input 和 @Output 进行通讯
就是利用输入属性和输出属性来实现
技巧01:输入属性和输出属性需要用到属性绑定和事件绑定相关的知识
2.2 兄弟关系
利用他们共同的父组件进行通信【有点麻烦】
技巧01:此时他们的父组件相当于一个中间人
2.3 适用于任何关系的方法
2.3.1 借助于service单例进行通讯
2.3.2 利用cookie或者localstorage进行通讯
2.3.3 利用session进行通讯
3 直接调用
对于父子组件而言,父组件可以直接调用子组件的public型属性和方法
缺点:如果父组件直接访问子组件,那么两个组件之间的关系就被固定死了。父子两个组件紧密依赖,谁也离不开谁,也就都不能单独使用了。所以,除非你知道自己在做什么,最好不要直接在父组件里面直接访问子组件上的属性和方法,以免未来一改一大片。
3.1 利用模板变量实现

3.2 利用@ViewChild实现

3.3 代码汇总
》父组件

<div class="panel panel-primary">
  <div class="panel-heading">父组件</div>
  <div class="panel-body">
    <child #child1 ></child>
    <p>
      <label>获取子组件的info属性值为:</label>
      <span>{{child1.info}}</span>
    </p>
    <p>
      <button (click)="child1.greeting('王杨帅');">调用子组件的greeting方法</button>
    </p>
  </div>
  <div class="panel-footer">{{currentDate | date : "yyyy-MM-dd HH:mm:ss"}}</div>
</div>

import { Component, OnInit, ViewChild } from '@angular/core';
import { ChildComponent } from './child/child.component';
import { AfterViewInit, AfterContentChecked, AfterContentInit, AfterViewChecked } from '@angular/core/src/metadata/lifecycle_hooks';

@Component({
  selector: 'parent',
  templateUrl: './parent.component.html',
  styleUrls: ['./parent.component.scss']
})
export class ParentComponent implements OnInit {

  @ViewChild("child1")
  child1 :  ChildComponent;

  currentDate : Date;

  constructor() { }

  ngOnInit() {
    this.currentDate = new Date();
    // setInterval(() => {
    //   this.currentDate = new Date();
    // }, 1000);

    this.child1.greeting("三少");
  }

}
》子组件

<div class="panel panel-primary">
  <div class="panel-heading">子组件</div>
  <div class="panel-body">

  </div>
  <div class="panel-footer">{{currentDate | date : "yyyy-MM-dd HH:mm:ss"}}</div>
</div>

import { Component, OnInit, DoCheck,AfterViewChecked, EventEmitter, AfterContentInit, Output, Input, OnChanges, SimpleChanges, AfterViewInit, AfterContentChecked } from '@angular/core';

@Component({
  selector: 'child',
  templateUrl: './child.component.html',
  styleUrls: ['./child.component.scss']
})
export class ChildComponent implements OnInit {

  currentDate : Date;

  info : string;

  constructor() { }

  ngOnInit() {
    this.info = "子组件中的info属性";
    this.currentDate = new Date();
    // setInterval(() => {
    //   this.currentDate = new Date();
    // }, 1000);
  }

  greeting(name : string) : void {
    alert("子组件中greeting方法的返回值: Helo " + name);
    console.log("子组件中greeting方法的返回值: Helo " + name);
  }

}
4 @Input 和 @Output
就是通过属性绑定来实现父组件向子组件的输入属性船值;通过事件绑定来实现子组件向父组件传值
技巧01:其实可以直接利用双向绑定来实现
4.1 父组件向子组件传值
子组件利用@Input定义一个输入属性,父组件视图中在子组件的标签上利用属性绑定来实现
4.2 子组件向父组件传值
子组件利用@Output定义一个输出属性,父组件视图中在子组件标签上利用事件来实现
4.3 代码汇总
》父组件

<div class="panel panel-primary">
  <div class="panel-heading">父组件</div>
  <div class="panel-body">

    <!-- 这三种写法都可以实现 -->
    <!-- <child [info]="parentInfo" (infoChange)="onInfoChange($event)" ></child> -->
    <!-- <child [info]="parentInfo" (infoChange)="parentInfo=$event" ></child>   -->
    <child [(info)]="parentInfo" ></child>

    <p>
      {{parentInfo}}
    </p>
  </div>
  <div class="panel-footer">{{currentDate | date : "yyyy-MM-dd HH:mm:ss"}}</div>
</div>

import { Component, OnInit, ViewChild } from '@angular/core';
import { ChildComponent } from './child/child.component';
import { AfterViewInit, AfterContentChecked, AfterContentInit, AfterViewChecked } from '@angular/core/src/metadata/lifecycle_hooks';

@Component({
  selector: 'parent',
  templateUrl: './parent.component.html',
  styleUrls: ['./parent.component.scss']
})
export class ParentComponent implements OnInit {

  parentInfo : string;

  currentDate : Date;

  constructor() { }

  ngOnInit() {
    this.parentInfo = "王杨帅";
    this.currentDate = new Date();
    // setInterval(() => {
    //   this.currentDate = new Date();
    // }, 1000);
  }

  onInfoChange(info : string) {
    this.parentInfo = info;
  }

}
》子组件

<div class="panel panel-primary">
  <div class="panel-heading">子组件</div>
  <div class="panel-body">
    <p>
      输入属性info的值为:{{info}}
    </p>
    <p>
      <button (click)="onTest()" >点击向父组件发送数据</button>
    </p>
  </div>
  <div class="panel-footer">{{currentDate | date : "yyyy-MM-dd HH:mm:ss"}}</div>
</div>

import { Component, OnInit, DoCheck,AfterViewChecked, EventEmitter, AfterContentInit, Output, Input, OnChanges, SimpleChanges, AfterViewInit, AfterContentChecked } from '@angular/core';

@Component({
  selector: 'child',
  templateUrl: './child.component.html',
  styleUrls: ['./child.component.scss']
})
export class ChildComponent implements OnInit {

  currentDate : Date;

  @Input()
  info : string;

  @Output()
  infoChange : EventEmitter<string> = new EventEmitter();

  constructor() { }

  ngOnInit() {
    this.currentDate = new Date();
    // setInterval(() => {
    //   this.currentDate = new Date();
    // }, 1000);
  }

  onTest() : void {
    this.infoChange.emit("子组件传过来的数据");
  }


}
5 服务实现
待更新...
6 cookie或localstorage实现
6.1 原理图

6.2 代码汇总
》工具组件
利用投影来简化代码

<div class="panel panel-primary">
  <div class="panel-heading">
    <ng-content select=".heading"></ng-content>
  </div>
  <div class="panel-body">
    <ng-content select=".body"></ng-content>
  </div>
  <div class="panel-footer">
    {{currentDate | date : "yyyy-MM-dd HH:mm:ss"}}
  </div>
</div>

import { Component, OnInit } from '@angular/core';
import { setInterval } from 'timers';

@Component({
  selector: 'panel',
  templateUrl: './panel.component.html',
  styleUrls: ['./panel.component.scss']
})
export class PanelComponent implements OnInit {

  currentDate : Date;

  constructor() { }

  ngOnInit() {
    this.currentDate = new Date();
    setInterval(() => {
      this.currentDate = new Date();
    }, 1000);
  }

}
》测试组件01

<panel>
  <div class="heading">
    测试组件01
  </div>
  <div class="body">
    <button (click)="onClick()">写入数据到</button>
  </div>
</panel>

import { Component, OnInit } from '@angular/core';
import { TestService } from '../services/test.service';

@Component({
  selector: 'test01',
  templateUrl: './test01.component.html',
  styleUrls: ['./test01.component.scss']
})
export class Test01Component implements OnInit {


  constructor(
  ) { }

  ngOnInit() {
  }

  onClick() : void {
    // 将对象转化成JSON字符串并存储道浏览器缓存中
    window.localStorage.setItem("user", JSON.stringify({name: "王杨帅", age: 9}));
  }

}
》测试组件02

<panel>
  <div class="heading">
    测试组件02
  </div>
  <div class="body">
    <p>
      <button (click)="onClick()">获取数据</button>
    </p>
  </div>
</panel>

import { Component, OnInit } from '@angular/core';
import { TestService } from '../services/test.service';

@Component({
  selector: 'test02',
  templateUrl: './test02.component.html',
  styleUrls: ['./test02.component.scss']
})
export class Test02Component implements OnInit {

  constructor(
  ) { }

  ngOnInit() {
  }

  onClick() : void {
    // 从浏览器缓存中获取数据【PS: 获取到的是string类型的数据】
    let data = localStorage.getItem("user");
    console.log(data);

    // 将JSON字符串转化成对象
    let json_data = JSON.parse(data);

    console.log(json_data.name);
    window.localStorage.removeItem("user");
  }

}
7 session实现
待更新...


 浙公网安备 33010602011771号