1-Elasticsearch - filebeat安装
about
centos7.9 + elasticsearch-6.8.15 + kibana-6.8.15 + filebeat-6.8.15 + elasticserach-head-chrome
https://www.elastic.co/cn/beats/filebeat
https://www.elastic.co/guide/en/beats/filebeat/6.8/filebeat-overview.html
https://www.cnblogs.com/zsql/p/13137833.html
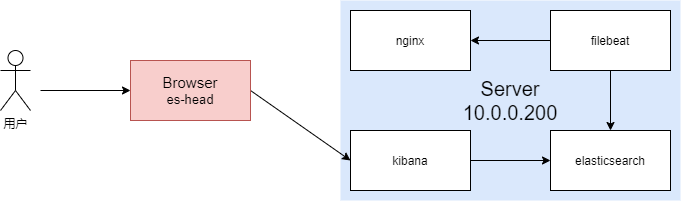
简单来说,filebeat是Bests中的一员,专门用于收集指定文件或位置的文本类型的收集工具。
它将收集的内容发送到指定es服务器进行存储,后续我们可以通过kibana对这些数据进行分析。
install filebeat
一些准备
首先,保证es和kibana以及elasticsearch-head都已经配置好了。
elasticsearch安装:https://www.cnblogs.com/Neeo/articles/10368280.html#rpm
elasticsearch-head:https://www.cnblogs.com/Neeo/articles/9146695.html#chrome
kibana安装:https://www.cnblogs.com/Neeo/articles/10623632.html#rpm
然后nginx也配置好,并且压测一下, 搞点数据,供后续filebeat收集用。
[root@cs tmp]# yum install nginx httpd-tools -y
[root@cs tmp]# nginx -t
nginx: the configuration file /etc/nginx/nginx.conf syntax is ok
nginx: configuration file /etc/nginx/nginx.conf test is successful


# 推荐使用systemctl来管理nginx
[root@cs tmp]# systemctl start nginx
[root@cs tmp]# lsof -i:80
COMMAND  PID  USER   FD   TYPE DEVICE SIZE/OFF NODE NAME
nginx   6225  root    6u  IPv4  55686      0t0  TCP *:http (LISTEN)
nginx   6225  root    7u  IPv6  55687      0t0  TCP *:http (LISTEN)
nginx   6226 nginx    6u  IPv4  55686      0t0  TCP *:http (LISTEN)
nginx   6226 nginx    7u  IPv6  55687      0t0  TCP *:http (LISTEN)
nginx   6227 nginx    6u  IPv4  55686      0t0  TCP *:http (LISTEN)
nginx   6227 nginx    7u  IPv6  55687      0t0  TCP *:http (LISTEN)
nginx   6228 nginx    6u  IPv4  55686      0t0  TCP *:http (LISTEN)
nginx   6228 nginx    7u  IPv6  55687      0t0  TCP *:http (LISTEN)
nginx   6229 nginx    6u  IPv4  55686      0t0  TCP *:http (LISTEN)
nginx   6229 nginx    7u  IPv6  55687      0t0  TCP *:http (LISTEN)
其他:
/var/log/nginx/access.log       # nginx的日志位置
/var/log/nginx/error.log        # nginx错误日志
/usr/share/nginx/               # nginx安装目录

# 压测,生成一些数据, -n表示访问多少次;-c表示多少个并发,注意,路径最后一定跟/
ab -n 100 -c 10 http://10.0.0.200/
安装filebeat
[root@cs tmp]# wget https://artifacts.elastic.co/downloads/beats/filebeat/filebeat-6.8.15-x86_64.rpm
[root@cs tmp]# rpm -ivh filebeat-6.8.15-x86_64.rpm

[root@cs tmp]# rpm -qc filebeat
/etc/filebeat/filebeat.yml                            # filebeat 主配置文件
/etc/filebeat/modules.d/apache2.yml.disabled
/etc/filebeat/modules.d/auditd.yml.disabled
/etc/filebeat/modules.d/elasticsearch.yml.disabled
/etc/filebeat/modules.d/haproxy.yml.disabled
/etc/filebeat/modules.d/icinga.yml.disabled
/etc/filebeat/modules.d/iis.yml.disabled
/etc/filebeat/modules.d/iptables.yml.disabled
/etc/filebeat/modules.d/kafka.yml.disabled
/etc/filebeat/modules.d/kibana.yml.disabled
/etc/filebeat/modules.d/logstash.yml.disabled
/etc/filebeat/modules.d/mongodb.yml.disabled
/etc/filebeat/modules.d/mysql.yml.disabled
/etc/filebeat/modules.d/nginx.yml.disabled
/etc/filebeat/modules.d/osquery.yml.disabled
/etc/filebeat/modules.d/postgresql.yml.disabled
/etc/filebeat/modules.d/redis.yml.disabled
/etc/filebeat/modules.d/suricata.yml.disabled
/etc/filebeat/modules.d/system.yml.disabled
/etc/filebeat/modules.d/traefik.yml.disabled
启动和配置都完事了,接下来,我们通过一个简单示例体验下filebeat的基本使用。
filebeat简单收集nginx日志
一台服务器上演示filebeat收集nginx日志
首先再次确认相关文件位置:
/var/log/nginx/access.log  # nginx 日志文件
/etc/filebeat/filebeat.yml  # filebeat 主配置文件
然后,我们编辑filebeat的配置文件:
filebeat.inputs:

- type: log
  # 打开日志收集功能
  enabled: true
  # 要收集的日志路径
  paths:
    - /var/log/nginx/access.log

output.elasticsearch:
  # 输出到指定es
  hosts: ["10.0.0.200:9200"]
简单的收集nginx日志,就这些配置,其他保持默认即可,注意yml文件的格式啊。
然后启动filebeat:
# 此时我的filebeat配置
[root@cs tmp]# egrep -v "#|^$" /etc/filebeat/filebeat.yml
filebeat.inputs:
- type: log
  enabled: true
  paths:
    - /var/log/nginx/access.log
filebeat.config.modules:
  path: ${path.config}/modules.d/*.yml
  reload.enabled: false
setup.template.settings:
  index.number_of_shards: 3
setup.kibana:
output.elasticsearch:
  hosts: ["10.0.0.200:9200"]
processors:
  - add_host_metadata: ~
  - add_cloud_metadata: ~

[root@cs tmp]# systemctl start filebeat
[root@cs tmp]# tail -f /var/log/filebeat/filebeat
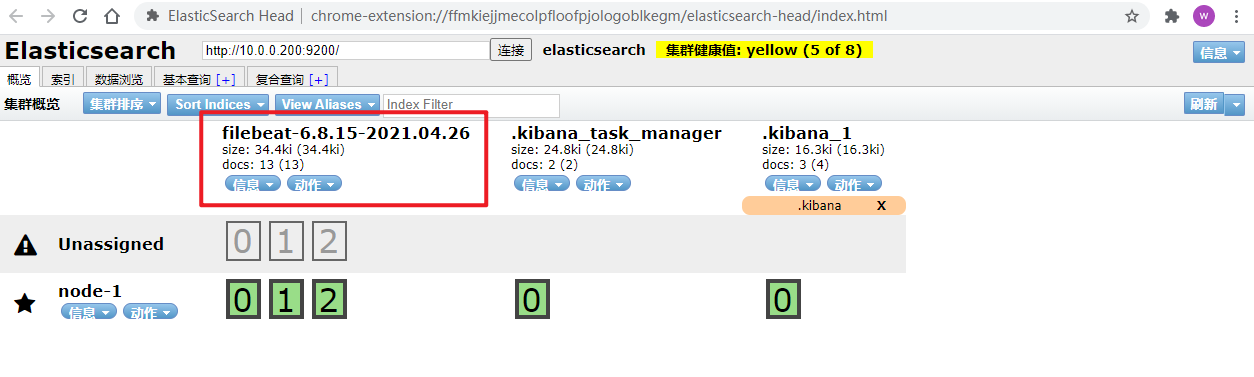
当filebeat启动完成,它会自动的收集nginx日志,然后发送到es,es会根据filebeat的模板(先忽略这个东西),自动创建索引,这个索引名由filebeat版本号加当前日期组成。
然后,elasticsearch-head中就可以查看到了:
完事之后,就要在kibana中配置了:
- 添加索引,找到es为filebeat创建索引,一般kibana会自动提示,你把它放到输入框中:

- 继续配置,按下图操作:

配置好之后,长这样:

- 在discover栏,就可以看到图标及日志信息了,在这个页面也可以进行一些其他的配置。
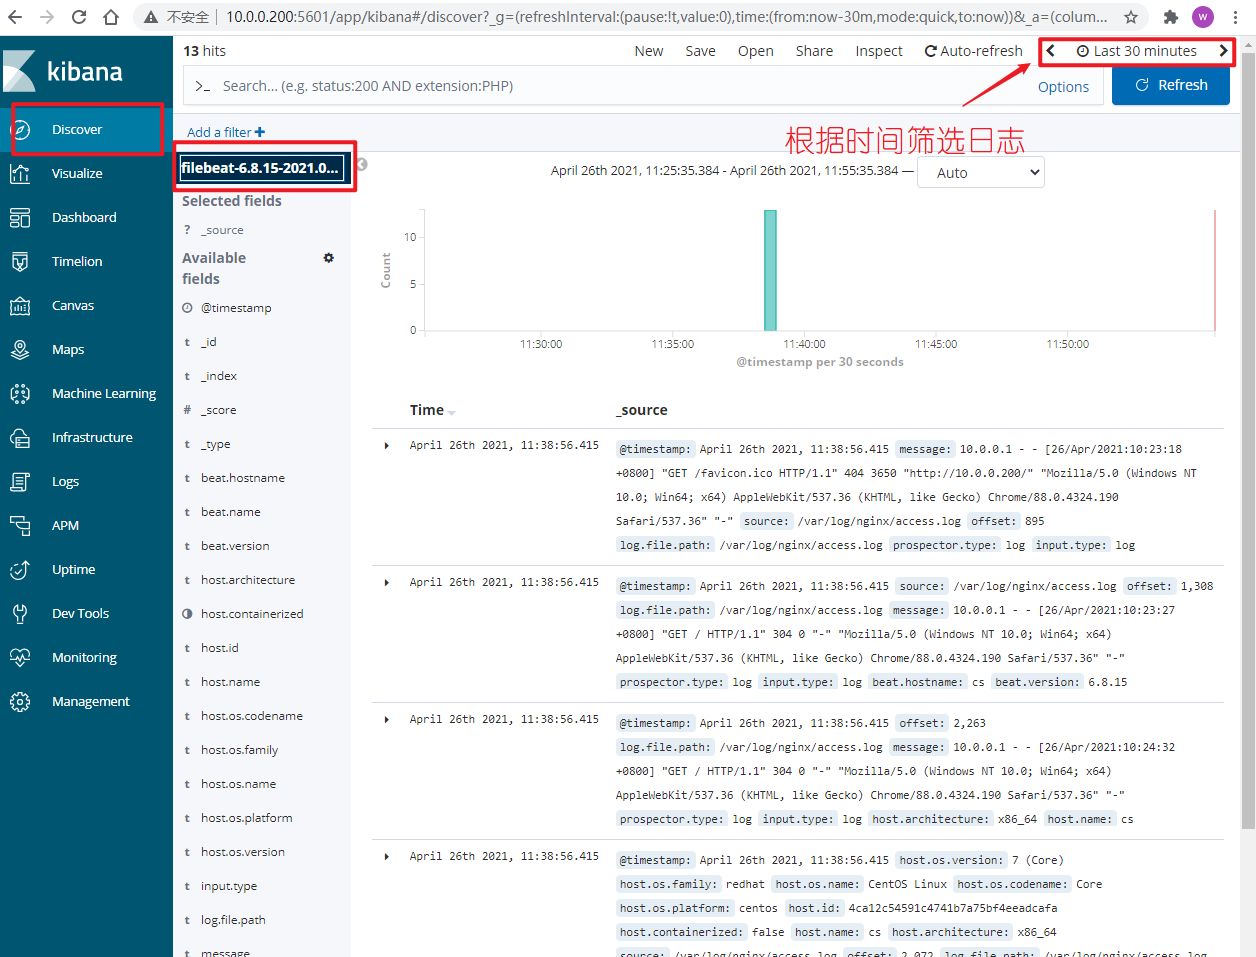
OK,filebeat安装和基本使用演示完毕,更多的filebeat使用,参考:https://www.cnblogs.com/Neeo/articles/9086806.html
that's all

 浙公网安备 33010602011771号