1-Python - pymysql
About pymysql
在Python2.x中,Python连接MySQL服务器使用mysqldb库,但是它只支持到Python2.x,在Python3.x中由pymysql模块代替。
PyMySQL 遵循 Python 数据库 API v2.0 规范,并包含了 pure-Python MySQL 客户端库。
Install
pip install pymysql
pip install -i https://pypi.doubanio.com/simple pymysql==1.0.2
准备
在正式操作前,这里默认你有了一个良好的环境,包括MySQL服务,Python环境。
建立连接
import pymysql
conn = pymysql.connect(
    host='localhost',   # 连接的服务器ip
    user='username',   # 用户名
    password='password',  # 密码
    database='day31',   # 你想连接的数据库
    charset='utf8'   # 指定字符编码,不要加杠,如:utf-8
)
cursor = conn.cursor()  # 获取游标

# 一顿操作后......别忘了
cursor.close()   # 关闭游标
conn.close()    # 关闭连接对象
创建数据库
首先,我们要手动在MySQL中创建表:
create database day31 charset=utf8;
use day31;
create table info(
	id int primary key auto_increment,
	user varchar(10) not null,
    pwd varchar(10)
);
快速上手之增删改查
增
法1
cursor = conn.cursor()  # 获取游标

cursor.execute('insert into info (user,pwd) values ("张开腿", "zhangkai1");')

conn.commit()
cursor.close()   # 关闭游标
conn.close()    # 关闭连接对象
相当于我们写原生的SQL语句。
法2
cursor = conn.cursor()  # 获取游标

sql = 'insert into info (user,pwd) values ("%s", "%s");' % ('张开2', 'zhangkai2')
cursor.execute(sql)

conn.commit()
cursor.close()   # 关闭游标
conn.close()    # 关闭连接对象
我们把sql语句提出来,用Python处理一下,相当于拼接字符串。
法3
cursor = conn.cursor()  # 获取游标

sql = 'insert into info (user,pwd) values (%s, %s);'
cursor.execute(sql, ('张开3', 'zhangkai3'))  # 第二个参数可以是元组也可以是列表

conn.commit()
cursor.close()   # 关闭游标
conn.close()    # 关闭连接对象
我们将值放到元组(或列表)中,交给execute帮我们处理,其实,execute本质上也是拼接字符串,然后再执行。
注意,在sql语句中,%s那里不要使用"%s"这种形式,因为MySQL会把引号当成普通的数据写入到数据库中。不信来看:
cursor = conn.cursor()  # 获取游标

sql = 'insert into info (user,pwd) values ("%s", "%s");'
cursor.execute(sql, ['张开4', 'zhangkai4'])  # 这里我们使用列表进行验证

conn.commit()
cursor.close()   # 关闭游标
conn.close()    # 关闭连接对象
来看输出结果:
mysql> select * from info where id = 4;
+----+-----------+------------+
| id | user      | pwd        |
+----+-----------+------------+
|  4 | '张开4'   | 'zhangkai4 |
+----+-----------+------------+
很明显,带着引号的不是我们想要的结果。
法4
不能总是一条一条插入,那岂不是费老劲了啊,能不能一次插入多条呢?答案是可以的:
cursor = conn.cursor()  # 获取游标

info_list = [('张开{}'.format(i), 'zhangkai{}'.format(i)) for i in range(5, 101)]

sql = 'insert into info (user,pwd) values (%s, %s);'
cursor.executemany(sql, info_list)

conn.commit()
cursor.close()   # 关闭游标
conn.close()    # 关闭连接对象
生成器可能是更优的选择:
cursor = conn.cursor()  # 获取游标

info_list = (('张开{}'.format(i), 'zhangkai{}'.format(i)) for i in range(101, 201))

sql = 'insert into info (user,pwd) values (%s, %s);'
cursor.executemany(sql, info_list)

conn.commit()
cursor.close()   # 关闭游标
conn.close()    # 关闭连接对象
删
删改查没啥好说,都是写SQL语句就完了。
cursor = conn.cursor()

sql = 'delete from info where user = %s;'
cursor.execute(sql, '张开200')
conn.commit()
cursor.close()
conn.close()
改
cursor = conn.cursor()

sql = 'update info set pwd = %s where user = %s'
cursor.execute(sql, ('张开一九九', '张开199'))

conn.commit()
cursor.close()
conn.close()
查
cursor = conn.cursor()  # 获取游标

sql = 'select id, user, pwd from info;'
rows = cursor.execute(sql)
print(rows)

conn.commit()
cursor.close()   # 关闭游标
conn.close()    # 关闭连接对象
直接打印返回值rows,得到的是所有记录的条数。
想要得到记录内容可以使用fetch系列:
cursor = conn.cursor()  # 获取游标

sql = 'select id, user, pwd from info;'
cursor.execute(sql)
print(cursor.fetchone())
print(cursor.fetchone())

conn.commit()
cursor.close()   # 关闭游标
conn.close()    # 关闭连接对象
fetchone一条一条取。
cursor = conn.cursor()  # 获取游标

sql = 'select id, user, pwd from info;'
cursor.execute(sql)
# print(cursor.fetchmany())   # 默认取第一条
print(cursor.fetchmany(3))  # 默认从开始取指定条数

conn.commit()
cursor.close()   # 关闭游标
conn.close()    # 关闭连接对象
fetchmany默认从开始取指定条数。
cursor = conn.cursor()  # 获取游标

sql = 'select id, user, pwd from info;'
cursor.execute(sql)
print(cursor.fetchall())

conn.commit()
cursor.close()   # 关闭游标
conn.close()    # 关闭连接对象
fetchall取所有。
pymysql.cursors.DictCursor
如果你每次看打印结果的话,结果都是以元组套元组的形式返回。
cursor = conn.cursor()
cursor.execute('select * from info;')
print(cursor.fetchmany(2))  # ((1, '张开腿', 'zhangkai1'), (2, '张开2', 'zhangkai2'))
我们也可以控制返回形式,比如以列表套字典的形式:
cursor = conn.cursor(cursor=pymysql.cursors.DictCursor)  # 需要在实例化游标对象的时候,传个参数
cursor.execute('select * from info;')
print(cursor.fetchmany(2))  # [{'id': 1, 'user': '张开腿', 'pwd': 'zhangkai1'}, {'id': 2, 'user': '张开2', 'pwd': 'zhangkai2'}]
conn.commit()
cursor.close()
conn.close()
scroll
先来看相对定位,根据当前的游标位置移动。
cursor = conn.cursor(cursor=pymysql.cursors.DictCursor)

cursor.execute('select * from info;')
print(cursor.fetchone())  # 此时游标在第一行
cursor.scroll(1, 'relative')  # 光标按照相对位置移动一位,此时在2
print(cursor.fetchone())  # 取第3行记录

conn.commit()
cursor.close()
conn.close()
接下来看绝对定位:
cursor = conn.cursor(cursor=pymysql.cursors.DictCursor)

cursor.execute('select * from info;')
print(cursor.fetchone())  # 此时游标在第一行
cursor.scroll(1, 'absolute')  # 光标按照绝对位置移动一位,此时在1
print(cursor.fetchone())  # 取第2行记录

conn.commit()
cursor.close()
conn.close()
SQL注入
什么是SQL注入呢?先来看个示例:
import pymysql

def connection(user=None, password=None, database=None, host='localhost', charset='utf8'):
    """ 建立连接并将游标返回 """
    conn = pymysql.connect(
        host=host,
        user=user,
        password=password,
        database=database,
        charset=charset
    )
    return conn.cursor()


def login():
    user = input('username: ').strip()
    pwd = input('password: ').strip()
    sql = 'select user, pwd from info where user= "%s" and pwd = "%s";' % (user, pwd)
    print(sql)
    result = cursor.execute(sql)  # 查询结果自带布尔值,查询成功返回1,查询失败返回0
    if result:
        print('login successful')
    else:
        print('login error')


if __name__ == '__main__':
    cursor = connection(user='root', password='root!admin', database='day31')
    login()
    conn.commit()
    cursor.close()
    conn.close()
在上述的登录示例中了,我们输入正确的用户名和密码肯定都没问题:
username: 张开2
password: zhangkai2
select user, pwd from info where user="张开2" and pwd = "zhangkai2";
login successful
但是,如果有人在输入用户名和密码时,做了手脚:
username: 张开2"; -- aswesasa
password:
select user, pwd from info where user="张开2"; -- aswesasa" and pwd = "";
login successful
可以看到,再输入用户名的时候,在用户名后面跟了"; -- aswesasa这些东西,再看打印的SQL语句,不难发现。判断语句现在变成了,只要是用户名对了就算成功。后面的密码部分,被--注释掉了,你写啥都无所谓了。
这就是SQL注入的方式之一。另外一种情况,就是用户名和密码都有问题,也能登录成功:
username: xxx" or 1 -- xxx
password:
select user, pwd from info where user="xxx" or 1 -- xxx" and pwd = "";
login successful
当用户名错误和密码错误时,依然登录成功。什么原因呢?由打印的SQL语句可以看到,用户名错了不要紧,我们使用or语句,后跟一个真值,这样用户名无论如何都会成立。当然,后面的密码部分已经被注释掉了。
以上就是SQL注入的两种方式,那么怎么解决呢?解决办法,就是我们不手动的拼接SQL字符串,而是交给pymysql来完成:
def login():
    user = input('username: ').strip()
    pwd = input('password: ').strip()
    sql = 'select user, pwd from info where user = %s and pwd = %s;' # 注意,%s这里要去掉引号,因为pymysql会帮我们加上的
    result = cursor.execute(sql, (user, pwd))
    if result:
        print('login successful')
    else:
        print('login error')
上述代码修改后,无论我们输入什么,pymysql都会把输入内容拼成普通的字符串,然后校验。所以,以后碰到这种拼接SQL语句的事情,都交给pymysql来做,而不是我们手动的拼接。
事物
也就是回滚机制,将一连串的执行当成一个原子性的操作,要么全部执行成功,要么全部执行失败。
我们演示执行两条命令,一条执行成功,一条执行失败,执行失败的话,就回滚到之前最开始的状态。
先来看正常的:
cursor = conn.cursor(cursor=pymysql.cursors.DictCursor)
sql1 = 'insert into info(user, pwd) values(%s, %s);'
sql2 = 'insert into info(user, pwd) values(%s, %s);'

try:
    cursor.execute(sql1, (("小王", "123")))
    cursor.execute(sql2, (("小李", "123")))
except Exception as e:
    print(e)
    conn.rollback()

cursor.execute('select * from info where user like %s;', '小%')
print(cursor.fetchall())  # [{'id': 210, 'user': '小王', 'pwd': '123'}, {'id': 211, 'user': '小李', 'pwd': '123'}]

conn.commit()
cursor.close()
conn.close()
如果try语句中的两个SQL语句都执行成功,则最终执行成功。
我们把刚才插入的删掉再测试。
cursor = conn.cursor(cursor=pymysql.cursors.DictCursor)
sql1 = 'insert into info(user, pwd) values(%s, %s);'
sql2 = 'insert into info(user, pwd) values(%s, %s);'

cursor.execute('delete from info where user like "小_"')
conn.commit()
try:
    cursor.execute(sql1, (("小王", "123")))
    cursor.execute(sql2, (("小李", "123")))
    raise 1
except Exception as e:
    print(e)  # exceptions must derive from BaseException
    conn.rollback()

cursor.execute('select * from info where user like %s;', '小%')
print(cursor.fetchall())  # ()

conn.commit()
cursor.close()
conn.close()
可以看到,在一串的执行中,遇到了错误,就回滚到之前的状态。
存储过程
接下来来看在pymysql中使用存储过程。
创建存储过程
delimiter\\
CREATE PROCEDURE t1 ()
BEGIN
    SELECT * FROM t1;
END\\
delimiter ;
使用存储过程
cursor = conn.cursor(cursor=pymysql.cursors.DictCursor)

cursor.callproc('t1')
conn.commit()
print(cursor.fetchall())
cursor.close()
conn.close()
批量录入数据
pymysql提供executemany方法用于批量插入。
基本用法:
# data必须是列表套列表,或者列表套元组的形式
data = [(1, 2, 3), (1, 2, 3), (1, 2, 3)]
cursor.executemany(sql, data)
上示例:
import time
import faker
import pymysql
from pymysql.connections import CLIENT

fk = faker.Faker(locale='zh_CN')

conn = pymysql.Connect(
    host='10.0.0.200', user='root', password='123',
    database='school', charset='utf8', client_flag=CLIENT.MULTI_STATEMENTS)
cursor = conn.cursor()


def timmer(func):
    def wrapper(*args, **kwargs):
        start = time.time()
        res = func(*args, **kwargs)
        print('{} running: {}'.format(func.__name__, time.time() - start))
        return res

    return wrapper


def create_table():
    """ 创建表 """
    sql = """
    DROP DATABASE IF EXISTS temp_db;
    CREATE DATABASE temp_db CHARSET utf8;
    USE temp_db;
    DROP TABLE IF EXISTS temp_tb;
    CREATE TABLE temp_tb1(
      id int not null primary key auto_increment,
      name varchar(32) not null default "张开",
      addr varchar(128) not null default "",
      phone varchar(32) not null,
      email varchar(64) not null
    ) ENGINE=INNODB CHARSET=utf8;
    CREATE TABLE temp_tb2 LIKE temp_tb1;
    """
    # 注意,一次性执行多行sql,必须在连接时,指定client_flag=CLIENT.MULTI_STATEMENTS
    cursor.execute(sql)
    conn.commit()


@timmer
def insert_one(num):
    """ 每次插入一条数据 """
    for i in range(1, num + 1):
        id, name, addr, phone, email = i, fk.name(), fk.address(), fk.phone_number(), fk.email()
        sql = "insert into temp_tb1(id, name, addr, phone, email) values(%s, %s, %s, %s, %s);"
        cursor.execute(sql, (id, name, addr, phone, email))
        conn.commit()


@timmer
def insert_many(num):
    """ 批量插入 """
    gen = ((i, fk.name(), fk.address(), fk.phone_number(), fk.email()) for i in range(1, num + 1))
    # print(gen)  # <generator object insert_many.<locals>.<genexpr> at 0x000001A68843C360>
    sql = "insert into temp_tb2(id, name, addr, phone, email) values(%s, %s, %s, %s, %s);"
    cursor.executemany(sql, gen)
    conn.commit()


if __name__ == '__main__':
    num = 10000
    create_table()
    insert_one(num)  # insert_one running: 12.135478019714355
    insert_many(num)  # insert_many running: 2.909210443496704

    cursor.close()
    conn.close()
由测试结果发现,批量插入的性能还是很高的。
常见报错
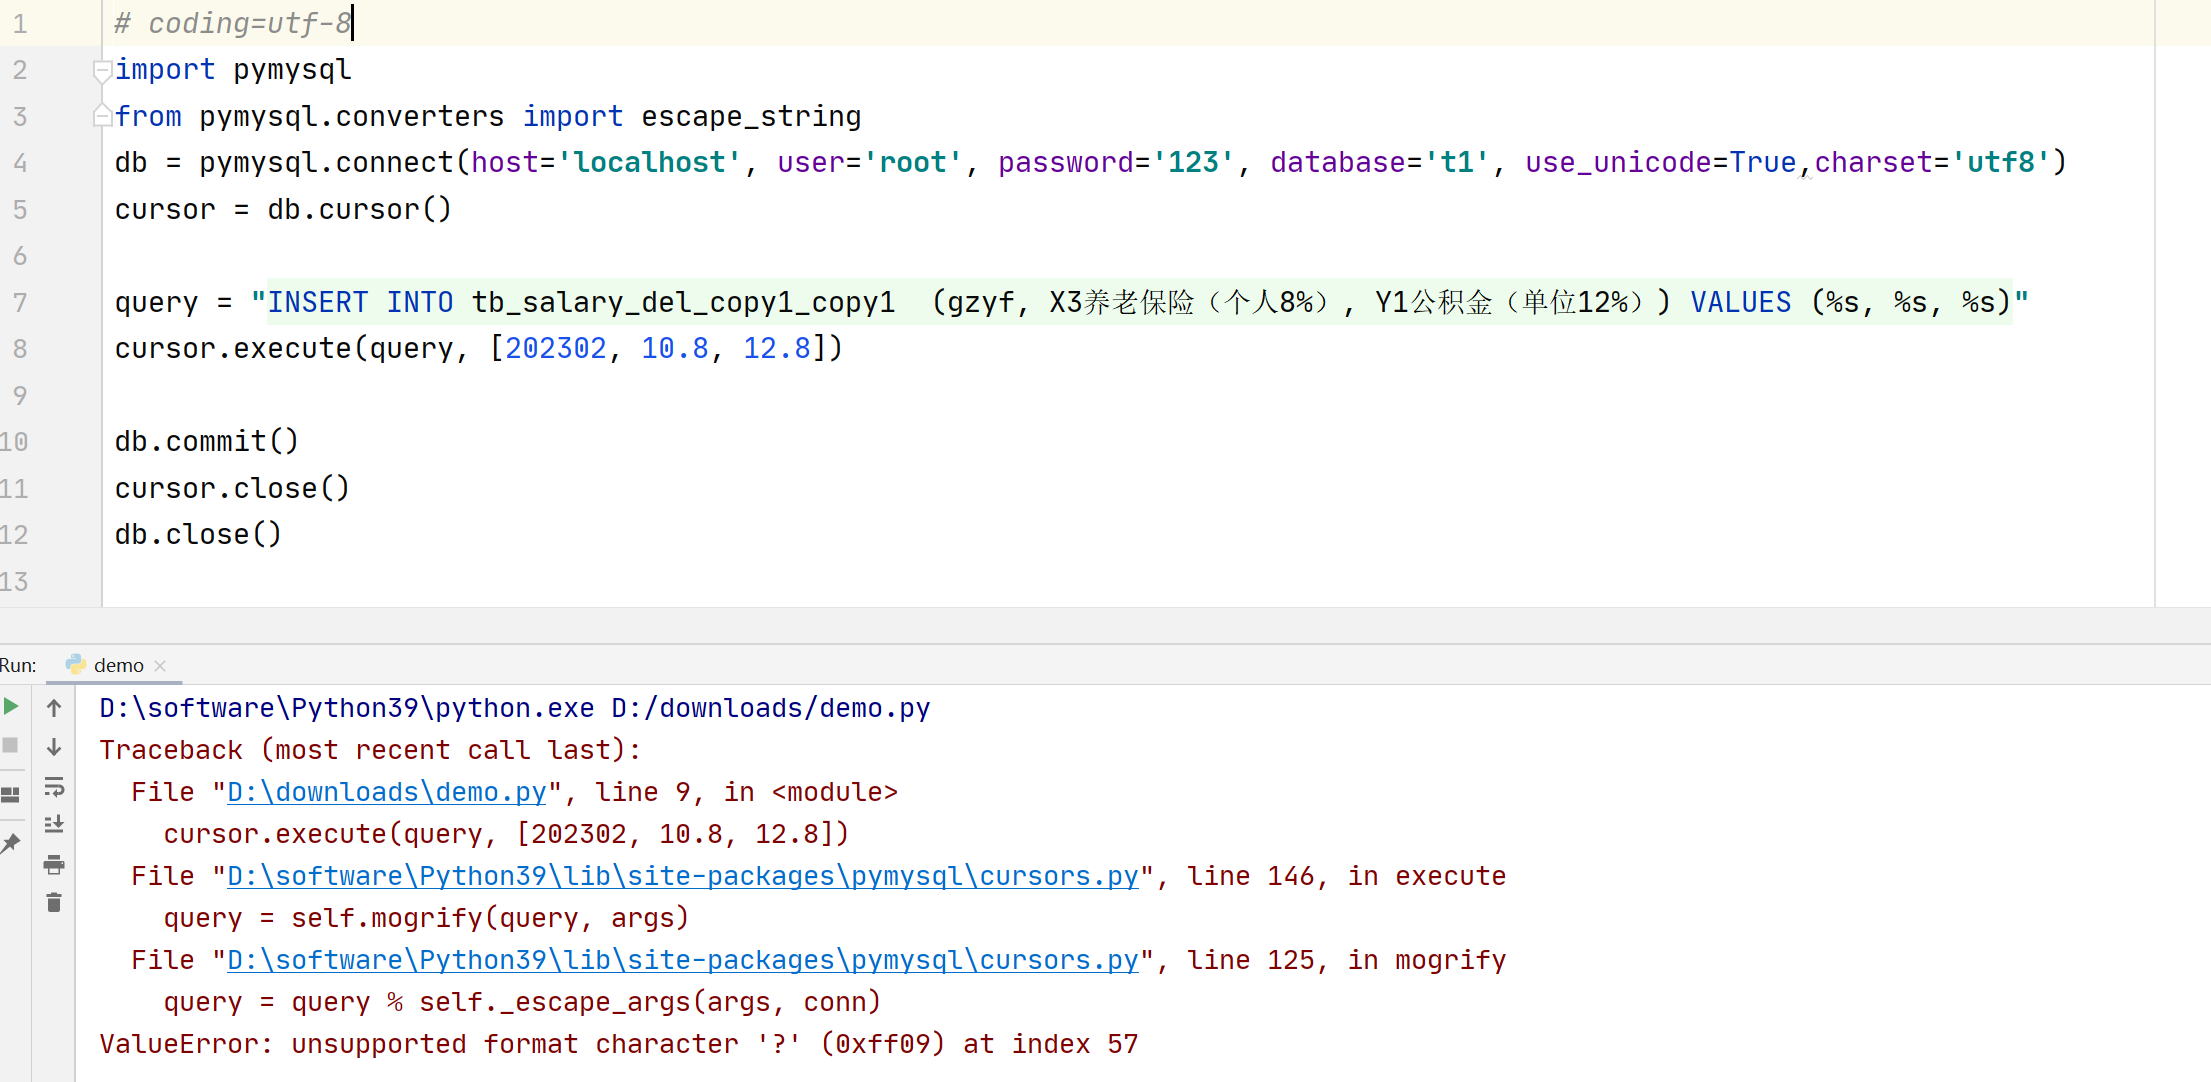
ValueError: unsupported format character '?' (0xff09) at index 57
win10 + mysql5.7 + python3.9 + pymysql
首先说下我的数据库的字符集和排序规则:
[(none)]>show create database t1;
+----------+-------------------------------------------------------------+
| Database | Create Database                                             |
+----------+-------------------------------------------------------------+
| t1       | CREATE DATABASE `t1` /*!40100 DEFAULT CHARACTER SET utf8 */ |
+----------+-------------------------------------------------------------+
1 row in set (0.00 sec)

[(none)]>select TABLE_NAME,TABLE_COLLATION
    -> from information_schema.TABLES t
    -> where TABLE_SCHEMA ='t1' and TABLE_NAME ='tb_salary_del_copy1_copy1';
+---------------------------+-----------------+
| TABLE_NAME                | TABLE_COLLATION |
+---------------------------+-----------------+
| tb_salary_del_copy1_copy1 | utf8_general_ci |
+---------------------------+-----------------+
1 row in set (0.00 sec)
utf8和utf8_general_ci。
那么遇到的问题是这样的,首先,有个表结构是这样的......部分表结构:
CREATE TABLE `tb_salary_del_copy1_copy1`  (
  `id` int NOT NULL AUTO_INCREMENT COMMENT 'id主键',
  `gzyf` int NOT NULL COMMENT '工资月份',
  `X1公积金(个人12%)` float NULL DEFAULT NULL COMMENT 'X1公积金(个人12%)',
  `X3养老保险(个人8%)` float NULL DEFAULT NULL COMMENT 'X3养老保险(个人8%)',
  PRIMARY KEY (`id`) USING BTREE
) ENGINE = InnoDB AUTO_INCREMENT = 23 CHARACTER SET = utf8mb3 COLLATE = utf8mb3_general_ci ROW_FORMAT = DYNAMIC;
然后用pymysql执行插入数据,报错了:

如上截图,插入的SQL中有中文就算了,还带特殊字符......
那么怎么解决呢?要我说,直接重构吧!看到字段名是中文带特殊符号的,我都头疼......
但然并卵,就必须这么着,然后还要解决报错。
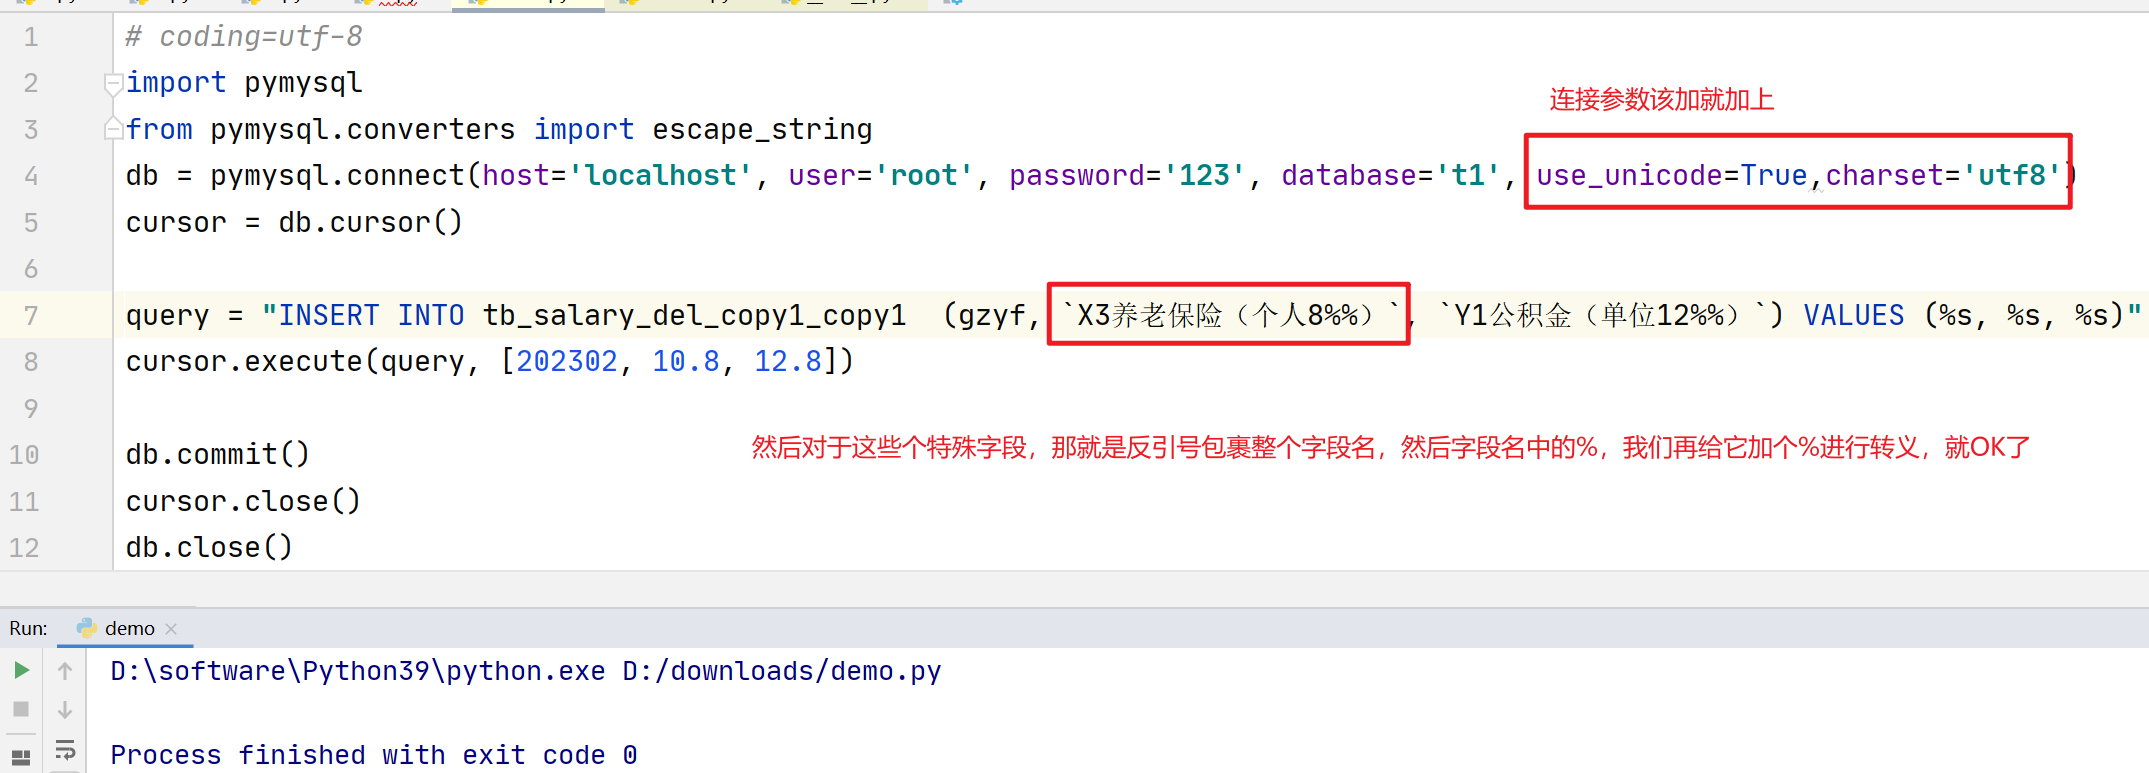
首先百度和谷歌一堆,又说指定连接参数use_unicode=True,charset='utf8'。有说用转义的.....尝试了半天,终于被我怼出来了,那就是成年人不做选择,都用上。

# coding=utf-8
import pymysql
from pymysql.converters import escape_string
db = pymysql.connect(host='localhost', user='root', password='123', database='t1', use_unicode=True,charset='utf8')
cursor = db.cursor()

query = "INSERT INTO tb_salary_del_copy1_copy1  (gzyf, `X3养老保险(个人8%%)`, `Y1公积金(单位12%%)`) VALUES (%s, %s, %s)"
cursor.execute(query, [202302, 10.8, 12.8])

db.commit()
cursor.close()
db.close()
AttributeError: 'NoneType' object has no attribute 'encoding'
pymysql1.0.2 + MySQL8.0.29
这个报错如下:

原因很奇怪,是pymysql.Connect时charset设置应该是utf8而不是utf-8 !!!
平常我用着没事,就这个版本时发现的,所以记录下。
字段名和字段值都是动态的,用法注意事项
pymysql1.0.2 + python3.9 + mysql5.7
使用pymysql操作记录时,可能有些场景需要字段名和字段值都是动态的,那么这么做的时候,就不能按照原来处理SQL注入的那一套来了,会报错。
比如:
# 先简简单单的来个表,用于后面的测试:
create table user(id int not null,name varchar(32)) charset=utf8;
insert into user(id, name) values(1, '张开'),(2, '李开');


# 下面是一般的pymysql操作,更新id为1的这条记录的name值
sql = 'update user set name=%s where id =%s;'
cursor.execute(sql, ['张开1', 1])
conn.commit()

# 上面的SQL被ymysql内部处理成这样: update user set name='张开1' where id =1;    这个SQL肯定没问题,执行也没问题
但如果你的表字段很多,有时更新的字段和值都是不固定的,那么你要是按照上面的逻辑改吧改吧代码就想跑,等你就是报错:
sql = 'update user set %s=%s where id =%s;'
cursor.execute(sql, ['name', '张开1', 1])   # 把字段名也在这里一起处理了,想得挺美
conn.commit()
上面的SQL会执行失败:pymysql.err.ProgrammingError: (1064, "You have an error in your SQL syntax; check the manual that corresponds to your MySQL server version for the right syntax to use near ''name'='张开1' where id =1' at line 1")

# 因为pymysql内部会将我们的SQL处理成这样执行:update user set 'name'='张开1' where id =1;
# 值肯定没问题,关键是name字段被处理成了 'name'='张开1'  字段名字也带引号(内部将字段名也当成字段值处理的),这就是问题所在了。
那么解决方式也非常简单,想要字段名也动态起来,那么我们可以选择提前处理字段名,然后其对应的值可以按照原来的方式处理:
# 把需要动态起来的字段名提前准备好
id = 'id'
name = 'name'

# 然后先用format格式化进去,这样就处理好了字段名
sql = 'update user set {}=%s where {}=%s;'.format(name, id)  # 我想了想,字段名这块应该没有SQL注入的问题
cursor.execute(sql, ['张开2', 1])  # 值还是按照原来的方式处理就没问题了
conn.commit()
# pymysql内部处理的SQL就正常了: update user set name='张开2' where id=1;
欢迎斧正,that's all
see also:
python 获取mysql 库信息/表信息/表结构/索引 | 第五篇:数据备份、pymysql模块 | Python3 MySQL 数据库连接 - PyMySQL 驱动 | PEP 249 -- Python Database API Specification v2.0 | PyMysql以及事务 | 多条语句一起执行,MySQL报错SQL syntax error的问题探究 | 利用 pymysql 往数据库插入百万条数据


 浙公网安备 33010602011771号