
数字图像处理-实验5
实验5:图像滤波
实验5.1 快速均值滤波
基于积分图实现图像的快速均值滤波
- 滤波窗口大小通过参数来指定:
void meanFilter(const Mat &input, Mat &output, int windowSize);
- 采用积分图进行加速,实现与滤波窗口大小无关的效率;
与OpenCV的boxFilter函数比较计算速度,并分析导致速度差异的原因。
首先写出的代码如下:
cv::Mat integral_image(const cv::Mat &src){
    cv::Mat res=cv::Mat::zeros(src.rows+1,src.cols+1,src.type());
    for(int i=1;i<=src.rows;++i){
        for(int j=1;j<=src.cols;++j){
            auto val=src.at<cv::Vec3b>(i-1,j-1);
            res.at<cv::Vec3b>(i,j)=res.at<cv::Vec3b>(i-1,j)+res.at<cv::Vec3b>(i,j-1)-res.at<cv::Vec3b>(i-1,j-1)+val;

        }
    }
    return res;
}
cv::Vec3b get_sum(const cv::Mat &sum,int x1,int y1,int x2,int y2){
    if(x1>x2||y1>y2) std::swap(x1,x2),std::swap(y1,y2);
    ++x1; ++x2; ++y1; ++y2;
    return sum.at<cv::Vec3b>(x2,y2)
           -sum.at<cv::Vec3b>(x1-1,y2)
           -sum.at<cv::Vec3b>(x2,y1-1)
           +sum.at<cv::Vec3b>(x1-1,y1-1);
}
void meanFilter(const cv::Mat &src,cv::Mat &dst,int window_size){
    cv::Mat integral=integral_image(src);
    dst=cv::Mat::zeros(src.rows,src.cols,src.type());
    for(int i=0;i<src.rows;++i){
        for(int j=0;j<src.cols;++j){
            int mid=window_size>>1;
            int x1=std::max(i-mid,0),y1=std::max(j-mid,0);
            int x2=std::min(i+mid,src.rows-1),y2=std::min(j+mid,src.cols-1);
            auto sum=get_sum(integral,x1,y1,x2,y2);
            int pixels=(x2-x1+1)*(y2-y1+1);
            dst.at<cv::Vec3b>(i,j)=sum/pixels;
        }
    }
}

int main(int argc,char *argv[]){
    cv::Mat image=cv::imread("bg.jpg");
    if(image.empty()){
        std::cout<<"Open File Fail!"; return 0;
    }
    cv::namedWindow("test");
    cv::createTrackbar("size","test",nullptr,std::min(image.rows,image.cols));
    while(1){
        static cv::Mat res;
        int window_size=cv::getTrackbarPos("size","test");
        meanFilter(image,res,window_size);
        cv::imshow("test",res);
        cv::waitKey(27);
    }
    cv::destroyAllWindows();
    return 0;
}
但是程序的运行结果明显不对:

排查原因发现我在积分图中使用了cv::Vec3b类型保存了像素的和,这显然会导致像素值的溢出,结果自然也不对了。
修改后的代码使用了下面的结构体来保存积分图,像素值使用std::tuple<int,int,int>存储,从而避免了溢出的问题。
struct IntegralImage{
    std::vector<std::tuple<int,int,int>> v;
    int width,height;
    IntegralImage(int width,int height){
        this->width=width; this->height=height;
        v.resize((width+1)*(height+1),{0,0,0});
    }
    std::tuple<int,int,int>& at(int i,int j){
        return v[j*width+i];
    }
};
除此之外,程序还重载了下面的运算符以方便计算:
std::tuple<int,int,int> operator+(const std::tuple<int,int,int> &a,const std::tuple<int,int,int> &b){
    auto [a1,a2,a3]=a; auto [b1,b2,b3]=b;
    return std::make_tuple(a1+b1,a2+b2,a3+b3);
}
std::tuple<int,int,int> operator+(const std::tuple<int,int,int> &a,const cv::Vec3b &b){
    auto [a1,a2,a3]=a;
    int b1=b[0],b2=b[1],b3=b[2];
    return std::make_tuple(a1+b1,a2+b2,a3+b3);
}
std::tuple<int,int,int> operator-(const std::tuple<int,int,int> &a,const std::tuple<int,int,int> &b){
    auto [a1,a2,a3]=a; auto [b1,b2,b3]=b;
    return std::make_tuple(a1-b1,a2-b2,a3-b3);
}
std::tuple<int,int,int> operator/(const std::tuple<int,int,int> &a,int d){
    auto [a1,a2,a3]=a;
    return std::make_tuple(a1/d,a2/d,a3/d);
}
其他部分的代码则大同小异,完整的代码如下:
查看代码
 struct IntegralImage{
    std::vector<std::tuple<int,int,int>> v;
    int width,height;
    IntegralImage(int width,int height){
        this->width=width; this->height=height;
        v.resize((width+1)*(height+1),{0,0,0});
    }
    std::tuple<int,int,int>& at(int i,int j){
        return v[j*width+i];
    }
};
std::tuple<int,int,int> operator+(const std::tuple<int,int,int> &a,const std::tuple<int,int,int> &b){
    auto [a1,a2,a3]=a; auto [b1,b2,b3]=b;
    return std::make_tuple(a1+b1,a2+b2,a3+b3);
}
std::tuple<int,int,int> operator+(const std::tuple<int,int,int> &a,const cv::Vec3b &b){
    auto [a1,a2,a3]=a;
    int b1=b[0],b2=b[1],b3=b[2];
    return std::make_tuple(a1+b1,a2+b2,a3+b3);
}
std::tuple<int,int,int> operator-(const std::tuple<int,int,int> &a,const std::tuple<int,int,int> &b){
    auto [a1,a2,a3]=a; auto [b1,b2,b3]=b;
    return std::make_tuple(a1-b1,a2-b2,a3-b3);
}
std::tuple<int,int,int> operator/(const std::tuple<int,int,int> &a,int d){
    auto [a1,a2,a3]=a;
    return std::make_tuple(a1/d,a2/d,a3/d);
}
void integral_image(const cv::Mat &src,IntegralImage &res){
    for(int i=1;i<=src.rows;++i){
        for(int j=1;j<=src.cols;++j){
            auto val=src.at<cv::Vec3b>(i-1,j-1);
            res.at(i,j)=res.at(i-1,j)+res.at(i,j-1)-res.at(i-1,j-1)+val;
        }
    }
}
std::tuple<int,int,int> get_sum(IntegralImage &sum,int x1,int y1,int x2,int y2){
    if(x1>x2||y1>y2) std::swap(x1,x2),std::swap(y1,y2);
    ++x1; ++x2; ++y1; ++y2;
    return sum.at(x2,y2)-sum.at(x1-1,y2)-sum.at(x2,y1-1)+sum.at(x1-1,y1-1);
}
void meanFilter(const cv::Mat &src,cv::Mat &dst,int window_size){
    IntegralImage integral(src.rows,src.cols);
    integral_image(src,integral);
    dst=cv::Mat::zeros(src.rows,src.cols,src.type());
    for(int i=0;i<src.rows;++i){
        for(int j=0;j<src.cols;++j){
            int mid=window_size>>1;
            int x1=std::max(i-mid,0),y1=std::max(j-mid,0);
            int x2=std::min(i+mid,src.rows-1),y2=std::min(j+mid,src.cols-1);
            auto sum=get_sum(integral,x1,y1,x2,y2);
            int pixels=(x2-x1+1)*(y2-y1+1);
            auto result=sum/pixels;
            dst.at<cv::Vec3b>(i,j)={(uchar)std::get<0>(result),(uchar)std::get<1>(result),(uchar)std::get<2>(result)};
        }
    }
}
int main(int argc,char *argv[]){
    cv::Mat image=cv::imread("bg.jpg");
    if(image.empty()){
        std::cout<<"Open File Fail!"; return 0;
    }
    cv::namedWindow("test");
    cv::createTrackbar("size","test",nullptr,std::min(image.rows,image.cols));
    while(1){
        static cv::Mat res;
        int window_size=cv::getTrackbarPos("size","test");
        meanFilter(image,res,window_size);
        cv::imshow("test",res);
        cv::waitKey(27);
    }
    cv::destroyAllWindows();
    return 0;
}
这次图像能够正常展示了:

然而此时又出现了新的问题,当修改滤波窗口的大小时,图像的上半部分会出现彩色的区域,并且随着窗口大小的增大彩色区域的部分也会变大。
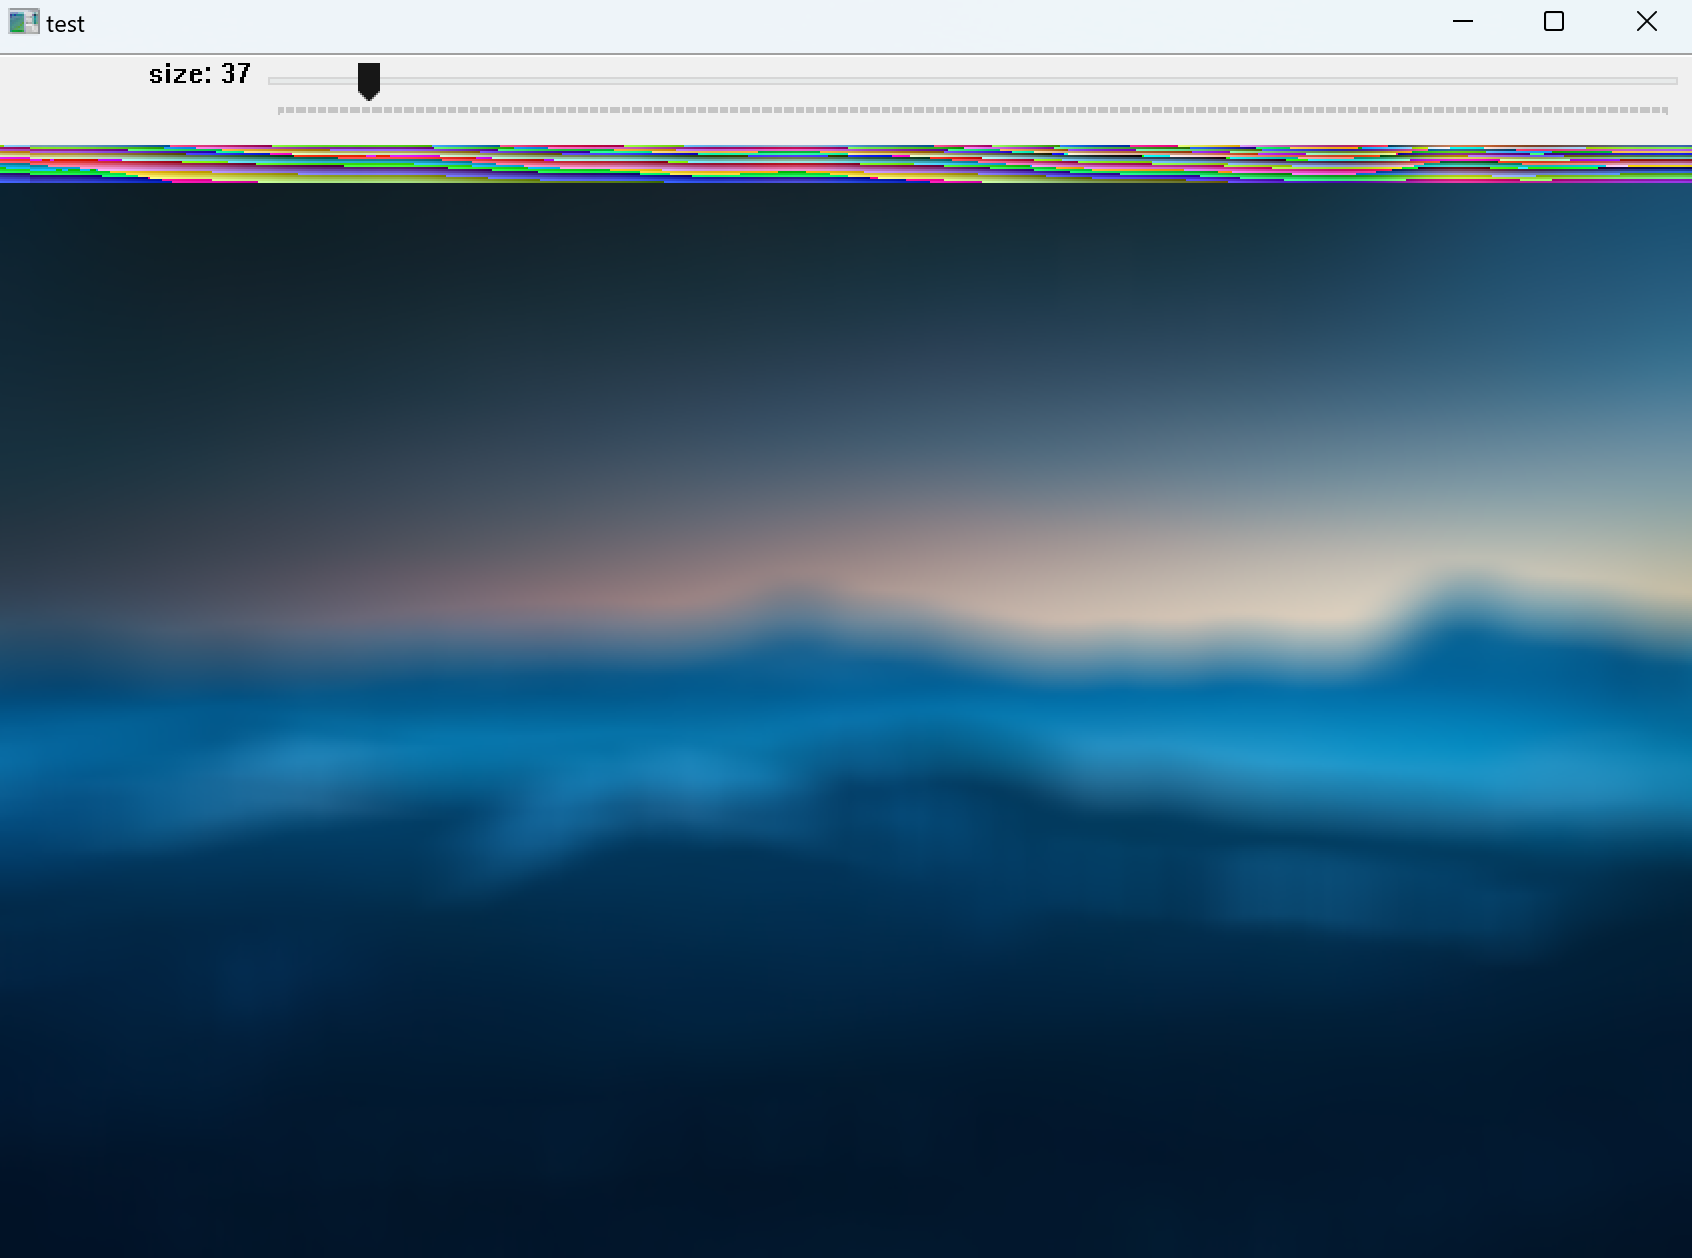
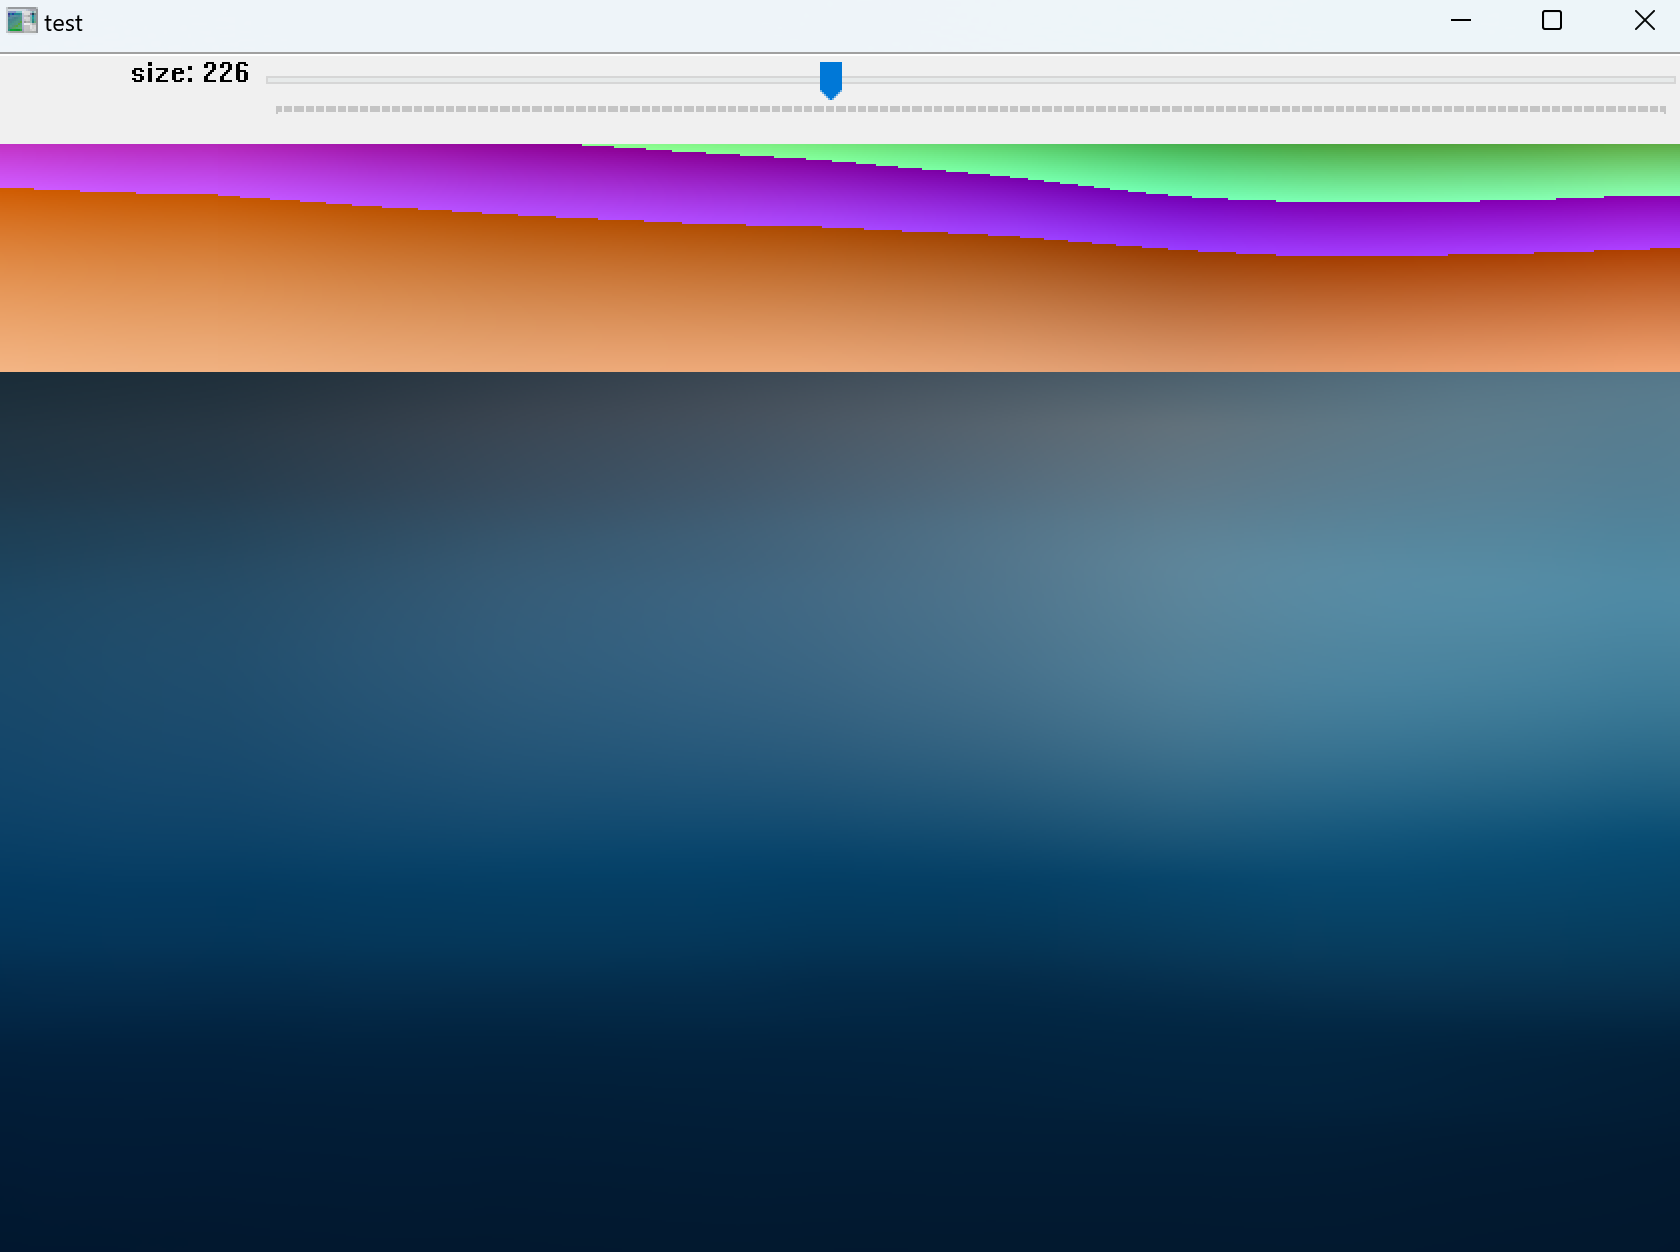
通过打印中间变量,发现彩色区域部分的像素值变成了负数,最终经过排查后找到了问题所在:定义积分图的时候为了防止越界,将积分图的行、列相比原图都增大了1,然而在根据行号、列号获取积分图中的元素时使用的还是原图的行列数,因此将类IntegralImage中的.at()函数从:
std::tuple<int,int,int>& at(int i,int j){
    return v[j*width+i];
}改为:return v[j*(width+1)+i];就正确了。


完整代码如下:
查看代码
 struct IntegralImage{
    std::vector<std::tuple<int,int,int>> v;
    int width,height;
    IntegralImage(int width,int height){
        this->width=width; this->height=height;
        v.resize((width+1)*(height+1),{0,0,0});
    }
    std::tuple<int,int,int>& at(int i,int j){
        return v[j*(width+1)+i];
    }
};
std::tuple<int,int,int> operator+(const std::tuple<int,int,int> &a,const std::tuple<int,int,int> &b){
    auto [a1,a2,a3]=a; auto [b1,b2,b3]=b;
    return std::make_tuple(a1+b1,a2+b2,a3+b3);
}
std::tuple<int,int,int> operator+(const std::tuple<int,int,int> &a,const cv::Vec3b &b){
    auto [a1,a2,a3]=a;
    int b1=b[0],b2=b[1],b3=b[2];
    return std::make_tuple(a1+b1,a2+b2,a3+b3);
}
std::tuple<int,int,int> operator-(const std::tuple<int,int,int> &a,const std::tuple<int,int,int> &b){
    auto [a1,a2,a3]=a; auto [b1,b2,b3]=b;
    return std::make_tuple(a1-b1,a2-b2,a3-b3);
}
std::tuple<int,int,int> operator/(const std::tuple<int,int,int> &a,int d){
    auto [a1,a2,a3]=a;
    return std::make_tuple(a1/d,a2/d,a3/d);
}
void integral_image(const cv::Mat &src,IntegralImage &res){
    for(int i=1;i<=src.rows;++i){
        for(int j=1;j<=src.cols;++j){
            auto val=src.at<cv::Vec3b>(i-1,j-1);
            res.at(i,j)=res.at(i-1,j)+res.at(i,j-1)-res.at(i-1,j-1)+val;
        }
    }
}
std::tuple<int,int,int> get_sum(IntegralImage &sum,int x1,int y1,int x2,int y2){
    if(x1>x2||y1>y2) std::swap(x1,x2),std::swap(y1,y2);
    ++x1; ++x2; ++y1; ++y2;
    return sum.at(x2,y2)-sum.at(x1-1,y2)-sum.at(x2,y1-1)+sum.at(x1-1,y1-1);
}
void meanFilter(const cv::Mat &src,cv::Mat &dst,int window_size){
    IntegralImage integral(src.rows,src.cols);
    integral_image(src,integral);
    dst=cv::Mat::zeros(src.rows,src.cols,src.type());
    for(int i=0;i<src.rows;++i){
        for(int j=0;j<src.cols;++j){
            int mid=window_size>>1;
            int x1=std::max(i-mid,0),y1=std::max(j-mid,0);
            int x2=std::min(i+mid,src.rows-1),y2=std::min(j+mid,src.cols-1);
            auto sum=get_sum(integral,x1,y1,x2,y2);
            int pixels=(x2-x1+1)*(y2-y1+1); //像素数量
            auto result=sum/pixels;
            dst.at<cv::Vec3b>(i,j)={(uchar)std::get<0>(result),(uchar)std::get<1>(result),(uchar)std::get<2>(result)};
        }
    }
}
int main(int argc,char *argv[]){
    cv::Mat image=cv::imread("bg.jpg");
    if(image.empty()){
        std::cout<<"Open File Fail!"; return 0;
    }
    cv::namedWindow("test");
    cv::createTrackbar("size","test",nullptr,std::min(image.rows,image.cols));
    while(1){
        static cv::Mat res;
        int window_size=cv::getTrackbarPos("size","test");
        meanFilter(image,res,window_size);
        cv::imshow("test",res);
        if(cv::waitKey(50)==27) break;
    }
    cv::destroyAllWindows();
    return 0;
}
效率比较
使用下面的代码,将滤波窗口大小设置为50,执行1000次,比较 meanFilter() 和 boxFilter() 两个函数的总耗时:
// 定义滤波窗口大小
int window_size=50;
int times=1000;
// 1. 基于积分图的均值滤波
auto startIntegral=QDateTime::currentMSecsSinceEpoch();
for(int i=1;i<=times;++i){
    Mat outputIntegral;
    meanFilter(img,outputIntegral,window_size);
}
auto durationIntegral=QDateTime::currentMSecsSinceEpoch()-startIntegral;
qDebug()<<"基于积分图的均值滤波 总耗时: "<<durationIntegral<<"ms";
// 2. OpenCV自带的boxFilter
auto startBoxFilter=QDateTime::currentMSecsSinceEpoch();
for(int i=1;i<=times;++i){
    Mat outputBoxFilter;
    boxFilter(img,outputBoxFilter,-1,Size(window_size, window_size));
}
auto durationBoxFilter=QDateTime::currentMSecsSinceEpoch()-startBoxFilter;
qDebug()<<"OpenCV boxFilter 总耗时: "<<durationBoxFilter<<"ms";
执行结果如下:

可以看出 OpenCV 的 boxFilter() 函数的效率要远高于我自己写的函数,通过查询资料得知,OpenCV 的 boxFilter() 函数是高度优化的,使用了多线程、SIMD 指令集和硬件加速等技术,充分利用了 CPU 资源,提高了执行的效率。


【推荐】编程新体验,更懂你的AI,立即体验豆包MarsCode编程助手
【推荐】凌霞软件回馈社区,博客园 & 1Panel & Halo 联合会员上线
【推荐】抖音旗下AI助手豆包,你的智能百科全书,全免费不限次数
【推荐】博客园社区专享云产品让利特惠,阿里云新客6.5折上折
【推荐】轻量又高性能的 SSH 工具 IShell:AI 加持,快人一步
· DeepSeek “源神”启动!「GitHub 热点速览」
· 我与微信审核的“相爱相杀”看个人小程序副业
· 上周热点回顾(2.17-2.23)
· 如何使用 Uni-app 实现视频聊天(源码,支持安卓、iOS)
· C# 集成 DeepSeek 模型实现 AI 私有化(本地部署与 API 调用教程)