

移动端重构实战系列2——line list
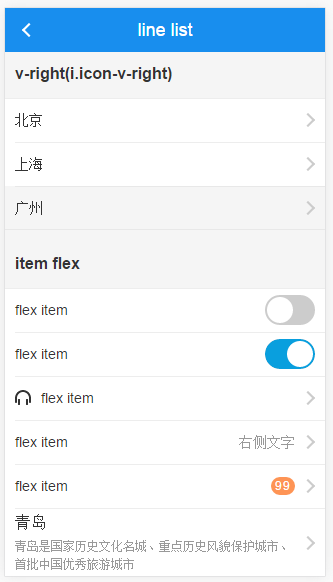
这个line list的名字是我自己起的(大概的意思是单行列表),要实现的东西为sheral的line list,对应的scss组件为_line-list.scss,下图为line-list的一个缩影:
这个UI应该是每个移动端网页都必备的,而且使用场景也是非常的丰富,所以这里我们采用一步步循序渐进的方式去重构。
先说下整个过程中要解决的问题:
- retina 1px
- 分割线缩进
- 整行点击
- 单页应用或跳转页面
- 如何方便扩展
最简模式
html结构
.line-list>.line-item
结构方面,标签可以是ul.line-list>.line-item或者div.line-list>a.line-item,前者用于单页应用,后者用于链接跳转。
关键scss代码
.line-item {
    @extend %bar-line;
}
.line-list {
    background: #fff;
    + .line-list {
        margin-top: 10px;
    }
}
由于这种line item的样式使用场景较多,所以我们封装了一个%bar-line,定义在sandal的_mixin.scss文件中(下面如无特殊说明,mixin和%均在该文件定义),如下:
// bar line
%bar-line {
    line-height: $barHeight - 10px;
    padding: 5px 10px;
    position: relative;
    display: block;
    overflow: hidden;
    @if $activeStateSwitch{ //是否开启:active样式
        &:active,
        &:hover {
            background-color: darken($colorF, 3%);
        }
    }
    &:not(:irst-of-type)::before { // 使用伪元素生成retina 1px
        content: "";
        @include retina-one-px-border;
    }
}
下面解读下上面的SCSS代码:
- retina 1px我们在sandal里面封装了个mixin
retina-one-px-border($direction: top, $color: $colorBorder),直接传入相应参数调用即可。 - 把
1px挂在除第一个元素之外的伪元素before上,而第一个最上面和最后一个最下面的1px将会在父元素上实现,那样中间line-item之间的1px就很容易扩展实现缩进。 - 每个line item的高度为
44px(ios 的标准高度为44px),实现方法为line-height + padding,为什么不是直接line-height:44px,这就涉及到我们下面更多的扩展形态了。
右箭头跳转模式
保持HTML结构不变,追加class实现所需的功能:
item之间的1px缩进,最开始和最末位的不缩进- 右侧箭头
.line-list--indent {
    @extend %border-tb; // 添加最上和最下的1px,形成封闭
    .line-item::before {
        left: 10px; // 缩进10px
    }
}
.line-list--after-v { // 右箭头通过after生成
    .line-item {
        padding-right: 30px;
        @extend %item-v-right;
    }
}
这里缩进用的伪元素
before的1px left定位来实现的,看到过有些方法是设置item的border-bottom,然后设置item的margin-left: 10px,这种实现方法是错误的,因为点击的不是整行了(缺了margin-left的10px),当然也可以内嵌一个inner元素设置inner元素的margin-left,或空元素定位等
同样考虑到比较常用,在sandal中封装了两个%,分别为%border-tb,%item-v-right,具体代码为:
// border top & bottom
%border-tb {
    position: relative;
    &::before {
        content: "";
        @include retina-one-px-border(top);
        z-index: 1; // 第一个元素点击的时候防止active背景色遮盖了1px
    }
    &::after {
        content: "";
        @include retina-one-px-border(bottom);
    }
}

// item arrow, 右侧箭头跳转指向
%item-v-right {
    &::after {
        content: "";
        @include v-arrow;
        color: $colorC;
        position: absolute;
        right: 15px;
        top: 50%;
        margin-top: -1px;
        transform: rotate(45deg) translate(0, -50%);
        box-sizing: border-box;
    }
}
选择模式
选择模式分为单选和多选,单选同样可以保持结构不变,通过after元素生成选中的对钩;而多选则可以添加i.icon-checbox元素。对钩和icon checkbox都是CSS绘制,使用currentColor,item选中时直接改变color即可,具体代码如下:
// 单选
.line-list--select {
    .line-item {
        padding-right: 30px;
        &.active {
            color: $primary; // 选中改变颜色
            &::after { // 伪元素生成对钩
                content: "";
                display: block;
                width: 14px;
                height: 8px;
                border-bottom: 2px solid currentColor;
                border-left: 2px solid currentColor;
                transform: rotate(-52deg) translate(0, -50%);
                box-sizing: border-box;
                position: absolute;
                top: 50%;
                right: 8px;
                margin-top: -4px;
            }
        }
    }
}

// 多选
.line-list--multi-select {
    .active{
        color: $primary;
        .icon-checkbox{
            color: $primary;
        }
    }
}
复杂模式
这里我们将采用flex,一行大概分为三栏:图标icon(固定宽度),中间内容(剩余宽度),右边操作或提示(switch,提示文字或数字,右箭头)。如果你要兼容的手机不支持flex,那也没关系,这个结构也足够你使用绝对定位或float布局了,完全不需要再更改结构。
.line-list--flex {
    .line-item {
        display: flex;
        align-items: center;
        padding-right: 0;

        .item-icon,
        .item-img,
        .icon-switch,
        .remind-num,
        .item-append{
            margin-right: 10px;
        }
        .item-bd { // 中间内容
            flex: 1;
            margin-right: 10px;
            width: 1%;
        }
        .item-append{
            color: $color9;
        }
        .icon-v-right {
            width: 30px;
            height: 30px;
            color: $colorC;
            margin-left: -10px;
        }
        .remind-num {
            position: static;
            line-height: 1.5;
        }
    }
}
打造好了line-list,就可以广泛应用于其他地方了,如actionsheet,filter,popover等各种地方。
出处:http://www.w3cplus.com/mobile/sandal-parts-2.html

 浙公网安备 33010602011771号