基于微信小程序的单指图片操作台
单指图片操作台小程序
——31803225_林承毅
| 博客班级 | https://edu.cnblogs.com/campus/zjcsxy/SE2020 |
|---|---|
| 作业要求 | https://edu.cnblogs.com/campus/zjcsxy/SE2020/homework/11334 |
| 作业目标 | 编写一个小程序,熟悉git代码管理流程,将源代码上传到到github,在博客园班级中写一篇相应的博文 |
| 作业源代码 | https://github.com/Null118/Single-finger-Workplace |
前言
没有js基础和网页开发基础从零开始也是比较难的。还好微信小程序开发工具的功能比较强大,各种调用封装的很好,
很多时候都只是一个函数的事情。加之网上也有不少教程,学起来不算吃力。但在两周的时间内从头写完一个小程序总会遇到各种预期之外的问题。
处于对自己的不自信我还是选择一个有一定基础但又不完善的小程序,在上面添加我学到的,会的修改来使其变得更好用。
各页面展示图
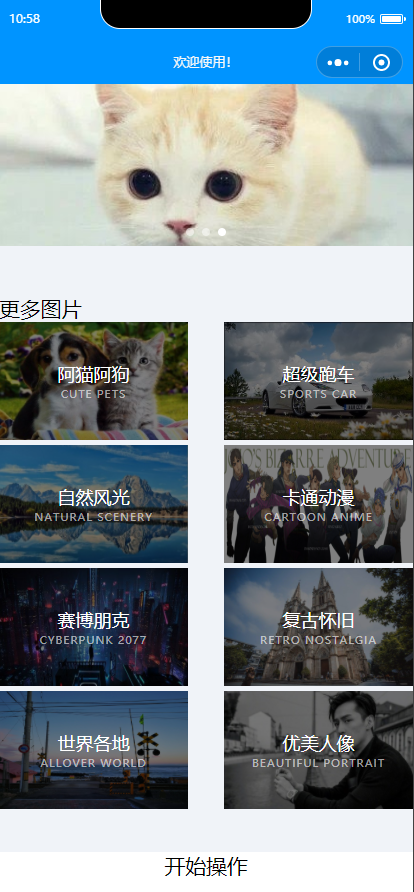

主要是可以单指的实现图片的拖动,旋转,调整遮罩优先级和多张图片合成一张图片的作用
代码结构
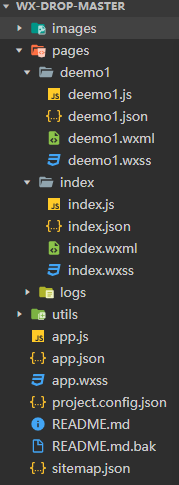
主要的页面也只有两个,其中一个很明显,deemo1是我自己加上去的主页进入页面,也就是刚才在展示的第一张图。其中的布局调整在之后会提到。
剩余的主要功能都在index的界面实现,其中调用的函数和改动也在之后再提。
主页的布局样式
页面 布局应该算是微信小程序最简单最容易学的部分了。所以我决定自己写一个进入页面,一来为了学以致用,二来为了给本来只有一个folder的程序加一点内容。
deemo1.wxml
<view class="top">
  <swiper indicator-dots indicator-color="rgba(255,255,255,0.5)"
  indicator-active-color="#fff" circular autoplay interval="4000">
    <swiper-item><image  mode ="widthFix "src="../../images/1.png"></image></swiper-item>
    <swiper-item><image mode ="widthFix" src="../../images/2.y.png"></image></swiper-item>
    <swiper-item><image mode ="widthFix" src="../../images/4.y.jpg"></image></swiper-item>
  </swiper>
</view>


<view class="works">
  <view class="container">
    <view class="pubTitle">
      <view class="txt">更多图片</view>
    </view>

    <view class="wkMain">
      <navigator class="box" open-type="reLaunch">
        <image class="pic" src="https://s1.ax1x.com/2020/10/17/0LCHK0.jpg"></image>
        <view class="ceng">
          <view class="title">阿猫阿狗</view>
          <view class="des">Cute Pets</view>
        </view>
      </navigator>


<navigator class="father" url="/pages/index/index">
  <view class="txt"> 开始操作 </view>
  </navigator>
删去了重复的内容,在wxml中主要就是采用不同的元件包装起来要显示的内容(我学习的感受),然后在wxss中修改元件的样式和调整比例,位置之类的。
这里主要用的就是轮播栏(顶部)和一个普通的窗口(“更多图片”),和许多的导航器(其实并没有跳转到外网,但最后一个“开始操作”的导航器是跳转到操作页面的)
demmo1.wxss
/* 轮播图 */
.top{width: 100%; height: 295rpx;}
.top swiper{height: 100%;width: 100%;}
.top image{ width: 100%; height: 295rpx;}

/* 图片样式 */
.works{ background: #f0f3f8; padding: 90rpx 0 70rpx;}
.wkMain{display: flex; flex-wrap: wrap; justify-content: space-between;}
.wkMain .box{ width: 344rpx; height: 214rpx; margin-bottom: 10rpx; position: relative;}
.wkMain .pic{ width: 100%; height: 100%;}
.wkMain .ceng{ width: 100%; height: 100%; background: rgba(0,0,0,0.5); position: absolute;
top: 0; left: 0; color: #fff; display: flex; flex-direction: column;
justify-content: center; align-items: center; padding: 0 20rpx; box-sizing: border-box;}
.wkMain .ceng .title{font-size: 34rpx;}
.wkMain .ceng .line{width: 100rpx; height: 2rpx; background: #fff; margin: 10rpx 0 20rpx;}
.wkMain .ceng .des{ opacity: 0.6; text-transform: uppercase; font-size: 20rpx;
letter-spacing: 2rpx;}

/* 跳转导航 */
.father{
  text-align: center;
}
.navigator-hover {
  color:blue;
}
.other-navigator-hover {
  color:red;
}
图片样式真的杀我,调整了很多次依旧达不成我想要的结果,最后参考了李乐同学的样式布局才得以解决
index.wxml
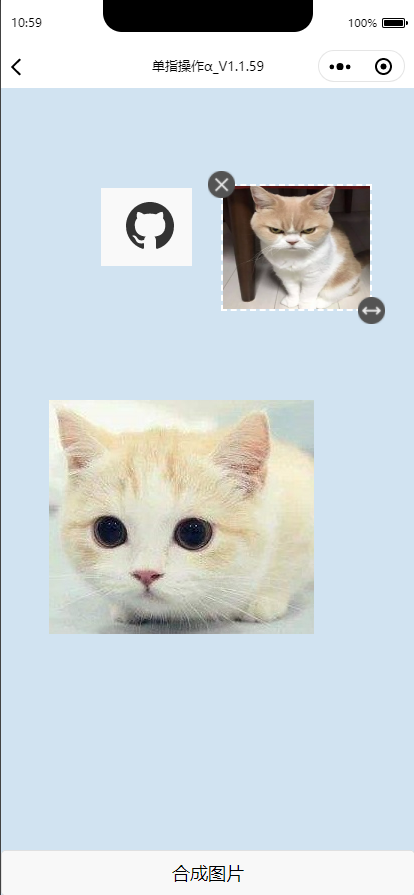
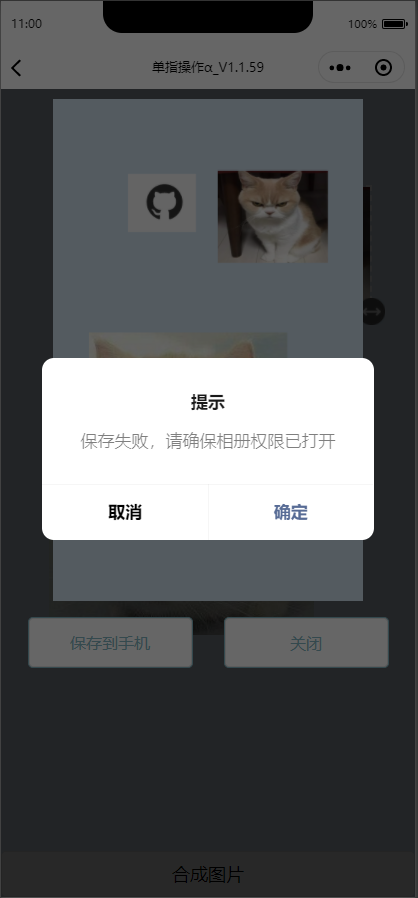
<view class="container">
  <image class="bg" src="/images/bg.png"></image>
</view>
<view class='contentWarp'>
  <!-- *************操作区域*************  -->
  <block wx:for="{{itemList}}" wx:key="{{item.id}}">
    <!-- 圆心坐标 <text style='position:absolute;top:{{item.y}}px;left:{{item.x}}px;width:2px;height:2px;background-color:yellow;z-index:500'></text> -->
    <view class='touchWrap' style='transform: scale({{item.scale}});top:{{item.top}}px;left:{{item.left}}px; z-index:{{item.active?100:1}}'>
      <view class='imgWrap {{item.active? "touchActive":""}}' style="transform: rotate({{item.angle}}deg); border: {{item.active?4*item.oScale:0}}rpx #fff dashed;">
        <image src='{{item.image}}' data-id='{{item.id}}' style='width:{{item.width}}px;height:{{item.height}}px;' bindtouchstart='WraptouchStart' bindtouchmove='WraptouchMove' bindtouchend='WraptouchEnd'></image>
        <image class='x' src='../../images/x.png' style='transform: scale({{item.oScale}});transform-origin:center;' data-id='{{item.id}}' bindtap='deleteItem'></image>
        <image class='o' src='../../images/o.png' style='transform: scale({{item.oScale}});transform-origin:center;' data-id='{{item.id}}' bindtouchstart='oTouchStart' bindtouchmove='oTouchMove' bindtouchend='WraptouchEnd'></image>
      </view>
    </view>
  </block>
  <!-- **************操作区域************  -->
  <view class="fixed">
    <button bindtap="openMask">合成图片</button>
  </view>
</view>
<view class='canvasWrap' hidden="{{!showCanvas}}">
  <image class="resImg" bindlongtap="saveImg" src="{{canvasTemImg}}" mode="widthFix"></image>
  <view class='btn_view'>
    <button bindtap='saveImg'>保存到手机</button>
    <button bindtap='disappearCanvas'>关闭</button>
  </view>
</view>

<!-- bug点:一定不要用if hidden 隐藏canvas会导致很多api调用bug -->
<canvas class='maskCanvas' canvas-id="maskCanvas" style='width:{{canvasWidth}}px; height:{{canvasHeight}}px;'></canvas>
这个文件主要是布置了画布背景,右上左下小按钮还有图片的位置和点击反馈。还有合成图片按钮的动作和弹出界面。比之源代码我并没有做太多的修改。
index.wxss
/**index.wxss**/
.bg {
  width: 100%;
  height: 100vh;
}
.contentWarp{
  position: absolute;
  width: 100%;
  height: 100%;
  top: 0;
  left: 0;
  bottom: 0;
  right: 0;
  margin: auto;
  /* background-color: #d1e3f1; */
}
.touchWrap{
    transform-origin: center;
    position: absolute;
    z-index: 100;
}

.imgWrap {
    box-sizing: border-box;
    width: 100%;
    transform-origin: center;
    float: left;
    border: 5rpx transparent dashed;
}
.imgWrap image {
    float: left;
}
.touchActive .x {
    display: block;
}

.touchActive .o {
    display: block;
}

.x {
    position: absolute;
    top: -25rpx;
    left: -25rpx;
    z-index: 500;
    display: none;
    width: 50rpx;
    height: 50rpx;
    overflow: hidden;
    font-weight: bold;
    color: #d1e3f1;
}
.o {
    position: absolute;
    bottom: -25rpx;
    right: -25rpx;
    width: 50rpx;
    height: 50rpx;
    text-align: center;
    display: none;
    overflow: hidden;
    font-weight: bold;
    color: #d1e3f1;
}
.active {
    background-color: rgb(78, 114, 151);
}

.active view {
    border: none;
}
.touchActive {
    /* border: 4rpx #fff dashed; */
    z-index: 400;
}
.fixed {
  position: absolute;
  bottom: 0;
  left: 0;
  right: 0;
  margin: auto;
}


.canvasWrap {
    position: absolute;
    width: 100%;
    height: 100%;
    top: 0;
    left: 0;
    background-color: rgba(0, 0, 0, 0.6);
    z-index: 999;
    text-align: center;
}

.maskCanvas {
    position: absolute;
    left: -200%;
    top: 0;
}

.btn {
    font-size: 30rpx;
    color: #81b7c4;
    border: 3rpx solid #81b7c4;
    background-color: #fff;
    line-height: 90rpx;
    width: 50%;
    margin-top: 20rpx;
    height: 90rpx;
}

.btnView view {
    padding-bottom: 20rpx;
}

.hand {
    position: absolute;
    left: 100rpx;
    right: 0;
    margin: auto;
    z-index: 100;
}

.getUserInfoBtn {
    position: initial;
    border: none;
    background-color: none;
}

.getUserInfoBtn::after {
    border: none;
}

.btn_view {
    display: flex;
    padding: 20rpx;
}

.btn_view button {
    width: 300rpx;
    font-size: 30rpx;
    color: #81b7c4;
    border: 3rpx solid #81b7c4;
    background-color: #fff;
    line-height: 90rpx;
}

.resImg {
  width: 75%;
  margin-top: 10px;
}
这里就是在wxml中显示的各种小元件的布局和显示效果,我调整了其中的部分参数和颜色,布局,使看起来更美观。
index.js
这是最难最复杂的各类操作函数定义的部分。因为十分冗长,我挑几个最重要,有代表性的,并配合我的注释讲一下。
以下是页面载入时初始化图片的过程(我挑出了其中有关的部分代码)
主要是将图片规范好后写入结构,方便以后的调用(重写了setData)。
items = []


data: {
    itemList: [],
  },


 onLoad: function(options) {
    items = this.data.itemList;


this.setDropItem({
      url: '/images/1.png'
    });
    this.setDropItem({
      url: '/images/2.png'
    });
    this.setDropItem({
      url: '/images/4.jpg'
    });
}


 setDropItem(imgData) {
    let data = {}
    wx.getImageInfo({
      src: imgData.url,
      success: res => {
        // 初始化数据
        data.width = res.width; //宽度
        data.height = res.height; //高度
        data.image = imgData.url; //地址
        data.id = ++itemId; //id
        data.top = 100; //top定位
        data.left = 100; //left定位
        //圆心坐标
        data.x = data.left + data.width / 2;
        data.y = data.top + data.height / 2;
        data.scale = 1; //scale缩放
        data.oScale = 1; //方向缩放
        data.rotate = 1; //旋转角度
        data.active = false; //选中状态
        console.log(data)
        items[items.length] = data;
        this.setData({
          itemList: items
        })
      }
    })
  },
控制移动的函数
WraptouchMove(e) {
    if (flag) {
      flag = false;
      setTimeout(() => {
        flag = true;
      }, 100)
    }
    // console.log('WraptouchMove', e)
    items[index]._lx = e.touches[0].clientX;
    items[index]._ly = e.touches[0].clientY;

    items[index].left += items[index]._lx - items[index].lx;
    items[index].top += items[index]._ly - items[index].ly;
    items[index].x += items[index]._lx - items[index].lx;
    items[index].y += items[index]._ly - items[index].ly;

    items[index].lx = e.touches[0].clientX;
    items[index].ly = e.touches[0].clientY;
    console.log(items)
    this.setData({
      itemList: items
    })
  },
删除项目图片的函数(需要新建列表转储来实现)
deleteItem: function(e) {
    let newList = [];
    for (let i = 0; i < items.length; i++) {
      if (e.currentTarget.dataset.id != items[i].id) {
        newList.push(items[i])
      }
    }
    if (newList.length > 0) {
      newList[newList.length - 1].active = true;
    }
    items = newList;
    this.setData({
      itemList: items
    })
  },
合成图片的函数
synthesis() { // 合成图片
    this.drawTime = this.drawTime + 1
    console.log('合成图片')
    maskCanvas.save();
    maskCanvas.beginPath();
    //一张白图  可以不画
    maskCanvas.setFillStyle('#fff');
    maskCanvas.fillRect(0, 0, this.sysData.windowWidth, this.data.canvasHeight)
    maskCanvas.closePath();
    maskCanvas.stroke();

    //画背景 hCw 为 1.62 背景图的高宽比
    maskCanvas.drawImage('/images/bg.png', 0, 0, this.data.canvasWidth, this.data.canvasHeight);
    /*
        num为canvas内背景图占canvas的百分比,若全背景num =1
        prop值为canvas内背景的宽度与可移动区域的宽度的比,如一致,则prop =1;
       */
    //画组件
    const num = 1,
      prop = 1;
小结
从零到一永远是最难的。从刚开始每一个文件的作用都不知道,到开始慢慢理解,再到上手能写基本的页面布局,
再到可以改动原来的代码。最后甚至能优化部分函数,我以为很漫长的过程却在两周内得到了实现。
我感觉我学到了很多,那就继续努力吧。

 浙公网安备 33010602011771号