hadoop虚拟机安装步骤
推荐笔记:https://note.youdao.com/share/?id=ee224ffa5dd6b4db4b13eb9285b096ba&type=note#/
以下为本人计算机具体操作内容及截屏。
刚开始在本机windows上安装hadoop,但是网址localhost:8088和localhost:50070可以进去,但eclipse运行hadoop报错,所以在linux虚拟机上配置hadoop,由于之前已配置过JDK,所以下面不展示JDK配置,比较简单。
1.添加用户并添加用户权限:
添加用户不作演示。
添加用户权限:
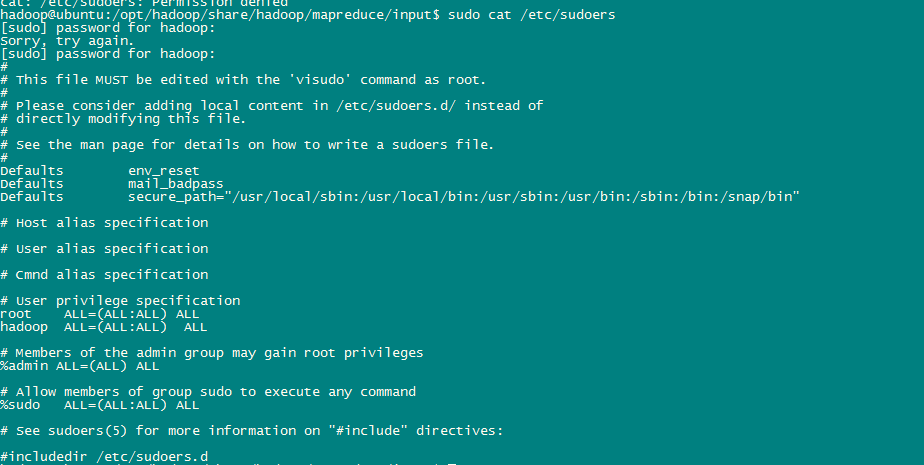
下面标红部分为添加用户权限,个人新建用户名为hadoop,根据自己设置进行改变。
#
# This file MUST be edited with the 'visudo' command as root.
#
# Please consider adding local content in /etc/sudoers.d/ instead of
# directly modifying this file.
#
# See the man page for details on how to write a sudoers file.
#
Defaults        env_reset
Defaults        mail_badpass
Defaults        secure_path="/usr/local/sbin:/usr/local/bin:/usr/sbin:/usr/bin:/sbin:/bin:/snap/bin"

# Host alias specification

# User alias specification

# Cmnd alias specification

# User privilege specification
root    ALL=(ALL:ALL) ALL
hadoop  ALL=(ALL:ALL)  ALL

# Members of the admin group may gain root privileges
%admin ALL=(ALL) ALL

# Allow members of group sudo to execute any command
%sudo   ALL=(ALL:ALL) ALL

# See sudoers(5) for more information on "#include" directives:

#includedir /etc/sudoers.d

2.全局变量设置:
根据个人具体目录及文件名进行修改
# /etc/profile: system-wide .profile file for the Bourne shell (sh(1))
# and Bourne compatible shells (bash(1), ksh(1), ash(1), ...).

if [ "$PS1" ]; then
  if [ "$BASH" ] && [ "$BASH" != "/bin/sh" ]; then
    # The file bash.bashrc already sets the default PS1.
    # PS1='\h:\w\$ '
    if [ -f /etc/bash.bashrc ]; then
      . /etc/bash.bashrc
    fi
  else
    if [ "`id -u`" -eq 0 ]; then
      PS1='# '
    else
      PS1='$ '
    fi
  fi
fi

if [ -d /etc/profile.d ]; then
  for i in /etc/profile.d/*.sh; do
    if [ -r $i ]; then
      . $i
    fi
  done
  unset i
fi
export JAVA_HOME=/opt/jdk
export JRE_HOME=${JAVA_HOME}/jre
export CLASSPATH=.:${JAVA_HOME}/lib:${JRE_HOME}/lib
export PATH=${JAVA_HOME}/bin:$PATH
export HADOOP_HOME=/opt/hadoop
export PATH=$PATH:$JAVA_HOME/bin:$JRE_HOME/bin:$HADOOP_HOME/bin:$HADOOP_HOME/sbin

注意:配置完要进行配置生效
sudo source /etc/profile 或者进行重启虚拟机操作
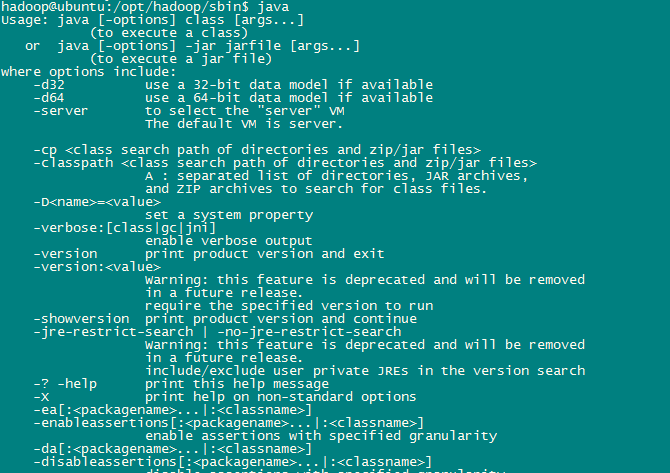
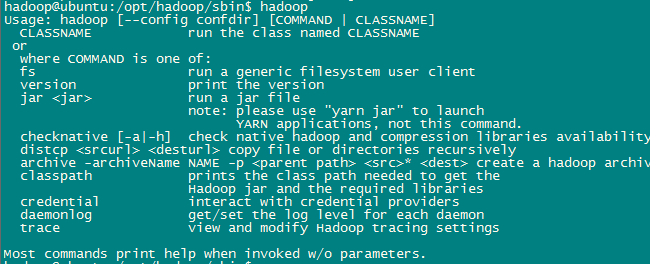
此时输入java 或 hadoop 具体显示页面如下:


若全局变量无效 , 则在当前用户权限文件进行添加:
参考博客: https://www.cnblogs.com/haore147/p/3633116.html

到这里hadoop的本地配置可以运行。
---------------------------------------------------------------------------------------------------------------------------------------------------------------------------------------------------------------------------------------
HADOOP与本机eclipse结合:
1.hdfs-site.xml
<!-- Put site-specific property overrides in this file. -->
<configuration>

    <!-- 配置HDFS的冗余度 -->
        <property>
                <name>dfs.replication</name>
                <value>1</value>
        </property>

        <!-- 配置是否检查权限 -->
        <property>
                <name>dfs.permissions.enabled</name>
                <value>false</value>
        </property>
</configuration>
2. core-site.xml
<configuration>

    <!--配置HDFS的NameNode -->
        <property>
                <name>fs.defaultFS</name>
                <value>hdfs://ubuntu:9000</value>
        </property>

        <!--配置DataNode保存数据的位置 -->
        <property>
                <name>hadoop.tmp.dir</name>
                <value>/opt/hadoop_tmp</value>
        </property>

</configuration>
3.在opt下面创建tmp文件
4.mapred-site.xm
<configuration>

    <!-- 配置Mapreduce运行框架 -->
        <property>
                <name>mapreduce.framework.name </name>
                <value>yarn</value>
        </property>
</configuration>
5. yarn-site.xml
<configuration>

        <!-- 配置ResourceManager的地址 -->
        <property>
                <name>yarn.resourcemanager.hostname</name>
                <value>ubuntu</value>
        </property>

        <!-- 配置NodeManager执行任务的方式 -->
        <property>
                <name>yarn.nodemanager.aux-services</name>
                <value>mapreduce_shuffle</value>
        </property>

</configuration>
6. 修改: C:\Windows\System32\drivers\etc\hosts
# Copyright (c) 1993-2009 Microsoft Corp.
#
# This is a sample HOSTS file used by Microsoft TCP/IP for Windows.
#
# This file contains the mappings of IP addresses to host names. Each
# entry should be kept on an individual line. The IP address should
# be placed in the first column followed by the corresponding host name.
# The IP address and the host name should be separated by at least one
# space.
#
# Additionally, comments (such as these) may be inserted on individual
# lines or following the machine name denoted by a '#' symbol.
#
# For example:
#
#      102.54.94.97     rhino.acme.com          # source server
#       38.25.63.10     x.acme.com              # x client host

# localhost name resolution is handled within DNS itself.
#    127.0.0.1       localhost
#    ::1             localhost
127.0.0.1    localhost
192.168.2.131 ubuntu
7. 注意要将本机上的hadoop/bin下的内容加上

8.配置好后 8088 和 50070均可访问
wordcount代码:
package worcount;


import java.io.IOException;
import java.util.Iterator;
import java.util.StringTokenizer;
import org.apache.hadoop.fs.Path;
import org.apache.hadoop.io.IntWritable;
import org.apache.hadoop.io.LongWritable;
import org.apache.hadoop.io.Text;
import org.apache.hadoop.mapred.FileInputFormat;
import org.apache.hadoop.mapred.FileOutputFormat;
import org.apache.hadoop.mapred.JobClient;
import org.apache.hadoop.mapred.JobConf;
import org.apache.hadoop.mapred.MapReduceBase;
import org.apache.hadoop.mapred.Mapper;
import org.apache.hadoop.mapred.OutputCollector;
import org.apache.hadoop.mapred.Reducer;
import org.apache.hadoop.mapred.Reporter;
import org.apache.hadoop.mapred.TextInputFormat;
import org.apache.hadoop.mapred.TextOutputFormat;

/**
 *
 * 描述:WordCount explains by Felix
 *
 * @author Hadoop Dev Group
 */
public class Wordcount {
    /**
     * MapReduceBase类:实现了Mapper和Reducer接口的基类(其中的方法只是实现接口,而未作任何事情) Mapper接口:
     * WritableComparable接口:实现WritableComparable的类可以相互比较。所有被用作key的类应该实现此接口。
     * Reporter 则可用于报告整个应用的运行进度,本例中未使用。
     *
     */
    public static class Map extends MapReduceBase implements
            Mapper<LongWritable, Text, Text, IntWritable> {
        /**
         * LongWritable, IntWritable, Text 均是 Hadoop 中实现的用于封装 Java
         * 数据类型的类,这些类实现了WritableComparable接口,
         * 都能够被串行化从而便于在分布式环境中进行数据交换,你可以将它们分别视为long,int,String 的替代品。
         */
        private final static IntWritable one = new IntWritable(1);
        private Text word = new Text();

        /**
         * Mapper接口中的map方法: void map(K1 key, V1 value, OutputCollector<K2,V2>
         * output, Reporter reporter) 映射一个单个的输入k/v对到一个中间的k/v对
         * 输出对不需要和输入对是相同的类型,输入对可以映射到0个或多个输出对。
         * OutputCollector接口:收集Mapper和Reducer输出的<k,v>对。
         * OutputCollector接口的collect(k, v)方法:增加一个(k,v)对到output
         */
        public void map(LongWritable key, Text value,
                OutputCollector<Text, IntWritable> output, Reporter reporter)
                throws IOException {
            String line = value.toString();
            StringTokenizer tokenizer = new StringTokenizer(line);
            while (tokenizer.hasMoreTokens()) {
                word.set(tokenizer.nextToken());
                output.collect(word, one);
            }
        }
    }

    public static class Reduce extends MapReduceBase implements
            Reducer<Text, IntWritable, Text, IntWritable> {
        public void reduce(Text key, Iterator<IntWritable> values,
                OutputCollector<Text, IntWritable> output, Reporter reporter)
                throws IOException {
            int sum = 0;
            while (values.hasNext()) {
                sum += values.next().get();
            }
            output.collect(key, new IntWritable(sum));
        }
    }

    public static void main(String[] args) throws Exception {

        // Hadoop的安装目录
        System.setProperty("hadoop.home.dir", "D:\\hadoop");

        /**
         * JobConf:map/reduce的job配置类,向hadoop框架描述map-reduce执行的工作
         * 构造方法:JobConf()、JobConf(Class exampleClass)、JobConf(Configuration
         * conf)等
         */
        JobConf conf = new JobConf(Wordcount.class);
        conf.setJobName("wordcount"); // 设置一个用户定义的job名称
        conf.setOutputKeyClass(Text.class); // 为job的输出数据设置Key类
        conf.setOutputValueClass(IntWritable.class); // 为job输出设置value类
        conf.setMapperClass(Map.class); // 为job设置Mapper类
        conf.setCombinerClass(Reduce.class); // 为job设置Combiner类
        conf.setReducerClass(Reduce.class); // 为job设置Reduce类
        conf.setInputFormat(TextInputFormat.class); // 为map-reduce任务设置InputFormat实现类
        conf.setOutputFormat(TextOutputFormat.class); // 为map-reduce任务设置OutputFormat实现类
        /**
         * InputFormat描述map-reduce中对job的输入定义 setInputPaths():为map-reduce
         * job设置路径数组作为输入列表 setInputPath():为map-reduce job设置路径数组作为输出列表
         */
        FileInputFormat.setInputPaths(conf, new Path("hdfs://ubuntu:9000/input"));
        FileOutputFormat.setOutputPath(conf, new Path("hdfs://ubuntu:9000/output"));
//        FileInputFormat.setInputPaths(conf, new Path(args[0]));
//        FileOutputFormat.setOutputPath(conf, new Path(args[1]));
        JobClient.runJob(conf); // 运行一个job
//        System.out.println("eee");
    }
}
log4j.properties代码
log4j.rootLogger=INFO, stdout
log4j.appender.stdout=org.apache.log4j.ConsoleAppender
log4j.appender.stdout.layout=org.apache.log4j.PatternLayout
log4j.appender.stdout.layout.ConversionPattern=%d %p [%c] - %m%n
log4j.appender.logfile=org.apache.log4j.FileAppender
log4j.appender.logfile.File=target/spring.log
log4j.appender.logfile.layout=org.apache.log4j.PatternLayout
log4j.appender.logfile.layout.ConversionPattern=%d %p [%c] - %m%n


