Python自动化之pytest
一、官方文档:
https://docs.pytest.org/en/stable/index.html
二、pytest使用
-
pytest 使用规范
需要提前安装:pip install pytest
文件名必须要以test_开头(注意下划线)
类名必须要以Test开头(注意大写)
方法名必须要以test_开头
# -*- coding: utf-8 -*-# import pytest class TestDemo: def test_one(self): assert 1 == 1 def testtwo(self): assert 1 == 2 def three(self): assert True if __name__ == '__main__': # pytest.main(['-q', 'test_Demo.py']) pytest.main() # 控制台执行 # pytest test_Demo.py
-
pytest 注意事项
-
pytest的运行同样有两种执行方式,只是颜色不同,我比较喜欢控制台的
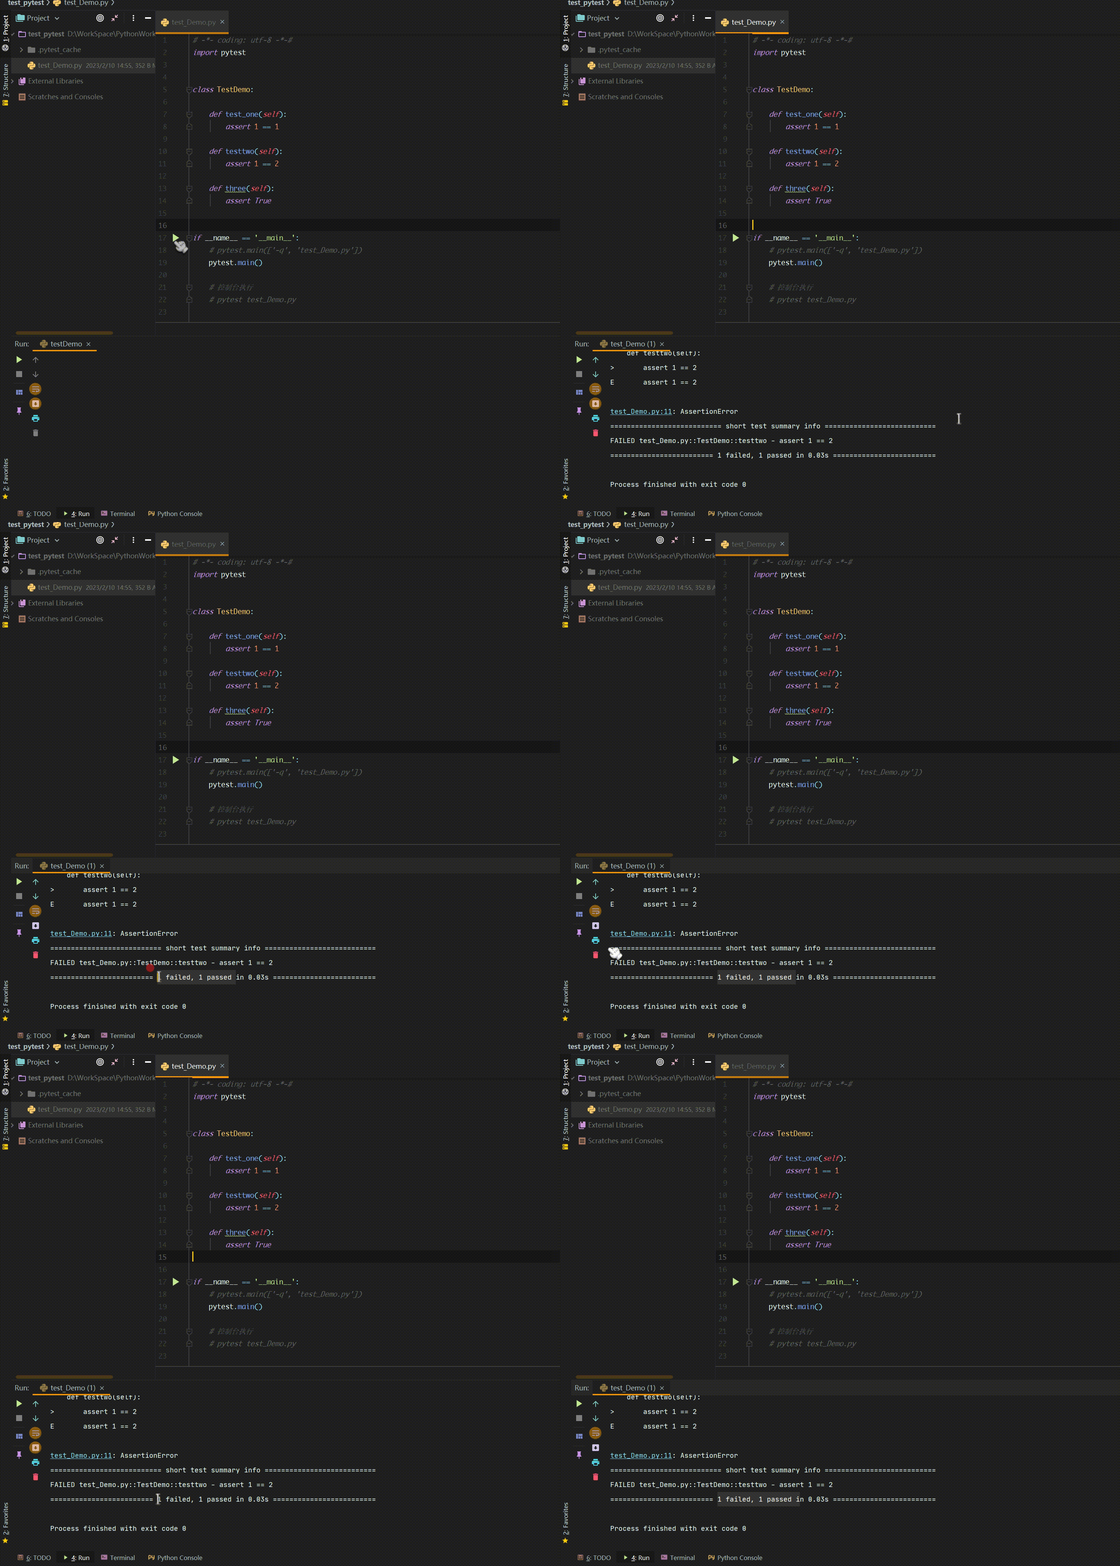
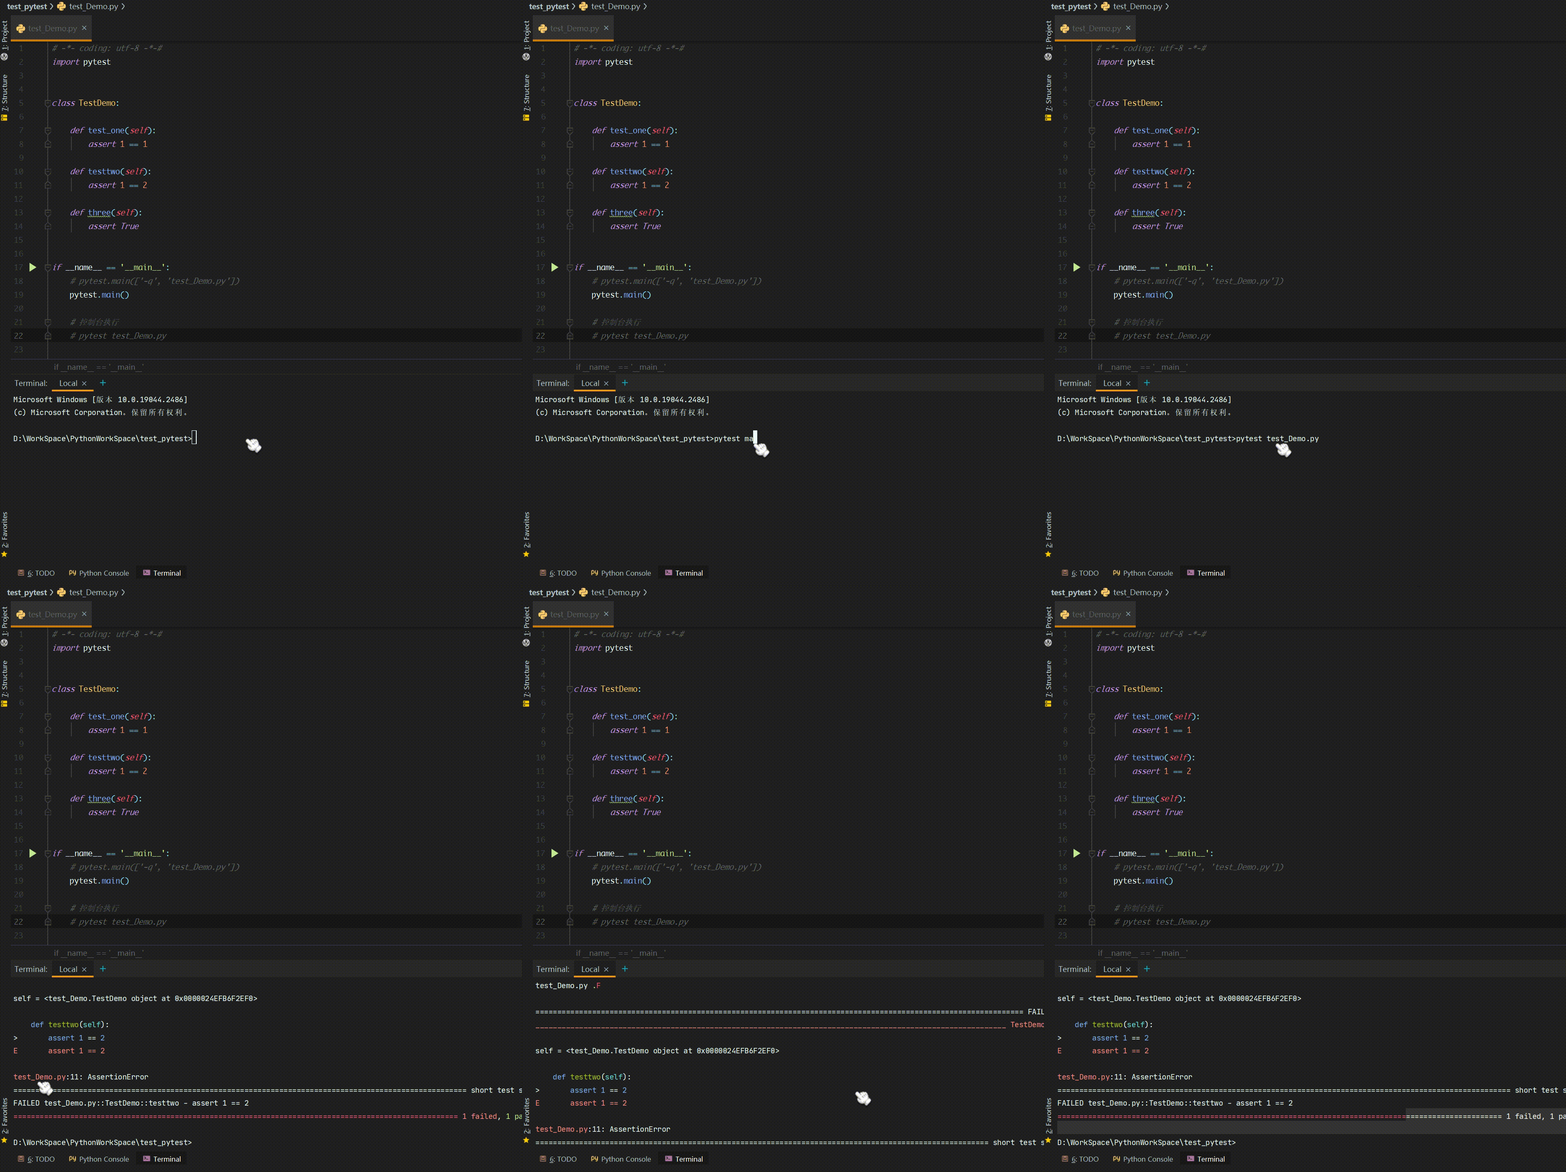
为什么上面说必须要以test开头,相较于unittest好似更严格了,接下来我们一起分析下
- 上面执行的gif已经展示了测试用例不以test开头是无法执行的--three
- 修改测试py从test_Demo更改为testDemo(结果:编辑器运行找不到用例,终端执行可以)
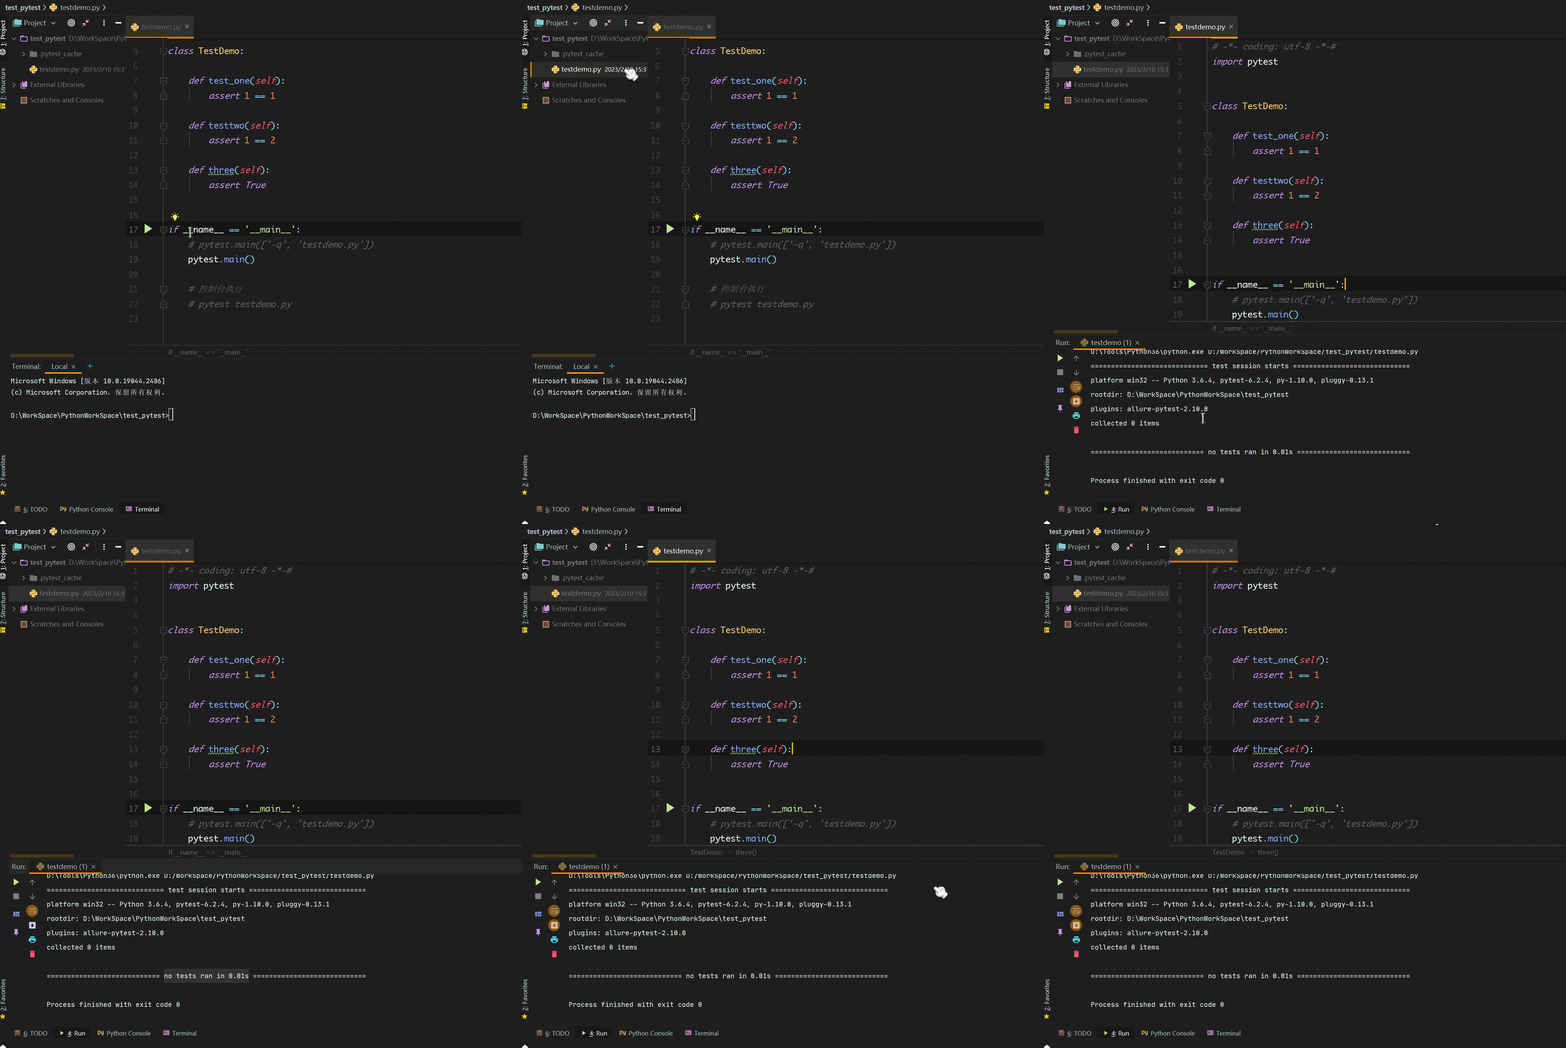

- 修改测试类名从TestDemo更改为testdemo(结果:编辑器及终端都无法加载用例)
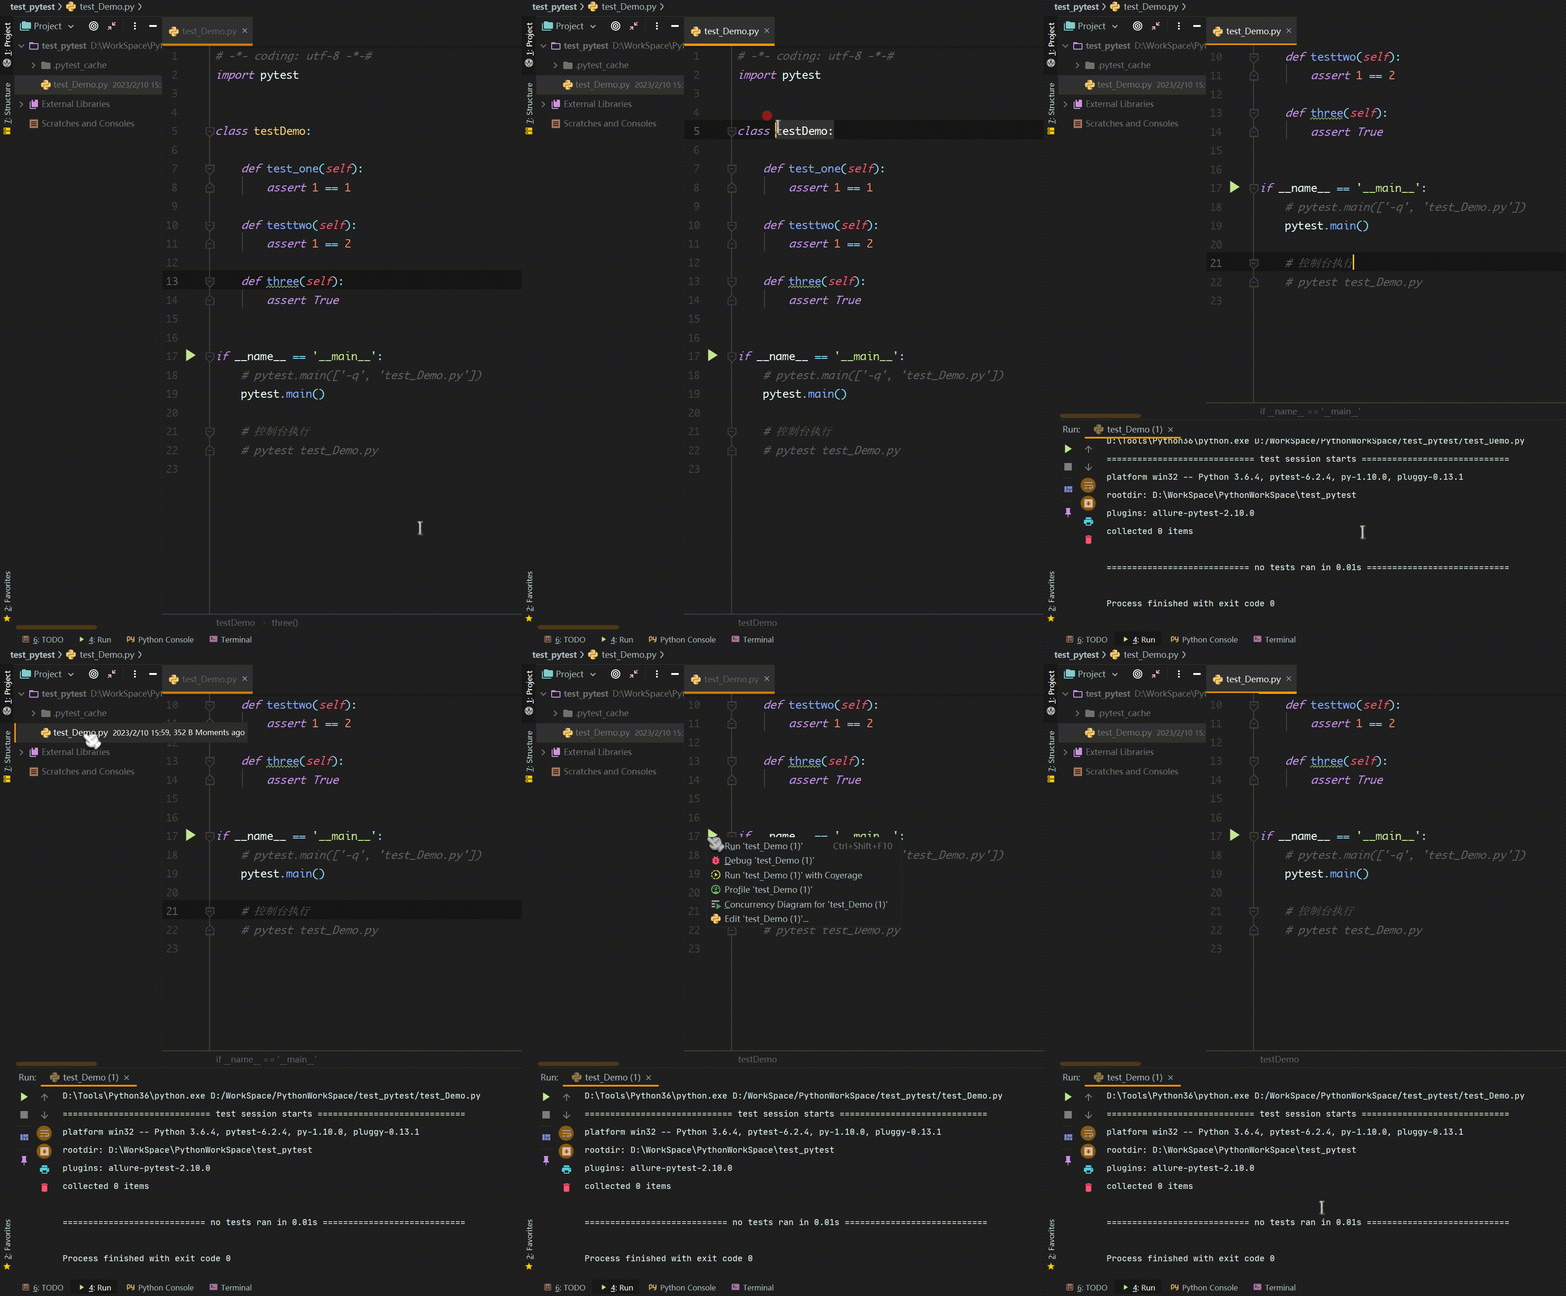
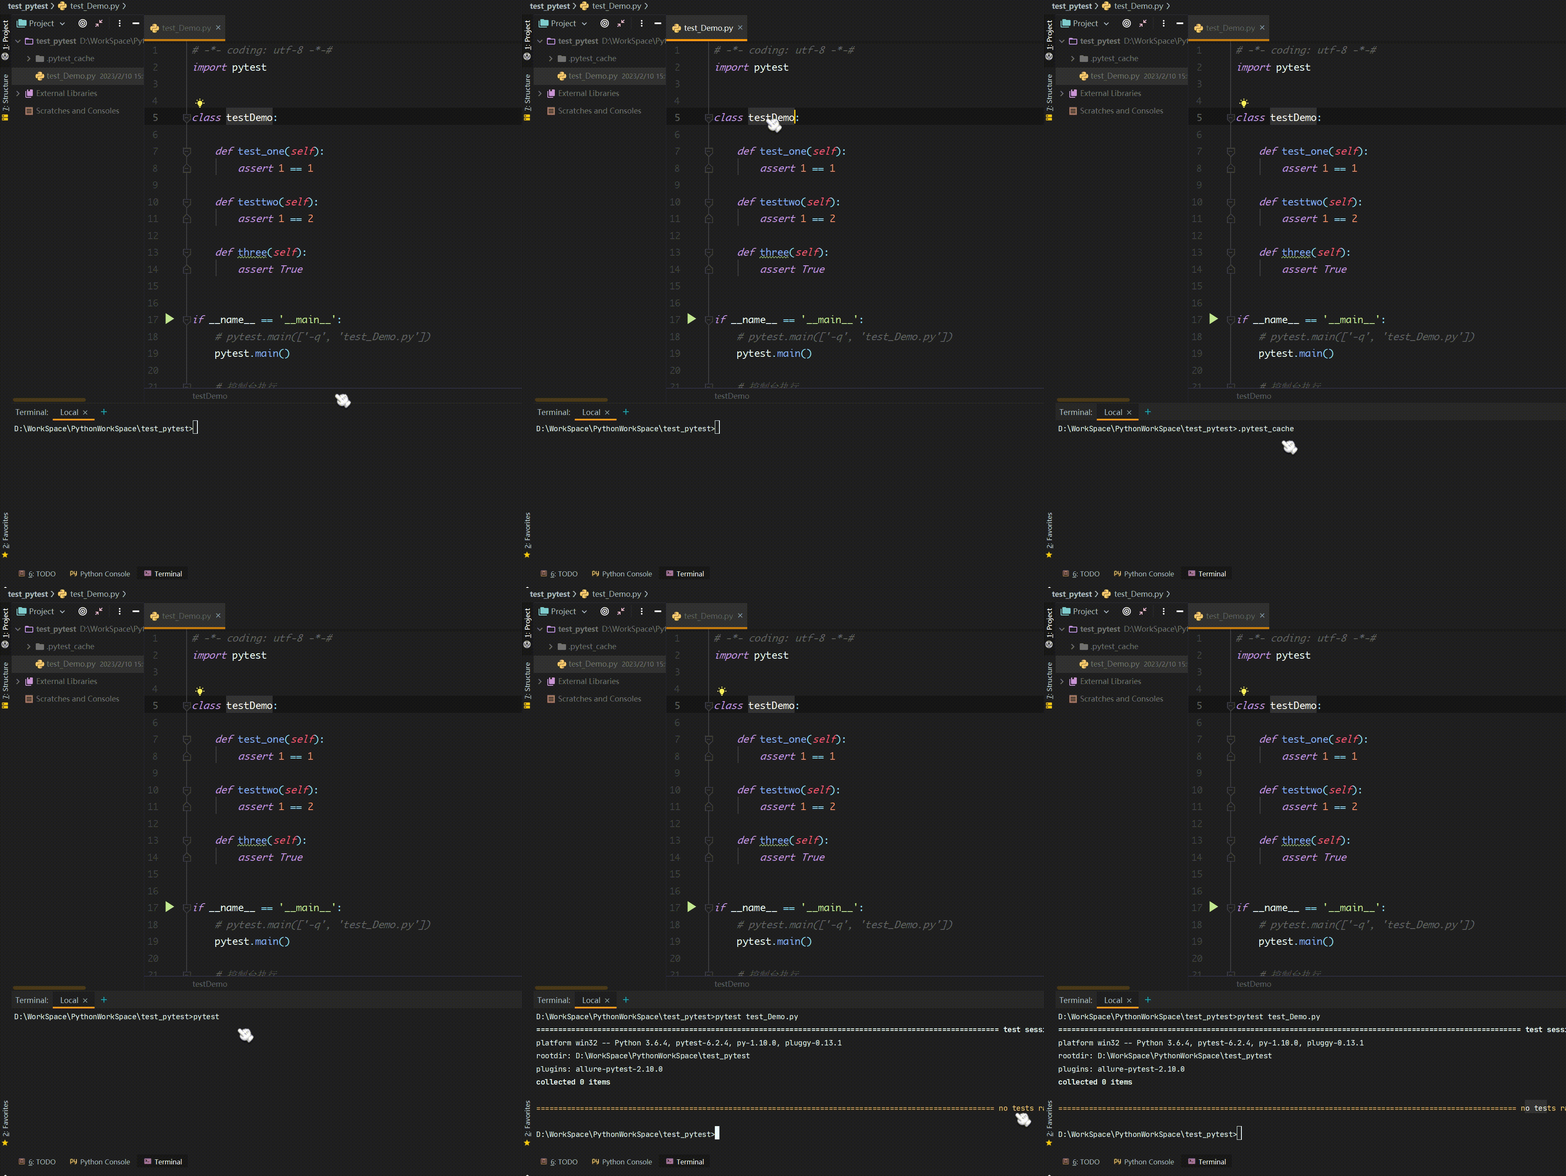
- 最后的最后,要严格按照使用规范进行命名文件及用例
-
-
pytest 执行参数
在前面说到了两种方式可以运行测试用例,对于执行的参数是有些区别的,适用于终端及main()
终端输入 pytest -h 查看pytest支持那些参数(下面只是列举几个,其他的根据需要自行了解)
-
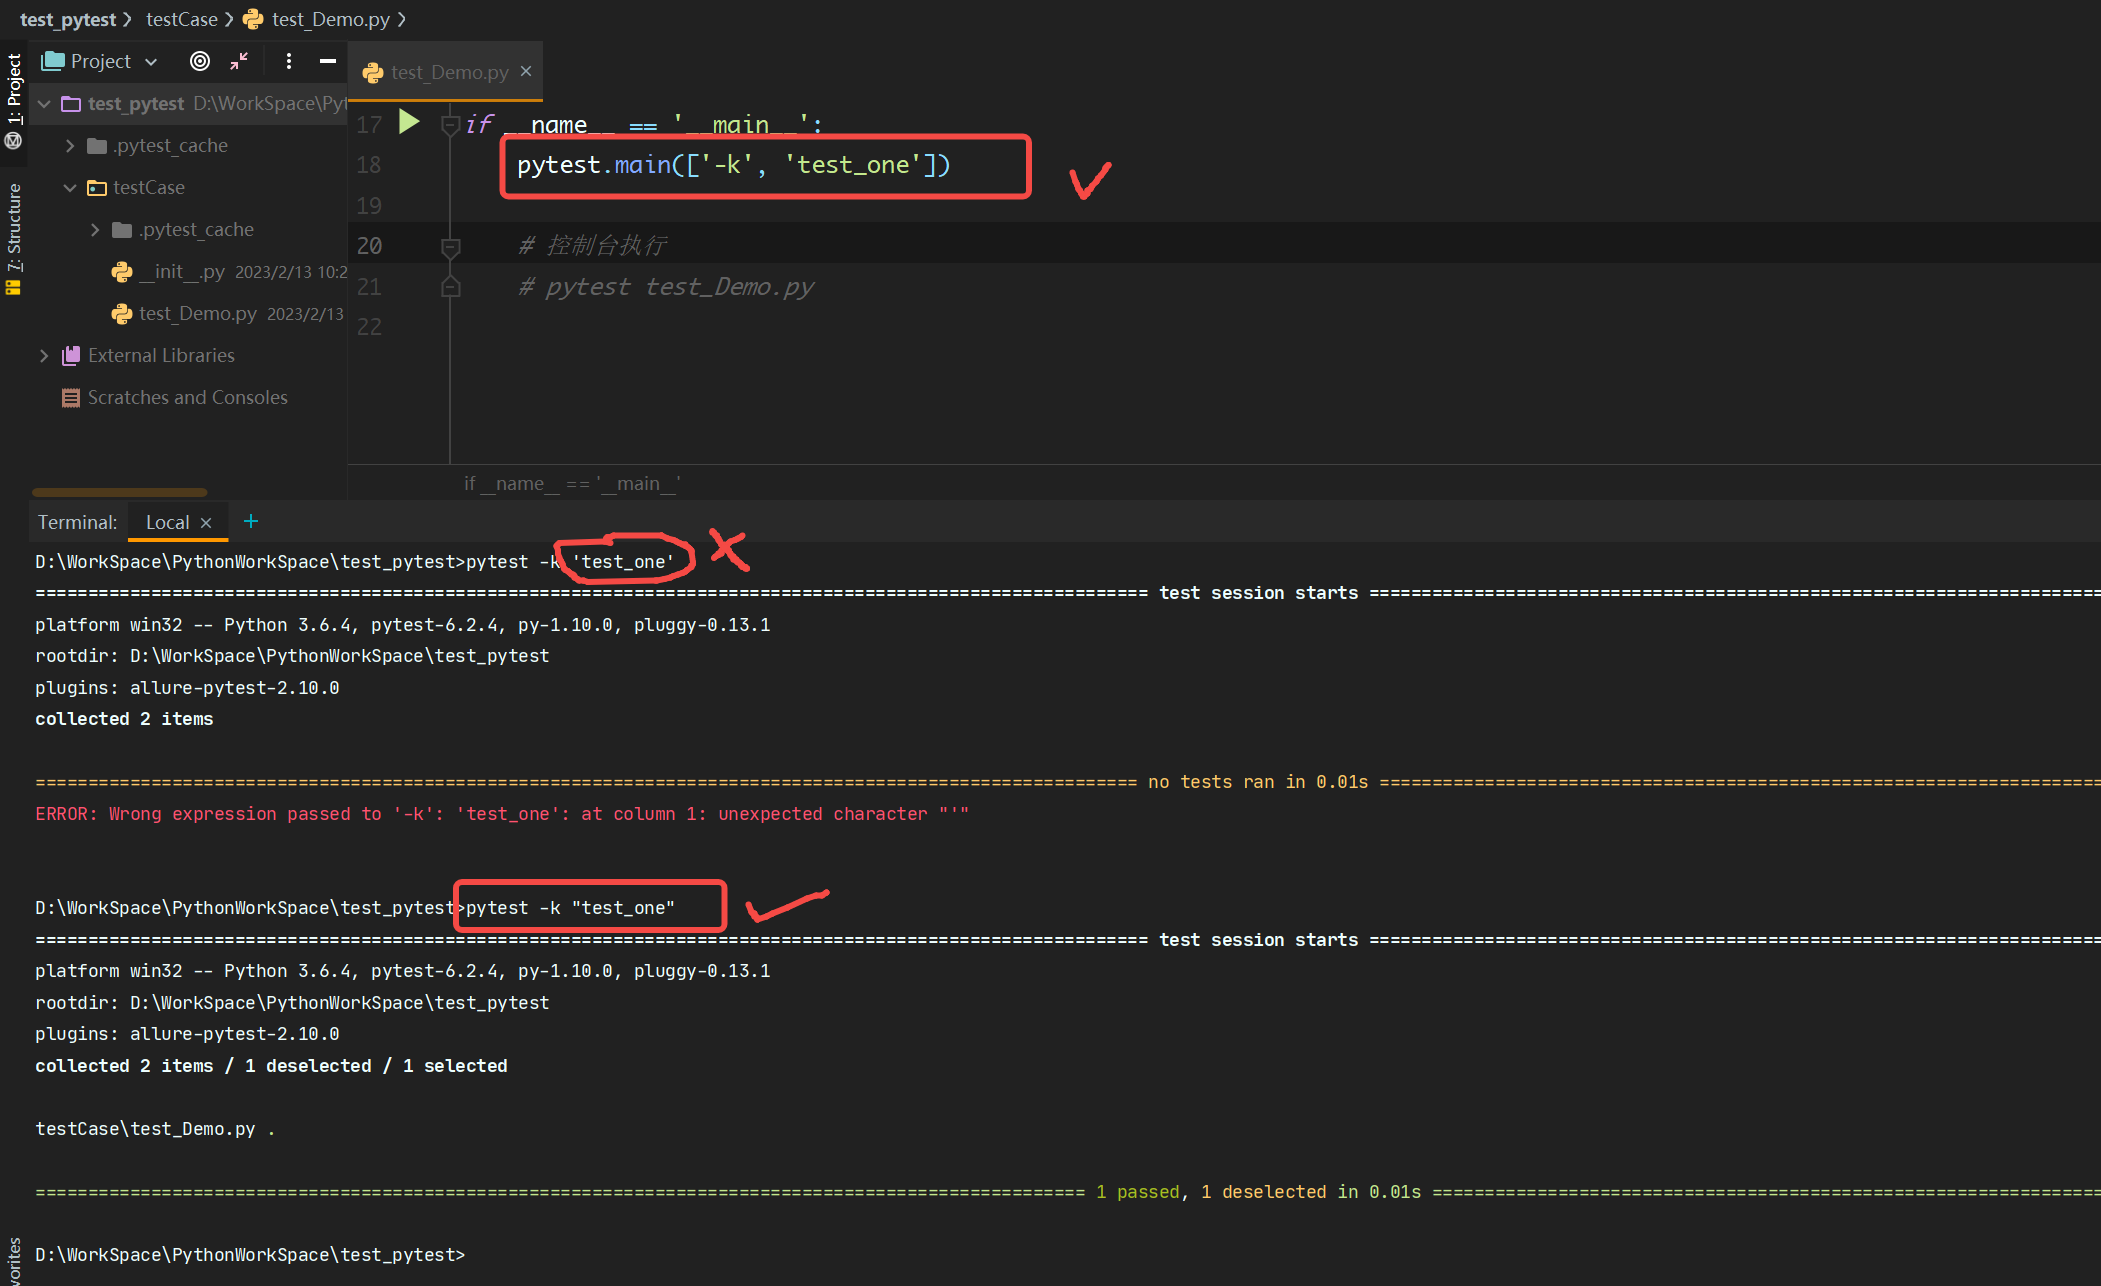
-k: 可以通过某些关键字进行匹配,从而执行哪些,不执行哪些(区分是否填写not)- 匹配规则可以是目录名、模块名、类名、测试函数名
- 匹配的名字需要用双引号
-
-m: 为用例打标签,执行时可以被指定,使用时用例上添加@pytest.mark.自定义标记名

-
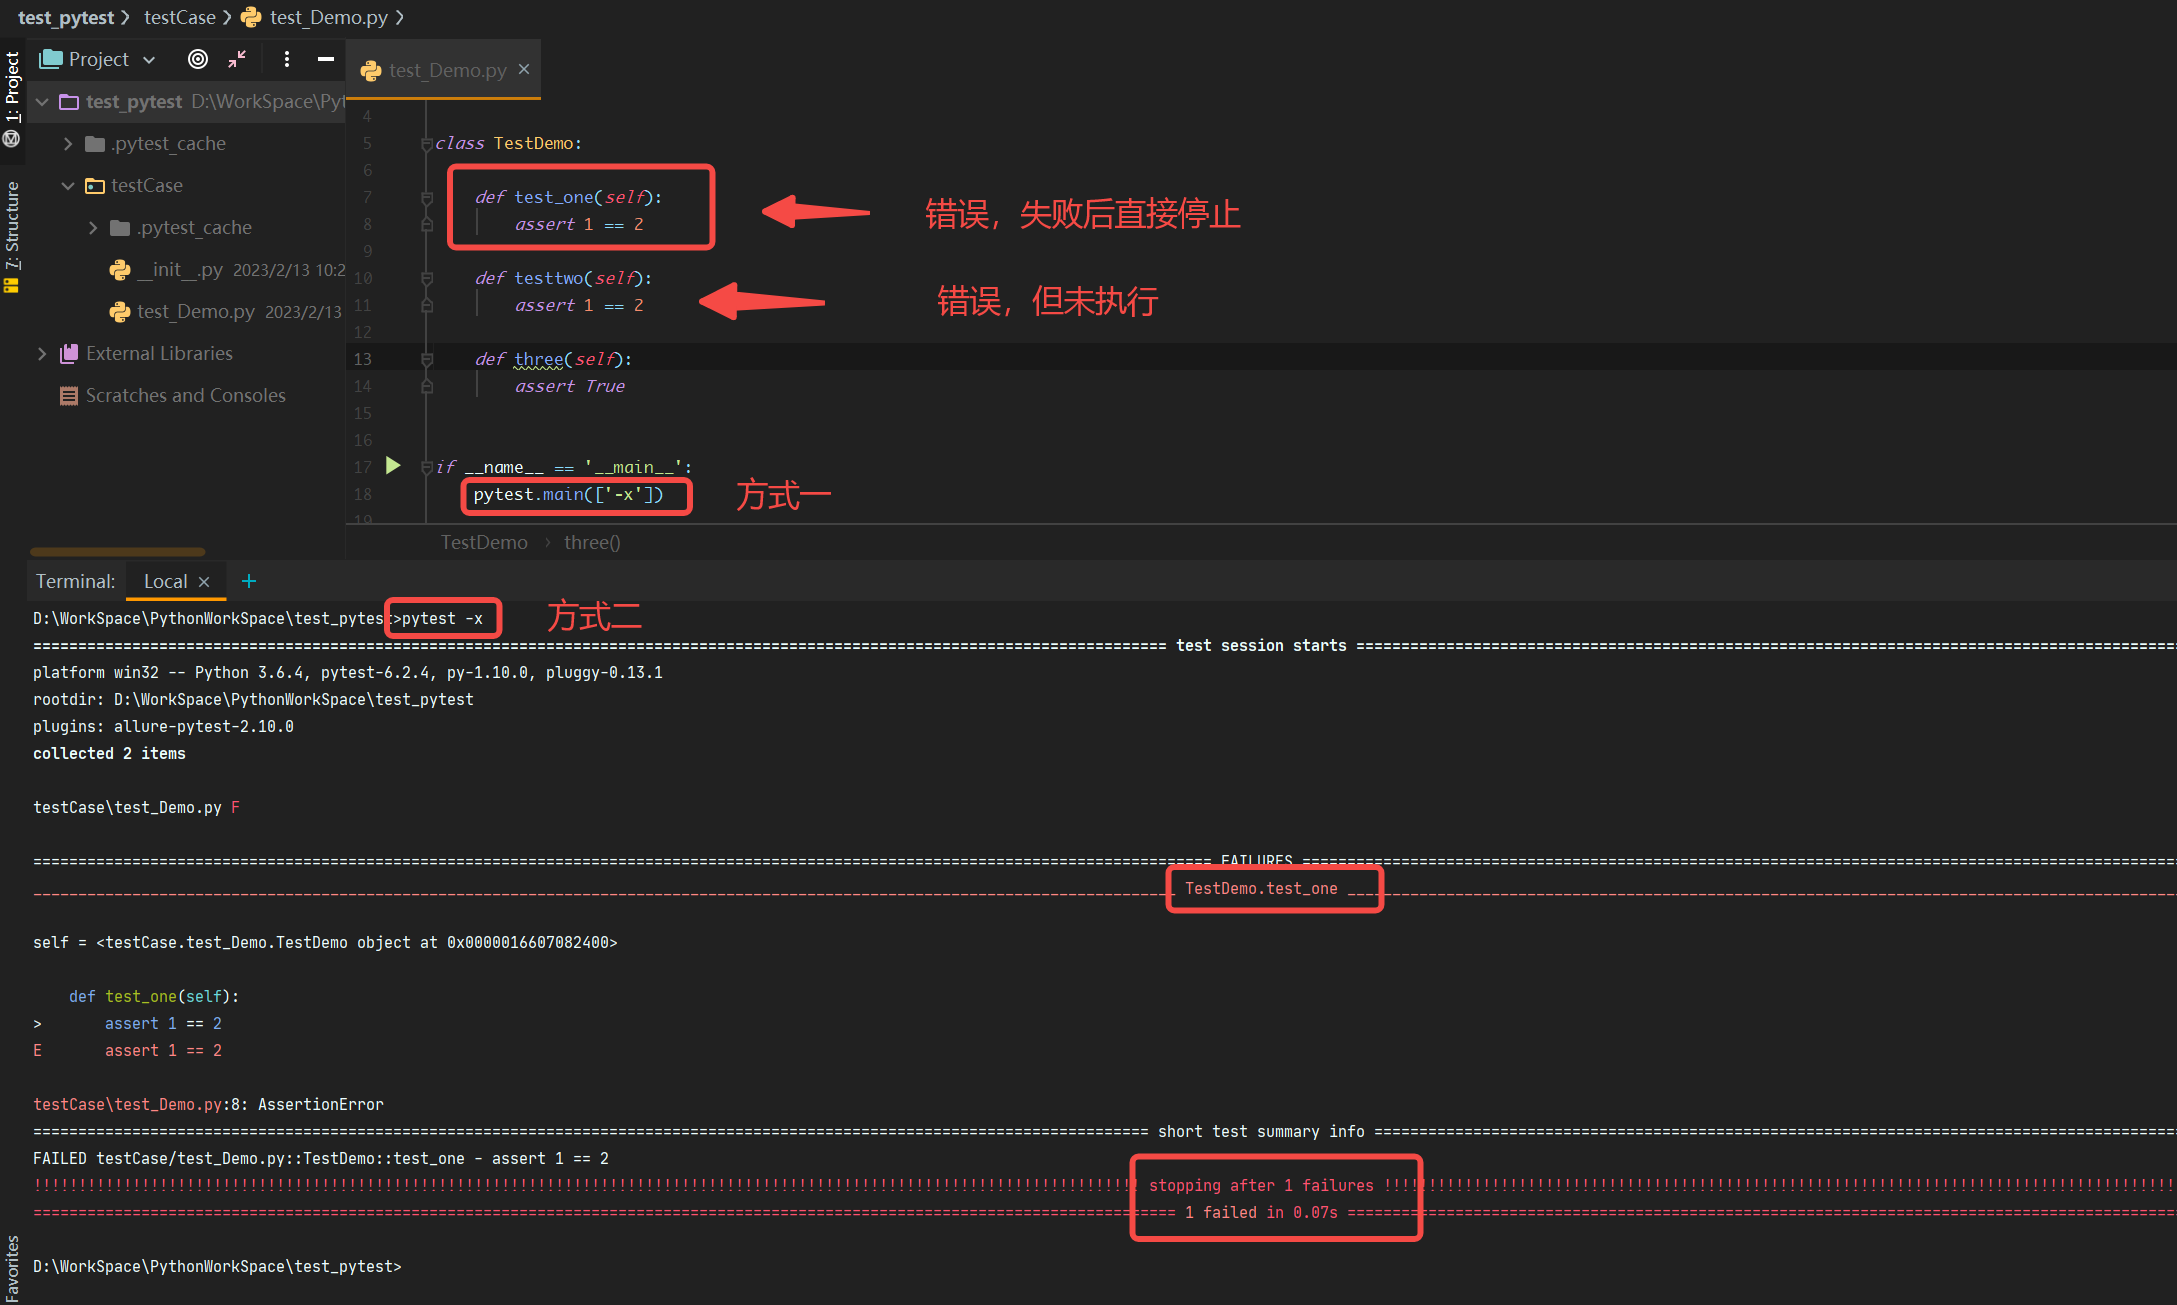
-x: 遇到错误用例,立即停止运行(后面的不再执行)
-
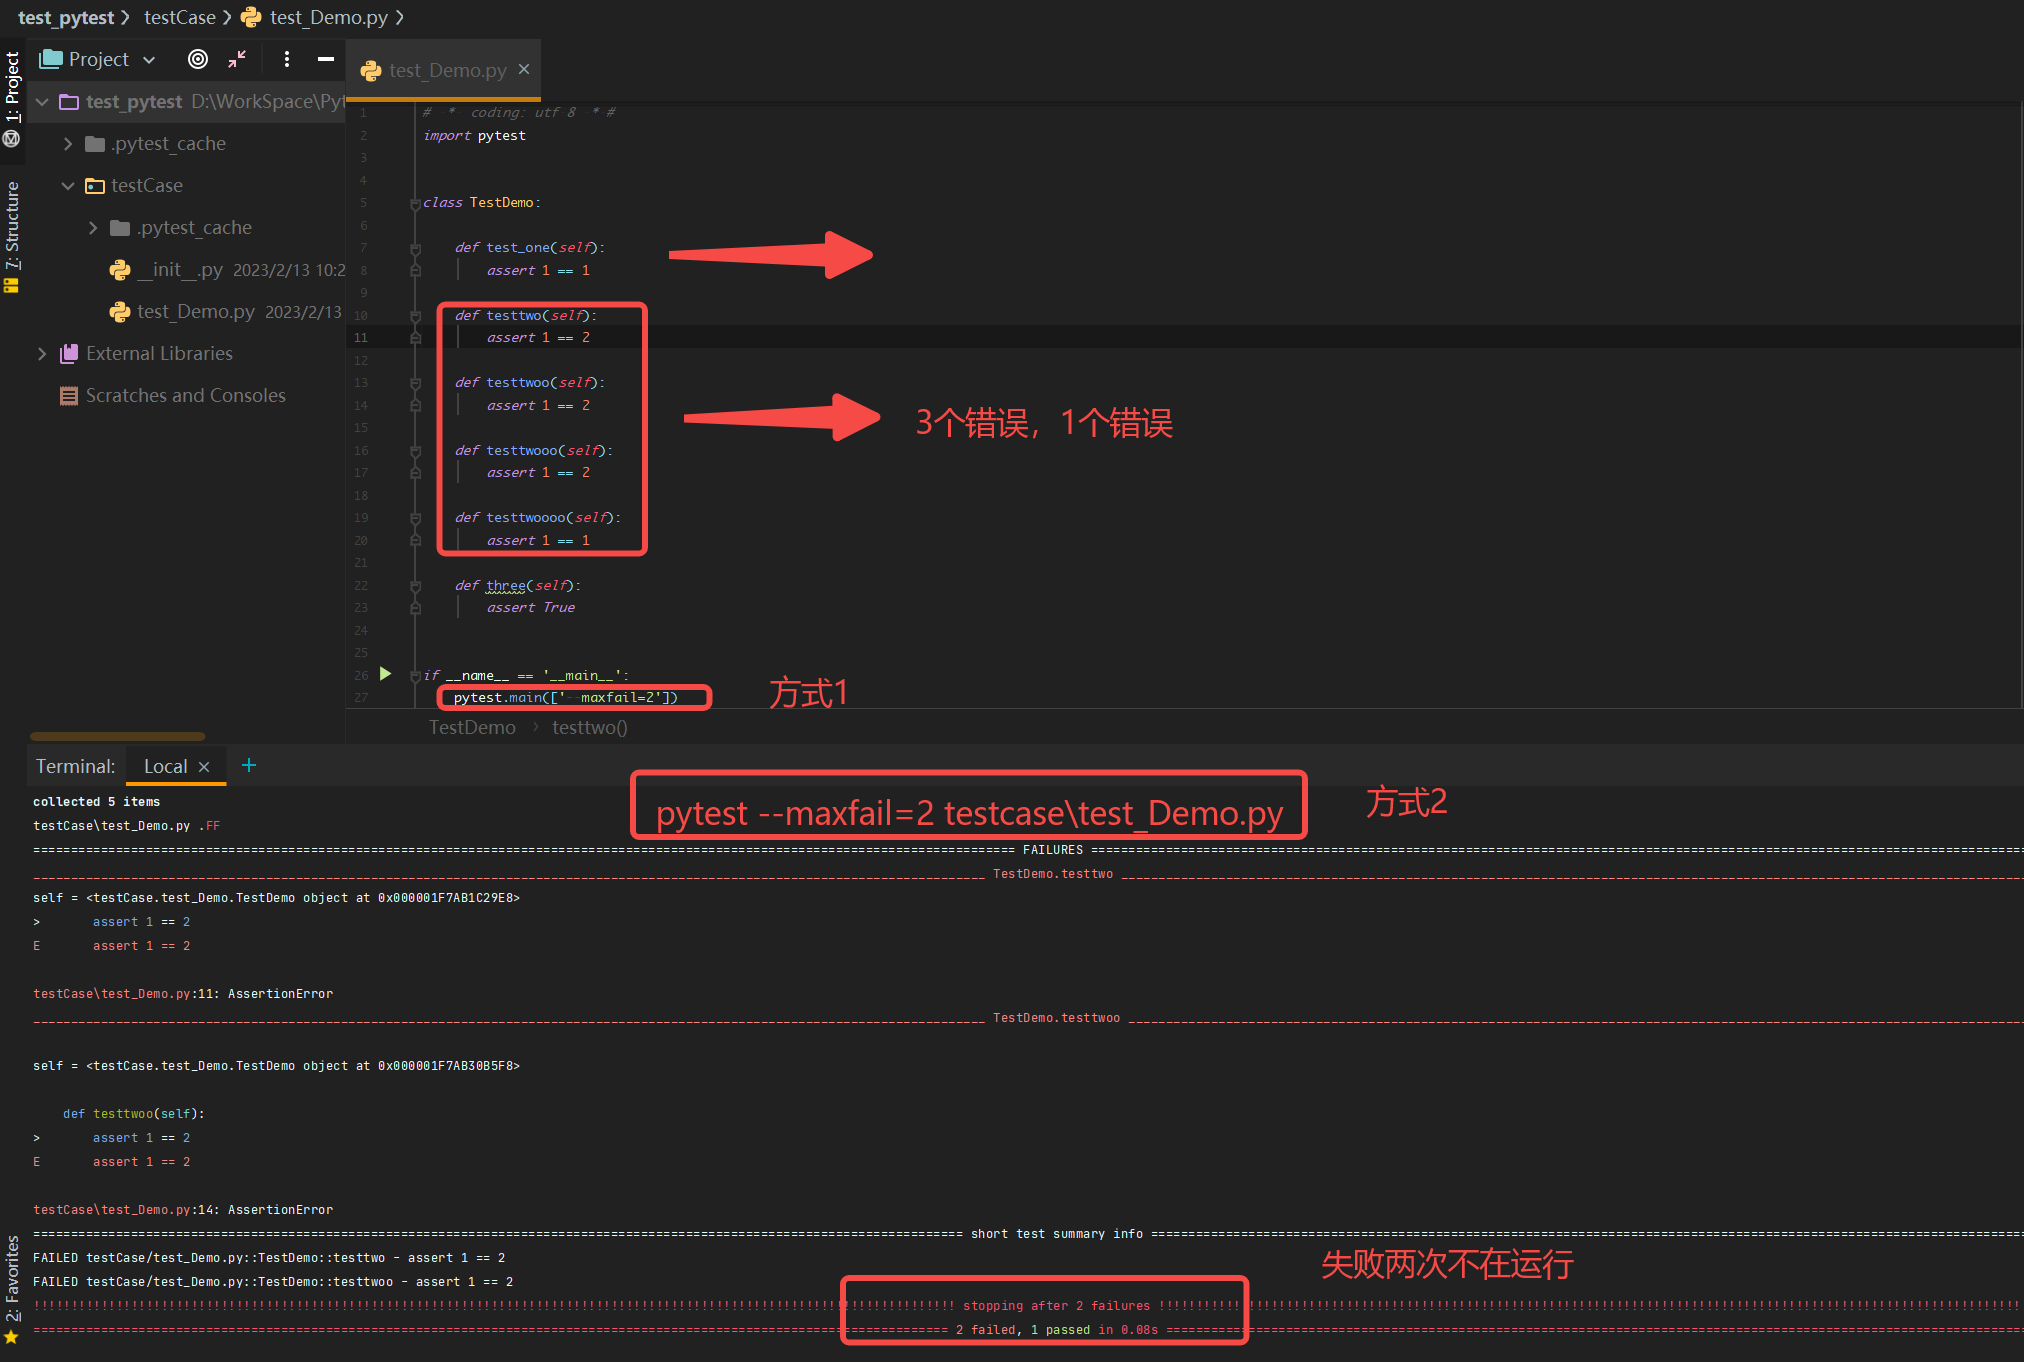
--maxfail=n: 失败到达n次后,退出
-
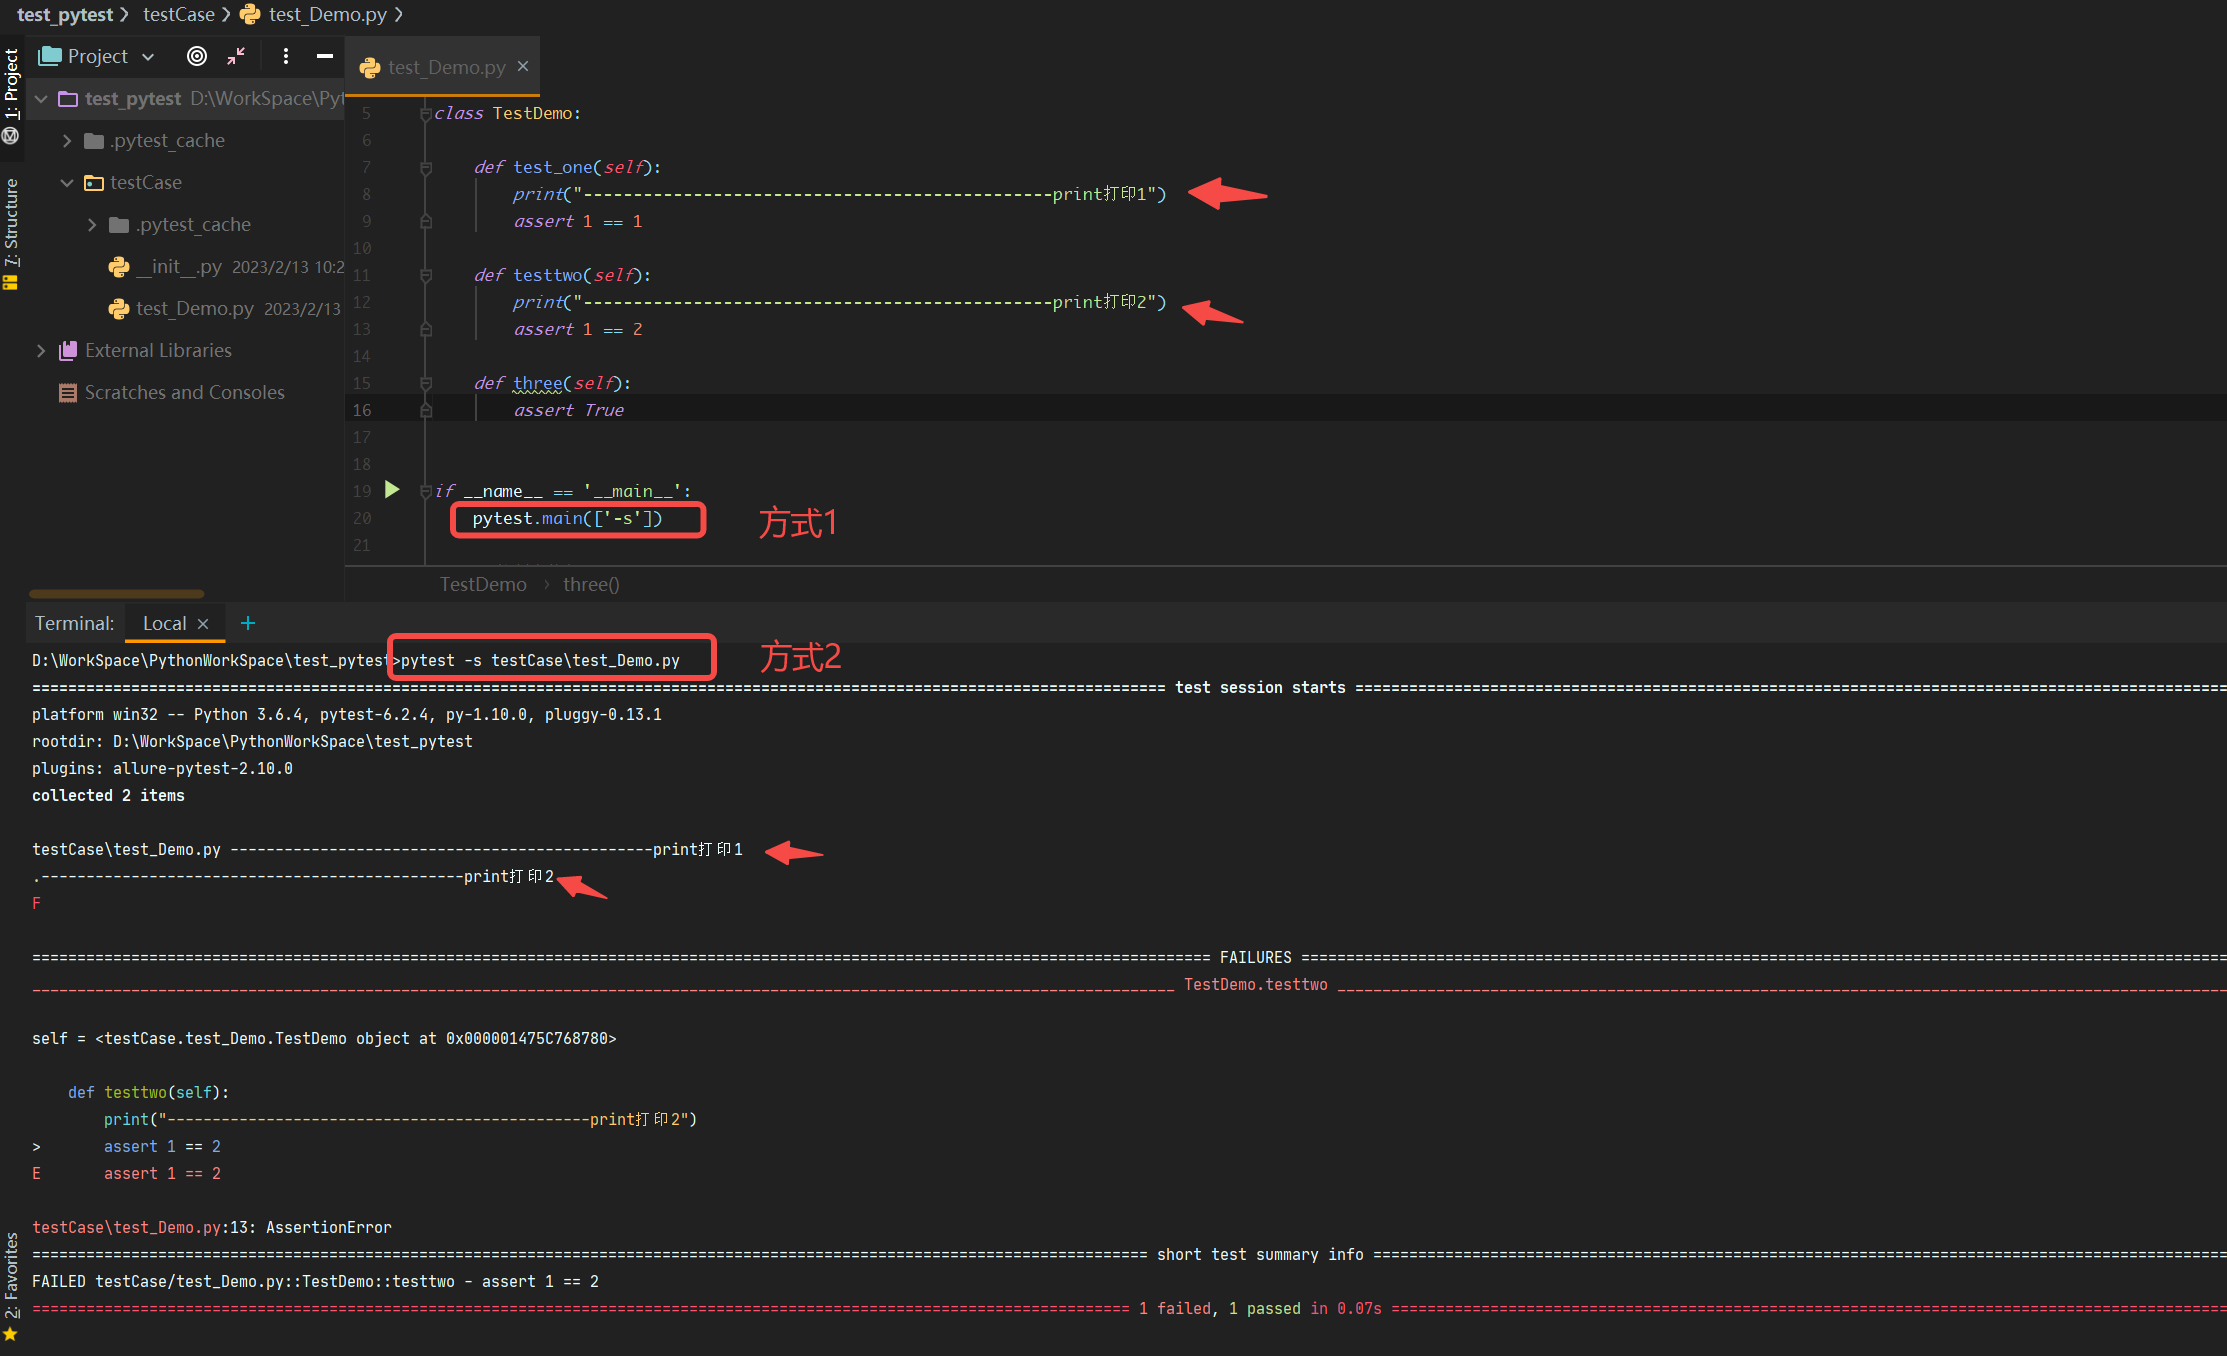
-s:将print的内容打印出来
-
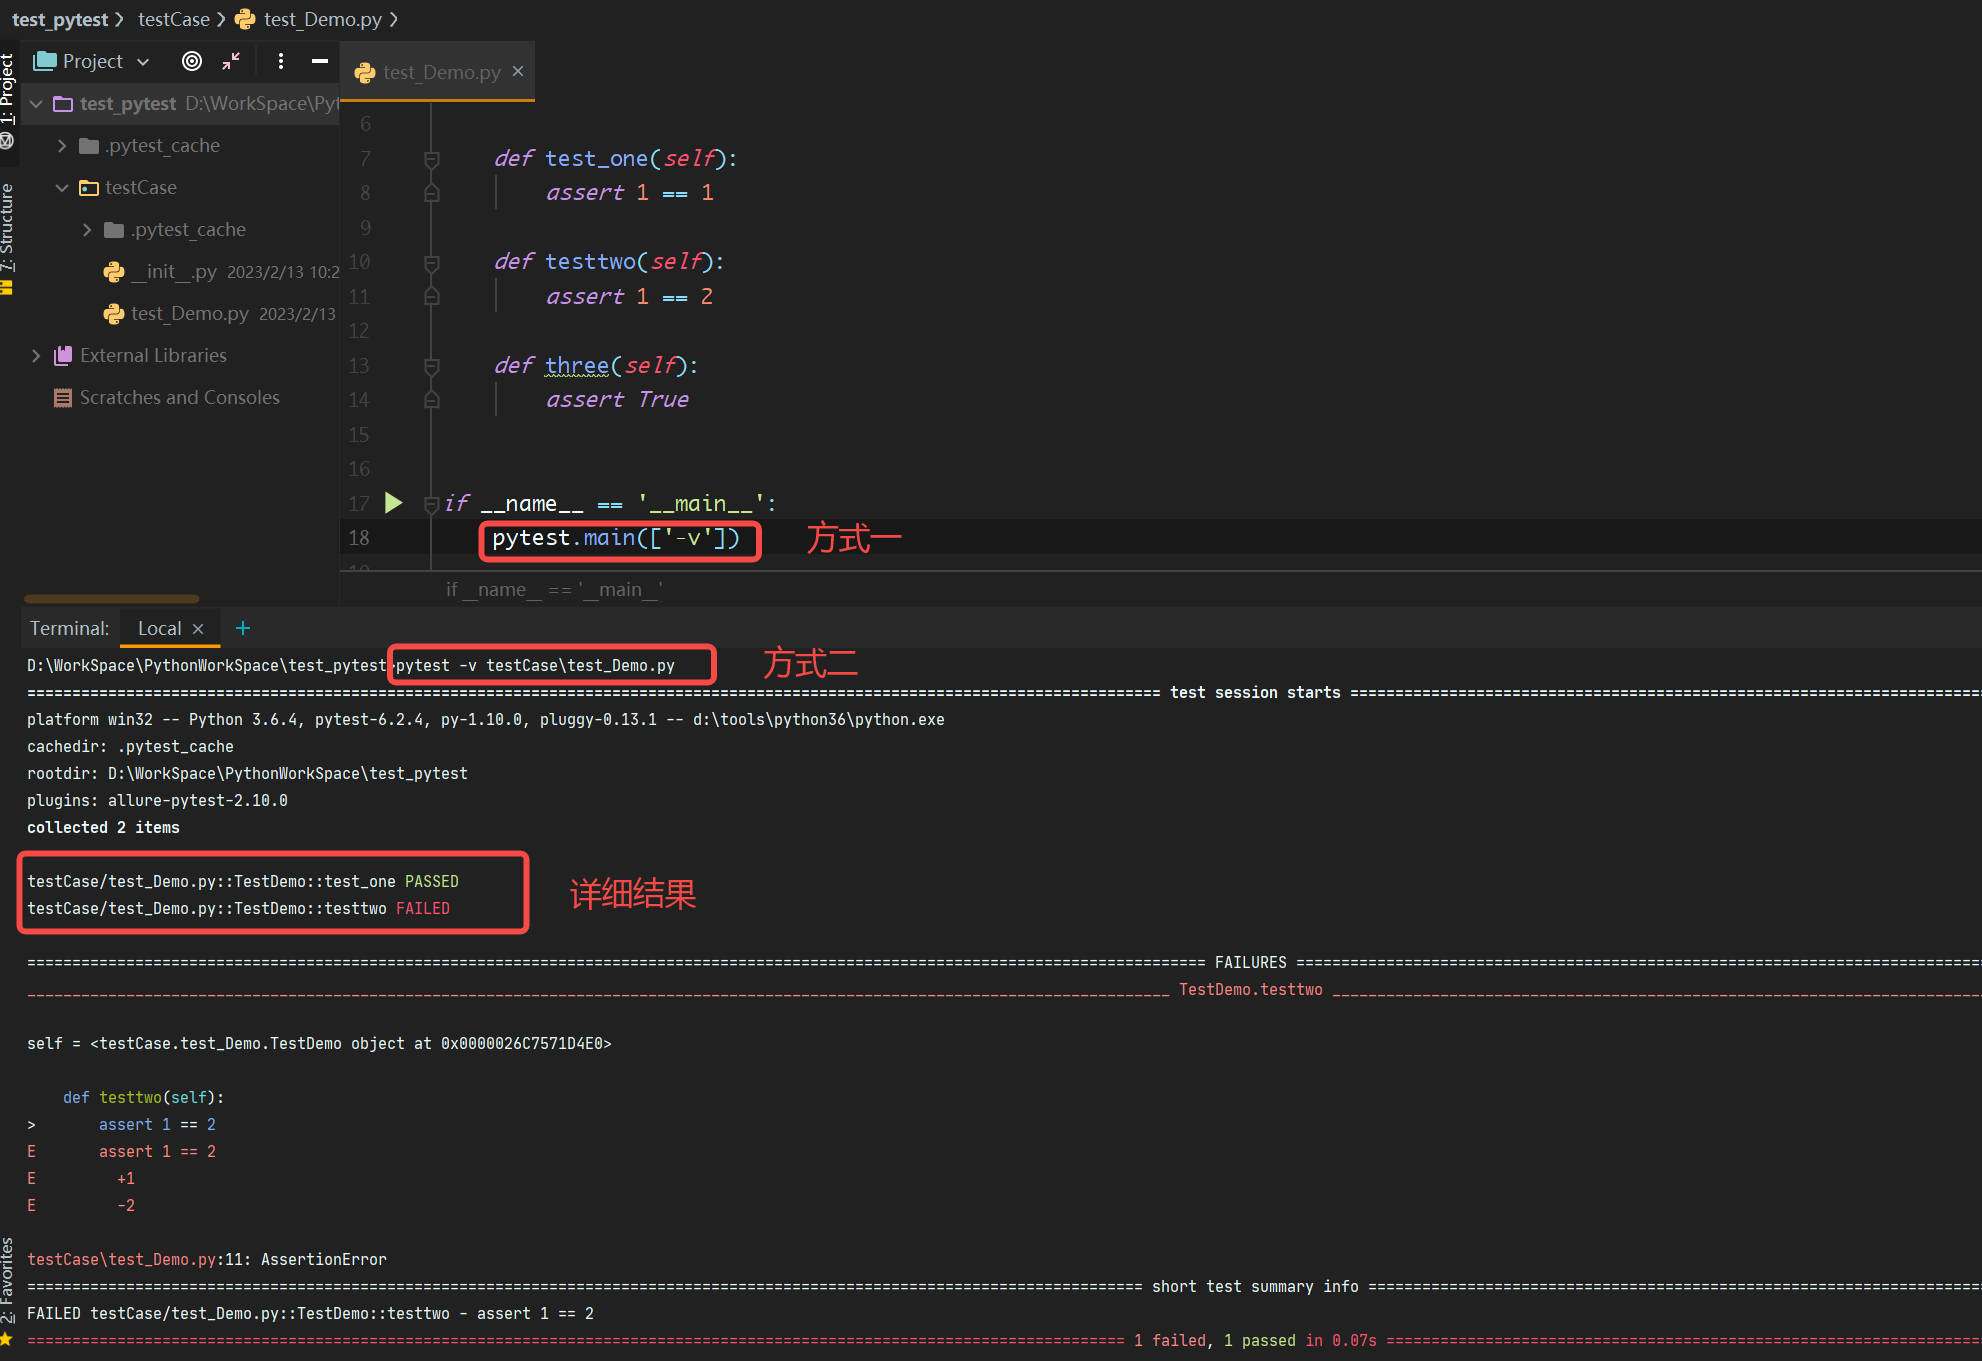
-v: 显示详细结果
-
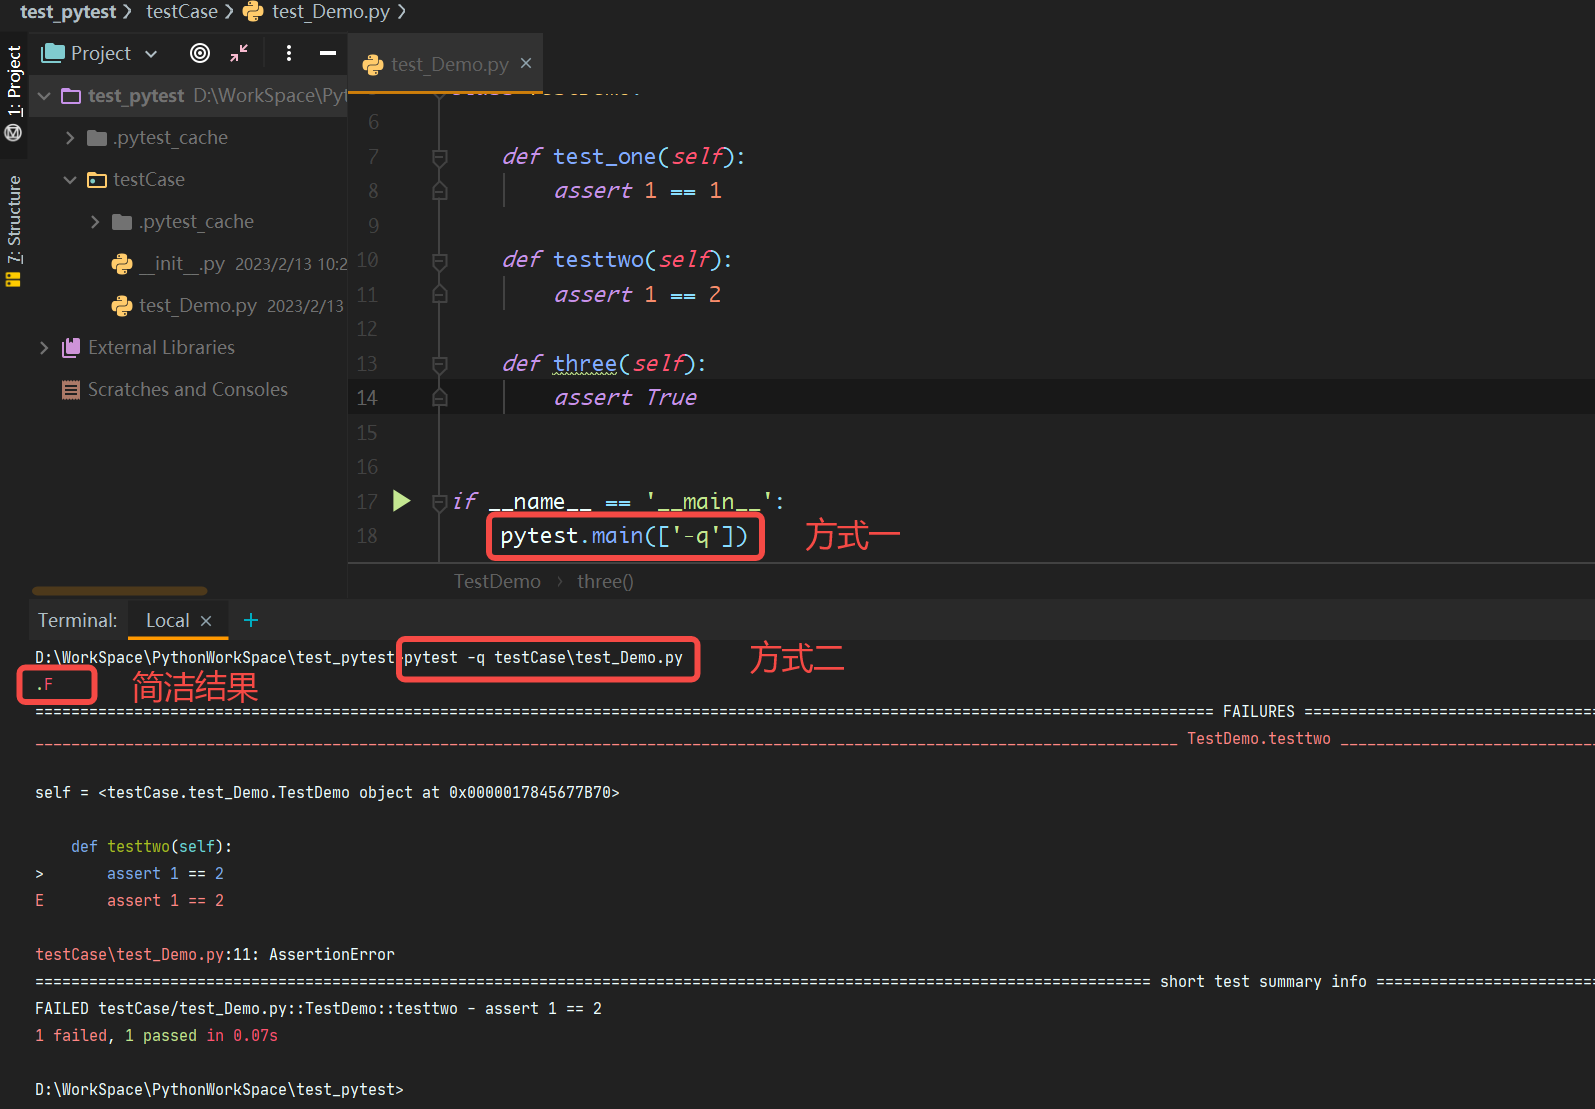
-q: 显示简洁结果
-
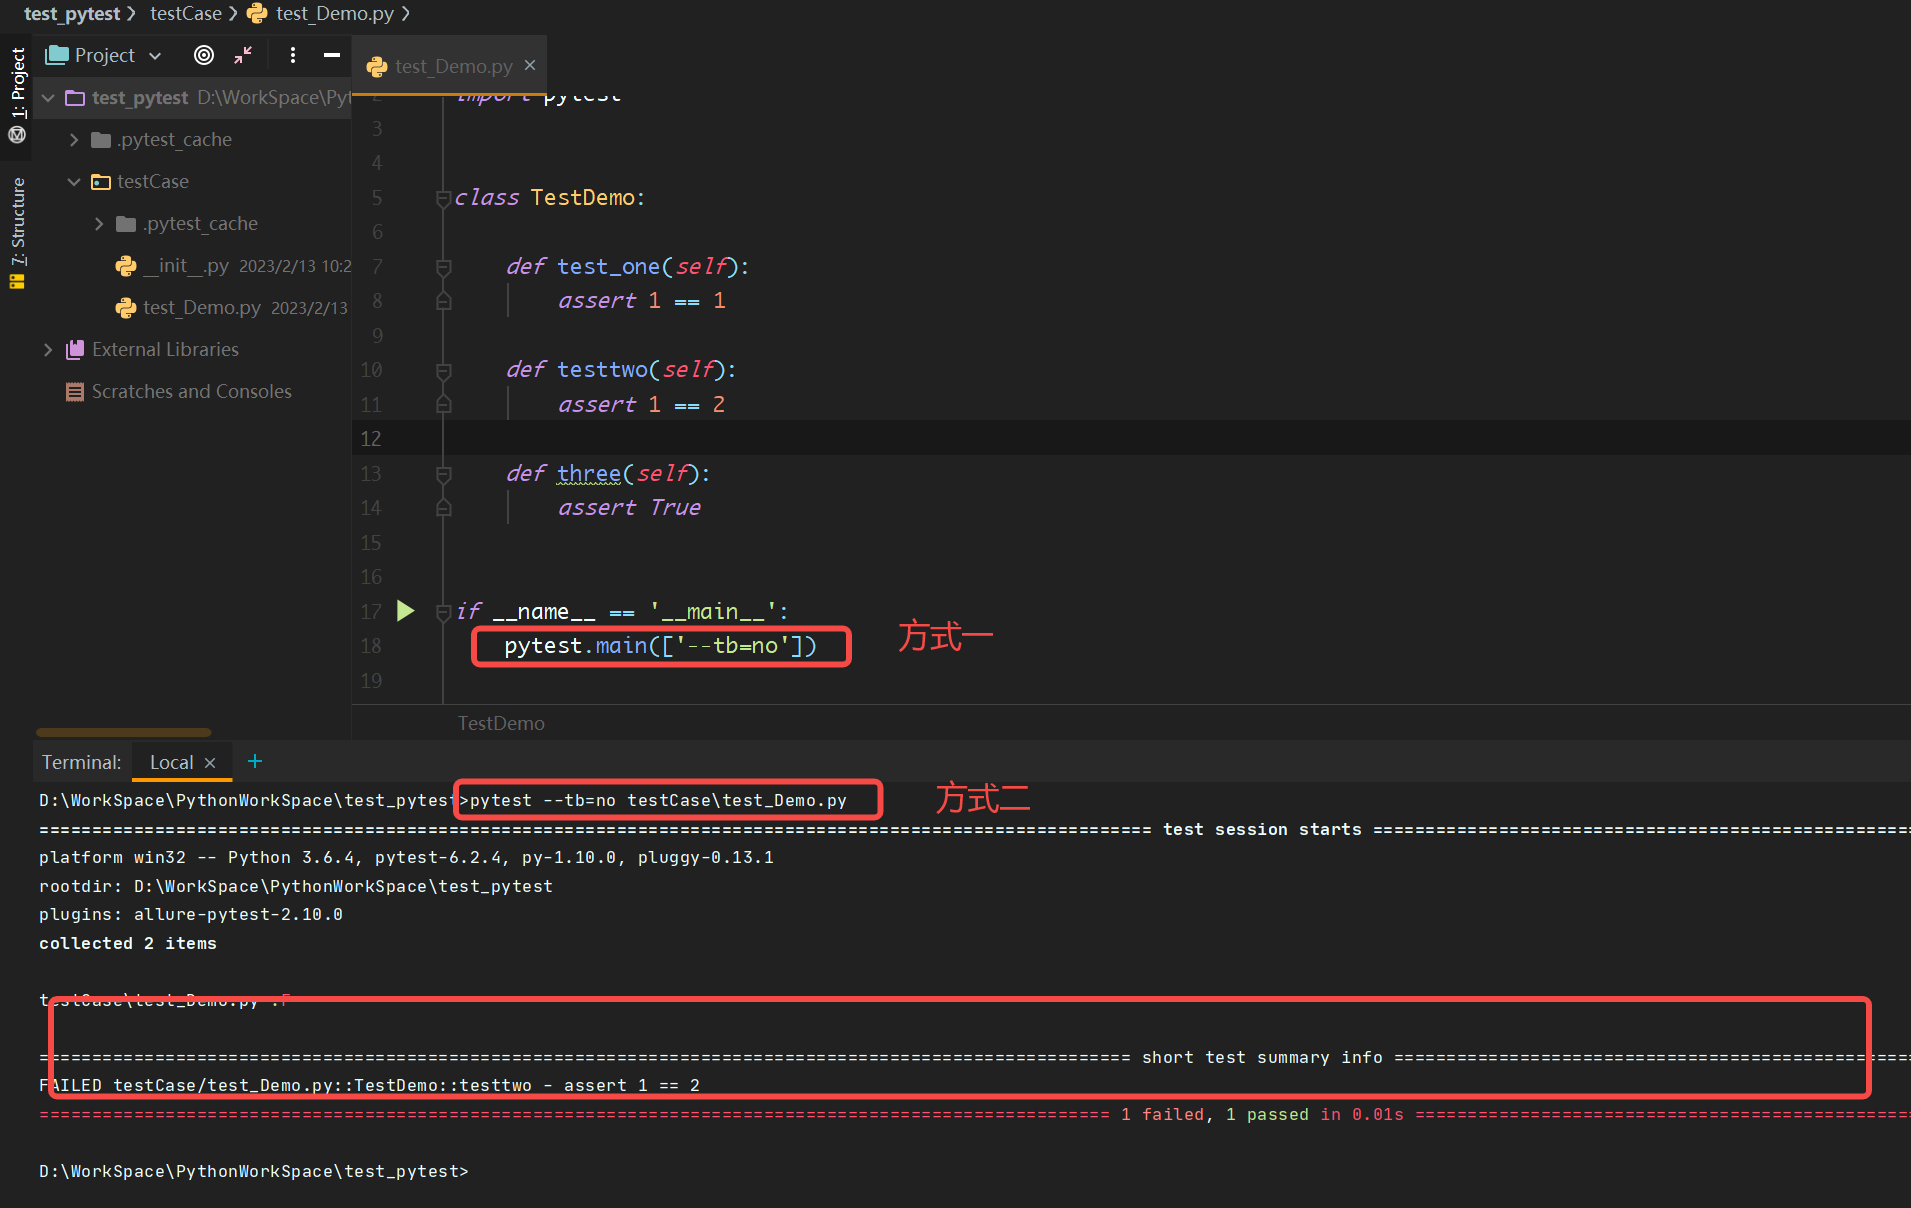
--tb=no: 不展示失败的详细错误
-
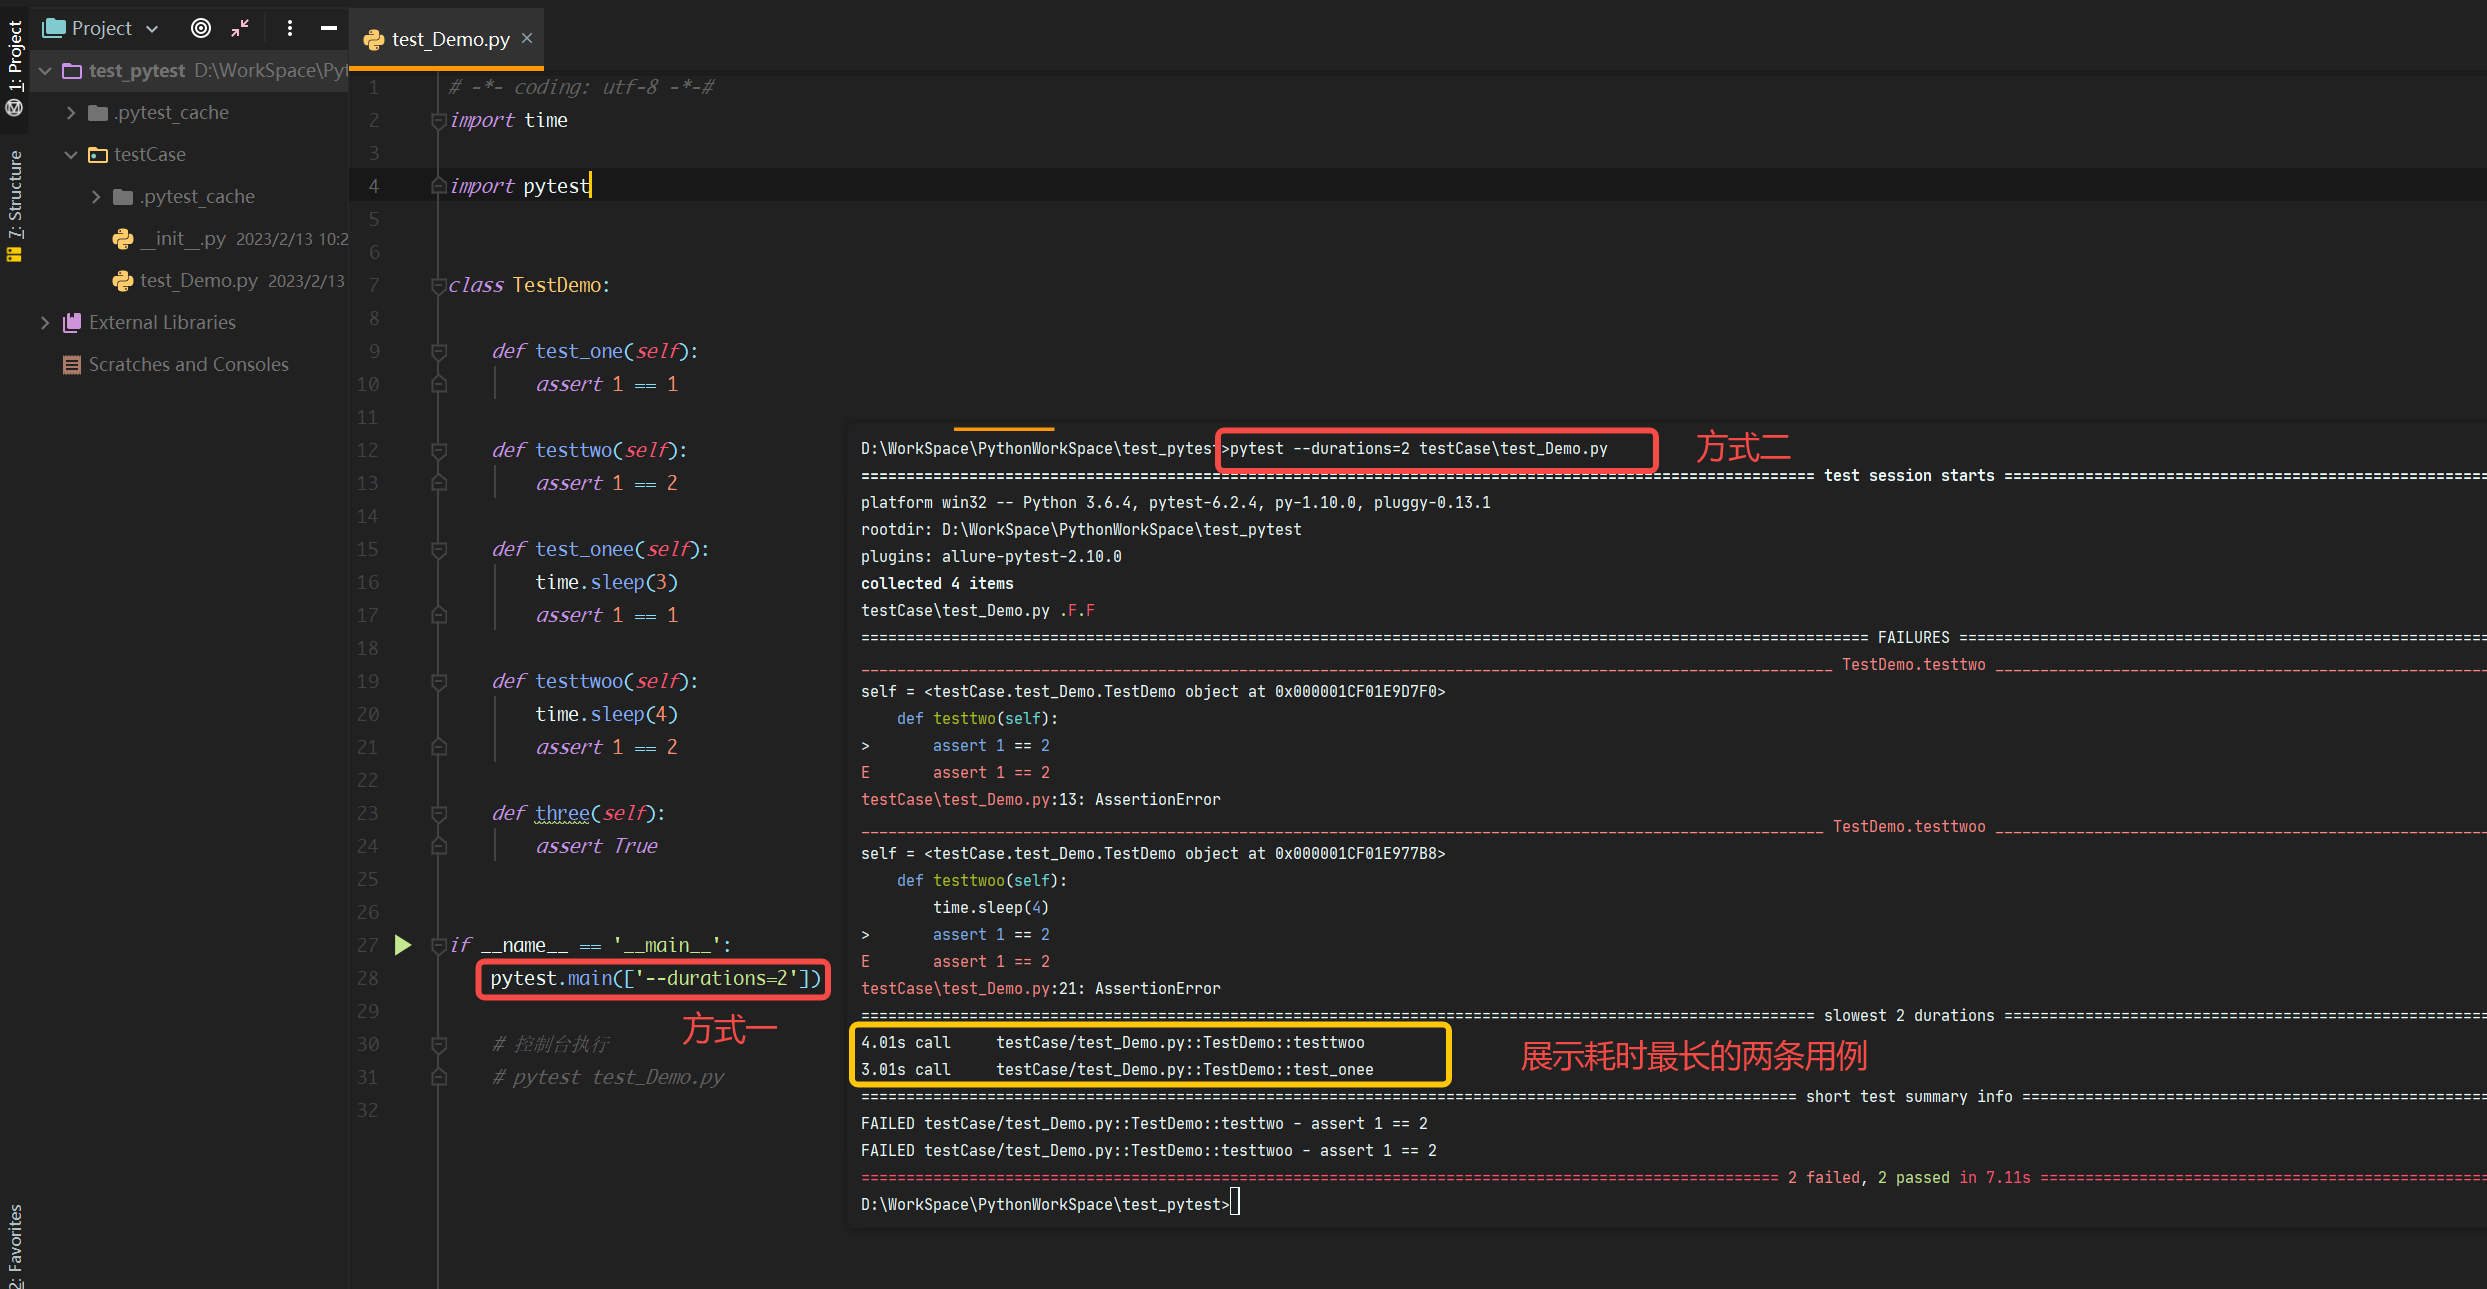
--durations=N: 展示耗时时间最长的N条用例
-
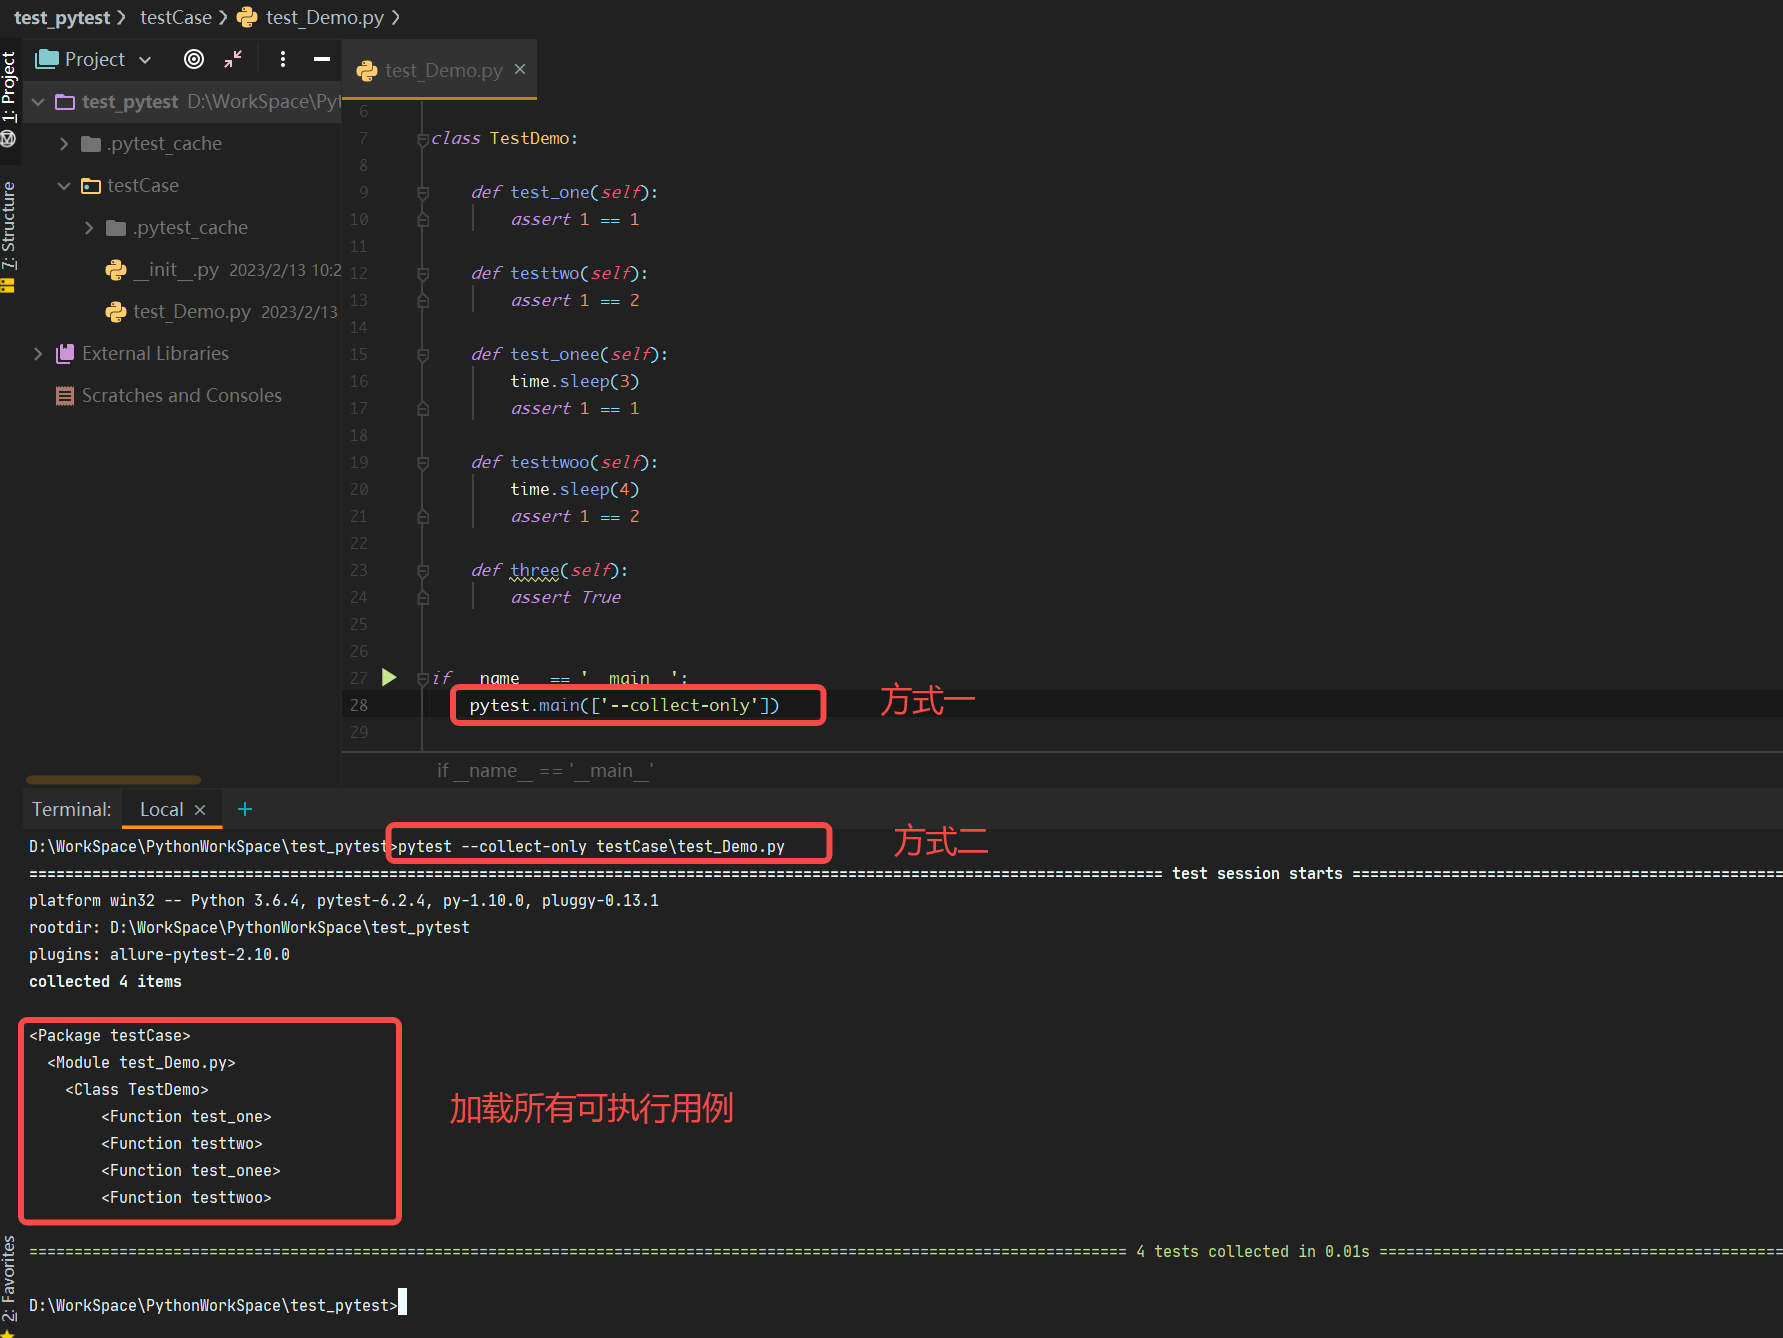
--collect-only: 获取所有用例
-
-
pytest 前置后置
pytest 中提供了不止一种前置后置方式:
相同的是都已setup、teardown开头
不同的是它分为模块级别、函数级别、类级别、方法级别
这里简单介绍一下import pytest class TestCase(): @classmethod def setup_class(cls): print("11111111111111111测试类前置,只执行一次--------------------------------") @classmethod def setup_method(cls): print("22222222222222222每个方法前执行一次") @classmethod def setup(cls): print("33333333333333333每个用例前执行一次") def test_one(self): print("------测试用例one------") def test_two(self): print("------测试用例two------") @classmethod def teardown(cls): print("22222222222222222每个用例后执行一次") @classmethod def teardown_method(cls): print("22222222222222222每个方法后执行一次") @classmethod def teardown_class(cls): print("11111111111111111测试类后置,只执行一次--------------------------------") if __name__ == '__main__': pytest.main(["-s", "test_Demo.py"])点我查看结果
testCase\test_Demo.py 11111111111111111测试类前置,只执行一次--------------------------------
22222222222222222每个方法前执行一次
33333333333333333每个用例前执行一次
------测试用例one------
.22222222222222222每个用例后执行一次
22222222222222222每个方法后执行一次
22222222222222222每个方法前执行一次
33333333333333333每个用例前执行一次
------测试用例two------
.22222222222222222每个用例后执行一次
22222222222222222每个方法后执行一次
11111111111111111测试类后置,只执行一次--------------------------------
-
fixture 使用
fixture也可以实现前置后置的功能,只需要@pytest.fixture(),下面通过简单的例子来演示一下fixture的使用
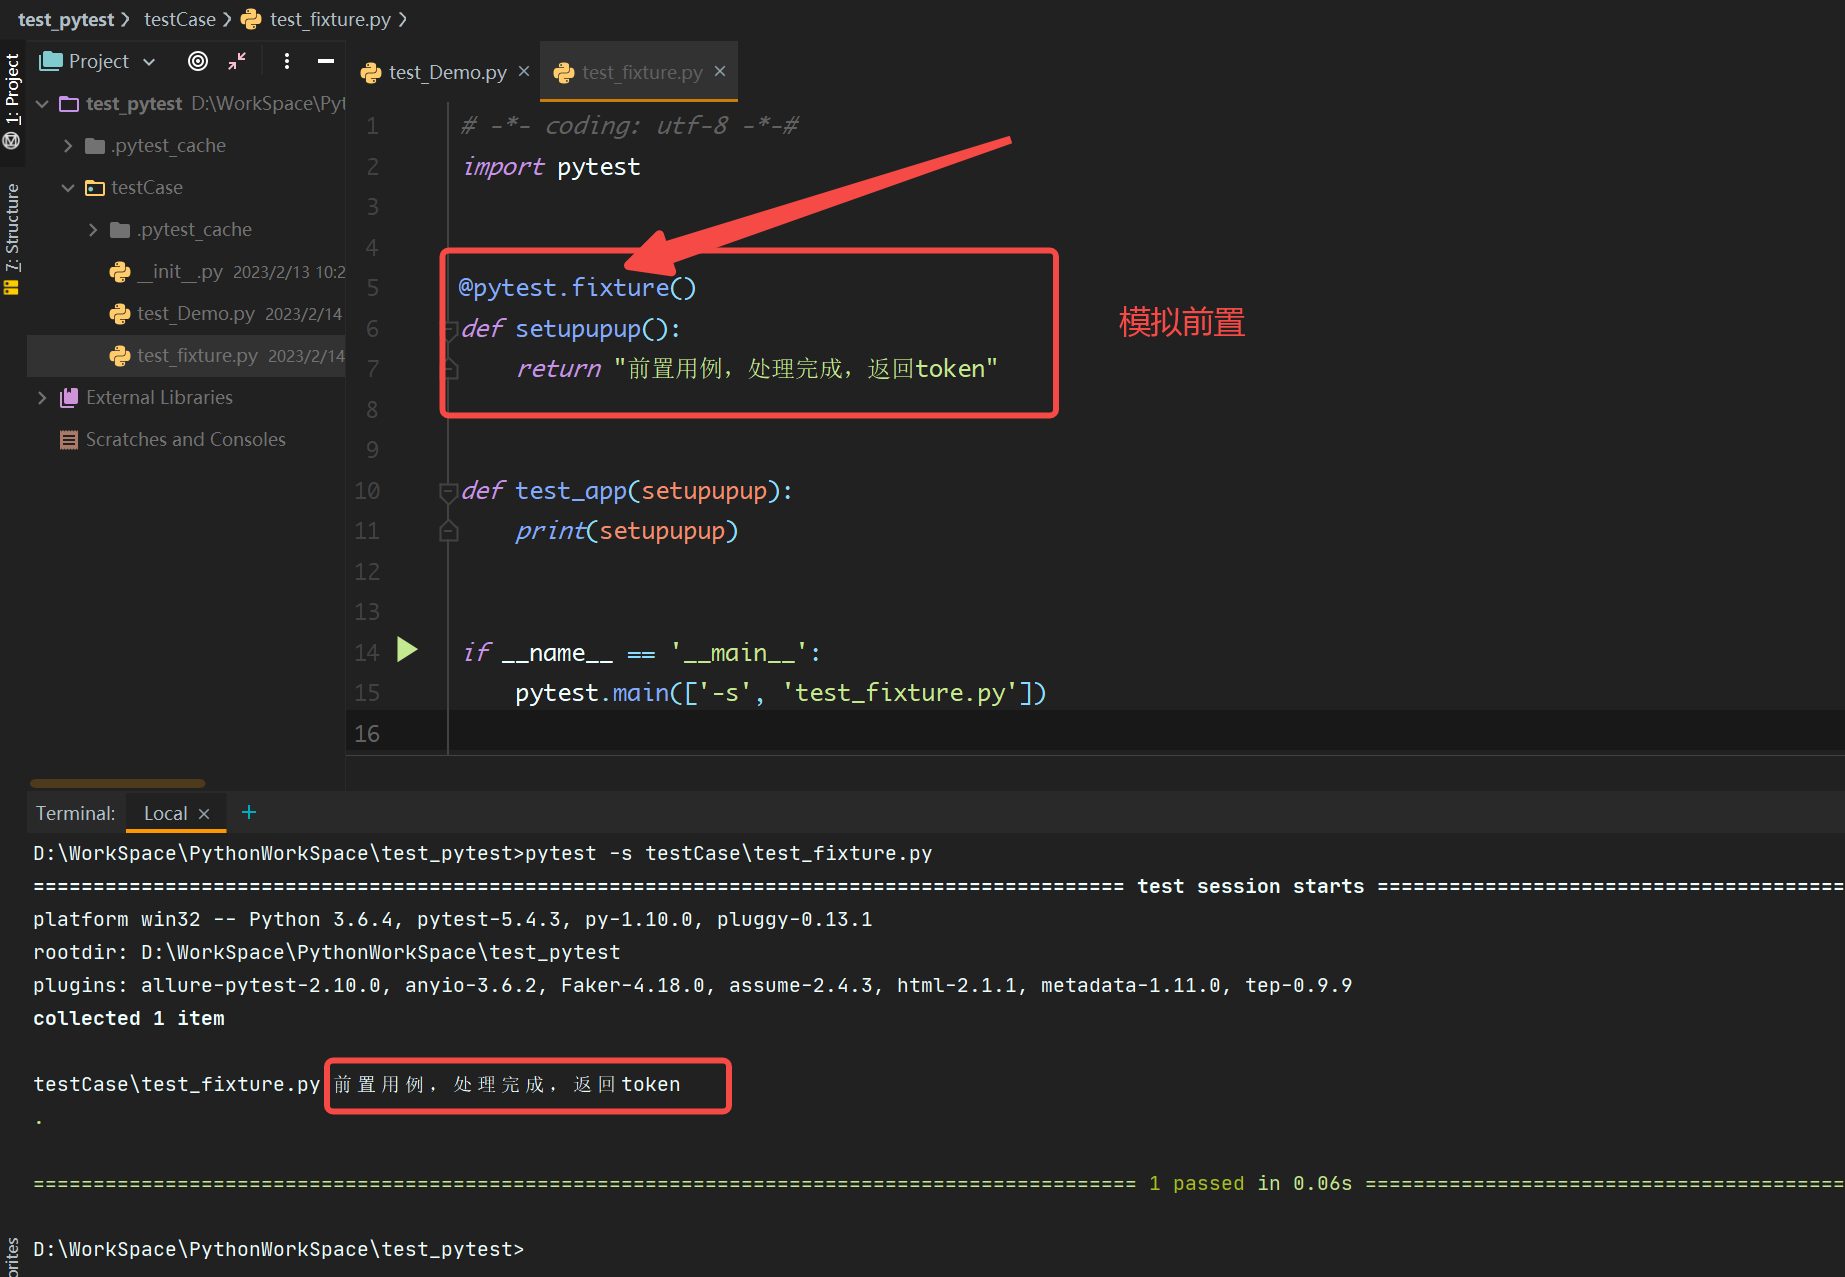
fixture 中存在运行级别这样的概念,通过设置不同的运行级别,可以实现前置后置的操作
fixture 中级别参数可以分为4级
session :所有用例执行前后执行一次
module :py文件执行前后执行一次
class :类执行前后执行一次
fucntion:函数执行前后执行一次!!!想要实现fixture的全部功能,需要在项目中新建一个conftest.py,这样代码中就可以无需import来加载这个配置了
目录结构:
|project(项目名)
|———testCase
|———testCase2
|——————test_fixture2.py
|——————test_fixture3.py
|———conftest.py-
conftest.py
# -*- coding: utf-8 -*-# import pytest # scope表示作用域,autouse为true表示测试函数不必进行参数传递就可以生效 @pytest.fixture(scope='session', autouse=True) def session_level(): print("session==所有用例前执行一次") yield print("session==所有用例后执行一次") @pytest.fixture(scope='module', autouse=True) def module_level(): print("module==模块前执行一次") yield print("module==模块后执行一次") @pytest.fixture(scope='class', autouse=True) def class_level(): print("class==类前执行一次") yield print("class==类后执行一次") @pytest.fixture(scope='function', autouse=True) def func_level(): print("function==函数前执行一次") yield print("function==函数后执行一次") -
test_fixture2 和 test_fixture3 只有用例名字差异
# -*- coding: utf-8 -*-#
import pytest


class TestFixture2():
    def test_fixture1(self):
        print("----test_fixture1----")

    def test_fixture2(self):
        print("----test_fixture2----")


if __name__ == '__main__':
    pytest.main(['-s','test_fixture2.py'])
点我查看结果
testCase2\test_fixture2.py session==所有用例前执行一次
module==模块前执行一次
class==类前执行一次
function==函数前执行一次
----test_fixture1----
.function==函数后执行一次
function==函数前执行一次
----test_fixture2----
.function==函数后执行一次
class==类后执行一次
module==模块后执行一次

testCase2\test_fixture3.py module==模块前执行一次
class==类前执行一次
function==函数前执行一次
----test_fixture3----
.function==函数后执行一次
function==函数前执行一次
----test_fixture4----
.function==函数后执行一次
class==类后执行一次
module==模块后执行一次
session==所有用例后执行一次
-
补充:关于conftest还有这样的用法!
yield后面存在参数的情况,一看就会了伪目录结构:
|——project
|————testCase
|——————conftest.py
|——————test_con.py- conftest.py
import pytest @pytest.fixture(scope="session") def login(): print("=开启环境=") name = 'zhangsan' age = 12 yield name, age print("=关闭环境=")- test_con.py
import pytest

class TestCon:

    def test_conn(self, login):
        name, age = login  # login是conftest的数据,它存在name 和 age
        print(f'------------{name}, {age}')

if __name__ == '__main__':
    pytest.main(['-s', '-v', 'test_con.py'])
点我查看结果

-
-
pytest 数据驱动
-
pytest 中通过
@pytest.mark.parametrize()来进行数据驱动 -
同时
fixture + parametrize()同样可行# -*- coding: utf-8 -*-# import pytest from common.readdata import ReadData reda = ReadData() rdj = reda.read_json() # json数据 rdy = reda.read_yaml() # yaml数据 rde = reda.read_excel() # excel数据 """ [{'name': 'Amy', 'age': 18}, {'name': 'Sam', 'age': 20}] [{'name': 'daming', 'age': 18}, {'name': 'lingling', 'age': 20}] [{'name': '李四', 'age': 20.0}, {'name': '李四', 'age': 20.0}] """ data1 = [{"name": "daming", "age": 10}, {"name": "lingling", "age": 9}] # 提前准备好组合嵌套的数据 # fixture + 参数化结合,注意我这里没写autouse=True,默认为false @pytest.fixture(scope='session') def fixture_date(): # 假装处理逻辑...... data2 = {"name": "p1", "age": 1} return data2 class TestParam: # 参数化:方式1 @pytest.mark.parametrize('a,b,c', [(1, 1, 1), (1, 2, 1), (1, 1, '')]) def test_ddt(self, a, b, c): print(f'测试项1:------{a},{b},{c}') # 参数化:方式2 @pytest.mark.parametrize('param', data1) def test_ddt1(self, param): print(f'测试项2:------{param["name"]},{param["age"]}') # 参数化:json数据 @pytest.mark.parametrize('data_json', rdj) def test_ddt_json(self, data_json): print(f'json数据:------{data_json["name"]},{data_json["age"]}') # 参数化:yaml数据 @pytest.mark.parametrize('data_yaml', rdy) def test_ddt_yaml(self, data_yaml): print(f'yaml数据:------{data_yaml["name"]},{data_yaml["age"]}') # 参数化:excel数据 @pytest.mark.parametrize('data_excel', rde) def test_ddt_excel(self, data_excel): print(f'excel数据:------{data_excel["name"]},{data_excel["age"]}') # fixture + 参数化结合,没写autouse=True就需要在函数中添加fixture装饰的函数名 @pytest.mark.parametrize('data', [123123, 345345]) def test_ddt_excel(self, fixture_date, data): print(f'结合使用:------{fixture_date},{data}') if __name__ == '__main__': pytest.main()点我查看结果
testCase3\test_parametrize.py 测试项1:------1,1,1
.测试项1:------1,2,1
.测试项1:------1,1,
.测试项2:------daming,10
.测试项2:------lingling,9
.json数据:------Amy,18
.json数据:------Sam,20
.yaml数据:------daming,18
.yaml数据:------lingling,20
.结合使用:------{'name': 'p1', 'age': 1},123123
.结合使用:------{'name': 'p1', 'age': 1},345345
.
-
-
pytest 跳过及断言
对于自动化测试,是一定要进行断言的,偶尔也会涉及到跳过的情况
-
断言操作(部分)
操作 含义 1 assert x判断 x为真2 assert not x判断 x为假3 assert a in b判断 b包含a4 assert a > b判断 a大于b5 assert a == b判断 a等于b6 assert a != b判断 a不等b -
跳过操作(部分)
操作 含义 1 @pytest.mark.skip(reason='描述')强制跳过, reason表示跳过原因2 @pytest.mark.skipif(True,reason='描述')有条件跳过,第一个参数为 True时才可以跳过3 pytest.skip()作用在测试用例执行期间的跳过 -
代码展示
# -*- coding: utf-8 -*-#
import pytest


@pytest.fixture(scope='session')
def param():
    return [1, 2, 3, 4, 5]


class TestParam:

    # 参数化断言
    @pytest.mark.parametrize('p', [1, 2, 3])
    def test_assert1(self, p):
        assert 4 > p

    def test_assert2(self):
        assert 1 == 1

    def test_assert3(self, param):
        assert 3 in param

    def test_assert4(self, param):
        assert len(param) != 4

    # 强制跳过
    @pytest.mark.skip(reason='1 != 3,所以跳过')
    def test_skip1(self):
        assert 1 == 3

    # 有条件跳过
    @pytest.mark.skipif(1 == 1, reason='第一个参数为true,所以跳过')
    def test_skip2(self):
        pass

    def test_skip3(self, param):
        for i in param:
            if i > 3:
                pytest.skip('param中存在大于3的数,跳过')  # 该跳过作用在方法中


if __name__ == '__main__':
    pytest.main(['-s', '-v', 'test_skipAssert.py'])
点我查看结果
testCase3/test_skipAssert.py::TestParam::test_assert1[1] PASSED
testCase3/test_skipAssert.py::TestParam::test_assert1[2] PASSED
testCase3/test_skipAssert.py::TestParam::test_assert1[3] PASSED
testCase3/test_skipAssert.py::TestParam::test_assert2 PASSED
testCase3/test_skipAssert.py::TestParam::test_assert3 PASSED
testCase3/test_skipAssert.py::TestParam::test_assert4 PASSED
testCase3/test_skipAssert.py::TestParam::test_skip1 SKIPPED
testCase3/test_skipAssert.py::TestParam::test_skip2 SKIPPED
testCase3/test_skipAssert.py::TestParam::test_skip3 SKIPPED

=============================== 6 passed, 3 skipped in 0.07s ===============================
-
-
pytest 报告及美化
-
pytest-html(操作简单,样式单调)
-
1、
pip install pytest-html==2.1.1 -
2、
pytest --html=testReport\report.html --self-contained-html testCase3\test_skipAssert.py--html=testReport\report.html:生成报告的名字及地址--self-contained-html:报告独立出来,不受css限制testCase3\test_skipAssert.py:执行的测试用例
-
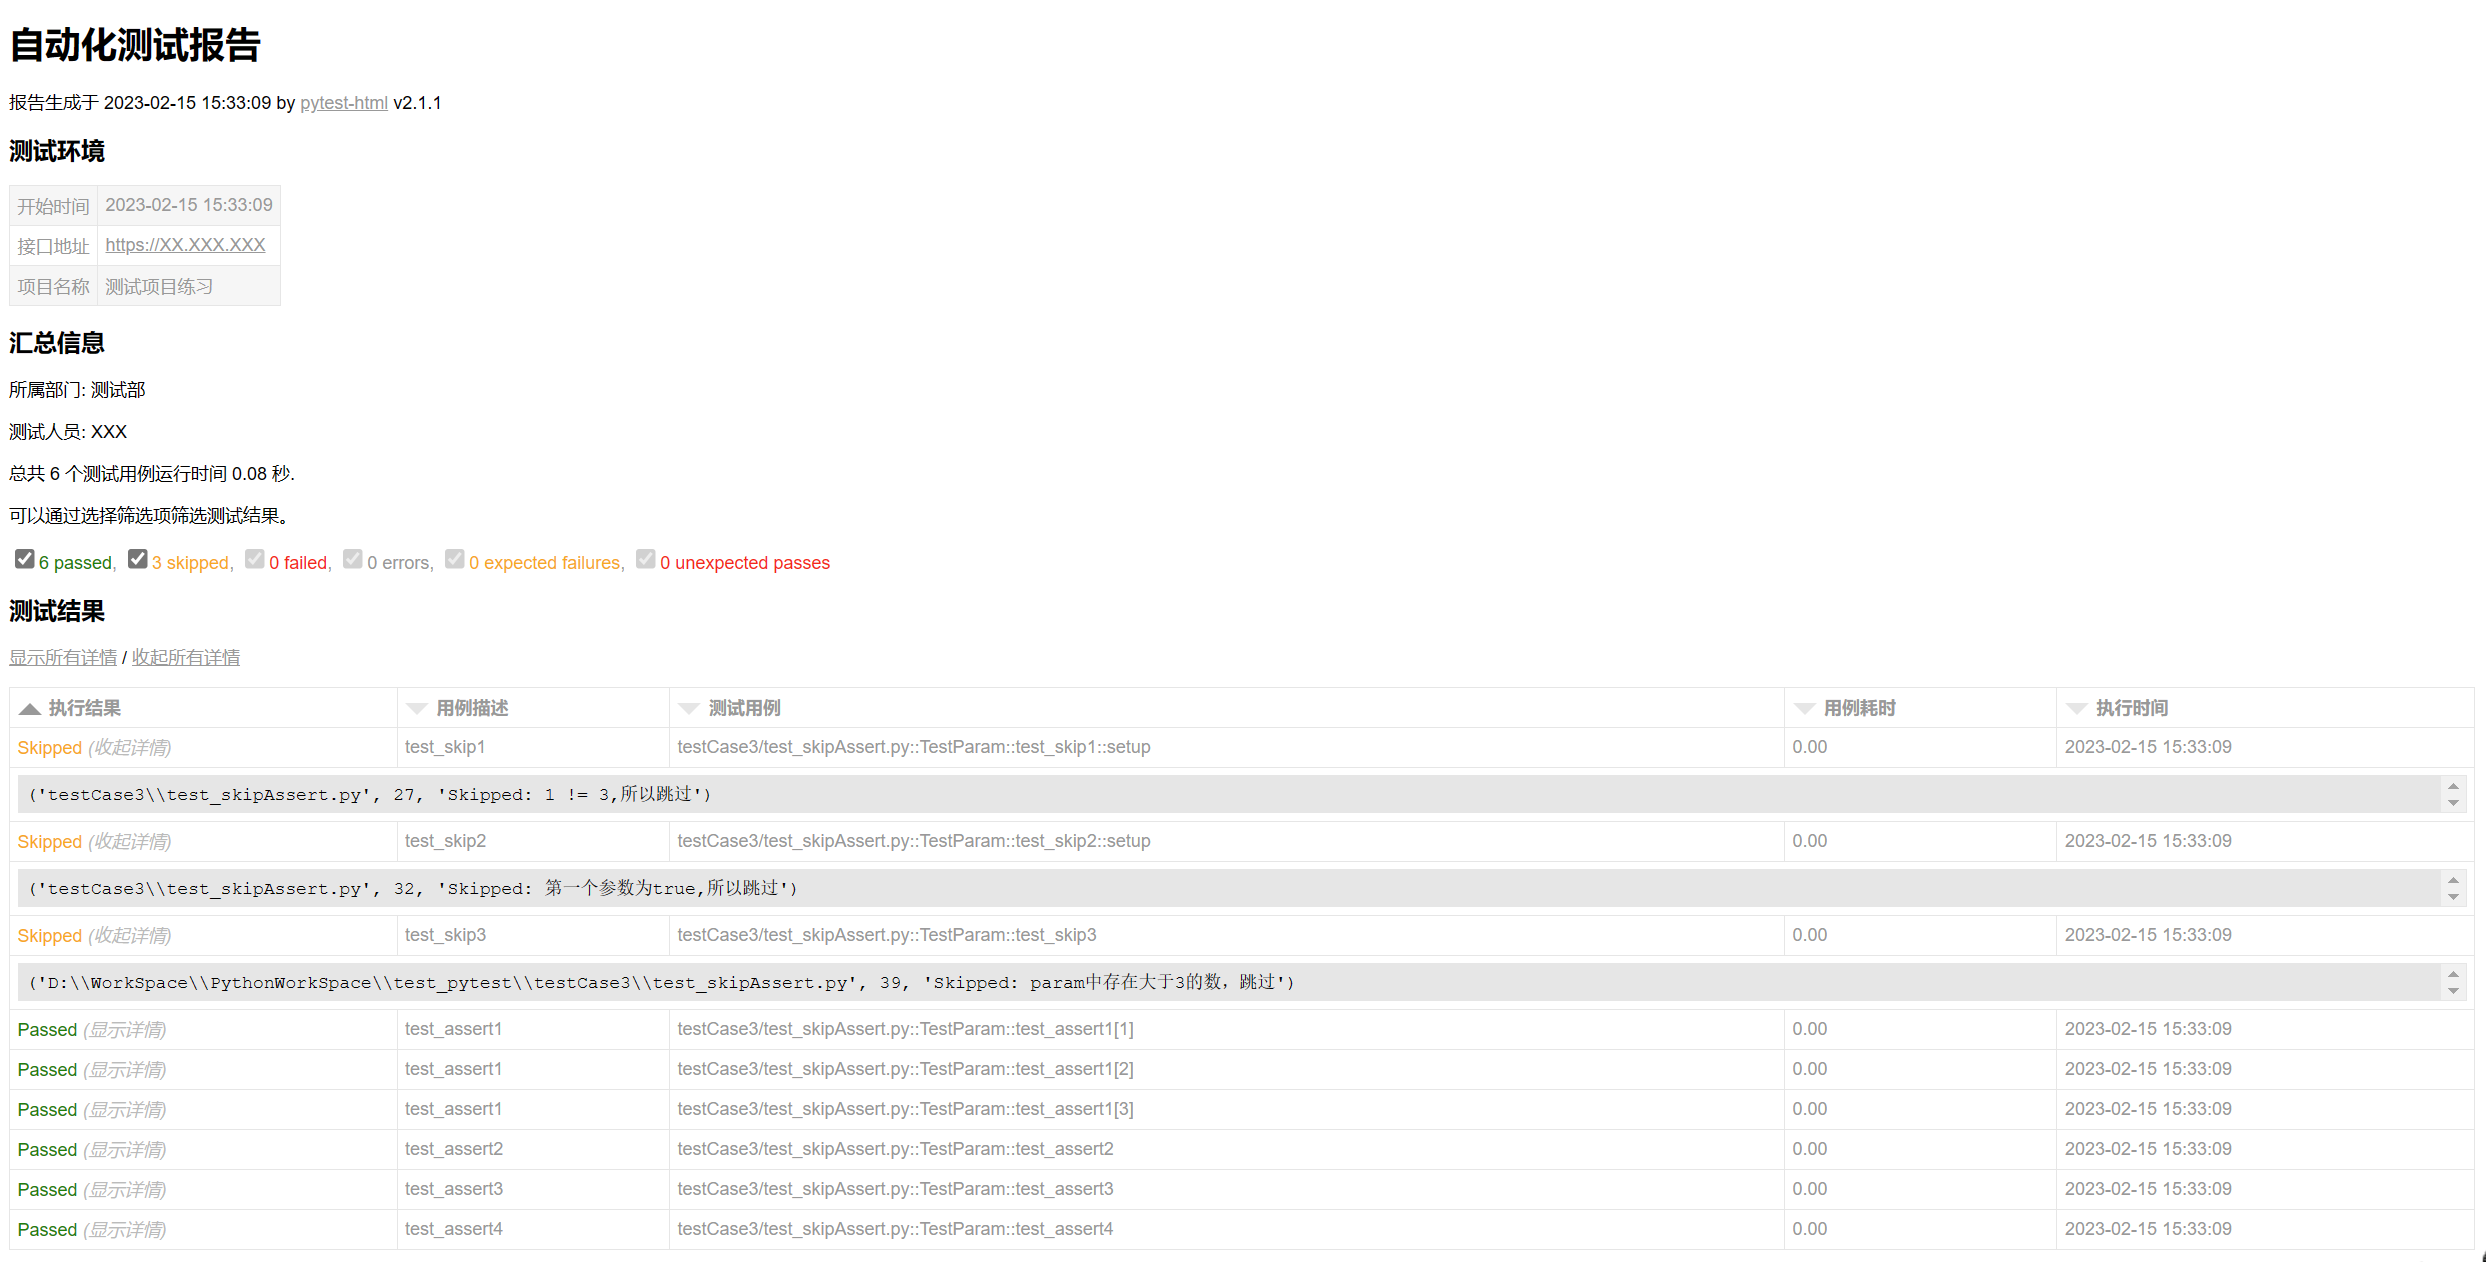
3、报告中文美化
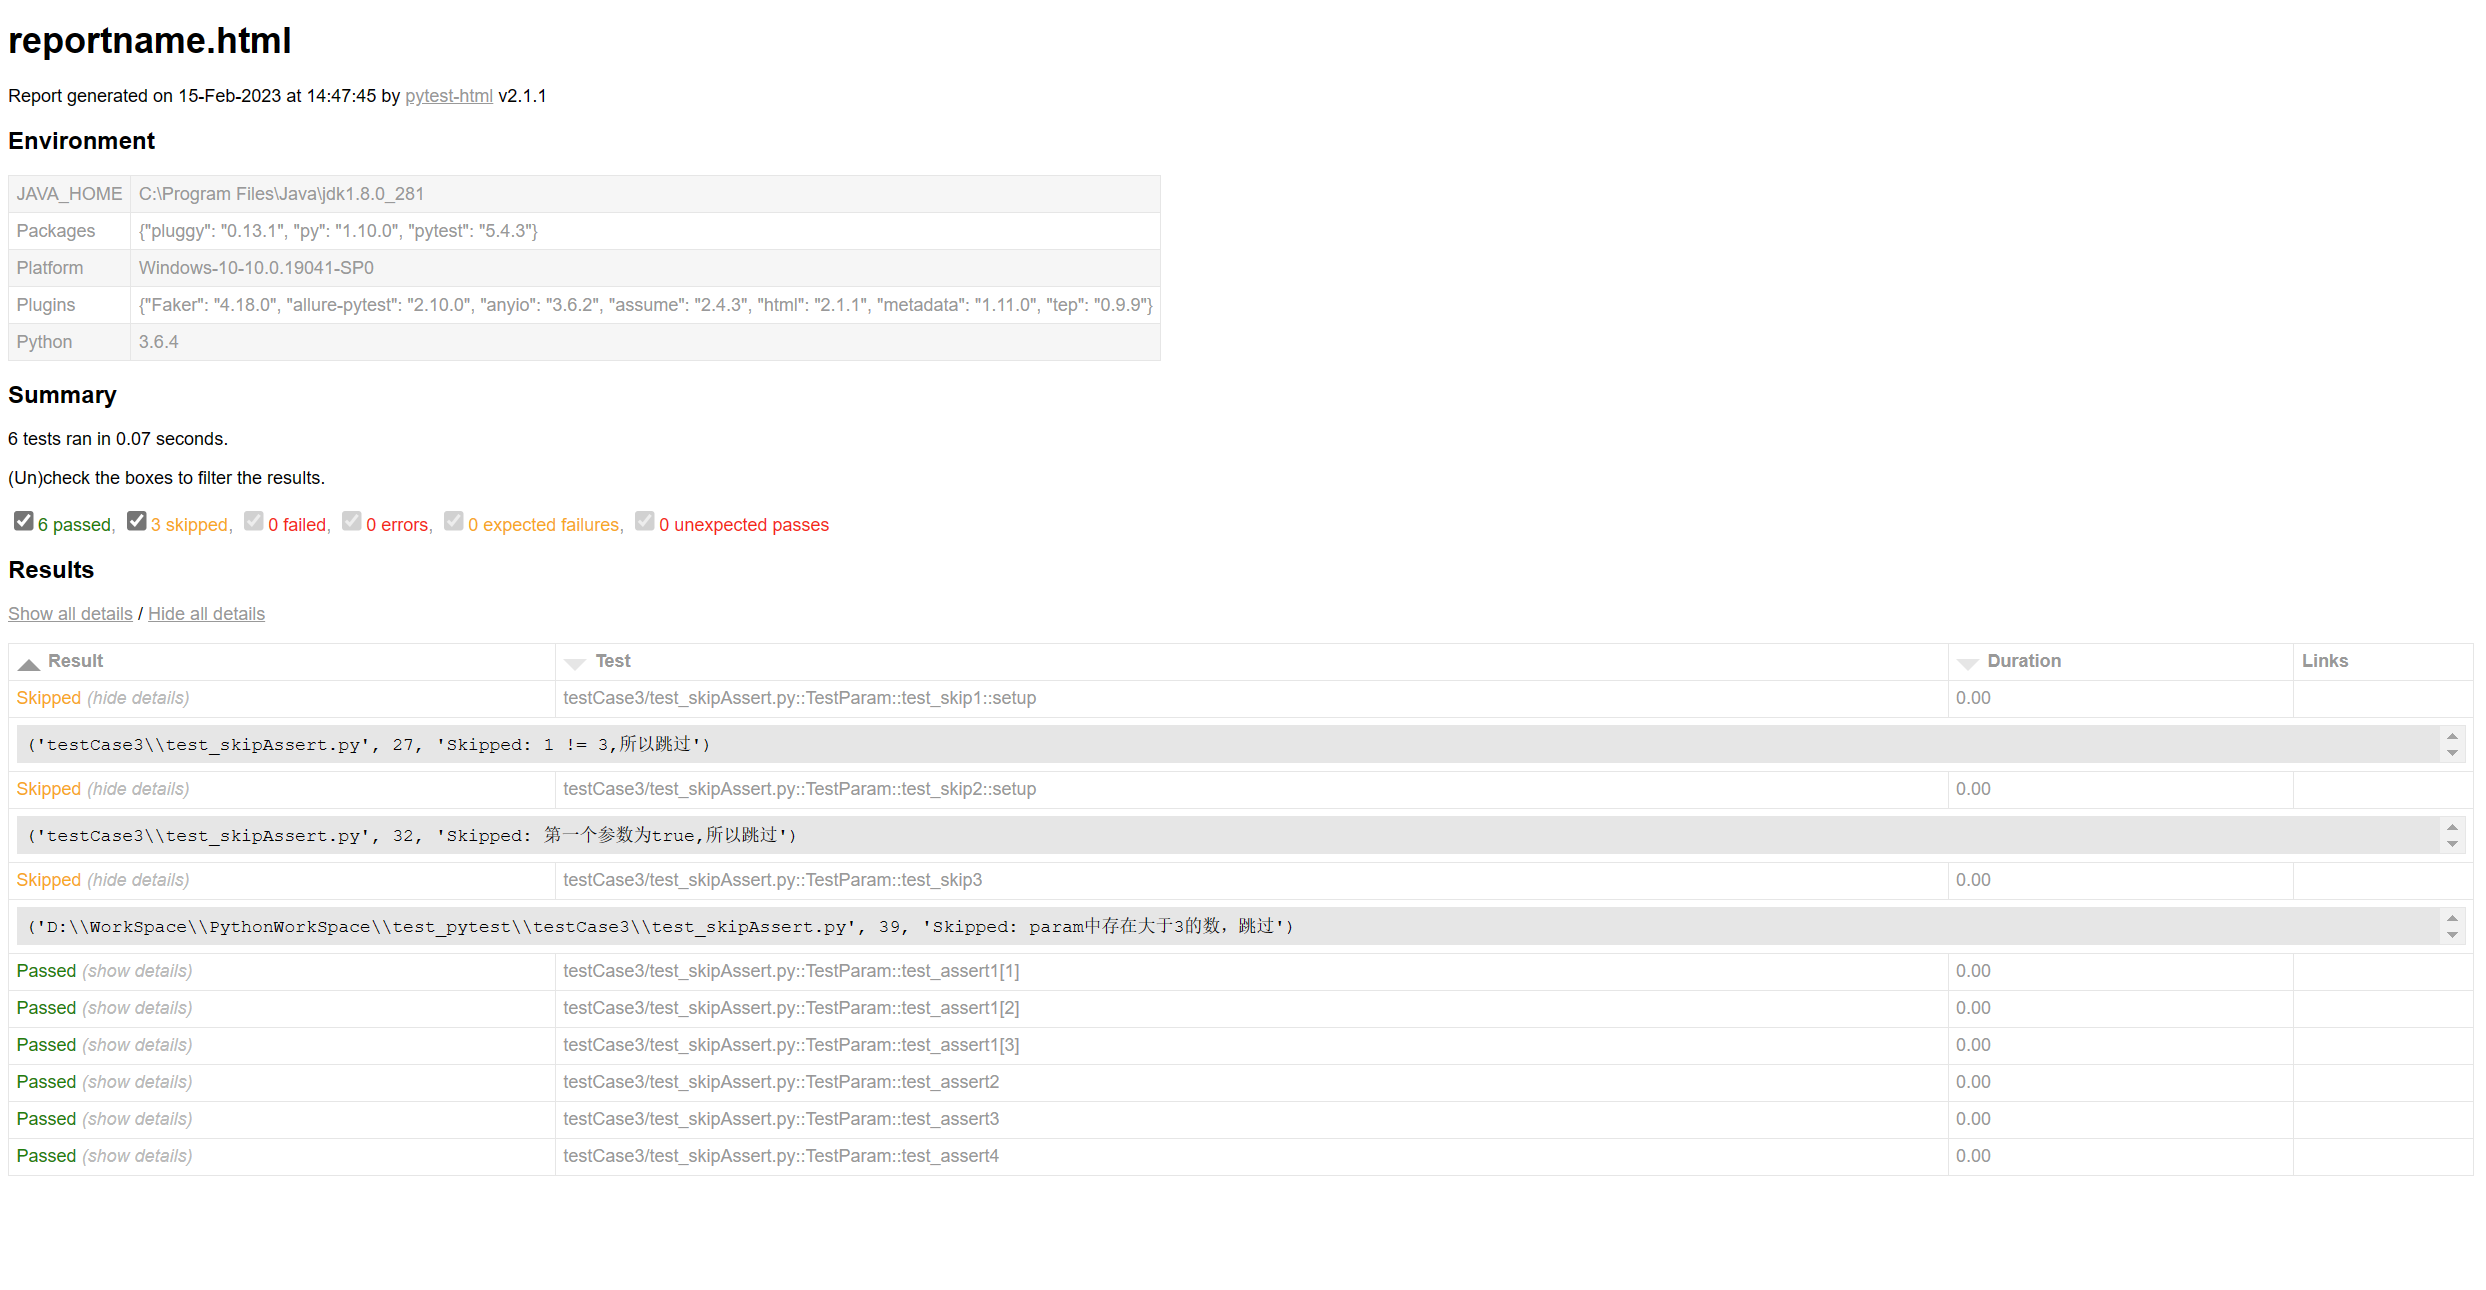
默认的报告是英文的,也没有饼状图,看起来不是很直观
- 1、替换pytest_html源码 (参考地址)
https://download.csdn.net/download/u010454117/20204991
https://pan.baidu.com/share/init?surl=sfmjQV8GavMJwt0MtKDsCA (6666)- 只需要替换自己的pytest-html即可

- 只需要替换自己的pytest-html即可
- 2、修改conftest.py (为大佬点赞)
# !/usr/bin/python3 # _*_coding:utf-8 _*_ """" # @Time :2021/7/11 22:32 # @Author : king # @File :conftest.py # @Software :PyCharm # @blog :https://blog.csdn.net/u010454117 # @WeChat Official Account: 【测试之路笔记】 """ from time import strftime from py._xmlgen import html import pytest def pytest_collection_modifyitems(items): # item表示每个测试用例,解决用例名称中文显示问题 for item in items: item.name = item.name.encode("utf-8").decode("unicode-escape") item._nodeid = item._nodeid.encode("utf-8").decode("unicode-escape") @pytest.mark.optionalhook def pytest_html_results_table_header(cells): cells.insert(1, html.th('用例描述', class_="sortable", col="name")) # 表头添加Description cells.insert(4, html.th('执行时间', class_='sortable time', col='time')) cells.pop(-1) # 删除link @pytest.mark.optionalhook def pytest_html_results_table_row(report, cells): cells.insert(1, html.td(report.description)) # 表头对应的内容 cells.insert(4, html.td(strftime('%Y-%m-%d %H:%M:%S'), class_='col-time')) cells.pop(-1) # 删除link列 @pytest.mark.optionalhook def pytest_html_results_table_html(report, data): # 清除执行成功的用例logs if report.passed: del data[:] data.append(html.div('正常通过用例不抓取日志', class_='empty log')) @pytest.mark.optionalhook def pytest_html_report_title(report): report.title = "自动化测试报告" # 修改Environment部分信息,配置测试报告环境信息 def pytest_configure(config): # 添加接口地址与项目名称 config._metadata["项目名称"] = "web项目冒烟用例" config._metadata['接口地址'] = 'https://XX.XXX.XXX' config._metadata['开始时间'] = strftime('%Y-%m-%d %H:%M:%S') # 删除Java_Home config._metadata.pop("JAVA_HOME") config._metadata.pop("Packages") config._metadata.pop("Platform") config._metadata.pop("Plugins") config._metadata.pop("Python") # 修改Summary部分的信息 def pytest_html_results_summary(prefix, summary, postfix): prefix.extend([html.p("所属部门: 测试部")]) prefix.extend([html.p("测试人员: XXX")]) @pytest.mark.hookwrapper def pytest_runtest_makereport(item, call): outcome = yield report = outcome.get_result() if item.function.__doc__ is None: report.description = str(item.function.__name__) else: report.description = str(item.function.__doc__) report.nodeid = report.nodeid.encode("utf-8").decode("unicode_escape") # 设置编码显示中文 - 3、执行查看
pytest --html=testReport\report.html --self-contained-html testCase3\test_skipAssert.py
- 1、替换pytest_html源码 (参考地址)
-
-
allure(需要配置,样式丰富)
-
三、总结:unittest和pytest你更倾向谁?
unittest和pytest都是Python中用于编写单元测试的测试框架,它们有许多相同点和不同点。
1. 测试用例命名规则
- unittest的测试用例命名规则是test开头,后面跟着下划线和测试用例名称,如test_addition、test_subtraction等。
- pytest的测试用例命名规则更加灵活,可以是任意可调用对象的名称,只需要在函数或方法上使用@pytest.mark.test标记即可识别为测试用例,如def test_addition()、def test_subtraction()等。
2. 断言方法
- unittest的断言方法包括assertEqual、assertNotEqual、assertTrue、assertFalse、assertIs、assertIsNone等,可以用于比较值、判断真假、判断对象是否相同等。
- pytest的断言方法则是使用python的assert语句来实现,比如assert a == 1、assert b is not None等,也可以使用pytest中提供的assert关键字来进行断言,如assert a == 1、assert b is not None等。
3. 测试收集和运行机制
- unittest的测试收集和运行机制比较简单,需要手动创建测试套件、测试用例,并使用TestLoader和TestRunner来执行测试。
- pytest的测试收集和运行机制更加灵活和智能化,可以自动发现测试文件和测试函数,并自动运行测试,支持参数化、fixture等高级用法,使测试编写更加简单和高效。
4. Fixture
- Fixture是pytest中的一个重要概念,可以用于管理测试用例的前置和后置条件,比如创建数据库连接、创建测试文件、关闭文件等。
- unittest也提供了setUp和tearDown方法来管理测试用例的前置和后置条件,但相对来说不如pytest的Fixture灵活和易用。
总的来说,unittest和pytest都是Python中优秀的测试框架,可以用于编写各种类型的测试,但pytest更加灵活和易用,已经成为Python中的主流测试框架之一。


【推荐】国内首个AI IDE,深度理解中文开发场景,立即下载体验Trae
【推荐】编程新体验,更懂你的AI,立即体验豆包MarsCode编程助手
【推荐】抖音旗下AI助手豆包,你的智能百科全书,全免费不限次数
【推荐】轻量又高性能的 SSH 工具 IShell:AI 加持,快人一步
· 震惊!C++程序真的从main开始吗?99%的程序员都答错了
· 【硬核科普】Trae如何「偷看」你的代码?零基础破解AI编程运行原理
· 单元测试从入门到精通
· 上周热点回顾(3.3-3.9)
· Vue3状态管理终极指南:Pinia保姆级教程