SpringBoot配置嵌入式Servlet容器
SpringBoot默认使用的是Tomcat作为嵌入式的Servlet容器,那么肯定会和外置的Tomcat有区别,那么就这些区别来谈一谈SpringBoot中对于容器的一些配置操作
如何定制和修改Servlet容器的相关配置
在内置的Tomcat中,不再有web.xml文件可以供我们修改,那么我们应该怎样去修改Servlet容器相关的配置呢?在SpringBoot中有两种方式可供选择,一种是在配置文件中修改,还有一种是通过配置类的方式去修改
配置文件中修改(具体修改的参数可以查看ServerProperties类)
server.port=8081
server.servlet.context-path=/crud

server.tomcat.uri-encoding=UTF-8

// 通用的Servlet容器设置
server.servlet.xxx
// Tomcat的设置
Server.tomcat.xxx
只需要在application.roperties或者application.yml/yaml中像上面那样就可以轻松的修改掉相关的配置
编写配置类(配置方法)
除了像上面那样在配置文件中修改以外,还可以自己编写配置类去修改,我们可以编写一个返回值为EmbeddedServletContainerCustomizer(SpringBoot2.0将其替换成了WebServerFactoryCustomizer)的方法放到我们自定义的配置类中来进行修改,不过在SpringBoot1.x跟SpringBoot2.x版本中有所不同
SpringBoot1.x:
@Bean  //一定要将这个定制器加入到容器中
public EmbeddedServletContainerCustomizer embeddedServletContainerCustomizer(){
    return new EmbeddedServletContainerCustomizer() {

        //定制嵌入式的Servlet容器相关的规则
        @Override
        public void customize(ConfigurableEmbeddedServletContainer container) {
            container.setPort(8083);
        }
    };
}
SpringNoot2.x:
// Servlet容器配置器
@Bean
public WebServerFactoryCustomizer<ConfigurableWebServerFactory> webServerFactoryCustomizer(){
    return new WebServerFactoryCustomizer<ConfigurableWebServerFactory>(){
        @Override
        public void customize(ConfigurableWebServerFactory factory) {
            factory.setPort(8081);
        }
    };
}
如何注册Servlet、Filter、Listener三大组件
(1)、ServletRegistrationBean
首先书写自己的Servlet(要继承HttpServlet类)

public class MyServlet extends HttpServlet {


    // GET方法
    @Override
    protected void doGet(HttpServletRequest req, HttpServletResponse resp) throws ServletException, IOException {
        doPost(req, resp);
    }

    // POST方法
    @Override
    protected void doPost(HttpServletRequest req, HttpServletResponse resp) throws ServletException, IOException {
        resp.getWriter().write("Hello MyServlet");
    }
}
将我们自己写的Servlet注册

@Bean
public ServletRegistrationBean servletRegistrationBean(){
    /**
     * 第一个参数是我们自己的Servlet对象
     * 第二个参数是是对应的路径,可以写多个
     */
    return new ServletRegistrationBean(new MyServlet(), "/servlet");
}
(2)、FilterRegistrationBean
书写自己的Filter(实现Filter接口)

public class MyFilter implements Filter {
    @Override
    public void init(FilterConfig filterConfig) throws ServletException {

    }

    @Override
    public void doFilter(ServletRequest servletRequest, ServletResponse servletResponse, FilterChain filterChain) throws IOException, ServletException {
        System.out.println("myFilter process...");
        filterChain.doFilter(servletRequest, servletResponse);
    }

    @Override
    public void destroy() {

    }
}
将我们自己写的Filter注册

@Bean
    public FilterRegistrationBean<MyFilter> filterRegistrationBean(){
        FilterRegistrationBean<MyFilter> myFilterFilterRegistrationBean = new FilterRegistrationBean<>();
        myFilterFilterRegistrationBean.setFilter(new MyFilter());
//        myFilterFilterRegistrationBean.addUrlPatterns("/hello", "/myServlet");
        myFilterFilterRegistrationBean.setUrlPatterns(Arrays.asList("/hello", "/myServlet"));
        return myFilterFilterRegistrationBean;
    }
(3)、ServletListenerRegistrationBean
定义我们自己的Listener(实现ServletContextListener接口)

public class MyListener implements ServletContextListener {
    @Override
    public void contextInitialized(ServletContextEvent servletContextEvent) {
        System.out.println("web项目启动了。。。");
    }

    @Override
    public void contextDestroyed(ServletContextEvent servletContextEvent) {
        System.out.println("web项目销毁了。。。");
    }
}
注册Listener

@Bean
public ServletListenerRegistrationBean servletListenerRegistrationBean(){
    return new ServletListenerRegistrationBean<MyListener> (new MyListener());
}
使用注解配置
当然,除了像上面那样在配置类中注册我们自定义的三大组件以外,还可以通过注解的方式去配置
首先,在SpringBoot主配置类上标注@ServletComponentScan
想要使用三大组件的注解,就必须先在SpringBoot主配置类(即标注了@SpringBootApplication注解的类)上标注@ServletComponentScan注解
@ServletComponentScan
@SpringBootApplication
public class DemoApplication {

    public static void main(String[] args) {
        SpringApplication.run(DemoApplication.class, args);
    }
}
然后就可以开始配置了
配置Servlet
在我们自己的Servlet类上配置 @WebServlet(name = "cus", urlPatterns = "server") 注解即可
配置Filter
在我们自己的Filter上配置 @WebFilter(filterName = "fil", urlPatterns = {"/server", "/hello"}) 注解即可
配置Listener
在我们自己的Listener上配置 @WebListener 即可
以上就是使用注解去配置三大组件
SpringBoot能不能使用其他的Servlet容器
SpringBoot默认使用的是Tomcat,那么能不能切换成其他的容器呢?这个当然是没问题的,而且切换的方式也很简单,只需要引入其他容器的依赖,将当前容器的依赖排除即可
切换其他容器
jetty(比较适合做长链接的项目,比如聊天等这种一直要连接的)
想要将容器从Tomcat切换到jetty,在pom.xml文件中导入相关依赖即可
<dependency>
    <groupId>org.springframework.boot</groupId>
    <artifactId>spring-boot-starter-web</artifactId>
    <exclusions>
        <exclusion>
            <artifactId>spring-boot-starter-tomcat</artifactId>
            <groupId>org.springframework.boot</groupId>
        </exclusion>
    </exclusions>
</dependency>
<!-- 引入其他的Servlet容器 -->
<dependency>
    <groupId>org.springframework.boot</groupId>
    <artifactId>spring-boot-starter-jetty</artifactId>
</dependency>
undertow(不支持JSP,但是是一个高性能的非阻塞的Servlet容器,并发性能非常好)
引入undertow的方式同jetty一样
<dependency>
    <groupId>org.springframework.boot</groupId>
    <artifactId>spring-boot-starter-web</artifactId>
    <exclusions>
        <exclusion>
            <artifactId>spring-boot-starter-tomcat</artifactId>
            <groupId>org.springframework.boot</groupId>
        </exclusion>
    </exclusions>
</dependency>
<!-- 引入其他的Servlet容器 -->
<dependency>
    <groupId>org.springframework.boot</groupId>
    <artifactId>spring-boot-starter-undertow</artifactId>
</dependency>
只需像上面那样在pom.xml文件中简单的引入依赖就可以切换容器了,不再需要做额外的操作
使用外置的Servlet容器
嵌入式的Servlet容器虽然用的挺爽,但是有时候也离不开外置的Servlet容器,首先我们来比较一下嵌入式跟外置的有优缺点
嵌入式Servlet容器:应用打成jar包
- 优点:简单、便携
-
缺点:默认不支持JSP、优化定制比较复杂(使用定制器【ServerProperties、自定义WebServerFactoryCustomizer】,自己编写嵌入式Servlet容器的创建工厂)
外置的Servlet容器:外面安装Tomcat,将应用打成war包的方式
外置的Sverlet的缺点也很明显,那就是使用起来复杂,但是没有内置的那些缺点,相反这些内置的缺点反而是它的优点
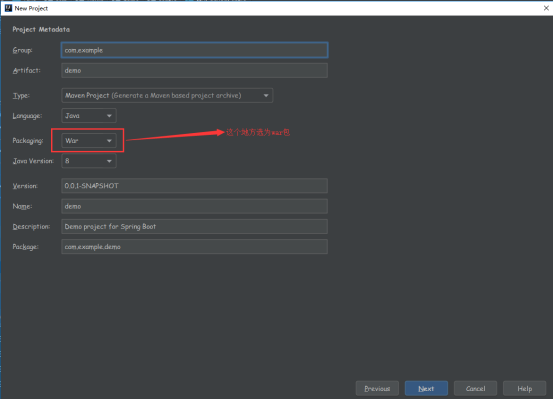
创建项目
首先要创建一个项目,使用war的方式打包

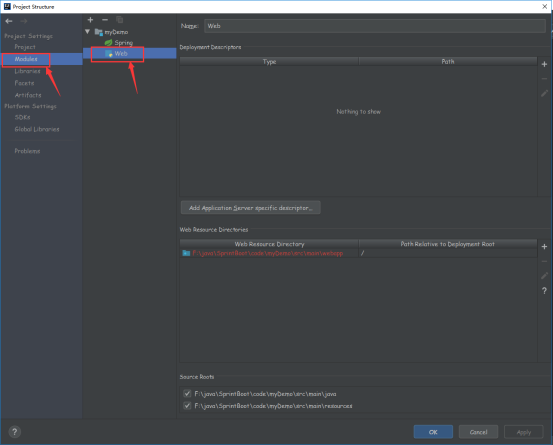
创建webapp文件夹
点击图示按钮

来到Modules下的web


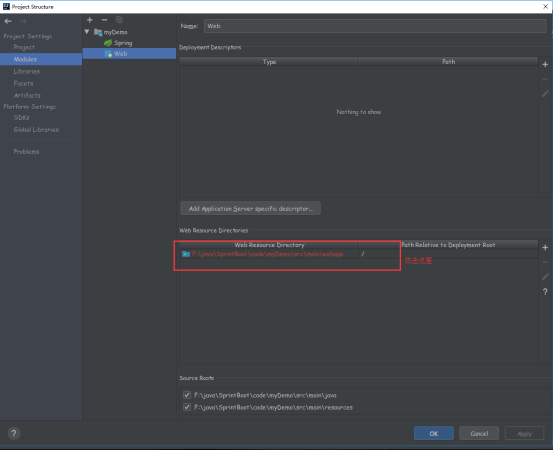
双击后会弹出一个框框

我们点击OK

询问是否创建webapp,点击yes即可
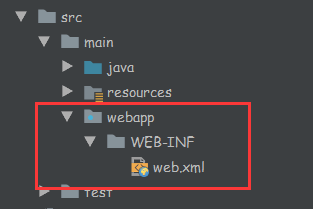
创建web.xml
点击图示按钮

点击web.xml

填写生成位置

点击OK然后应用即可
可以看到已经创建完成

之后配置下Tomcat就可以启动项目了
变化
1、将嵌入式的Tomcat指定为了provided
<dependency>
    <groupId>org.springframework.boot</groupId>
    <artifactId>spring-boot-starter-tomcat</artifactId>
    <scope>provided</scope>
</dependency>
2、编写了一个类继承于SpringBootServletInitializer,并重载了configure方法
public class ServletInitializer extends SpringBootServletInitializer {

    @Override
    protected SpringApplicationBuilder configure(SpringApplicationBuilder application) {
	// 传入SpringBoot应用的主程序
	return application.sources(DemoApplication.class);
    }

}


 浙公网安备 33010602011771号