

SpringBoot_web
这章讲的主要是springboot在web开发中的一些问题,不会有springboot连接数据库的操作,主要记录了Spring boot对静态资源的映射规则,SpringMVC自动配置,错误处理机制以及通过一个RestfulCrud项目来记录Spring boot使用国际化以及拦截器等功能
使用springboot开发流程
- 创建SpringBoot应用。选中我们需要的模块
- SpringBoot已经默认将这些场景配置好了。只需要在配置文件中指定少量配置就可以运行起来
- 自己编写业务代码
SpringBoot对静态资源的映射规则
通过SpringBoot的源码可以发现有这样几个有趣的功能
SpringBoot的静态资源文件夹
先看一段源码,这段源码是从 WebMvcAutoConfiguration 类中取出的
@Override
public void addResourceHandlers(ResourceHandlerRegistry registry) {
   if (!this.resourceProperties.isAddMappings()) {
      logger.debug("Default resource handling disabled");
      return;
   }
   Duration cachePeriod = this.resourceProperties.getCache().getPeriod();
   CacheControl cacheControl = this.resourceProperties.getCache()
         .getCachecontrol().toHttpCacheControl();
   if (!registry.hasMappingForPattern("/webjars/**")) {
      customizeResourceHandlerRegistration(registry
            .addResourceHandler("/webjars/**")
            .addResourceLocations("classpath:/META-INF/resources/webjars/")
            .setCachePeriod(getSeconds(cachePeriod))
            .setCacheControl(cacheControl));
   }
   String staticPathPattern = this.mvcProperties.getStaticPathPattern();
   if (!registry.hasMappingForPattern(staticPathPattern)) {
      customizeResourceHandlerRegistration(
            registry.addResourceHandler(staticPathPattern)
                  .addResourceLocations(getResourceLocations(
                        this.resourceProperties.getStaticLocations()))
                  .setCachePeriod(getSeconds(cachePeriod))
                  .setCacheControl(cacheControl));
   }
}
通过上面的源码可以获得以下两个信息
所有/webjars/**的请求,都去 classpath:/META-INF/resources/webjars/ 下找资源
什么意思呢?就是说所有的localhost:8080/webjars/**请求都被映射到了 localhost:8080/META-INF/resources/webjars/
通过这个功能,我们就可以映入一些框架的文件,例如jQuery的,或者Bootstrap,不过得先通过Maven引入这些框架文件,我们可以webjars的官网去找到这些文件的依赖信息
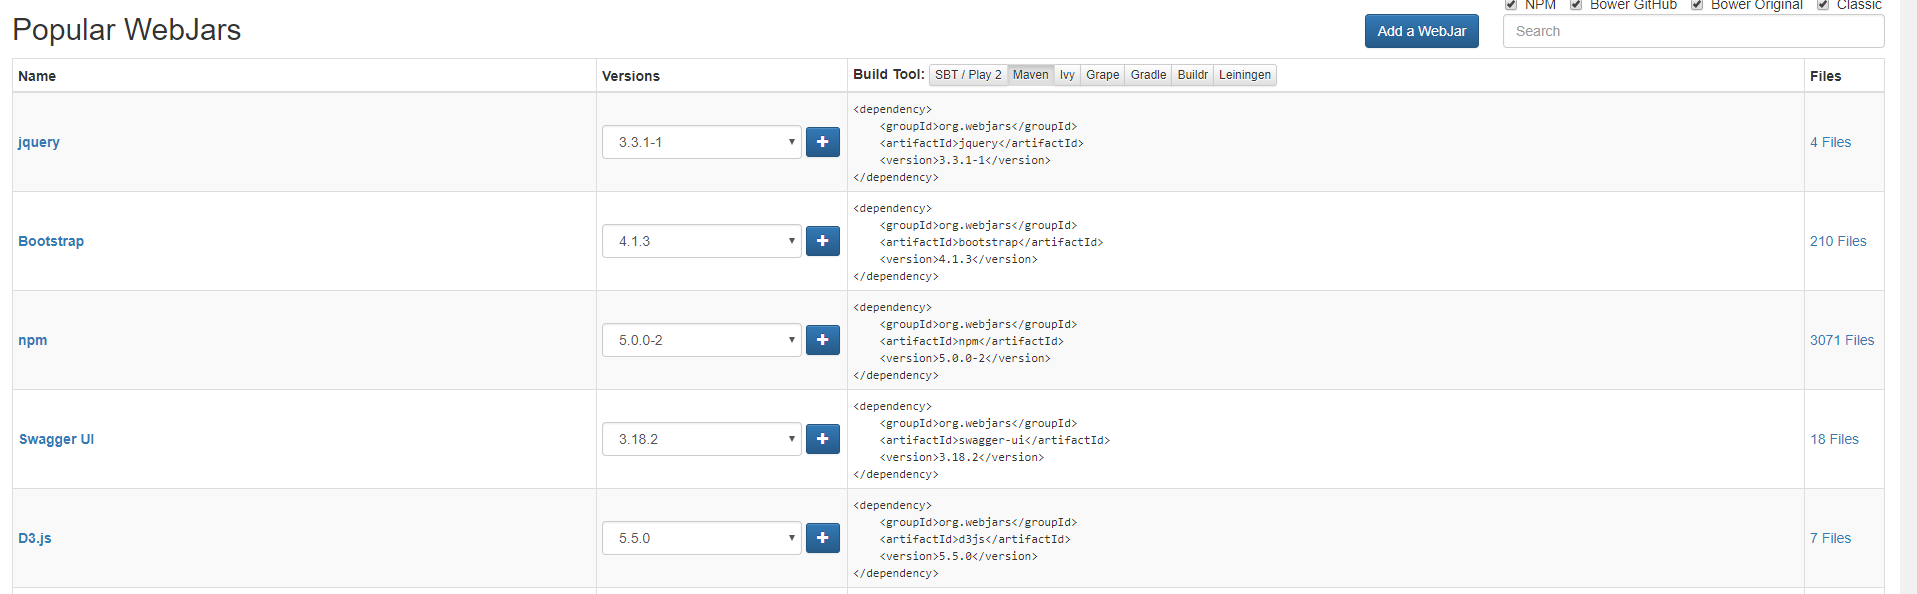
只需要将上图Maven栏中的相关信息放到我们项目的pom.xml文件中即可
这是映入相关框架的jar包后的目录,以jquery为例:
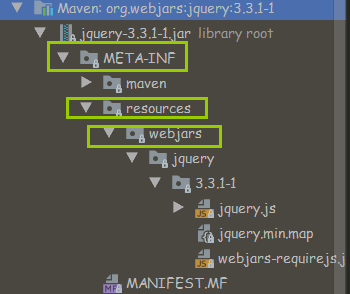
前面说过所有的/webjars/**请求都去classpath:/META-INF/resources/webjars/ 下找资源,所以该jquery.js的文件的访问路径就是/webjars/jquery/3.3.1-1/jquery.js在项目中就可以通过这个路径去引入jquery文件
/**访问当前项目的任何资源,如果没有会去下面几个路径下找资源
"classpath:/META-INF/resources/"
"classpath:/resources/"
"classpath:/static/"
"classpath:/public/"
"/"     # 当前项目的根路径(java目录跟resources都是根目录)
通过上面的源码我们还能发现这个功能,就是localhost:8080/会被映射到上面几个文件中
例如访问 localhost:8080/abc.js,就会去上面所说的几个位置寻找名为abc.js的文件
那么有一个问题,我们可不可以修改静态资源的位置呢?自然是可以的,只需要在application.properties中去修改即可
spring.resources.static-locations=classpath:/hello/, classpath:/jinxin
接收的是一个数组,多个文件通过逗号间隔
欢迎页
在WebMvcAutoConfiguration类中还有下面一段代码
@Bean
public WelcomePageHandlerMapping welcomePageHandlerMapping(
      ApplicationContext applicationContext) {
   return new WelcomePageHandlerMapping(
         new TemplateAvailabilityProviders(applicationContext),
         applicationContext, getWelcomePage(),
         this.mvcProperties.getStaticPathPattern());
}
我们可以发现这样一个规则,即访问 localhost:8080/ 就能访问到静态资源文件下的index.html页面,这个页面被称为欢迎页
页面图标
在WebMvcAutoConfiguration类中还有一段代码
@Configuration
@ConditionalOnProperty(value = "spring.mvc.favicon.enabled", matchIfMissing = true)
public static class FaviconConfiguration implements ResourceLoaderAware {

   private final ResourceProperties resourceProperties;

   private ResourceLoader resourceLoader;

   public FaviconConfiguration(ResourceProperties resourceProperties) {
      this.resourceProperties = resourceProperties;
   }

   @Override
   public void setResourceLoader(ResourceLoader resourceLoader) {
      this.resourceLoader = resourceLoader;
   }

   @Bean
   public SimpleUrlHandlerMapping faviconHandlerMapping() {
      SimpleUrlHandlerMapping mapping = new SimpleUrlHandlerMapping();
      mapping.setOrder(Ordered.HIGHEST_PRECEDENCE + 1);
      mapping.setUrlMap(Collections.singletonMap("**/favicon.ico",
            faviconRequestHandler()));
      return mapping;
   }

   @Bean
   public ResourceHttpRequestHandler faviconRequestHandler() {
      ResourceHttpRequestHandler requestHandler = new ResourceHttpRequestHandler();
      requestHandler.setLocations(resolveFaviconLocations());
      return requestHandler;
   }

   private List<Resource> resolveFaviconLocations() {
      String[] staticLocations = getResourceLocations(
            this.resourceProperties.getStaticLocations());
      List<Resource> locations = new ArrayList<>(staticLocations.length + 1);
      Arrays.stream(staticLocations).map(this.resourceLoader::getResource)
            .forEach(locations::add);
      locations.add(new ClassPathResource("/"));
      return Collections.unmodifiableList(locations);
   }
由上面的代码可知所有的 **/favicon.ico 都在静态资源文件下找,即不管是那个页面都可以在静态资源下找这个图标,那么这个图标是显示在哪儿的呢?在浏览器的标签栏上边会有一个图标,这个图标就是显示在哪儿的

SpringMVC自动配置
我们可以去官方文档查看关于SpringMVC的自动配置
Spring Boot已经自动配置好了SpringMVC,以下是官方文档中显示的SpringBoot对SpringMVC的默认配置:(WebMvcAutoConfiguration)
- 包含了 ContentNegotiatingViewResolver 和 BeanNameViewResolver 组件
- 自动配置了ViewResolver(视图解析器:根据方法的返回值得到视图对象(view),视图对象决定如何渲染(转发还是重定向到页面))
- ContentNegotiatingViewResolver :组合所有视图解析器的
- 如何定制:我们可以自己给容器中添加一个视图解析器,ContentNegotiatingViewResolver 会自动的将其组装进来
- 支持静态资源文件夹路径和webjars
- 自动注册了 Converter, GenericConverter, Formatter 组件.
- Converter:转换器,例如:如果页面提交了一组数据,我们使用user对象接收(public String hello(User user);),而涉及到一些非字符串属性的时候,例如18,从前端传来的是字符串类型,这里样转换成数字类型就会用到Converter
- Formatter :格式化器,如果前端传来2017-1-12的字符串,格式化器就能将它转换成Date类型的数据
- 自己添加格式化转换器,我们只需要放在容器中即可(通过@Bean或@Component)
- 支持 HttpMessageConverters
- HttpMessageConverters :消息转换器,SpringMVC用来转换Http请求和响应的
- 自己给容器中添加HttpMessageConverters ,只需要将自己注册的组件添加到容器即可(通过@Bean或@Component)
- HttpMessageConverters :消息转换器,SpringMVC用来转换Http请求和响应的
- 定义错误代码生成规则 MessageCodesResolver.
- 以index.html作为静态首页访问
- 支持添加图标favicon.ico
- Automatic use of a ConfigurableWebBindingInitializerbean.
- 初始化WebDataBinder
- 请求的数据 ---> JavaBean
- 我们也可以配置一个ConfigurableWebBindingInitializer 来替换默认的,只需要放到容器中即可
org.springframework.boot.autoconfigure.web:web的所有自动场景;
If you want to keep Spring Boot MVC features, and you just want to add additional MVC configuration (interceptors, formatters, view controllers etc.) you can add your own @Configuration class of type WebMvcConfigurerAdapter, but without @EnableWebMvc. If you wish to provide custom instances of RequestMappingHandlerMapping, RequestMappingHandlerAdapter or ExceptionHandlerExceptionResolver you can declare a WebMvcRegistrationsAdapter instance providing such components.
If you want to take complete control of Spring MVC, you can add your own @Configuration annotated with @EnableWebMvc.
扩展SprngMVC
虽然上面说的一些功能已经让我们眼花缭乱了,但是可惜的是使用上面的那些功能开发仍旧不够,我们还需要自己扩展。。。
想要扩展SpringMVC的配置就必须要自己定义一个配置类,并且使用@Configuration注解标注,让它成为一个配置类,而且要实现 WebMvcConfigurer 接口,最关键的是一定不能将这个类标注上 @EnableWebMvc 注解
这样做的特点:既保留了所有的自动配置,也能用我们扩展的配置
@Configuration
public class MyMvcConfig implements WebMvcConfigurer {


    @Override
    public void addViewControllers(ViewControllerRegistry registry) {
        // 浏览器发送 /jinxin 请求来到 success页面
        registry.addViewController("/jinxin").setViewName("success");
    }
}
全面接管SpringMVC
我们有时候不想使用SpringBoot默认配置的SpringMVC了,而是所有的配置都由我们自己写,那么如何让SpringBoot的默认配置失效呢?只需要在我们自己配置的类标注上@EnableWebMvc即可
@EnableWebMvc
@Configuration
public class MyMvcConfig implements WebMvcConfigurer {


    @Override
    public void addViewControllers(ViewControllerRegistry registry) {
        // 浏览器发送 /jinxin 请求来到 success页面
        registry.addViewController("/jinxin").setViewName("success");
    }
}
原理:为什么@EnableWebMvc使自动配置失效了?
1、@EnableWebMvc的核心
@Import({DelegatingWebMvcConfiguration.class})
public @interface EnableWebMvc {
}
2、根据上一步@EnableWebMvc导入了DelegatingWebMvcConfiguration类,而这个类继承了WebMvcConfigurationSupport 类,所以这个类是WebMvcConfigurationSupport 类型的
@Configuration
public class DelegatingWebMvcConfiguration extends WebMvcConfigurationSupport {
3、而在WebMvcAutoConfiguration类中有一个注解很重要@ConditionalOnMissingBean,它表示容器中没有这个组件的时候,这个自动配置类才生效
@Configuration
@ConditionalOnWebApplication(type = Type.SERVLET)
@ConditionalOnClass({ Servlet.class, DispatcherServlet.class, WebMvcConfigurer.class })
// 表示容器中没有这个组件的时候,这个自动配置类才生效
@ConditionalOnMissingBean(WebMvcConfigurationSupport.class)
@AutoConfigureOrder(Ordered.HIGHEST_PRECEDENCE + 10)
@AutoConfigureAfter({ DispatcherServletAutoConfiguration.class,
      ValidationAutoConfiguration.class })
public class WebMvcAutoConfiguration {
4、在上一步中@ConditionalOnMissingBean需要判断容器中没有某个组件才会让WebMvcAutoConfiguration自动配置类生效,而它检测的正是WebMvcConfigurationSupport 类,然而我们的@EnableWebMvc注解早已经把WebMvcConfigurationSupport类型的DelegatingWebMvcConfiguration类导入了容器中,所以这个注解不会判断通过,因此自动配置类不会加载,MVC自动配置全部失效
如何修改SpringBoot的默认配置
- SpringBoot在自动配置很多组件的时候,先看容器中有没有用户自己配置的(@Bean、@Component)如果有就用用户配置的,如果没有,才自动配置;如果有些组件可以有多个(ViewResolver)将用户配置的和自己默认的组合起来;
- 在SpringBoot中会有非常多的xxxConfigurer帮助我们进行扩展配置
- 在SpringBoot中会有很多的xxxCustomizer帮助我们进行定制配置
RestfulCrud项目
默认访问首页
在上面提到过SpringBoot中有这样一个功能,就是访问localhost:8080/会默认访问到index.html页面,但是前提是这个index.html文件必须在静态资源文件夹中才行,否则访问不到,但是不巧的是在使用thymeleaf模板的时候,必须将页面放到templates目录下,也就是说必须要将index.html页面放到templates目录中,那么再使用localhost:8080就访问不到了,这时的解决办法就是将localhost:8080/这个访问路径转到templates目录下的某个页面,这里以login.html为例进行绑定
//@EnableWebMvc
@Configuration
public class MyMvcConfig implements WebMvcConfigurer {
    // 所有的WebMvcConfigurerAdapter组件都会一起起作用
    @Bean   // 将组件添加到容器中
    public WebMvcConfigurer webMvcConfigurer(){
        WebMvcConfigurer webMvcConfigurer = new WebMvcConfigurer() {
            @Override
            public void addViewControllers(ViewControllerRegistry registry) {
                registry.addViewController("/").setViewName("login");
                registry.addViewController("/index.html").setViewName("login");
            }
        };
        return webMvcConfigurer;
    }
}
上面将setViewName设置为了login,这里会使用到thymeleaf的字符串拼接,其实完整的路径是 /templates/login.html
国际化
如果由SpringMVC来做国际化:
- 编写国际化配置文件
- 使用ResourceBundleMessageSource管理国际化资源文件
- 在页面使用fmt:message取出国际化内容
现在由SpringBoot来做:
1、编写国际化配置文件,抽取页面需要显示的国际化信息
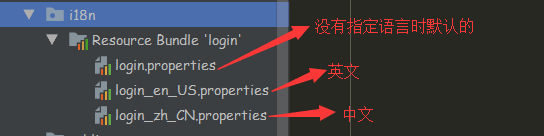
2、将基础文件(去掉国家名的国际化资源文件)指定为我们自己所写的文件(去application.properties文件)

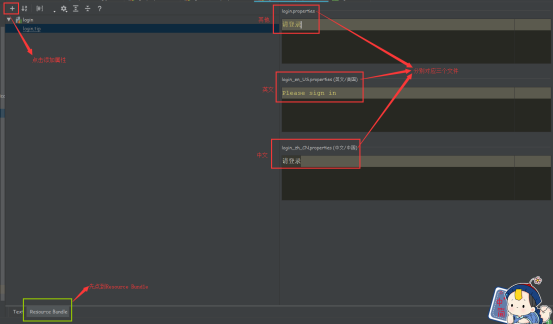
3、去页面获取国际化的值
在thymeleaf中有一个表达式 #{} 就是专门去获取国际化信息的
th:text="#{login.tip}"
这样做的效果:根据浏览器语言设置的信息切换了国际化

原理:
国际化Locale(区域信息对象):通过LocaleResolver获取区域信息对象,根据请求头带来的区域信息获取Locale进行国际化
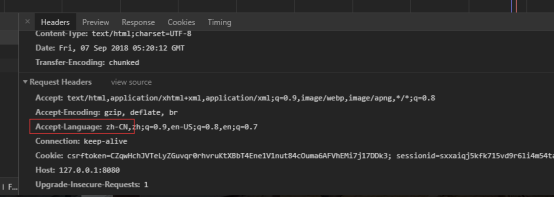


@Bean
@ConditionalOnMissingBean
@ConditionalOnProperty(prefix = "spring.mvc", name = "locale")
public LocaleResolver localeResolver() {
   if (this.mvcProperties
         .getLocaleResolver() == WebMvcProperties.LocaleResolver.FIXED) {
      return new FixedLocaleResolver(this.mvcProperties.getLocale());
   }
   AcceptHeaderLocaleResolver localeResolver = new AcceptHeaderLocaleResolver();
   localeResolver.setDefaultLocale(this.mvcProperties.getLocale());
   return localeResolver;
}
4、那么知道原理后我们就可以自己定制LocaleResolver实现在页面点击就能切换语言的效果
(1) 首先需要给后台发送给一个参数l带要设置的语言,当然这样是不够的,因为LocaleResolver仍旧会按照请求头中的信息来设置的区域信息,那么这时候就需要我们自己写一个LocaleResolver来替换掉原来的了

(2) 自己写一个LocaleResolver
public class MyLocaleResolver implements LocaleResolver {

    /**
     * 解析区域信息
     * @param request
     * @return
     */
    @Override
    public Locale resolveLocale(HttpServletRequest request) {
        // 获取国际化信息
        String l = request.getParameter("l");
        Locale locale = Locale.getDefault();   // 设置为操作系统默认的区域信息
        if(!StringUtils.isEmpty(l)){    // 如果不为空
            String[] split = l.split("_");
            locale = new Locale(split[0], split[1]);
        }
        return locale;
    }

    @Override
    public void setLocale(HttpServletRequest httpServletRequest, HttpServletResponse httpServletResponse, Locale locale) {

    }
}
(3) 将自己写的LocaleResolver添加到容器中替换掉原来默认的
去到我们自己的配置类MyMvcConfig类添加
@Bean
public LocaleResolver localeResolver(){
    return new MyLocaleResolver();
}
开发期间模板引擎修改后想要实时生效
1、禁用模板引擎的缓存
spring.thymeleaf.cache=false
2、页面修改完成以后按 CTRL + F9重新编译
拦截器进行登录检查
1、首先准备一个拦截器类 MyHandleInterceptor,该类必须继承HandleInterceptor
public class MyHandlerInterceptor implements HandlerInterceptor {
    /**
     * 目标方法执行之前执行
     * @param request
     * @param response
     * @param handler
     * @return
     */
    @Override
    public boolean preHandle(HttpServletRequest request, HttpServletResponse response, Object handler) throws ServletException, IOException {
        Object loginUser = request.getSession().getAttribute("loginUser");
        if(loginUser == null){
            // 未登录,拦截,返回登录页面
            request.setAttribute("errorMsg", "还未登陆!");
            request.getRequestDispatcher("/index.html").forward(request,response);
//            response.sendRedirect("/");
            return false;
        }else{
            // 已经登录,放行
            return true;
        }
    }
}
2、将自定义拦截器添加到容器中,去我们自己的配置类中添加
@Override
public void addInterceptors(InterceptorRegistry registry) {
    /**
     * SpringBoot2.0之后拦截器会拦截静态资源文件。。。
    */
    registry.addInterceptor(new MyHandlerInterceptor()).addPathPatterns("/**").    // 选择拦截的请求
                    excludePathPatterns("/index.html", "/", "/user/login", "/webjars/**", "/css/**", "/js/**", "/img/**");     // 选择不拦截的请求
}
错误处理机制
SpringBoot默认的错误处理机制
默认效果:
1、浏览器,返回一个默认的错误页面
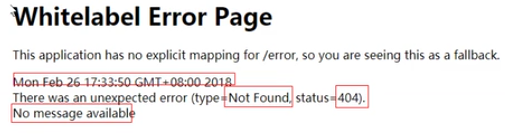
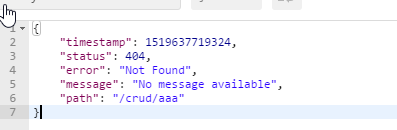
2、如果是其他客户端,默认响应一个json数据
原理:可以参照ErrorMvcAutoConfiguration错误处理的自动配置
给容器中添加了如下组件:
1、DefaultErrorAttributes
// 帮我们在页面共享信息
public Map<String, Object> getErrorAttributes(WebRequest webRequest, boolean includeStackTrace) {
    Map<String, Object> errorAttributes = new LinkedHashMap();
    errorAttributes.put("timestamp", new Date());
    this.addStatus(errorAttributes, webRequest);
    this.addErrorDetails(errorAttributes, webRequest, includeStackTrace);
    this.addPath(errorAttributes, webRequest);
    return errorAttributes;
}
2、BasicErrorController:处理/error请求
@Controller
@RequestMapping("${server.error.path:${error.path:/error}}")
public class BasicErrorController extends AbstractErrorController {


@RequestMapping(produces = "text/html")   // 产生HTML类型的数据,浏览器点发送的请求来到这个方法处理
public ModelAndView errorHtml(HttpServletRequest request,
      HttpServletResponse response) {
   HttpStatus status = getStatus(request);
   Map<String, Object> model = Collections.unmodifiableMap(getErrorAttributes(
         request, isIncludeStackTrace(request, MediaType.TEXT_HTML)));
   response.setStatus(status.value());
   ModelAndView modelAndView = resolveErrorView(request, response, status, model);
   return (modelAndView != null) ? modelAndView : new ModelAndView("error", model);
}

@RequestMapping
@ResponseBody        // 产生json数据,其他客户端来到这个方法处理
public ResponseEntity<Map<String, Object>> error(HttpServletRequest request) {
   Map<String, Object> body = getErrorAttributes(request,
         isIncludeStackTrace(request, MediaType.ALL));
   HttpStatus status = getStatus(request);
   return new ResponseEntity<>(body, status);
}
3、ErrorPageCustomizer
@Value("${error.path:/error}")
private String path = "/error";  // 系统出现错误以后来到error请求进行处理
4、DefaultErrorViewResolver
private ModelAndView resolve(String viewName, Map<String, Object> model) {


// 默认SpringBoot可以去找一个页面,  error/404
   String errorViewName = "error/" + viewName;

// 模板引擎可以解析这个页面地址就用模板引擎解析
   TemplateAvailabilityProvider provider = this.templateAvailabilityProviders
         .getProvider(errorViewName, this.applicationContext);
   if (provider != null) {

// 模板引擎可用的情况下返回到errorViewName 指定的视图地址
      return new ModelAndView(errorViewName, model);
   }

// 模板引擎不可用,就在静态资源文件夹下找errorViewName 对应的页面   error/404.html
   return resolveResource(errorViewName, model);
}
步骤:
一旦系统出现4xx或者5xx之类的错误,ErrorPageCustomizer就会生效(定制错误的响应规则),就会来到/error请求。被BasicErrorController处理
响应页面:去哪个页面是由DefaultErrorViewResolver解析得到的
如何定制错误响应
如何定制错误页面
(1) 有模板引擎的情况下:将自定制的错误页面放到templates目录下的error目录下,而且以错误状态码为文件名,即404响应页面为 error/404.html
① 我们可以以4xx跟5xx来匹配所有这一类错误,如果有精确的现寻找精确的
② 页面能获取的信息:
1) Timestamp:时间戳
2) Status:状态码
3) Error:错误提示
4) Exception:异常对象
5) Message:异常消息
6) Errors:JSR303数据校验的错误都在这里
(2) 没有模板引擎的情况下(在templates目录下没有错误页面):静态文件下找
(3) 在templates目录跟静态目录下都找不到,默认来到SpringBoot的错误提示页面
如何定制错误的json数据
(1) 方式一(缺点:浏览器跟客户端得到的都是json数据,不能够自适应)
先编写一个UserNotExistException类:
public class UserNotExistException extends RuntimeException {
    public UserNotExistException(){
        super("用户不存在");
    }
}
编写自己的错误处理机制MyExceptionHandler:
@ControllerAdvice
public class MyExceptionHandler {

    @ResponseBody
    @ExceptionHandler(UserNotExistException.class)
    public Map<String, Object> handleException(Exception e){
        Map<String, Object> map = new HashMap<>();
        // 添加异常信息
        map.put("code", "user.notexist");
        map.put("message", e.getMessage());

        return map;
    }
}
(2) 方式二:转发到/error进行自适应
@ExceptionHandler(UserNotExistException.class)
public String handleException(Exception e, HttpServletRequest request){
    // 设置自己的错误状态码,否则就不会进入定制的错误页面解析流程
    /**
     * Integer statusCode = (Integer) request
     .getAttribute("javax.servlet.error.status_code");
     */
    request.setAttribute("javax.servlet.error.status_code",400);

    Map<String, Object> map = new HashMap<>();
    // 添加异常信息
    map.put("code", "user.notexist");
    map.put("message", e.getMessage());

    return "redirect:/error";
}
(3) 将我们定制的数据携带出去
SpringBoot处理错误机制:出现错误后,会来到/error请求,被BasicErrorController处理,响应出去可以获取的数据是由getErrorAttributes得到的(是AbstractErrorController规定的方法)
① 完全来编写一个ErrorController的实现类【或者是编写AbstractErrorController的子类】,放在容器中;(太复杂)
② 页面上能用的数据,或者是json返回能用的数据都是通过errorAttributes.getErrorAttributes得到;
容器中DefaultErrorAttributes.getErrorAttributes();默认进行数据处理的;
自定义ErrorAttributes:
@Component
public class MyErrorAttributes extends DefaultErrorAttributes {

    @Override
    public Map<String, Object> getErrorAttributes(WebRequest webRequest, boolean includeStackTrace) {
        Map<String, Object> map = super.getErrorAttributes(webRequest, includeStackTrace);
        map.put("company", "qianyi");
        return map;
    }
}
将我们异常处理携带的数据返回给浏览器和客户端
1、将我们的异常信息放到request域中
@ExceptionHandler(UserNotExistException.class)
public String handleException(Exception e, HttpServletRequest request){
    // 设置自己的错误状态码,否则就不会进入定制的错误页面解析流程
    /**
     * Integer statusCode = (Integer) request
     .getAttribute("javax.servlet.error.status_code");
     */
    request.setAttribute("javax.servlet.error.status_code", 400);

    Map<String, Object> map = new HashMap<>();
    // 添加异常信息
    map.put("code", "user.notexist");
    map.put("message", e.getMessage());

    // 将我们的异常信息放到request域中
    request.setAttribute("ext", map);
    return "redirect:/error";
}
2.将我们的异常处理器携带的数据放到getErrorAttributes中
@Component
public class MyErrorAttributes extends DefaultErrorAttributes {


    // 返回的Map就是页面和json能获取的所有字段
    @Override
    public Map<String, Object> getErrorAttributes(WebRequest webRequest, boolean includeStackTrace) {
        Map<String, Object> map = super.getErrorAttributes(webRequest, includeStackTrace);
        map.put("company", "qianyi");

        // 将我们的异常处理器携带的数据放到getErrorAttributes中
        Map<String, Object> ext = (Map<String, Object>) webRequest.getAttribute("ext", 0);
        map.put("ext", ext);
        return map;
    }
}

 浙公网安备 33010602011771号