Element-UI
Element-UI
https://blog.csdn.net/weixin_48884617/article/details/123077247?spm=1001.2014.3001.5502
1.环境配置
1.1 vue安装
首先使用以下命令卸载旧版本:
npm uninstall vue-cli -g
安装最新版本:
npm i -g @vue/cli
查看是当前版本号:
vue -V

输入 命令查看commands
vue -h
输入vue-ui,启动vue的界面
创建项目—>在此创建新项目
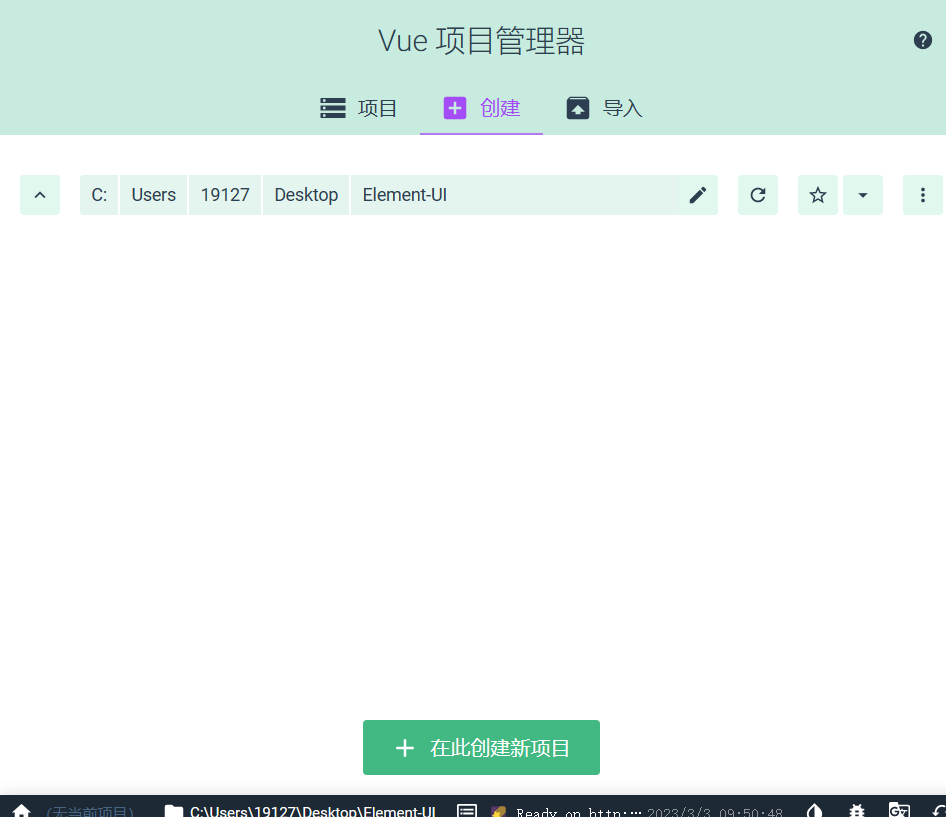
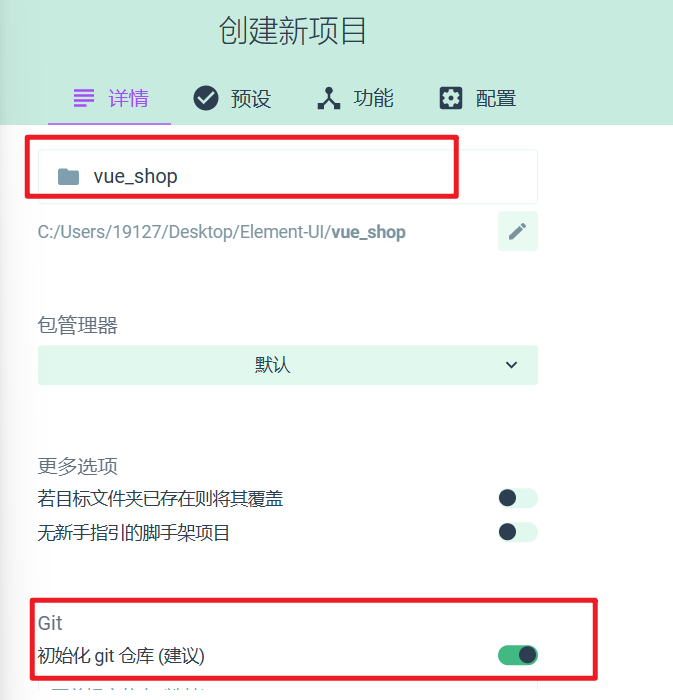
输入项目名称(必须是英文的)
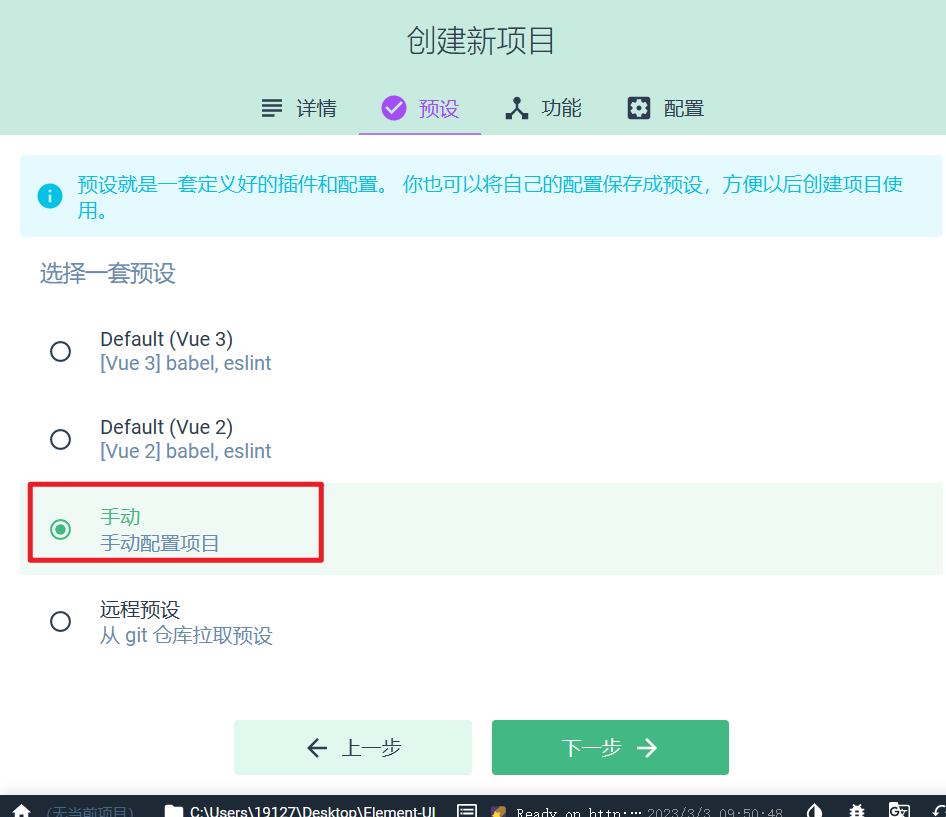
选择手动创建
选择/babel/router/linter(没选)/使用配置文件
选择vue 2.x
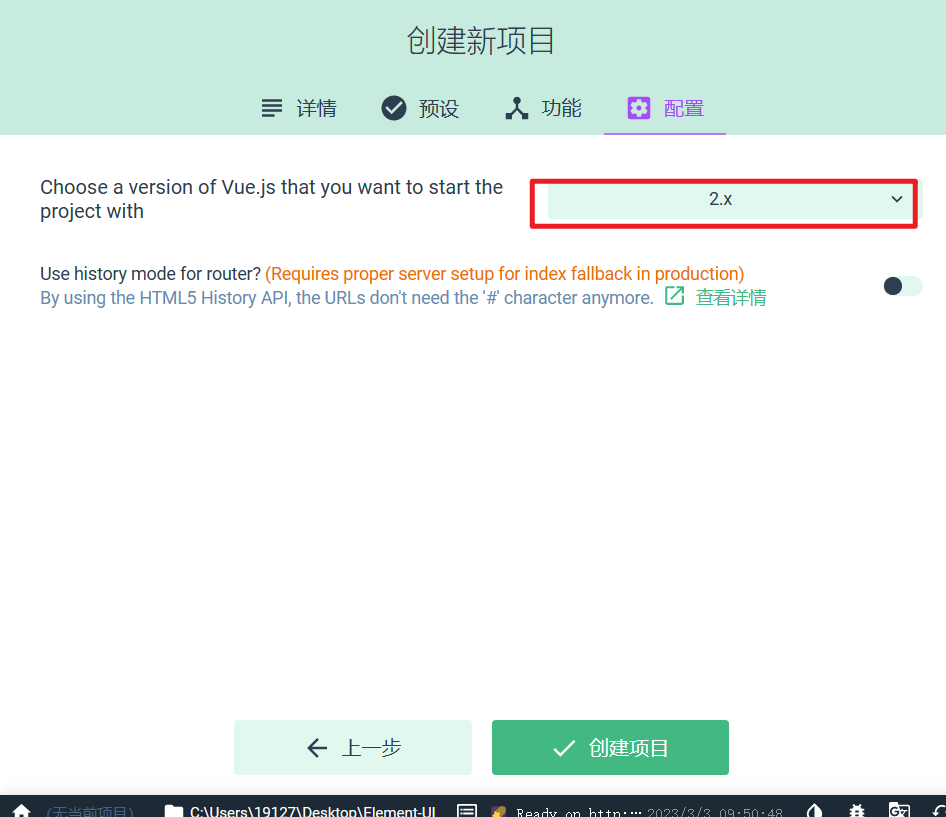
输入预设名称
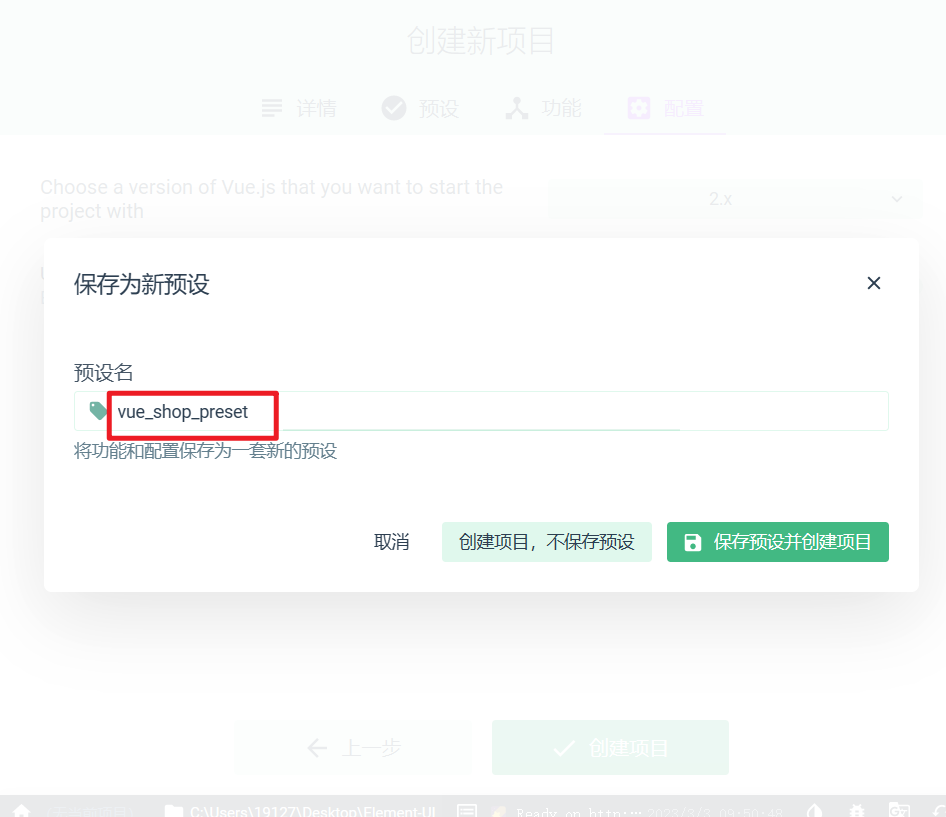
创建中ing

1.2 配置Element-UI组件库
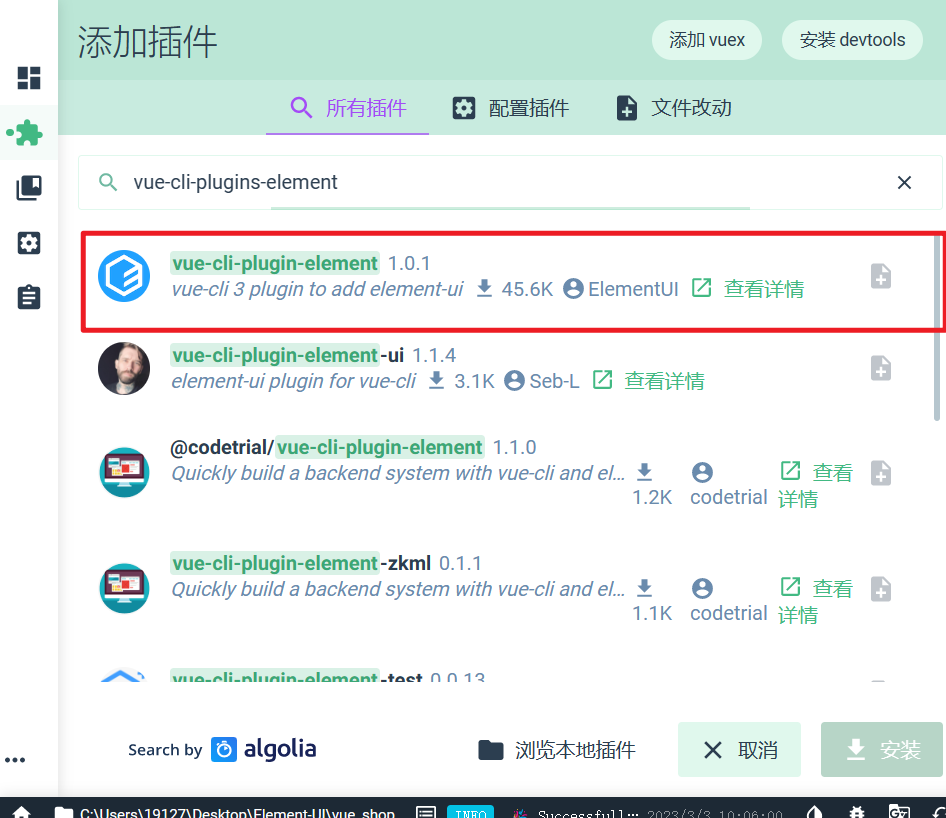
在仪表盘->插件->搜索vue-cli-plugins-element 选中安装
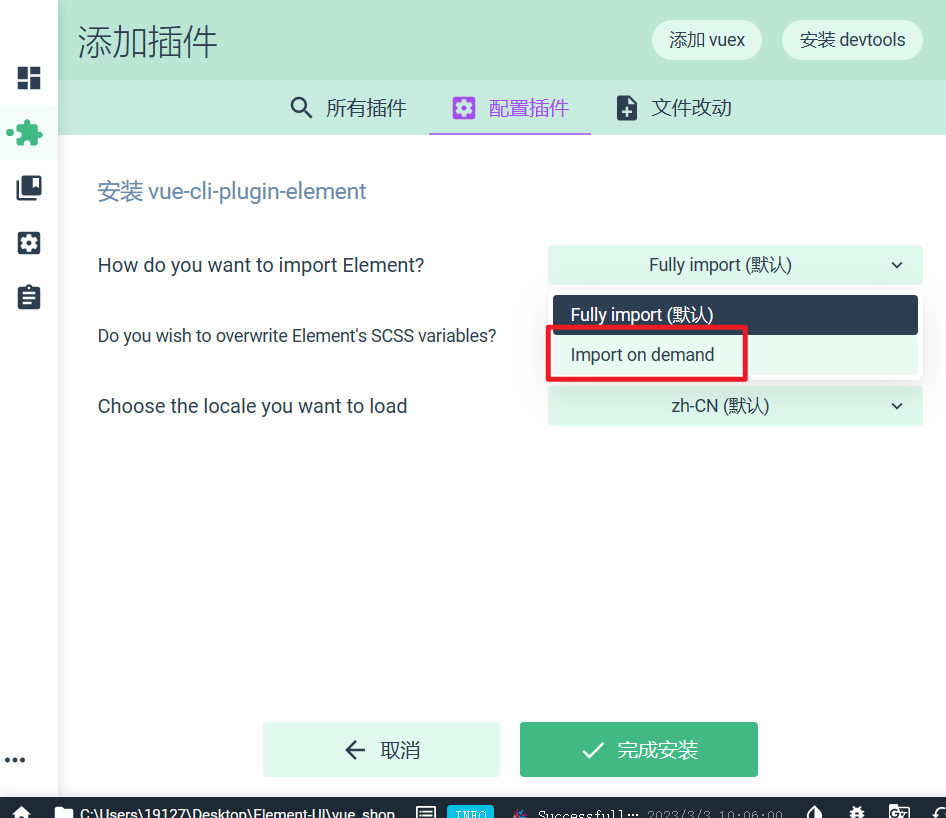
对插件做相关配置,将全部导入改为按需导入
1.3 配置axios库
在仪表盘->依赖->点击安装依赖(这里视频上版本比较老,所以用命令行安装的)
npm install axios@0.18.0

1.4 初始化 git 远程仓库
Gitee 提供了基于SSH协议的Git服务,在使用SSH协议访问仓库之前,需要先配置好账户/仓库的SSH公钥。
你可以按如下命令来生成 sshkey:
ssh-keygen -t rsa -C "1912733027@qq.com"
代码参数含义:
-t 指定密钥类型,默认是 rsa ,可以省略。
-C 设置注释文字,比如邮箱。
-f 指定密钥文件存储文件名。
到id_rsa.pub这个文件中复制粘贴所有内容
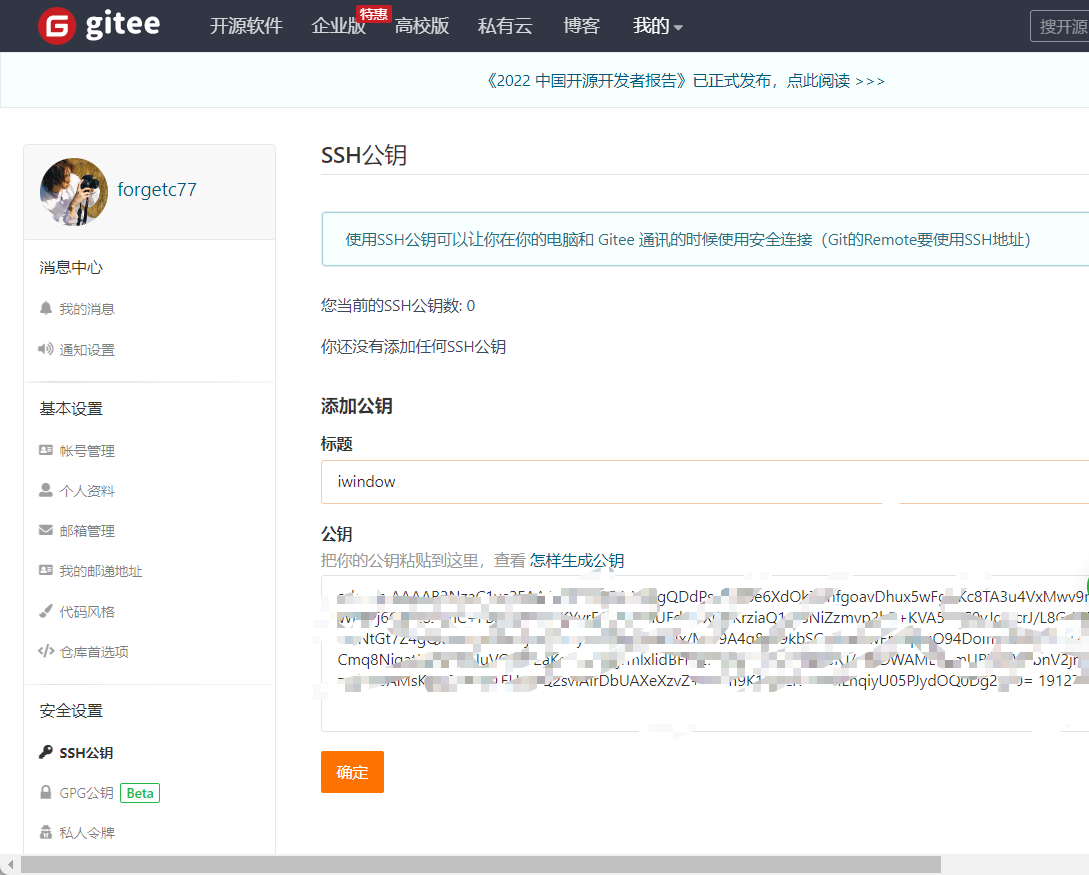
添加后,在终端(Terminal)中输入
ssh -T git@gitee.com
首次使用需要确认,输入yes 并添加主机到本机SSH可信列表。若返回 Hi XXX! You've successfully authenticated, but Gitee.com does not provide shell access. 内容,则证明添加成功。
重复执行指令

1.5 将本地项目托管到码云中
创建仓库
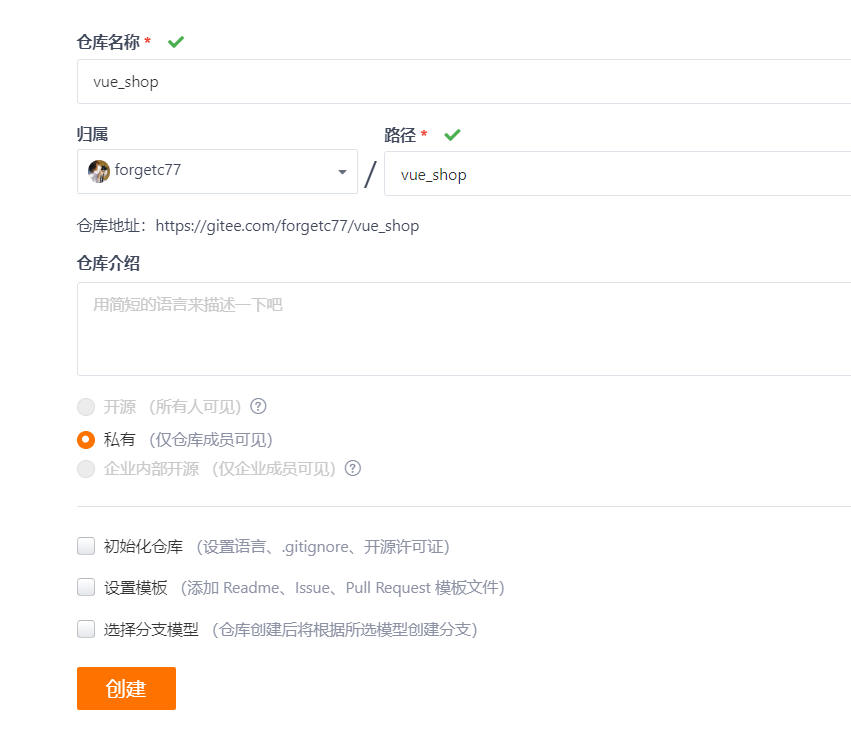
Git 全局设置:
git config --global user.name "forgetc77"
git config --global user.email "1912733027@qq.com"
进入vue-shop文件夹输入
git add .
提交
git commit -m "add files"
将本地仓库上传到码云中:
git remote add origin https://gitee.com/forgetc77/vue_shop.git
输入账号密码

后台部署已经跳过使用api
https://lianghj.top:8888/api/private/v1/
1.6安装webpack
npm install webpack-cli -g
npm install webpack -g
1.7 补充一个loginIn分支
git checkout -b loginIn
git clone https://gitee.com/forgetc77/vue_shop.git
git push origin loginIn
git push -u origin loginIn
将其推送到origin主舱储的login子分支
1.8 git分支怎样改名字
假设分支名称为oldName
想要修改为 newName
- 本地分支重命名(还没有推送到远程)
git branch -m oldName newName
- 远程分支重命名 (已经推送远程-假设本地分支和远程对应分支名称相同)
a. 重命名远程分支对应的本地分支
git branch -m oldName newName
b. 删除远程分支
git push --delete origin oldName
c. 上传新命名的本地分支
git push origin newName
d.把修改后的本地分支与远程分支关联
git branch --set-upstream-to origin/newName
2.登录/退出功能
2.1登录概述
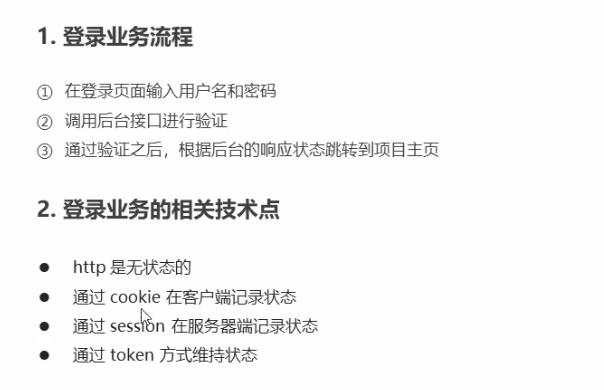
如果不存在跨域问题,可以使用cookie/session试下
如果存在跨域问题,可以使用token这种方式来维持状态
2.2 token原理分析
token主要是进行客户端和服务器之间的一个校验
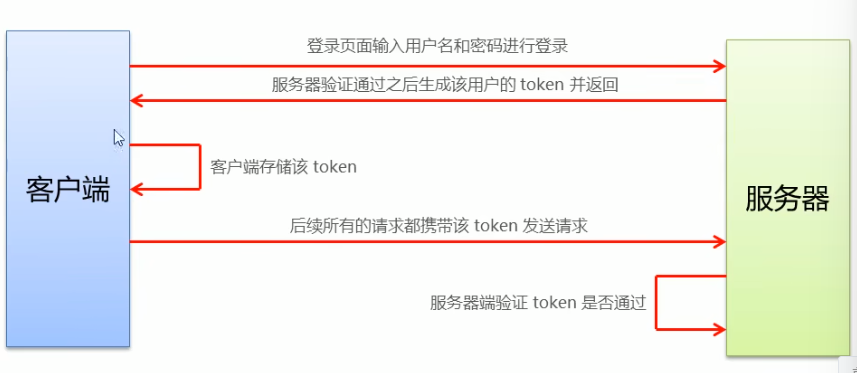
2.3 登录功能实现
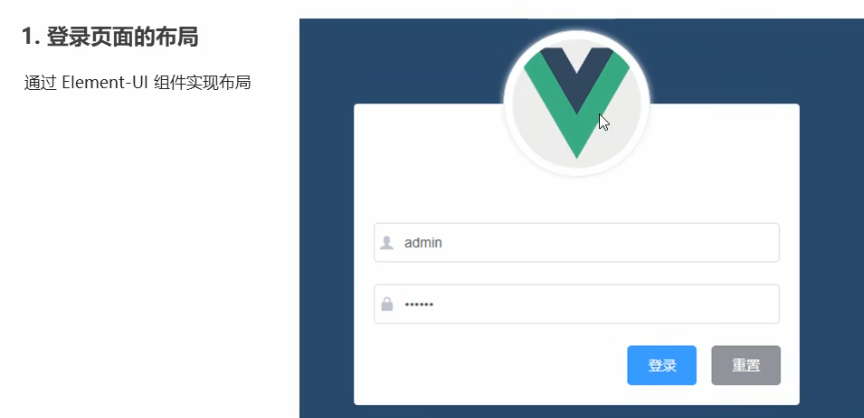
分析:主要是使用el-form,用户名、密码、登录、重置都是一个item
首先用vscode打开终端,这里输入git status查看当前的状态
PS C:\Users\19127\Desktop\Element-UI\vue_shop> git status
On branch master
Your branch is up to date with 'origin/master'.

nothing to commit, working tree clean
可以看到这里提示是一个干净的工作空间
输入命令,新建分支并且切换到这个分支上Switched to a new branch 'login'
git checkout -b login
运行一下这个shop
npm run serve
2.3.1 创建登录组件
编写组件:
<template>
    <div>
        登录组件
    </div>
</template>
<script>
export default{

}
</script>
<style lang = "less" scoped>

</style>
引入组件在index.js中:
import Login from '../components/Login.vue'
const router = new VueRouter({
  routes:[
    {
      path:'/login',
      components:Login
    }
  ]
})
路由重定向,自动跳转到登录页面:
{ path:'/',redirect:'/login'},
2.3.2 登录组件布局
给登录组件添加样式:
<template>
    <div class="login_container">登录主页</div>
</template>
<style lang="less">
.login_container{
    background-color: cornflowerblue;
}
</style>
这里报错 Module not found: Error: Can't resolve 'less-loader' in 'C:\Users\19127\Desktop\Element-UI\vue_shop'
报错原因:由于在<style lang='less' ></style>中添加lang='less'属性报错
解决办法:删除lang='less'属性或安装less-loader开发依赖包(如图)
npm install less@4 --save-dev
npm install --save-dev less-loader less
在asset/css/global.css 设立全局样式表
/* 全局样式表 */
html,body,#app{
    height: 100%;
    margin: 0;
    padding: 0;
}
在main.js中引入全局样式:
//导入全局样式表
import './assets/css/global.css'
设置登录盒子,设置盒子居中:
    <div class="login_container">
        <div class="login_box"></div>
    </div>
.login_box{
    width: 450px;
    height: 300px;
    background-color: #fff;
    border-radius: 3px;
    // 设置居中
    position: absolute;
    left: 50%;
    top: 50%;
    transform: translate(-50%,-50%);
}
2.3.3 登录组件头部布局
<div class="login_box">
        <div class="avatar_box">
        <img src="../assets/logo.png" alt="">
</div>
.login_box{
    padding: 10px;
    .avatar_box{
        height: 130px;
        width: 130px;
        border: 1px solid #eee;
        border-radius: 50%;

        // 添加阴影
        box-shadow: 0 0 10px #000;
        img{
            width: 100%;
            height: 100%;
            border-radius: 50%;
            background-color: #eee;
        }
    }
}

.avatar_box{
       position: absolute;
        left:50%;
        transform: translate(-50%,-50%);
}
2.3.4 登录组件表单布局
使用element ui
  <div class="login_box">
            <!-- 登录表单区域 -->
            <el-form >
                <!-- 用户名 -->
                <el-form-item >
                    <el-input></el-input>
                </el-form-item>
                <!-- 密码 -->
                <el-form-item >
                    <el-input></el-input>
                </el-form-item>
                <!-- 按钮区域 -->
                <el-form-item >
                    <el-button type="primary">登录</el-button>
                    <el-button type="info">重置</el-button>
                </el-form-item>

            </el-form>
        </div>
因为我们勾选了按需引入,所以我们要去plugins文件夹下面的element.js中引用并使用
import Vue from 'vue'

import { Button } from 'element-ui'

import {Form,FormItem} from 'element-ui'

import { Input } from 'element-ui'

Vue.use(Button)

Vue.use(Form)

Vue.use(FormItem)

Vue.use(Input)
设置样式:
.login_box {
    width: 450px;
    height: 300px;
    background-color: #fff;
    border-radius: 3px;
    // 设置居中
    position: absolute;
    left: 50%;
    top: 50%;
    transform: translate(-50%, -50%);
    padding: 10px;

    .avatar_box {
        height: 130px;
        width: 130px;
        border: 1px solid #eee;
        border-radius: 50%;
        position: absolute;
        left: 50%;
        transform: translate(-50%, -50%);
        // 添加阴影
        box-shadow: 0 0 10px #000;

        img {
            width: 100%;
            height: 100%;
            border-radius: 50%;
            background-color: #eee;
        }
    }
    .loginForm{
        position: absolute;
        bottom: 0;
        width: 100%;
        padding: 0 20px;
        //这边输入框会被挤到右边
        box-sizing: border-box;
    }
    .btns{
        display: flex;
        justify-content: flex-end;
    }
2.3.5 登录组件小图标布局
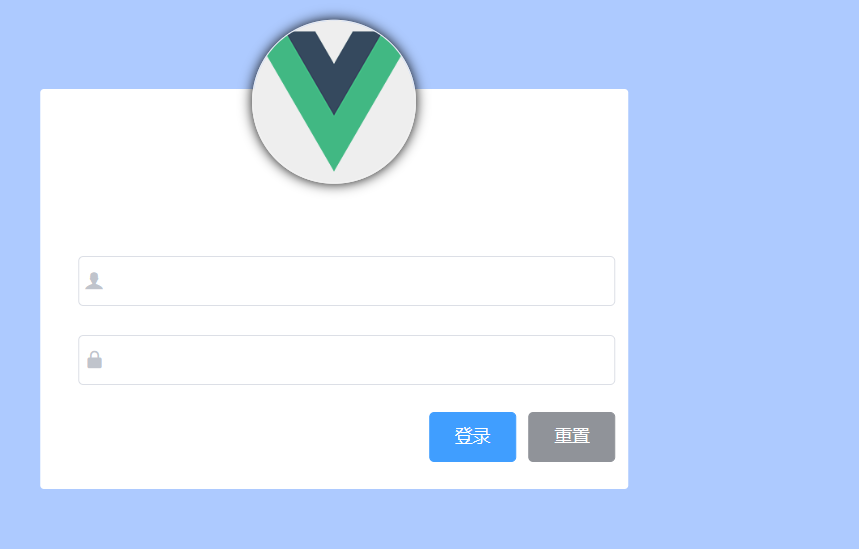
font-class引用
第一步、引入样式表:
// 导入字体图标
import './assets/fonts/iconfont.css'
第二步、挑选相应图标并获取类名,应用于页面:
<!-- 用户名 -->
<el-form-item >
    <el-input prefix-icon = "iconfont icon-user"> </el-input>
</el-form-item>
<!-- 密码 -->
<el-form-item >
    <el-input prefix-icon = "iconfont icon-3702mima"></el-input>
</el-form-item>
2.3.6 表单的数据绑定
第一步、为<el-form>进行 :model数据绑定
<!-- 登录表单区域 -->
<el-form :model="loginForm" class="loginForm">
第二步、定义数据属性
export default{
    data(){
        return{
            //这是登录表单的数据绑定对象
            loginForm:{
                username:'',
                password:''
            }
        }
    }
};
第三步、通过v-model绑定到每一数据对象上
<el-input v-model="loginForm.username" prefix-icon = "iconfont icon-user"> </el-input>
为了让密码不被显式看到,我们需要设置密码的input的type为password
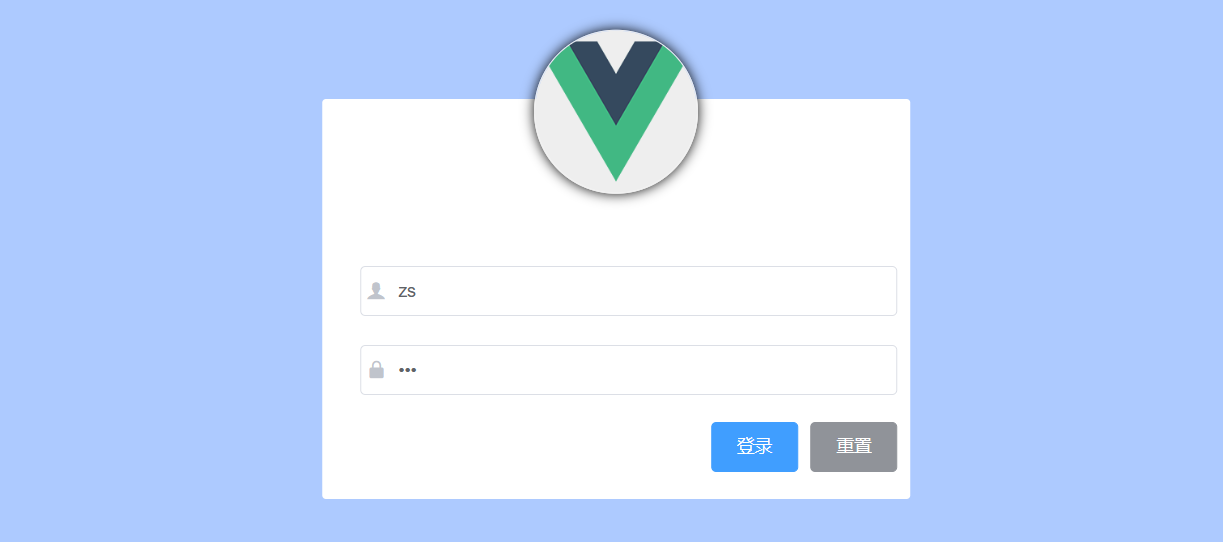
<el-input v-model="loginForm.password" prefix-icon = "iconfont icon-3702mima" type="password"></el-input>
2.3.7 表单的数据验证
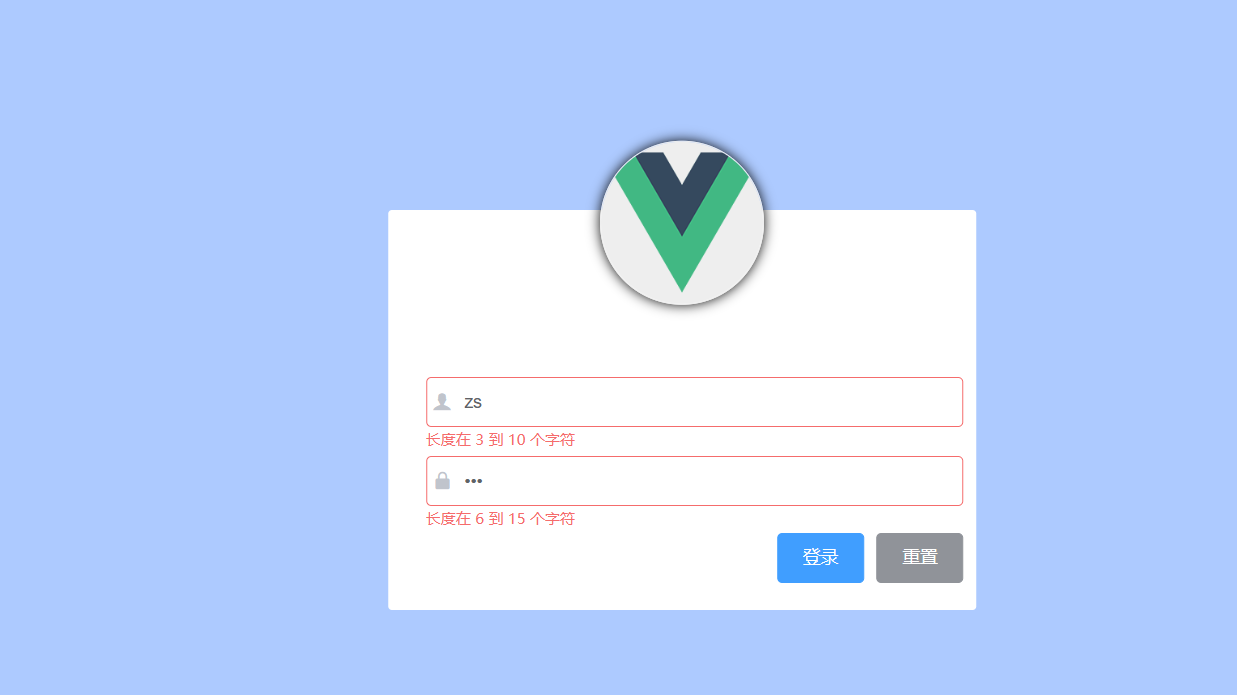
第一步、在el-form中绑定一个表单验证对象:rules="rules"
<el-form :model="loginForm" :rules="loginFormRules" class="loginForm">
第二步、在data数据中定义这个校验对象
    data(){
        return{
            //这是表单的验证规则对象
            loginFormRules:{
                //验证用户名是否合法
                username:[
                { required: true, message: '请输入用户名', trigger: 'blur' },
                { min: 3, max: 10, message: '长度在 3 到 10 个字符', trigger: 'blur' }
                ],
                //验证密码是否合法
                password:[
                { required: true, message: '请输入登录密码', trigger: 'blur' },
                { min: 6, max: 15, message: '长度在 6 到 15 个字符', trigger: 'blur' }
                ]
            }
        }
    }
验证规则都是一个个的数组,数组中每一个对象都是一个验证规则
- required: 是否必需
- message :提示消息
- trigger :在何时触发
- min:最小长度 / max :最大长度
第三步、用在item中用prop="xxx"绑定一个具体的验证规则
<!-- 用户名 -->
<el-form-item  prop="username">
    ...
</el-form-item>
<!-- 密码 -->
<el-form-item prop="password">
    ...
</el-form-item>
注意:验证规则名称必须要与数据一致
验证规则是加给item的而不是加给input的
2.3.8 实现表单的重置

第一步、定义引用
<el-form ref="loginFormRef"
第二步、为重置按钮绑定一个单击事件
<el-button type="info" @click="resetLoginForm">重置</el-button>
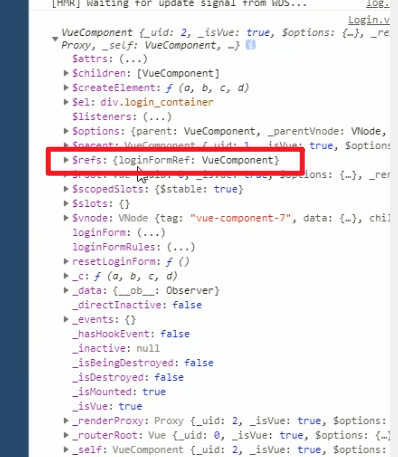
第三步、编写具体方法
export default{
methods:{
        //点击重置按钮,重置登录表单
        resetLoginForm(){
           // console.log(this)
     	  this.$refs.loginFormRef.resetFields()
        }
    }
};
2.3.9 登录前的预验证

第一步、先获取到表单的引用对象
resetLoginForm(){
        // console.log(this)
        this.$refs.loginFormRef.resetFields()
    }
第二步、拿着引用对象调用validate函数
<el-button type="info" @click="resetLoginForm">重置</el-button>
validate中接收一个回调函数,callback的第一个形参是一个bool值,如果验证通过那么bool值是true、如果验证不通过,bool值是false。
调用validate只需要拿到这个表单的引用对象就可以了
2.3.10 根据预验证来决定是否发送请求
import axios from 'axios'
//配置请求的根路径
axios.defaults.baseURL = 'https://lianghj.top:8888/api/private/v1/'
Vue.prototype.$http = axios
把axios这个包挂载到原型对象上,这样就可以全部通过this.$http从而去发起ajax请求
login(){
this.$refs.loginFormRef.validate(valid=>{
    // console.log(valid)
    if(!valid) return;
    const result = this.$http.post("login",this.loginForm);
    console.log(result)
})
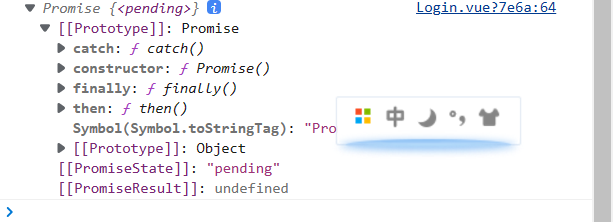
如果返回结果是promise,我们可以使用await来简化。把紧挨着await的函数用async修饰为一个异步函数
login(){
this.$refs.loginFormRef.validate(async valid=>{
    // console.log(valid)
    if(!valid) return;
    const result =await this.$http.post("login",this.loginForm);
    console.log(result)
})
这时返回的就不是promise了,而是一个具体的响应对象

这里面的六个属性都是axios帮我们封装好的,最重要的就是data属性,data才是服务器返回的真实数据,在这里我们可以在这里把data属性结构复制出来
login(){
this.$refs.loginFormRef.validate(async valid=>{
    // console.log(valid)
    if(!valid) return;
    const {data:res} = await this.$http.post("login",this.loginForm);
    console.log(res)
})

判断是否为200
login(){
this.$refs.loginFormRef.validate(async valid=>{
    // console.log(valid)
    if(!valid) return;
    const {data:res} = await this.$http.post("login",this.loginForm);
    if(res.meta.status!=200) return console.log('登录失败')
    console.log('登录成功');
})
2.3.11 配置弹窗提示
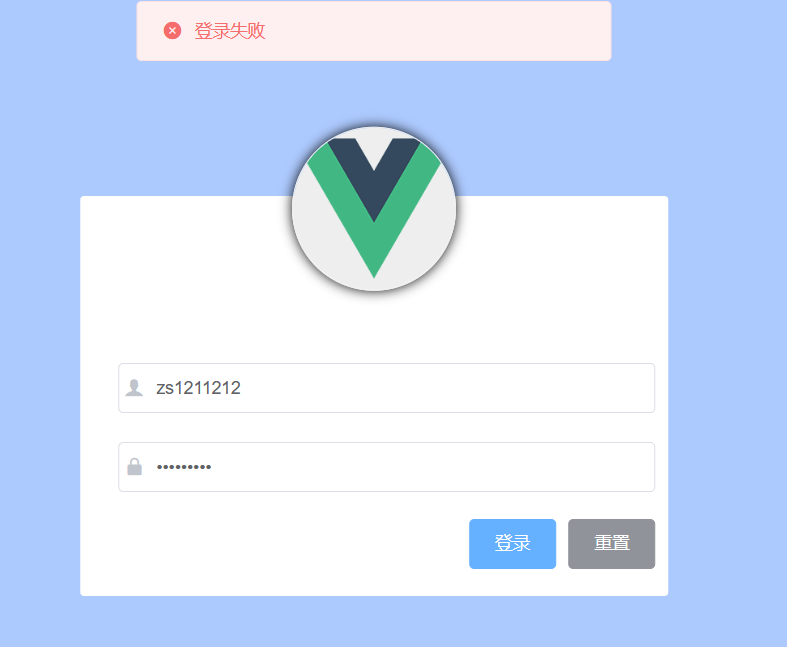
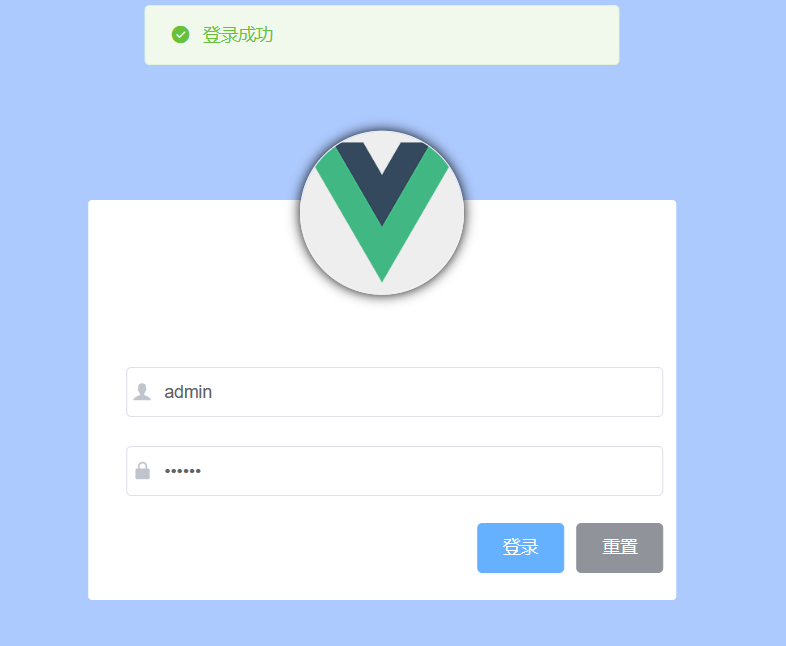
把弹框组件挂载到了Vue原型上
//导入弹框提示组件
import {Message } from 'element-ui'
// $message 是一个自定义属性
Vue.prototype.$message = Message
可以直接通过this访问$message
login(){
this.$refs.loginFormRef.validate(async valid=>{
    // console.log(valid)
    if(!valid) return;
    const {data:res} = await this.$http.post("login",this.loginForm);
    if(res.meta.status!=200) return this.$message.error('登录失败')
    this.$message.success("登录成功")
})
2.3.11登录成功后的行为
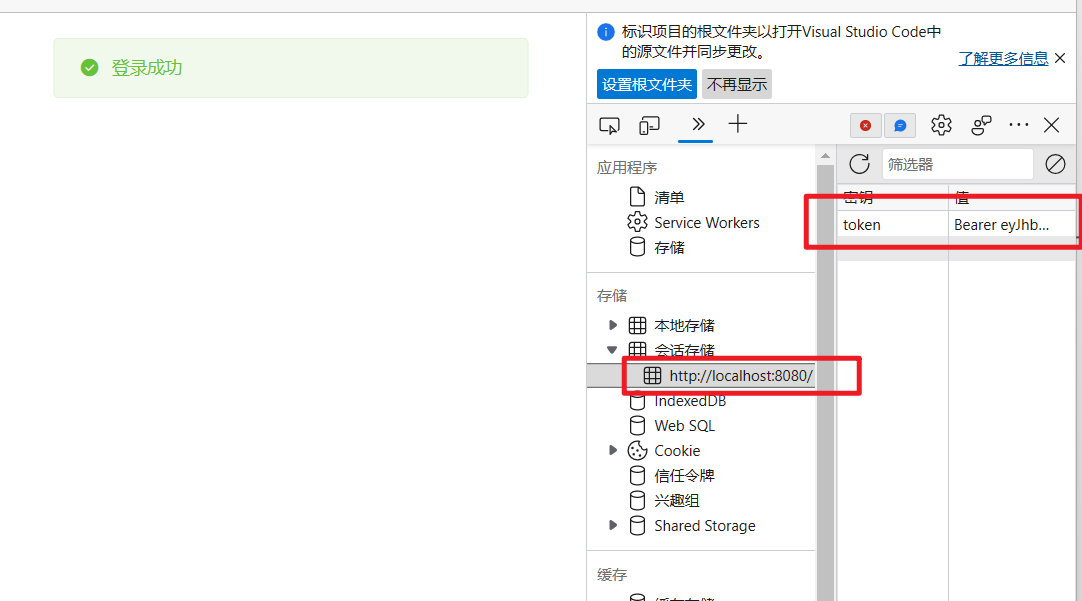
将token保存到sessionStorage而不是LocalStroage中是因为:LocalStroage是持久化的存储机制,sessionStorage是会话的存储机制,token只应在当前网站打开期间生效,所以将token保存在sessionStorage中
login(){
        // 1.将登录成功之后的token, 保存到客户端的sessionStorage 中
            //1.1项目中出了登录之外的其他API接口,必须在登录之后才能访问
            //1.2 token 只应在当前网站打开期间生效,所以将token保存在sessionStorage 中
        // 2.通过编程式导航跳转到后台主页,路由地址是/home
        window.sessionStorage.setItem('token',res.data.token)
        this.$router.push('/home')
    })
}
引入home组件:
import Home from '../components/Home.vue'
{
	path: '/home',
	component: Home
}
3.路由导航守卫控制权限
如果用户没有登录,但是直接通过URL访问特定页面,需要重新导航到登录页面。
//挂载路由导航守卫
router.beforeEach((to,from,next)=>{
  //to将要访问的路径
  //from 代表从哪一个路径跳转而来
  //next 是一个函数表示放行
  //next 放行    next('/login') 强制跳转

  if(to.path === '/login') return next();
  // 获取token
  const tokenStr =  window.sessionStorage.getItem('token')
  if(!tokenStr) return next('/login')
  next()
等于
(=)是一个赋值运算符,它将 = 左侧的变量设置为其右侧表达式的值。该运算符将左值分配给右值。例如,写 a=10 就可以了。如果我们写 10=10, 'a' = 10 或 'a' = 'a',就会导致引用错误。
双等号
(==)是一个比较运算符,它在比较之前转换具有相同类型的操作数。因此,当你将字符串与数字进行比较时,JavaScript 会将任何字符串转换为数字。空字符串始终转换为零。没有数值的字符串被转换为
NaN(非数字),返回 false。
===(三等号)是 JavaScript 中的严格相等比较运算符,对于不属于相似类型的值返回false。此运算符执行类型转换以获得相等性。如果我们使用 === 将 2 与“2”进行比较,那么它将返回一个false值。
2.3.12 退出功能实现原理
基于token的方式实现退出比较简单,只需要销毁本地的token即可。这样,后续的请求就不会携带token,必须重新登录生成一个新的token之后才可以访问页面。
<div>
    <el-button type="info" @click="logout">退出</el-button>
</div>
logout(){
        //清空token
        window.sessionStorage.clear()
        //跳转到登录页
        this.$router.push('login')
}
2.3.13 处理语法警告问题
.prettierrc
{
    "semi": false,
    "singleQuote": true
 }
句尾不添加分号 : "semi": false,
使用单引号代替双引号 :"singleQuote": true
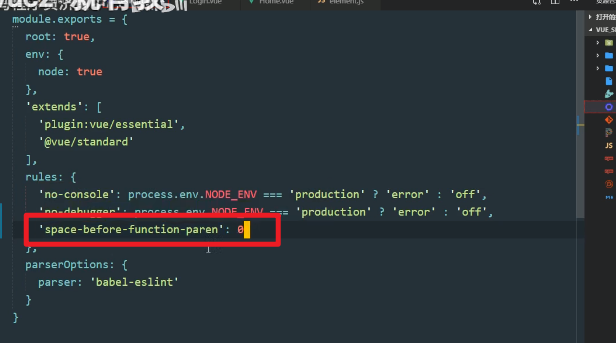
在eslintrc.js中设置: 让方法括号前面不自动加空格
2.3.14 优化elementui的按需导入
合并变为一句:
import{Button,Form,FormItem,Input,Message} from 'element-ui'
2.3.14 提交登录功能代码
新建一个终端:

将代码提交:
git add .
git status
git commit -m "完成了登录功能"
只要是我们写的源代码经过测试之后没有问题,一定要先合并到主分支,然后再将主分支合并到云端仓库中
3.主页布局
git checkout -b home
3.1 整体布局
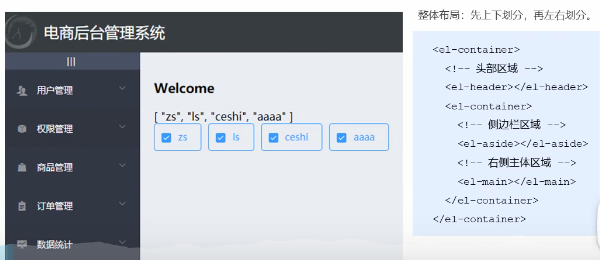

首先挑选一个合适的布局:
<el-container class="home-container">
    <!-- 头部区域 -->
  <el-header>
    <div>
        <img src="../assets/header-icon.png" alt="">
        <span>报表系统</span>
    </div>
    <el-button type="info" @click="logout">退出</el-button>
  </el-header>
    <!-- 页面主体区域 -->
  <el-container>
    <!-- 侧边栏 -->
    <el-aside width="200px">Aside</el-aside>
    <!-- 右侧内容主体 -->
    <el-main>Main</el-main>
  </el-container>
</el-container>
引入组件:
import{Button,Form,FormItem,Input,Message,Container,Header,Aside,Main} from 'element-ui'
Vue.use(Container)
Vue.use(Header)
Vue.use(Aside)
Vue.use(Main)
每一个elementui中的组件的组件名就是它的样式类的类名
.el-header{
    background-color: #373d41;
    display: flex;
    // 左右贴边对齐
    justify-content: space-between;
    padding-left: 0;
    //居中,不让它上下贴边
    align-items: center;
    color: #fff;
    font-size: 20px;
    // 文本纵向
    div{
        display: flex;
        align-items: center;
        span{
            margin-left: 15px;
        }
        img{
            width: 50px;
            height: 50px;
        }
    }
}
.el-aside{
    background-color:#333744 ;
}
.el-main{
    background-color:#EAEDF1 ;
}
.home-container{
    height: 100%;
}
3.2 左侧菜单
3.2.1左侧菜单布局
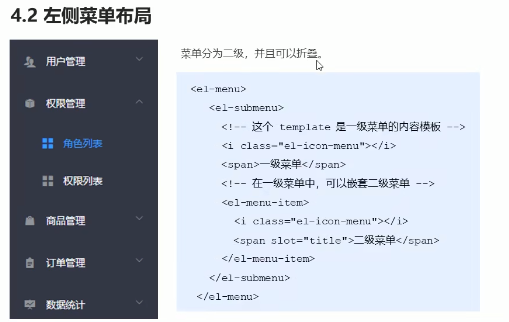
引入组件:
import{Button,Form,FormItem,Input,Message,Container,Header,Aside,Main,Menu,Submenu,MenuItem} from 'element-ui'

Vue.use(Menu)
Vue.use(Submenu)
Vue.use(MenuItem)
使用:
<!-- 侧边栏 -->
<el-aside width="200px"> <el-menu
  background-color="#333744"
  text-color="#fff"
  active-text-color="#ffd04b">
  <!-- 一级菜单 -->
  <el-submenu index="1">
    <!-- 一级菜单的模板区域 -->
    <template slot="title">
        <!-- 图标 -->
      <i class="el-icon-location"></i>
      <!-- 文本 -->
      <span>导航一</span>
    </template>
   <!-- 二级菜单 -->
    <el-menu-item>
         <!-- 二级菜单的模板区域 -->
         <template slot="title">
        <!-- 图标 -->
      <i class="el-icon-location"></i>
      <!-- 文本 -->
      <span>导航一</span>
    </template>
    </el-menu-item>
  </el-submenu>

</el-menu>
menu是一级菜单 submenu 是二级菜单
i 指定图标 span 指定文字
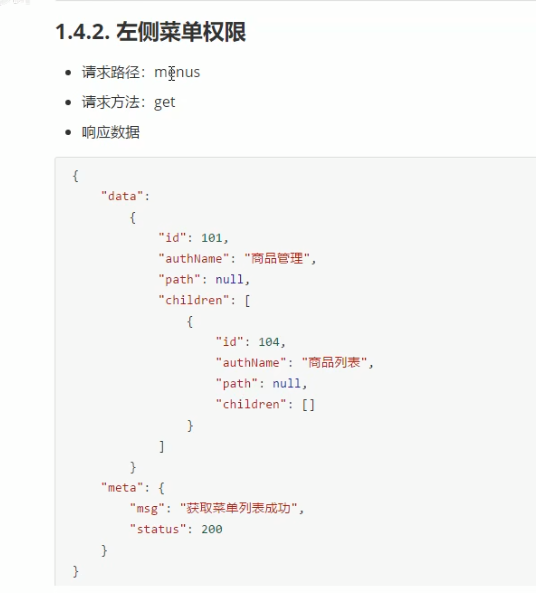
3.2.2 通过接口获取菜单数据
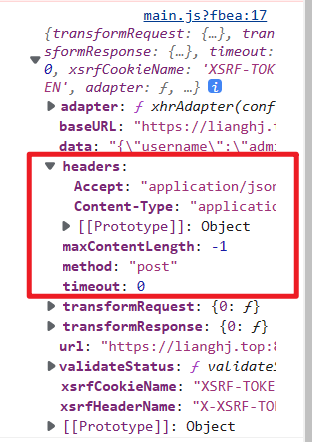
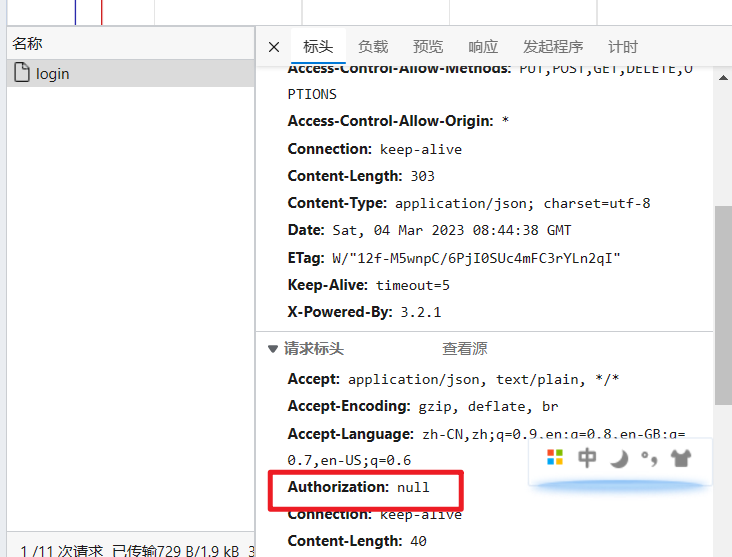
除了登录之外,其他需要授权的API,必须在请求头中使用Authorization字段提供token 令牌
通过axios 请求拦截器添加token,保证拥有获取数据的权限

这里有一个headers:
//设置请求拦截器
axios.interceptors.request.use(config=>{
  //在最后必须return config
  console.log(config)
  config.headers.Authorization = window.sessionStorage.getItem('token')
  return config
})
在控制台的网络中可以看到,因为是登录期间,所以系统并没有给你颁发令牌
    data(){
        return {
            // 左侧菜单数据
          menulist: []
        }
    },
    created(){
        this.getMenuList();
    },
    methods:{
        //获取所有的左侧菜单
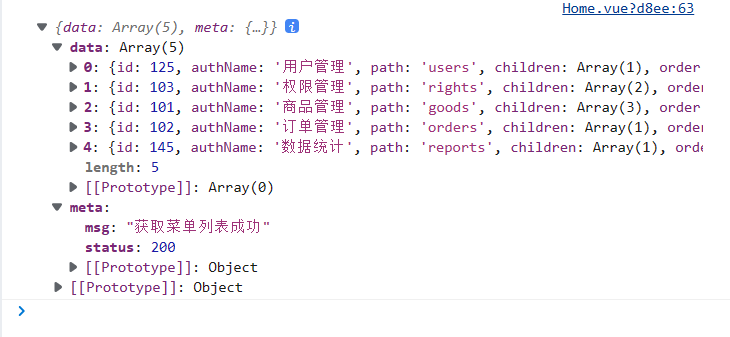
       async getMenuList(){
           const {data:res} = await this.$http.get('menus')
           if(res.meta.status!==200) return this.$message.error(res.meta.msg)
           this.menulist = res.data
           console.log(res)
        }
    }
3.2.3 左侧菜单UI绘制
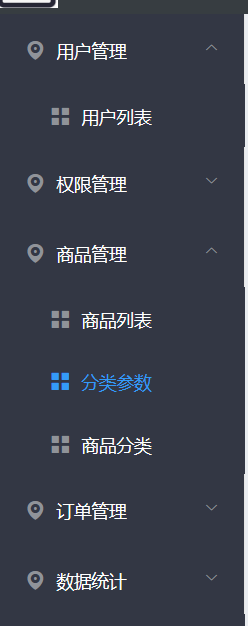
  <el-menu
  background-color="#333744"
  text-color="#fff"
  active-text-color="#ffd04b">
<!-- 一级菜单 -->
  <el-submenu :index="item.id+''" v-for="item in menulist" :key="item.id" >
    <!-- 一级菜单的模板区域 -->
    <template slot="title">
        <!-- 图标 -->
      <i class="el-icon-location"></i>
      <!-- 文本 -->
      <span>{{item.authName}}</span>
    </template>
<!-- 二级菜单 -->
    <el-menu-item  :index= "subItem.id + '' " v-for="subItem in item.children" :key = "subItem.id" >
         <!-- 二级菜单的模板区域 -->
         <template slot="title">
        	<!-- 图标 -->
      		<i class="el-icon-location"></i>
      		<!-- 文本 -->
      		<span>{{ subItem.authName }}</span>
   		 </template>
    </el-menu-item>
  </el-submenu>
</el-menu>
:index只接受一个字符串不接受数值,所以需要将id转换为字符串
数值与字符串拼接就能得到一个字符串
激活的文本颜色:active-text-color="#ffd04b"
3.2.4 左侧单元格式美化
每个菜单有自己的图标:
<i :class="iconObj[item.id]"></i>
iconObj:{
        '125':'iconfont icon-user',
        '103':'iconfont icon-tijikongjian',
        '101':'iconfont icon-shangpin',
        '102':'iconfont icon-danju',
        '145':'iconfont icon-baobiao'
}
3.2.5 左侧菜单优化

每次只展开一个菜单:unique-opened="true"
<el-menu
      background-color="#333744"
      text-color="#fff"
      active-text-color="#349af8" :unique-opened="true">
如果你设置为true的话,需要前面加冒号否则就只是一个字符串。或者写为unique-opened就可
可以看出这里有点没对齐
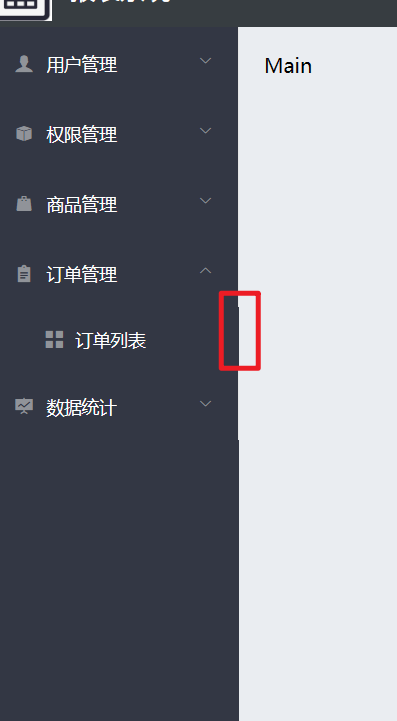
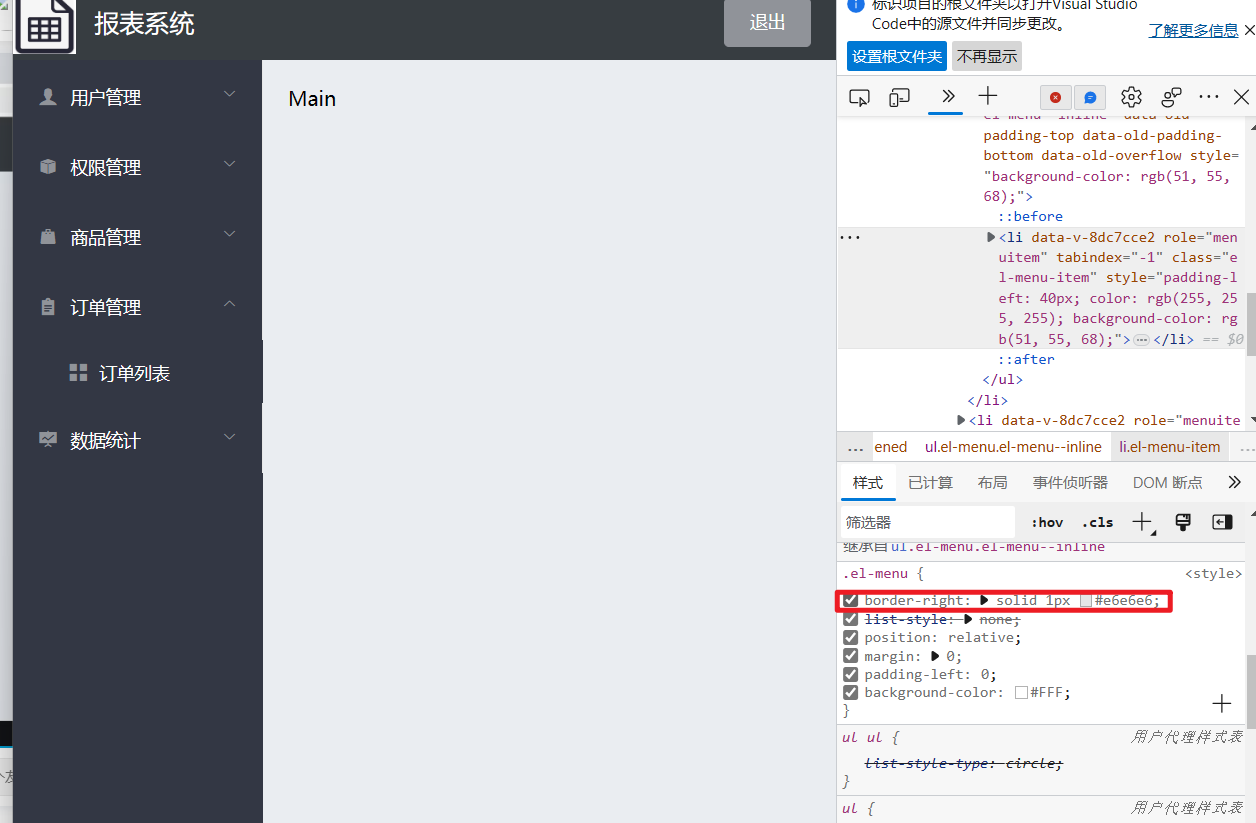
3.2.6 实现左侧菜单的折叠与展开功能

collapse是否折叠
collapse-transition是否实行折叠展开动画
通过动态绑定bool值实现菜单栏的折叠与展开
<!-- 侧边栏 -->
<el-aside :width="isCollapse ?'64px':'200px' ">
<div class="toggle-button" @click="toggleCollapse">|||</div>
<el-menu
background-color="#333744"
text-color="#fff"
active-text-color="#349af8" :unique-opened="true" :collapse="isCollapse"
:collapse-transition="false">
<!-- 一级菜单 -->
    data(){
        return {
          //是否折叠
          isCollapse:false
        }
    },
    methods:{
        //点击按钮,切换菜单的折叠与展开
        toggleCollapse(){
          this.isCollapse = !this.isCollapse
        }
    }
根据isCollapse的值来动态设置侧边栏的宽度 :width="isCollapse ?'64px':'200px' "
3.2.7 实现首页的路由重定向
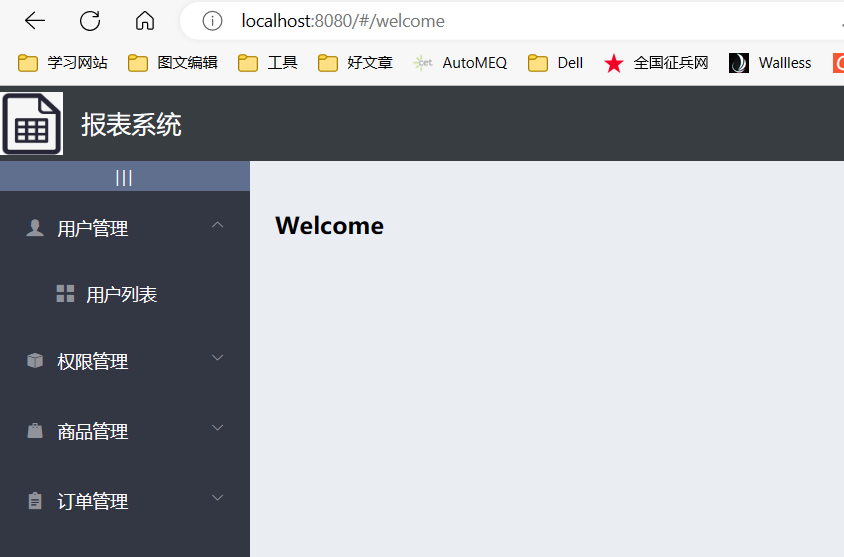
新建welcome.vue将其加入到路由中,然后将welcome设置为它的子路由
import Welcome from '../components/Welcome.vue'
{
    path: '/home',

    component: Home,
    redirect:'welcome',
    children:[
      {path:'/welcome',component:Welcome}
    ]
  }
在Main这里放一个路由占位符
<!-- 右侧内容主体 -->
<el-main>
  <!-- 路由占位符 -->
  <router-view></router-view>
</el-main>
3.2.8 左侧菜单改造为路由链接

这里最好是拿path属性作为我们唯一的路由跳转
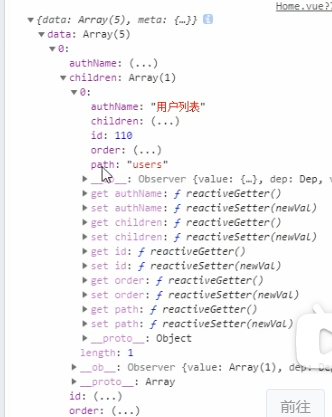
在最外侧的el-menu中开启 :router="true"或者直接写 router
<el-menu
      background-color="#333744"
      text-color="#fff"
      active-text-color="#349af8" :unique-opened="true" :collapse="isCollapse"
      :collapse-transition="false"
      :router = "true">
在二级菜单中设置路由:
<el-menu-item :index= "'/'+subItem.path" v-for="subItem in item.children" :key = "subItem.id" >
3.3 用户列表开发
3.3.1添加用户路由
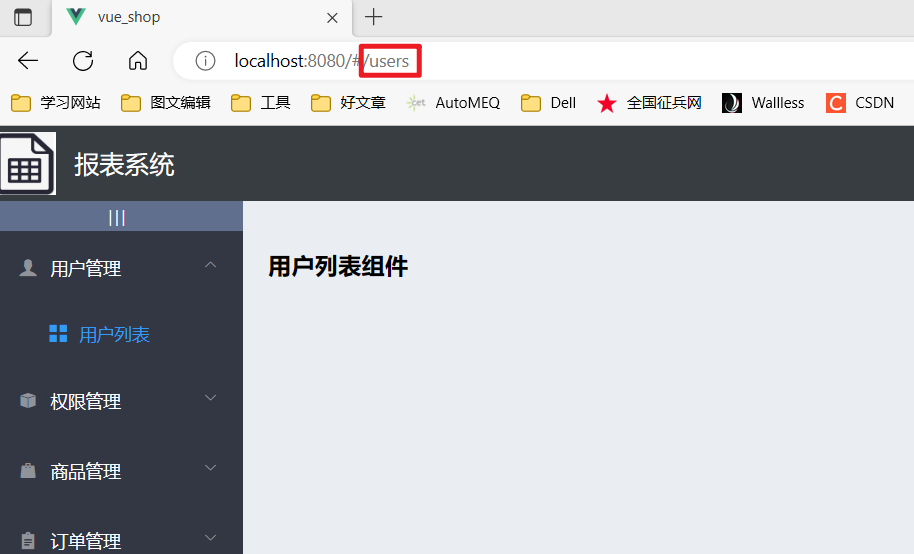
新建一个User.vue,加入到home的子路由中
{
    path: '/home',
    component: Home,
    redirect:'welcome',
    children:[
      {path:'/welcome',component:Welcome},
      {path:'/users',component:Users}
    ]
},
3.3.2 解决刷新高亮消失的情况

如果你想要菜单中的某一项被高亮激活,那么你就把这一项对应的index的值赋值为整个menu菜单的属性

给二级菜单绑定单击事件,把path值都存储起来
在总的el-menu里面设置:default-active="'/'+activePath"
 <el-menu
      background-color="#333744"
      text-color="#fff"
      active-text-color="#349af8" :unique-opened="true" :collapse="isCollapse"
      :collapse-transition="false"
      :router = "true"
      :default-active="'/'+activePath">
 <el-menu-item :index= "'/'+subItem.path" v-for="subItem in item.children" :key = "subItem.id"
        @click="saveNavState('/'+subItem.path)">
定义属性activePath,在create里面设置window.sessionStorage。点击el-menu-item设置相应的subItem.path
data(){
return {
  //定义一个数组保存激活的链接
  activePath:''
}
created(){
	this.getMenuList();
	this.activePath = window.sessionStorage.getItem('activePath')
},// 保存链接的激活状态
saveNavState(activePath){
  	window.sessionStorage.setItem('activePath',activePath)
}
localStorage 和 sessionStorage 属性允许在浏览器中存储 key/value 对的数据。
sessionStorage 用于临时保存同一窗口(或标签页)的数据,在关闭窗口或标签页之后将会删除这些数据。
提示: 如果你想在浏览器窗口关闭后还保留数据,可以使用 localStorage 属性, 该数据对象没有过期时间,今天、下周、明年都能用,除非你手动去删除。
语法
window.sessionStorage保存数据语法:
sessionStorage.setItem("key", "value");读取数据语法:
var lastname = sessionStorage.getItem("key");删除指定键的数据语法:
sessionStorage.removeItem("key");删除所有数据:
sessionStorage.clear();
3.3.3绘制用户列表的基本UI
<!-- 面包屑导航区域 -->
<el-breadcrumb separator-class="el-icon-arrow-right">
    <el-breadcrumb-item :to="{ path: '/home' }">首页</el-breadcrumb-item>
    <el-breadcrumb-item>用户管理</el-breadcrumb-item>
    <el-breadcrumb-item>用户列表</el-breadcrumb-item>
</el-breadcrumb>
<!-- 卡片视图区 -->
<el-card >
    <el-row :gutter="30">
    <el-col :span="8">
        <el-input placeholder="请输入内容" >
         <el-button slot="append" icon="el-icon-search"></el-button>
        </el-input></el-col>
    <el-col :span="4">
        <el-button type="primary">添加用户</el-button>
    </el-col>
</el-row>
</el-card>
:gutter 设置el-column之间的距离
:span 设置el-row的宽度
先存放一个el-row,el-row里面包含el-column
引入组件:
Vue.use(Breadcrumb)
Vue.use(BreadcrumbItem)
Vue.use(Card)
Vue.use(Row)
Vue.use(Col)
更改一下样式:
.el-breadcrumb{
    margin-bottom: 15px;
    font-size: 15px;
}
.el-card{
    box-shadow: 0 1px 1px rgb(0, 0, 0,0.15) !important;
}
3.3.4 获取用户数据
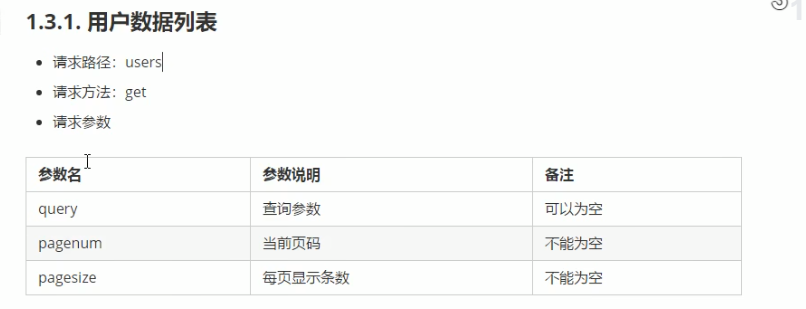
data(){
        return{
            //获取用户列表的参数对象
            queryInfo:{
                query:'',
                pagenum:1,
                pagesize:2
            },userlist:[],
            total:0

        }
    },created(){
        this.getUserList()
    },methods:{
        async getUserList(){
          const {data:res} = await this.$http.get('users',{params:this.queryInfo})
        //    console.log(res)
          if(res.meta.status!==200) return this.$message.error("获取用户列表失败")
          //数据成功获取并且保存到了data身上
          this.userlist = res.data.userlist
          this.total = res.data.total
          console.log(res)
        }
    }
$http.get('users',{params:this.queryInfo}) 第一个参数是接口名,第二个参数是传入的参数
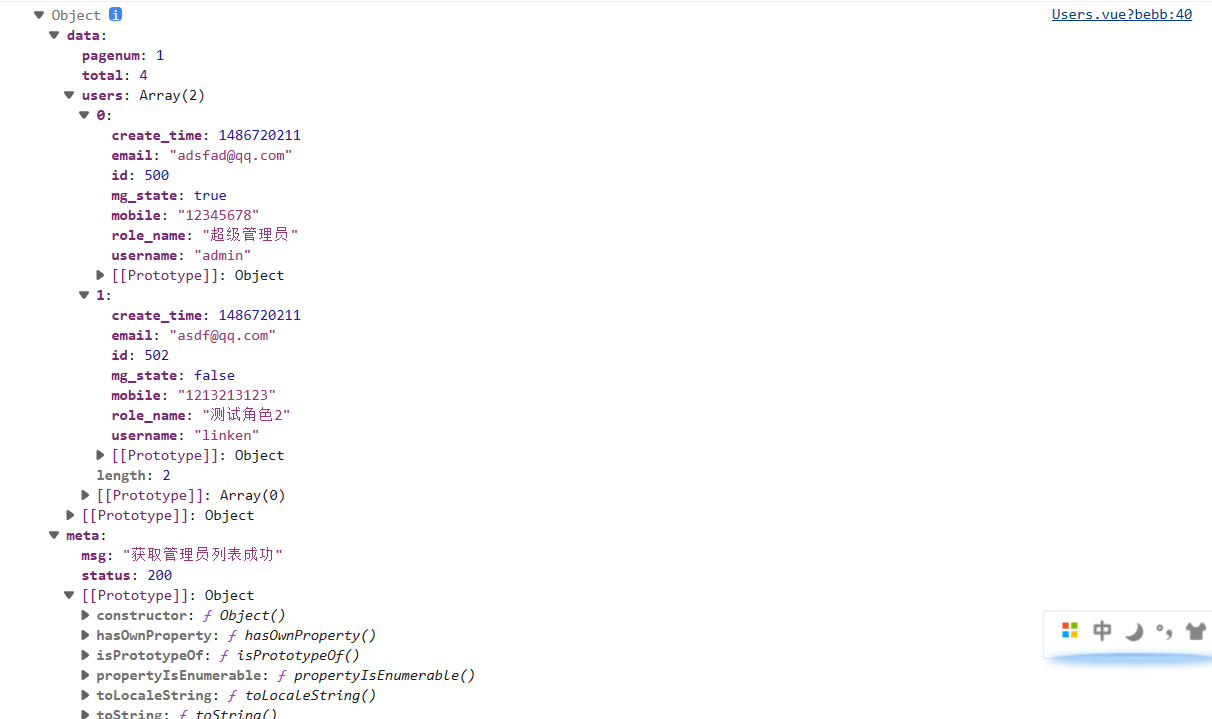
3.3.5渲染用户列表数据
    <!-- 用户列表区域 -->
    <el-table
  :data="userlist"
  style="width: 100%"
  border
  stripe >
  <el-table-column
    prop="username"
    label="姓名">
  </el-table-column>
  <el-table-column
    prop="email"
    label="邮箱">
  </el-table-column>
  <el-table-column
    prop="mobile"
    label="电话">
  </el-table-column>
  <el-table-column
    prop="role_name"
    label="角色">
  </el-table-column>
  <el-table-column
    prop="mg_state"
    label="状态">
  </el-table-column>
  <el-table-column
    label="操作">
  </el-table-column>
</el-table>
用el-table 中:data 注入tableData:[]数组
el-table-column中 :prop说明 要渲染的数据项/ label是当前表头
给表格加上边框线 : border 表格底色带斑马纹: stripe 属性
3.3.6 为用户表格添加索引列
添加一个column
<el-table-column
type="index">
</el-table-column>
3.3.7 改造状态列的显示效果
在状态这一列,你只要通过作用于插槽,接收scope
      <el-table-column
        prop="mg_state"
        label="状态">
        <template slot-scope="scope">
          {{scope.row}}
        </template>
      </el-table-column>
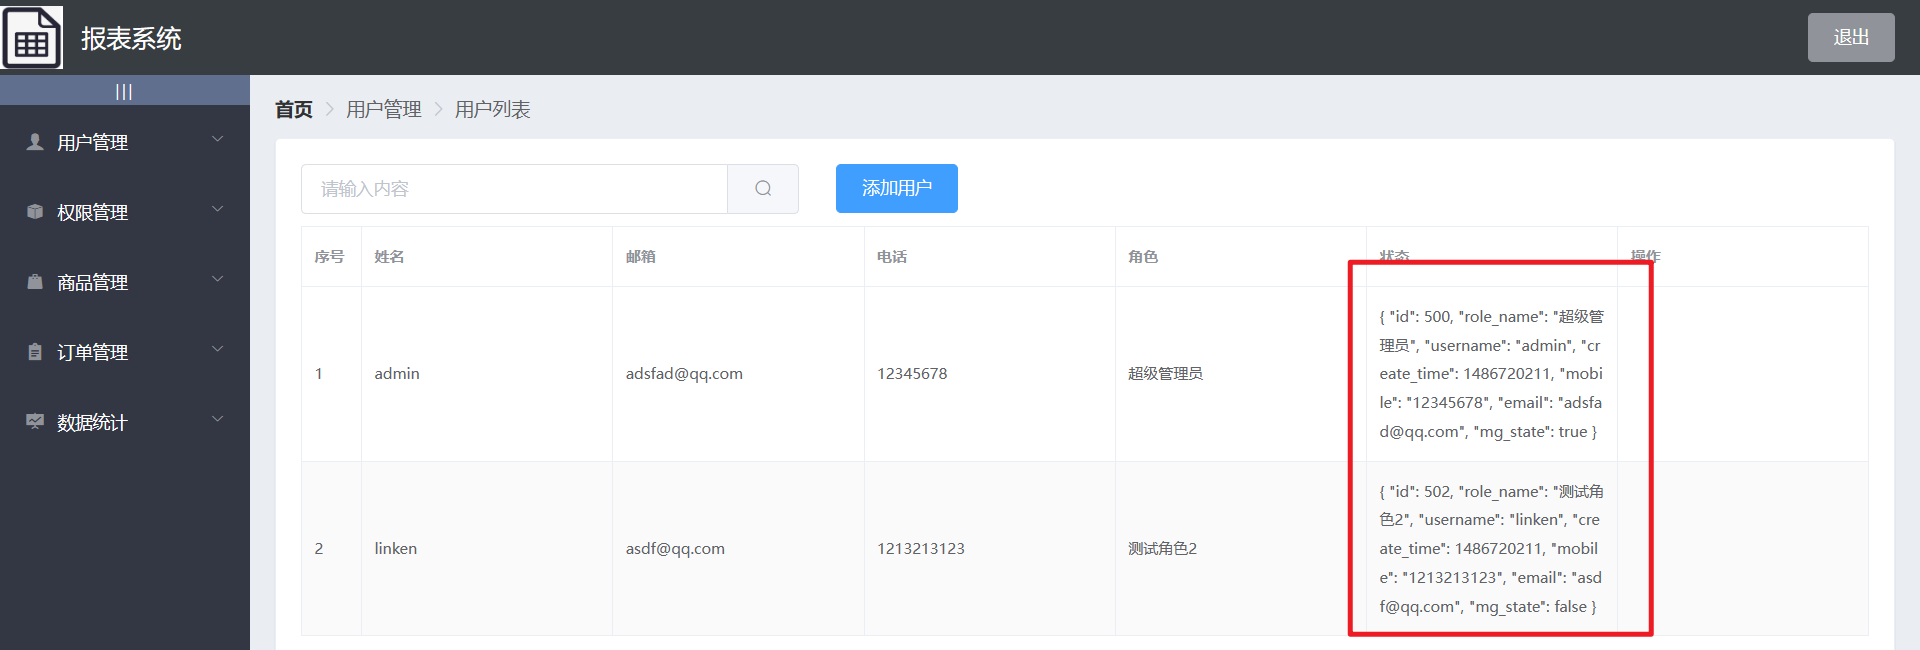
可以通过scope.row拿到这一行的数据。然后在v-model中绑定具体的属性值就可以了
<el-table-column
    label="状态">
    <template slot-scope="scope">
      <el-switch
          v-model="scope.row.mg_state">
      </el-switch>
    </template>
  </el-table-column>
3.3.8 插槽形式 自定义列的渲染
操作这一列并不对应任何的数据
  <el-table-column
    width="180px"
    label="操作">
    <template slot-scope="scope">
      <!-- 修改按钮 -->
      <el-button type="primary" icon="el-icon-edit" circle size="medium"></el-button>
      <!-- 删除按钮 -->
      <el-button type="danger" icon="el-icon-delete" circle size="medium"></el-button>
      <!-- 分配角色按钮 -->
      <el-tooltip class="item" effect="dark"
      content="分配角色" placement="top" :enterable="false">
        <el-button type="warning" icon="el-icon-setting" circle size="medium"></el-button>
     </el-tooltip>
    </template>
  </el-table-column>

设置背景颜色 : effect="dark",设置文本内容:content
设置位置:placement
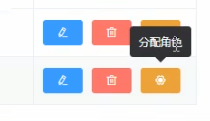
当点击下面的时候,再次想点击上面的时候发现这里的tooltip并没有消失,反而妨碍我们去点上面的那一个按钮

默认为true,当我们鼠标进入到这个tooltip中并不会隐藏,因此我们需要将其设置为false
3.3.9 实现数据分页效果
引入分页组件:
Vue.use(Pagination)
<!-- 分页区域 -->
<div class="block">
<span class="demonstration"></span>
<el-pagination
  @size-change="handleSizeChange"
  @current-change="handleCurrentChange"
  :current-page="queryInfo.pagenum"
  :page-sizes="[1, 2, 5, 10]"
  :page-size="queryInfo.pagesize"
  layout="total, sizes, prev, pager, next, jumper"
  :total="total">
</el-pagination>
</div>
// 监听pageSize改变的事件
handleSizeChange(newSize){
    // console.log(newSize)
    this.queryInfo.pagesize = newSize;
    //页数改变了,应该发起新的请求来获取新的用户列表
    this.getUserList()
},
//监听页码值改变的事件
handleCurrentChange(newPage){
  // console.log(newPage)
  this.queryInfo.pagenum = newPage
  //同样需要重新获取数据
  this.getUserList()
}
当我们点击切换的时候pageSize会改变,我们要把它存到我们的queryInfo数组下,同理pageNum改变的时候也需要存储。我们修改完之后,需要重新获取一下数组
3.3.10 实现用户状态的修改
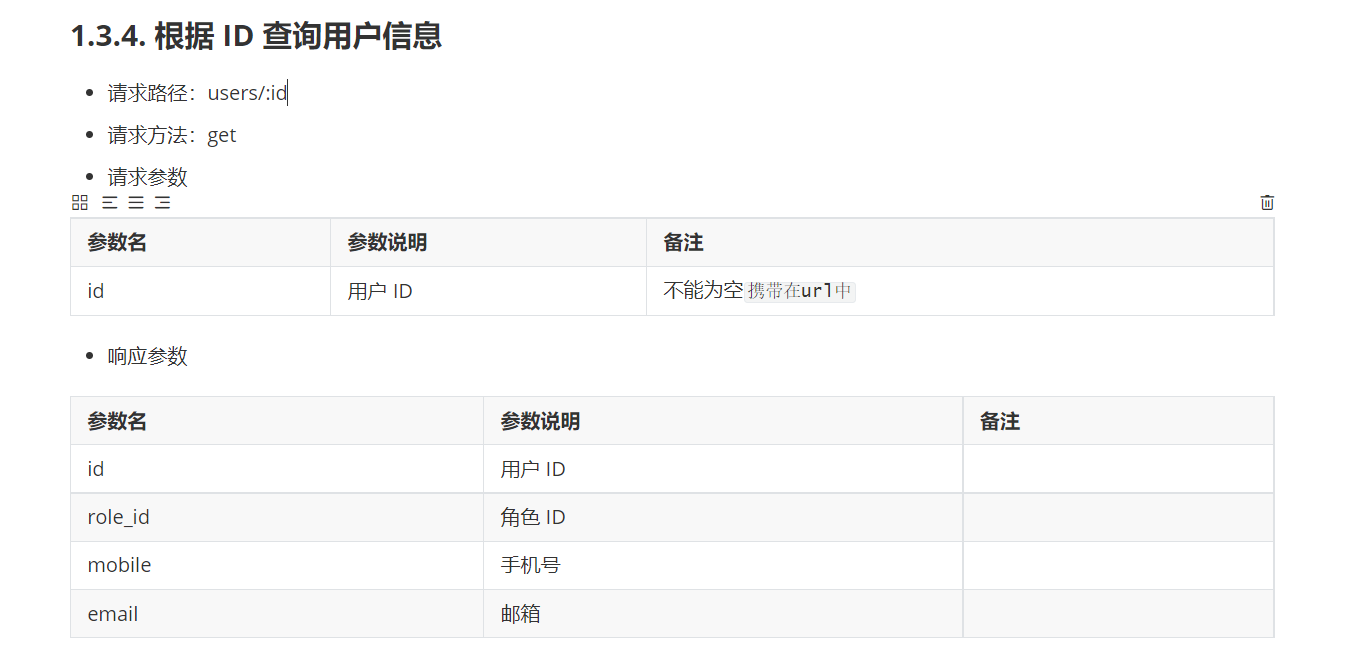
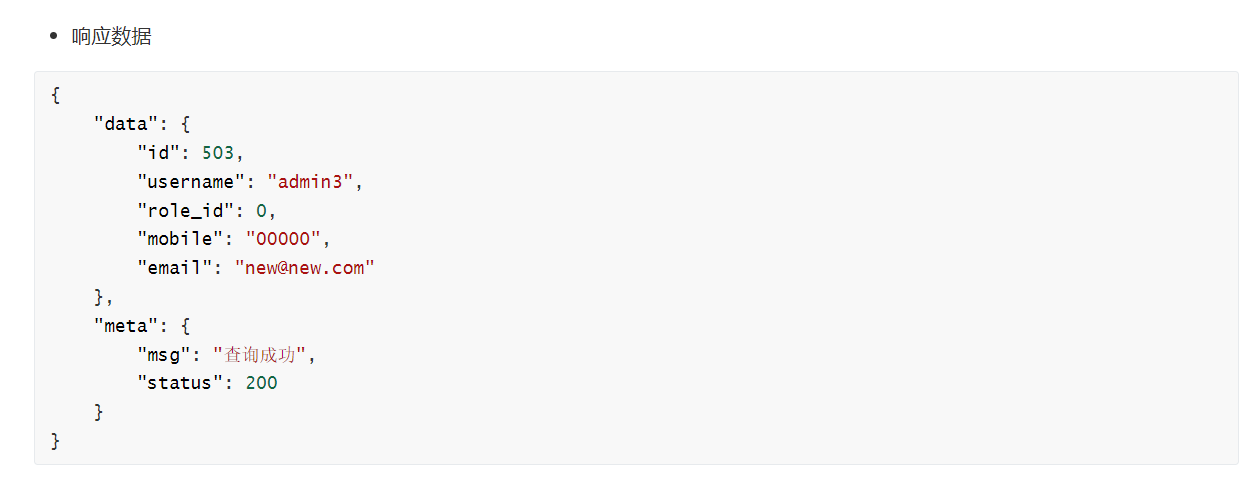
当我们把开关的状态打开之后,我们再次刷新之后发现这个状态并没有被保存,因为我们只是在前台进行了修改,并没有对后台进行保存。
需要把用户的修改同步保存到状态数据库中
第一步、监听到switch状态的改变,拿到最新的状态

当前是通过v-model指令双向绑定到了mg_state身上
  <el-table-column
    prop="mg_state"
    label="状态">
    <template slot-scope="scope">
      <el-switch
          v-model="scope.row.mg_state"
          @change="userStateChanged(scope.row)">
      </el-switch>
    </template>
  </el-table-column>
第二步、调用api接口,将最新的状态保存到数据库中
// 监听 Switch开关状态的改变
async userStateChanged(userinfo){
    // console.log(userinfo)
  const {data: res} = await this.$http.put(`users/${userinfo.id}/state/${userinfo.mg_state}`)
  if(res.meta.status!==200) {
    userinfo.mg_state=!userinfo.mg_state
    return this.$message.error('更新用户状态失败')
  }
     this.$message.success('更新用户状态成功')

}
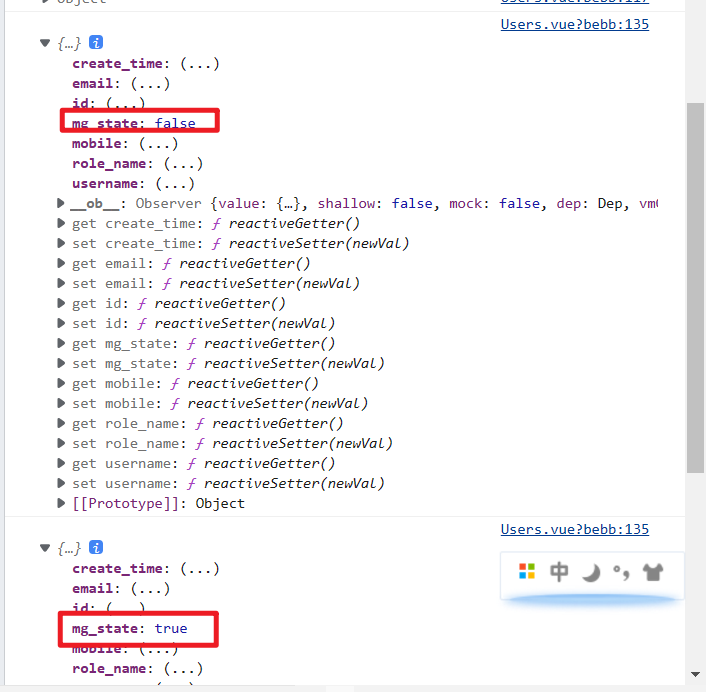
3.3.11实现搜索的功能
根据指定名称搜索用户
<el-row :gutter="30">
    <el-col :span="8">
        <el-input placeholder="请输入内容"
        clearable
         v-model="queryInfo.query" >
         <el-button slot="append" icon="el-icon-search"
         @click="getUserList"></el-button>
        </el-input></el-col>
    <el-col :span="4">
        <el-button type="primary">添加用户</el-button>
    </el-col>
</el-row>
clearable清空文本框
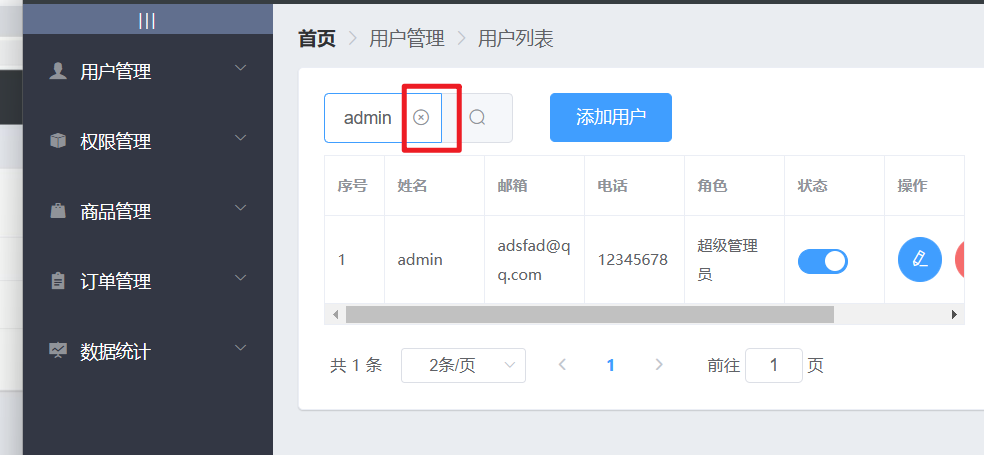
3.3.12 实现添加用户对话框的显示

只要点击了取消或者确定都会隐藏对话框
按需导入对话框组件,并且在页面中找到对应的结构
Vue.use(Dialog)
<!-- 添加用户的对话框 -->
<el-dialog
title="提示"
:visible.sync="addDialogVisible"
    width="50%">
<!-- 内容主体区域 -->
<span>这是一段信息</span>
<!-- 底部区域 -->
<span slot="footer" class="dialog-footer">
<el-button @click="addDialogVisible = false">取 消</el-button>
<el-button type="primary" @click="addDialogVisible = false">确 定</el-button>
</span>
</el-dialog>
title标题 visible 用来对话框的显示与隐藏
对按钮进行点击设置,点击隐藏对话框
// 控制添加用户对话框的显示与隐藏
addDialogVisible:false
3.3.13 添加用户的对话框中渲染一个添加用户的表单
放入el-form 和 el-form-item
    <!-- 内容主体区域 -->
    <el-form :model="addForm" :rules="addFormRules" ref="addFormRef" label-width="70px" >
  <el-form-item label="用户名" prop="username">
    <el-input v-model="addForm.username"></el-input>
  </el-form-item>
  <el-form-item label="密码" prop="password">
    <el-input v-model="addForm.password"></el-input>
  </el-form-item>
  <el-form-item label="邮箱" prop="email">
    <el-input v-model="addForm.email"></el-input>
  </el-form-item>
  <el-form-item label="手机" prop="mobile">
    <el-input v-model="addForm.mobile"></el-input>
  </el-form-item>

  </el-form>
el-form 中的model 是我们的数据绑定对象,rules是我们的验证规则对象,ref是一个引用对象。因为都是规则所以都以rules结尾
通过label-width指定文本宽度
el-form-item通过label指定文本 ,prop是验证规则属性。校验规则在rules里面去做具体的设置
在每个item里面会包含一个文本输入框,其中用v-model来做数据的双向绑定,就绑定到了el-form :model="addForm" 这里面。今后输入的所有数据都会同步到addForm中
// 添加用户的表单数据
addForm:{
  username:'',
  password:'',
  email:'',
  mobile:''
},
// 添加表单验证规则
addFormRules: {
  username: [
  { required: true, message: '请输入用户名', trigger: 'blur' },
  { min: 3, max: 10, message: '长度在 3 到 10 个字符', trigger: 'blur' }
  ],
  password: [
  { required: true, message: '请输入密码', trigger: 'blur' },
  { min: 6, max: 15, message: '长度在 6到 15 个字符', trigger: 'blur' }
  ],
  email: [
  { required: true, message: '请输入邮箱', trigger: 'blur' }
  ],
  mobile: [
  { required: true, message: '请输入电话', trigger: 'blur' }
  ],

}
3.3.14 实现自定义规则
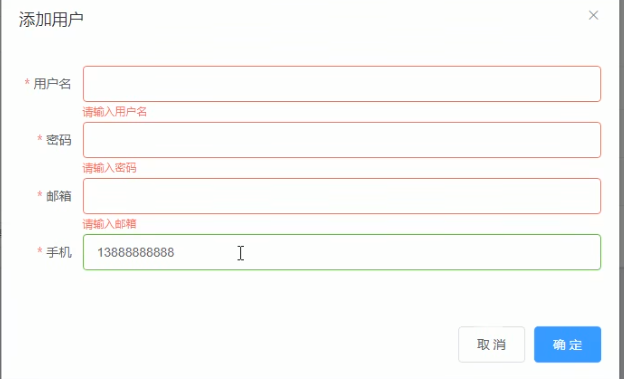
校验邮箱和手机号

第一步、通过var定义一个校验规则,它的值指向一个箭头函数,在箭头函数的形参中包含了三个变量:
rule:验证规则,value:需要验证的值,callback :回调函数
在校验期间,一般是先定义正则表达式,在调用test来校验这个值是否合法
如果验证成功了,就直接callback();如果失败了需要加一个生成的错误消息
    data(){
      //验证邮箱的规则
      var checkEmail = (rules,value,callback)=>{
        // 验证邮箱的正则表达式
        const regEmail = /^([a-zA-Z0-9_-])+@([a-zA-Z0-9_-])+(\.[a-zA-Z0-9_-])+/
        if(regEmail.test(value)){
          // 合法 的邮箱
            return callback()
        }
        callback(new Error('请输入合法的邮箱'))
      }
      // 验证手机号的规则
      var checkMobile= (rules,value,callback)=>{
        // 验证手机号的正则表达式
        const regMobile = /^(13[0-9]|14[5|7]|15[0|1|2|3|4|5|6|7|8|9]|18[0|1|2|3|5|6|7|8|9])\d{8}$/;
        if(regMobile.test(value)){
          callback()
        }
        callback(new Error("请输入合法的手机号"))

      }
第二步、validator指定自定义校验规则,trigger来指定触发校验的时机
// 添加表单验证规则
addFormRules: {
  email: [
  { required: true, message: '请输入邮箱', trigger: 'blur' },
  {validator:checkEmail ,trigger:'blur'}
  ],
  mobile: [
  { required: true, message: '请输入手机号', trigger: 'blur' },
  {validator:checkMobile ,trigger:'blur'}
  ],

}
3.3.15 实现添加用户表单的重置功能
当我们填写某几项之后点击取消之后,再次点击添加用户还是保存之前输入的数据,我们需要将其重置
在整个对话框关闭的时候,重置这个表单,添加一个@close="addDialogClosed"
<!-- 添加用户的对话框 -->
<el-dialog
title="添加用户"
:visible.sync="addDialogVisible"
    width="50%"
    @close="addDialogClosed">
// 监听用户对话框的关闭事件
addDialogClosed(){
    this.$refs.addFormRef.resetFields()
}
3.3.16 添加用户的预验证功能
<el-button type="primary" @click="addUser" >确 定</el-button>
 // 点击按钮,添加新用户
 addUser(){
  this.$refs.addFormRef.validate(valid=>{
    // console.log(valid)
    if(!valid) return
    // 可以发起添加用户的网络请求
  })
}
什么都不填就会显示false
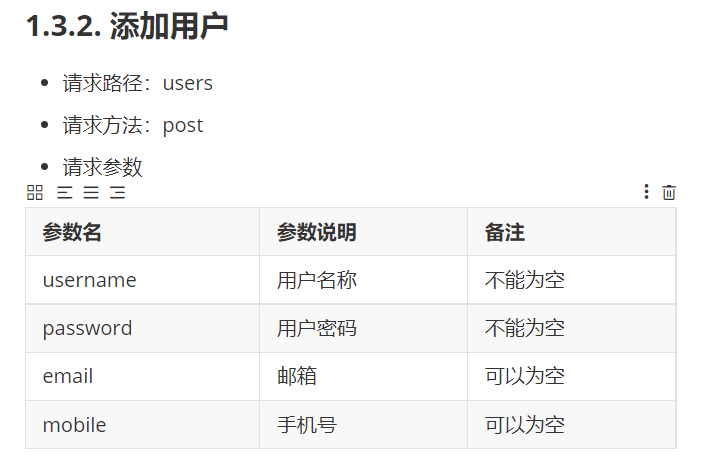
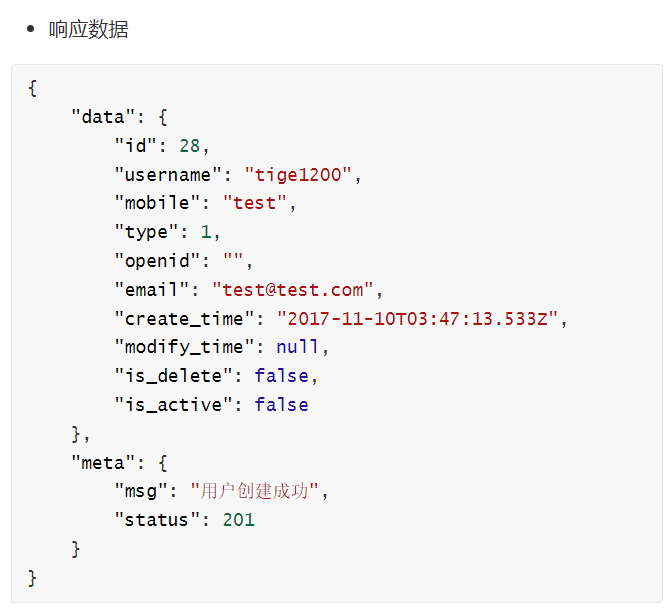
3.3.17 添加用户修改的操作
第一步、先给修改按钮绑定一个事件监听
<el-table-column width="180px" label="操作">
          <template slot-scope="scope">
            <!-- 修改按钮 -->
            <el-button type="primary" icon="el-icon-edit" circle size="medium" @click="showEditDialog()"></el-button>
在外面通过作用域插槽接收到了scope这个数据对象
第二步、创建一个el-dialog ,设置标题和visible属性,并定义这个属性
<!-- 用户修改的对话框 -->
<el-dialog title="修改用户信息" :visible.sync="editDialogVisible" width="50%" >
  <!-- 内容主体区域 -->
  <el-form :model="editForm" :rules="editFormRules" ref="editFormRef" label-width="70px">
    <el-form-item label="用户名">
      <el-input v-model="editForm.username" disabled></el-input>
    </el-form-item>
    <el-form-item label="邮箱" prop="email">
      <el-input v-model="editForm.email"></el-input>
    </el-form-item>
    <el-form-item label="手机" prop="mobile">
      <el-input v-model="editForm.mobile"></el-input>
    </el-form-item>
  </el-form>
  <!-- 底部区域 -->
  <span slot="footer" class="dialog-footer">
    <el-button @click="editDialogVisible = false">取 消</el-button>
    <el-button type="primary" @click="addUser">确 定</el-button>
  </span>
</el-dialog>
disabled表示禁用修改
      // 控制修改用户对话框的显示与隐藏
      editDialogVisible:false,
第二步、在data中定义一个私有数据对象专门来保存用户的信息
将用户原来的旧数据填充到这里面
    // 展示编辑用户的对话框
    async showEditDialog(id) {
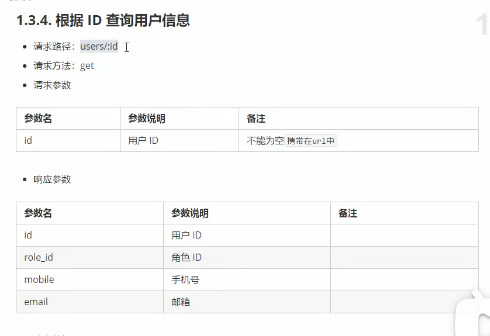
      const {data:res} = await this.$http.get('users/' + id)
      if(res.meta.status!==200){
        return this.$message.error('查询用户信息失败!')
      }
      this.editForm = res.data
      this.editDialogVisible = true
    },
并设定自定义校验规则
      // 修改表单的验证规则对象
      editFormRules:{
        email: [
          { required: true, message: '请输入邮箱', trigger: 'blur' },
          { validator: checkEmail, trigger: 'blur' },
        ],
        mobile: [
          { required: true, message: '请输入手机号', trigger: 'blur' },
          { validator: checkMobile, trigger: 'blur' },
        ],
      }
3.3.18 修改表单关闭之后的重置操作
修改之后有一个验证的结果,然后点击取消,这里验证的结果依然还在这里,需要监听对话框的close事件,在close事件中重置表单
<!-- 用户修改的对话框 -->
<el-dialog title="修改用户信息" :visible.sync="editDialogVisible" width="50%"
@close="editDialogClosed" >
//监听修改用户对话框的关闭事件
editDialogClosed(){
    this.$refs.editFormRef.resetFields()
}
在vue中ref可以以属性的形式添加给标签或者组件
ref 写在标签上时:this.$refs.ipt 获取的是添加了ref="ipt"标签对应的dom元素
ref 写在组件上时:this.$refs['component'] 获取到的是添加了ref="component"属性的这个组件
3.3.19 提交修改之前表单预验证操作
<el-button type="primary" @click="editUserInfo">确 定</el-button>
//修改用户信息并提交
editUserInfo(){
  this.$refs.editFormRef.validate(valid=>{
    console.log(valid)
  })
}
只要是修改的数据也会同步保存到editForm里面
3.3.20 修改用户信息的操作
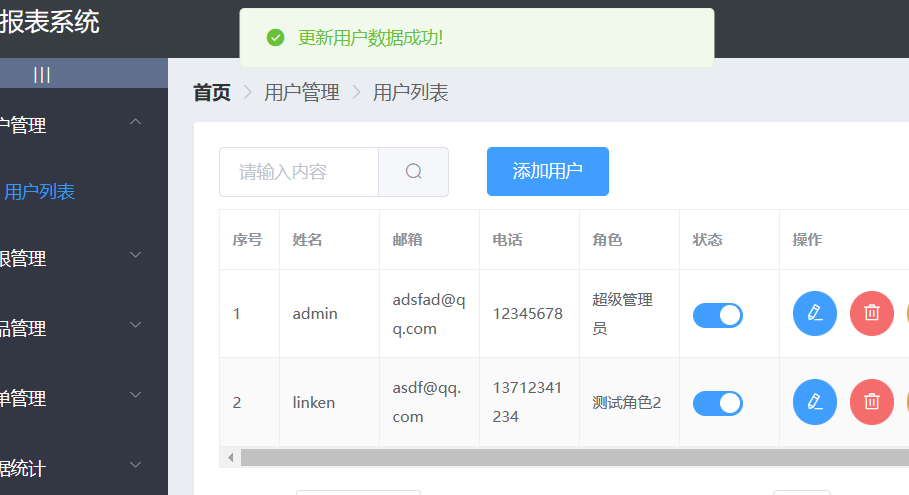
    //修改用户信息并提交
    editUserInfo(){
      this.$refs.editFormRef.validate(async valid=>{
        if(!valid) return
          // 发起修改用户信息的用户请求
          const {data:res} = await this.$http.put('users/'+
          this.editForm.id,
          {
            email:this.editForm.email,
            mobile:this.editForm.mobile
          })
          if(res.meta.status!==200){
            return  this.$message.error('更新用户信息失败!')
          }
          //关闭对话框
          this.editDialogVisible = false
          //刷新数据列表
          this.getUserList()
          //修改数据列表
          this.$message.success('更新用户数据成功!')


      })
    }
首先在验证通过之后,发起了一次put请求,把要提交到服务器的数据都提交到这里面。
3.3.21 实现删除用户的操作
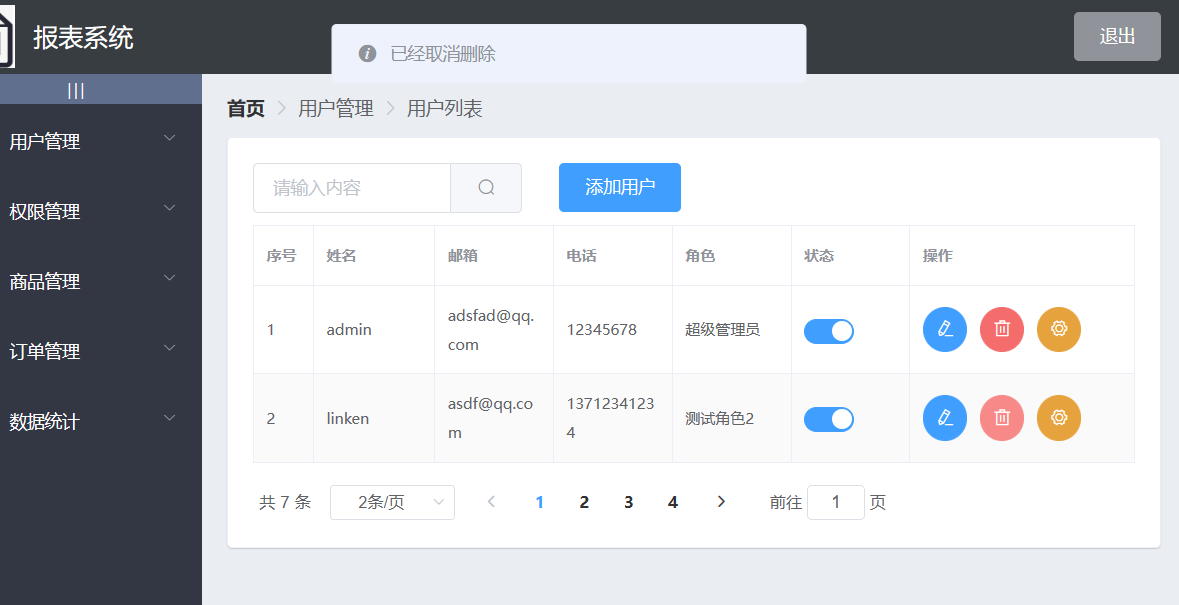
message box
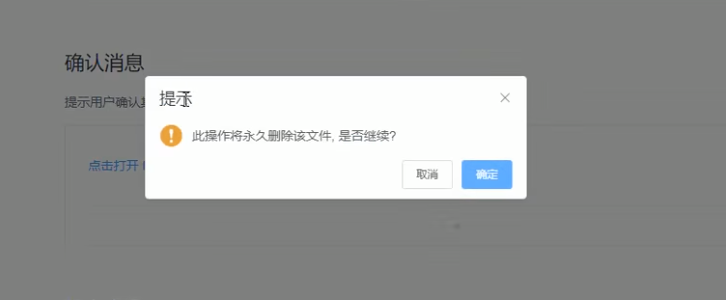
this.$confirm 这个函数弹出一个确认的消息框
这个this.$confirm 需要挂载才能够使用,this是当前组件的实例
第一步:这个组件比较特殊:
import{MessageBox}
Vue.prototype.$confirm = MessageBox.confirm
第二步:
    //根据id删除对应的用户信息
    async removeUserById(id){
       //弹框询问用户是否删除数据
      const confirmResult = await this.$confirm('此操作将永久删除该用户, 是否继续?', '提示', {
          confirmButtonText: '确定',
          cancelButtonText: '取消',
          type: 'warning'
        }).catch(err =>
           err
        )
        // 如果用户确认删除,则返回值字符串confirm
        //如果用户点击取消则返回字符串cancel【需要捕获error】
        // console.log(confirmResult)
        if(confirmResult!=='confirm'){
          return this.$message.info('已经取消删除')
        }
        console.log('确认了删除')
    }
type字段表明消息类型,可以为success,error,info和warning,无效的设置将会被忽略。
通过confirmResult来介绍用户的操作
catch()捕获前面的所有错误
写完整:
catch(err =>{
          return err
        })
如果只有一行代码,可以直接return
catch(err =>
           err
)
可以通过返回的字符串看出来用户是否真正删除了
3.3.22完成删除用户的操作
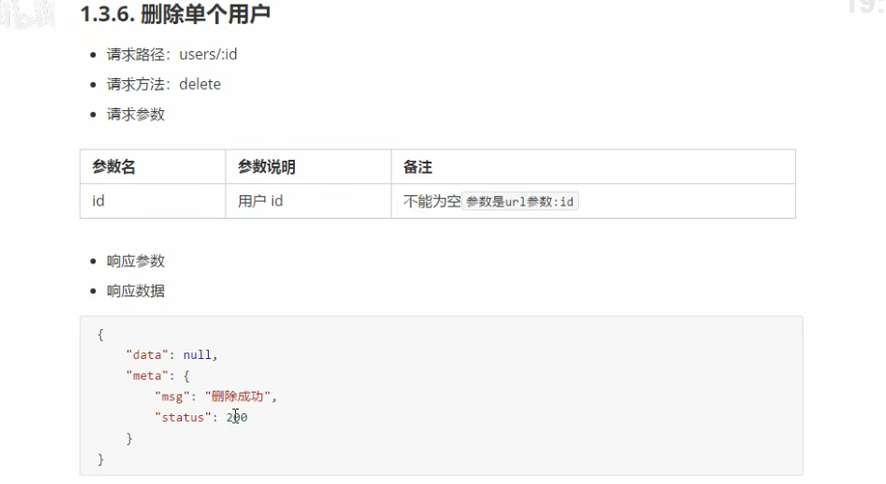
//根据id删除对应的用户信息
async removeUserById(id){
   //弹框询问用户是否删除数据
  const confirmResult = await this.$confirm('此操作将永久删除该用户, 是否继续?', '提示', {
      confirmButtonText: '确定',
      cancelButtonText: '取消',
      type: 'warning'
    }).catch(err =>
       err
    )
    // 如果用户确认删除,则返回值字符串confirm
    //如果用户点击取消则返回字符串cancel【需要捕获error】
    // console.log(confirmResult)
    if(confirmResult!=='confirm'){
      return this.$message.info('已经取消删除')
    }
   const{data:res} =  await  this.$http.delete('users/'+id)
    if(res.data.status!==200){
      return this.$message.error('删除用户失败')
    }
    this.$message.success('删除用户成功!')
    this.getUserList()
  }
3.3.23 提交用户功能列表代码
重命名分支
git branch -m home user
git push origin user
origin云端仓库的别名 -u如果已经有这个分支了就不用写了
git checkout master
git merge user
git push
3.4 权限管理开发
3.4.1权限开发管理开始
git checkout -b rights
git push origin rights
3.4.2开发权限列表对应规格
新建power文件夹和Rights.vue 引入并添加路由
import Rights from '../components/power/Rights.vue'
children:[
  {path:'/welcome',component:Welcome},
  {path:'/users',component:Users},
  { path:'/rights',component:Rights}

]
3.4.3 权限管理界面
    <!-- 面包屑导航区域 -->
    <el-breadcrumb separator-class="el-icon-arrow-right">
      <el-breadcrumb-item :to="{ path: '/home' }">首页</el-breadcrumb-item>
      <el-breadcrumb-item>权限管理</el-breadcrumb-item>
      <el-breadcrumb-item>权限列表</el-breadcrumb-item>
    </el-breadcrumb>

    <!-- 卡片视图 -->
    <el-card>
        123
    </el-card>
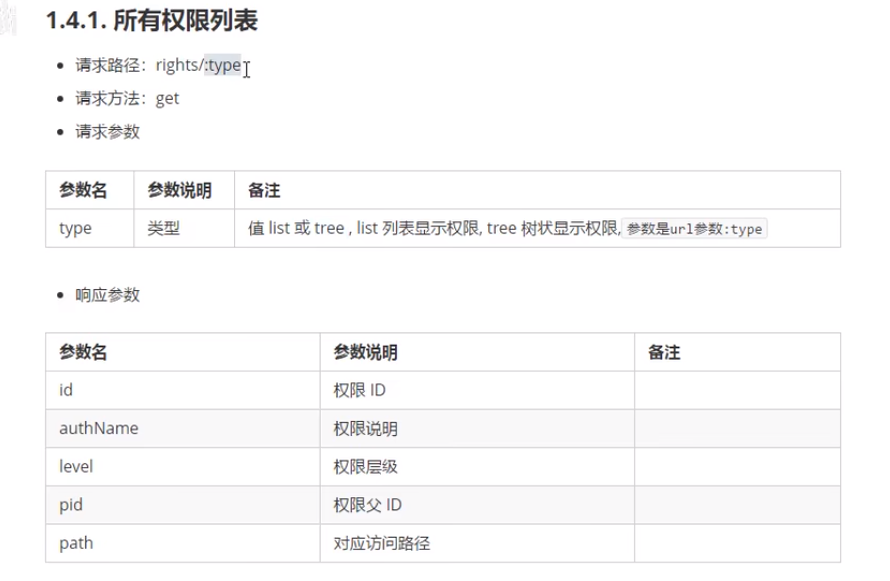
3.4.5 权限列表的数据获取
//获取权限列表
async getRightsList(){
    const {data:res} = await this.$http.get('rights/list')
    if(res.meta.status!==200){
        return this.$message.error('获取权限列表失败!')
    }
    this.rightsList = res.data
    console.log(this.rightsList)

}
3.4.6 权限列表的数据渲染
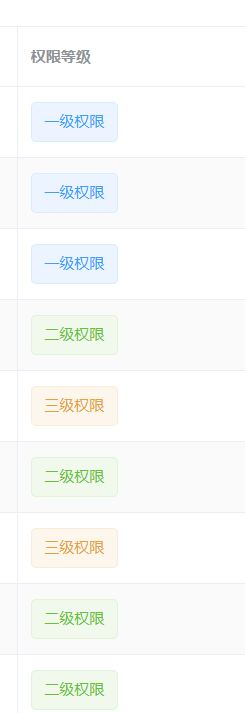
<el-table-column  label="权限等级" prop="level">
    <template slot-scope="scope">
        <el-tag v-if="scope.row.level === '0'">一级权限</el-tag>
        <el-tag type="success" v-else-if="scope.row.level ==='1'">二级权限</el-tag>
        <el-tag type="warning" v-else>三级权限</el-tag>
    </template>
</el-table-column>
el-table :data 来绑定数据源
3.5 权限管理
3.5.1 业务分析
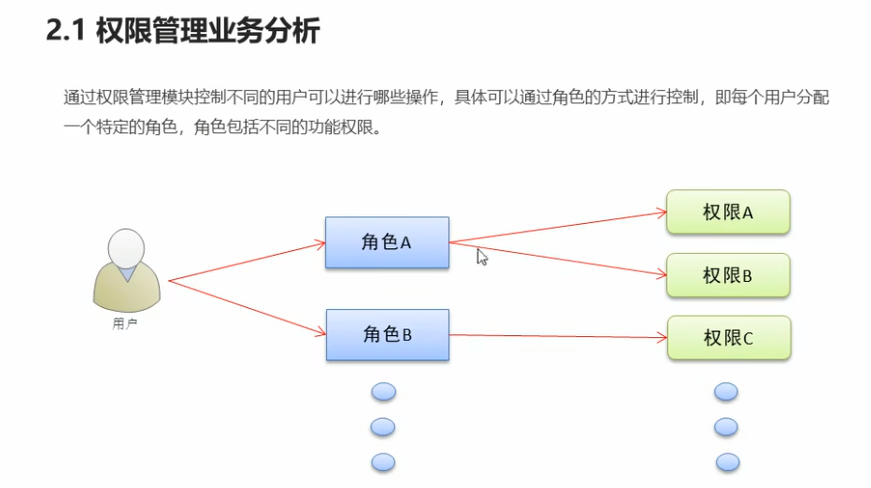
3.5.2 角色列表的路由切换
import Roles from '../components/power/Roles.vue'
 {path:'/roles',component:Roles}
3.5.3 角色列表的数据获取
export default {
  data() {
    return {
      //所有角色列表数据
      rolesList: [],
    }
  },
  created() {
    this.getRolesList()
  },
  methods: {
    async getRolesList() {
      const { data: res } = await this.$http.get('roles')
      if (res.meta.status !== 200) {
        return this.$message.error('获取角色列表失败')
      }
      this.rolesList = res.data
      console.log(this.rolesList)
    },
  },
}
3.5.4 角色列表的基本渲染
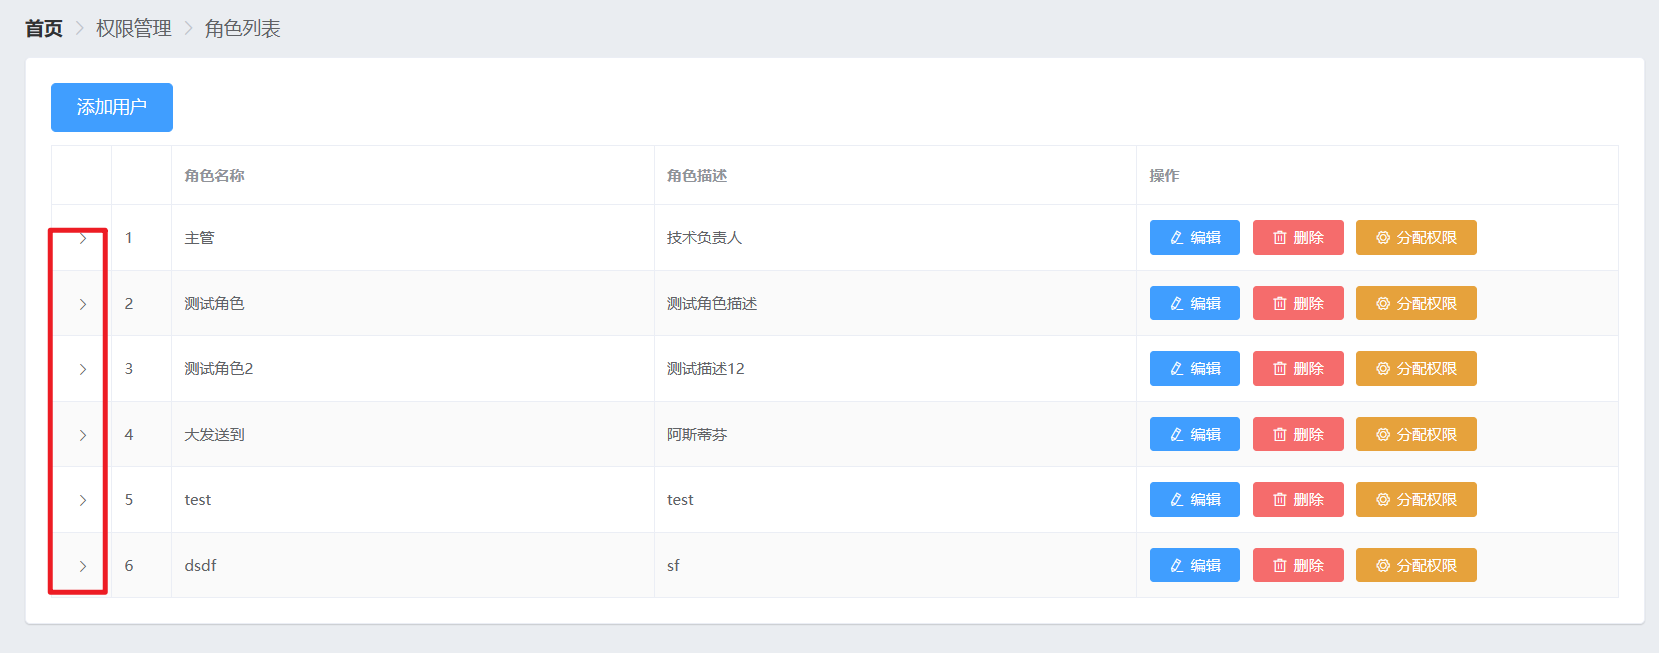
<!-- 展开列 -->
<el-table-column type="expand"></el-table-column>
3.5.5 渲染子列表
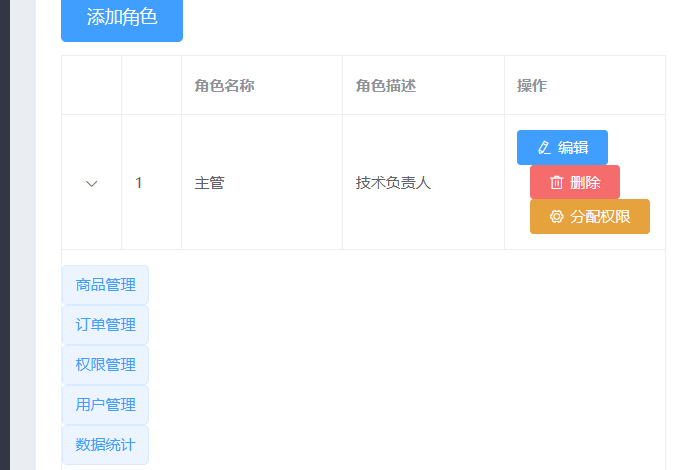
先拿到这个属性之后.children属性就可以了
第一步、通过scope.row拿到权限信息
<el-table :data="rolesList" border stripe>
<!-- 展开列 -->
<el-table-column type="expand">
    <template slot-scope="scope">
        <pre>
            {{ scope.row }}
        </pre>

    </template>
</el-table-column>
第二步、通过三层for循环将对应的权限渲染出来
3.5.6 一级权限的渲染
scope.row.children包含 的是所有的一级权限,咱们每循环一次就往第一列里面放一个tag标签
 <!-- 展开列 -->
        <el-table-column type="expand">
            <template slot-scope="scope">
                <el-row v-for="(item1,i1) in scope.row.children" :key="item1.id">
                    <!-- 渲染一级权限 -->
                    <el-col :span="5">
                        <el-tag>{{ item1.authName }}</el-tag>
                    </el-col>
                    <!-- 渲染二级和三级权限 -->
                    <el-col :span="19"></el-col>
                    <el-col></el-col>
                </el-row>
                <pre>
                    {{ scope.row }}
                </pre>
            </template>
        </el-table-column>
3.5.7 一级权限的美化

新建了两个样式:在所有按钮底部加上一个边框横线,只有在第一个按钮顶部加边框横线
.bdtop{
    border-top: 1px solid #eee;
}
.bdbottom{
    border-bottom: 1px solid #eee;
}
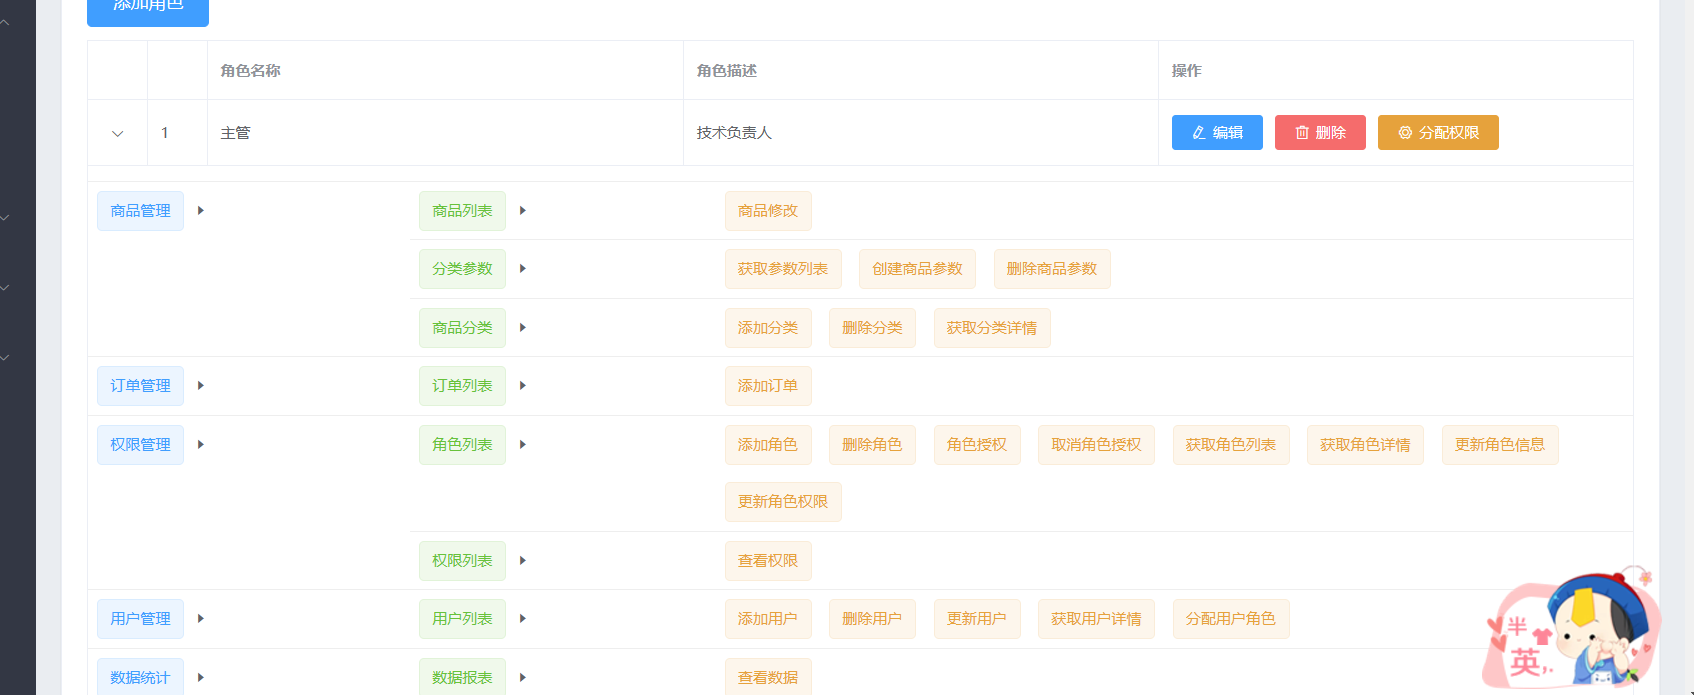
<el-row :class="['bdbottom',i1===0? 'bdtop':'']"    v-for="(item1,i1) in scope.row.children" :key="item1.id">
    <!-- 渲染一级权限 -->
    <el-col :span="5">
        <el-tag>{{ item1.authName }}</el-tag>
        <i class="el-icon-caret-right"></i>
    </el-col>
    <!-- 渲染二级和三级权限 -->
    <el-col :span="19"></el-col>
    <el-col></el-col>
</el-row>
3.5.8 二级权限的渲染
<!-- 渲染二级权限 -->
<el-col :span="19">
<!-- 通过for循环 嵌套渲染二级权限 -->
<el-row :class="[i2 === 0 ? '' : 'bdtop']" v-for="(item2, i2) in item1.children" :key="item2.id">
  <el-col :span="6">
    <el-tag type="success">{{ item2.authName }}</el-tag>
    <i class="el-icon-caret-right"></i>
  </el-col>

</el-row>
</el-col>
3.5.9 三级权限的渲染
 <el-col :span="18">
    <el-tag type="warning" v-for="(item3, i3) in item2.children" :key="item3.id">
      {{ item3.authName }}
    </el-tag>
  </el-col>
首先通过scope.row拿到了当前角色的数据
通过.children拿到所有的一级权限的数据
3.5.10 权限不换行
设置页面最小宽度,实现不轻易换行
/* 全局样式表 */
html,body,#app{
    height: 100%;
    margin: 0;
    padding: 0;
    min-width: 1366px;
}
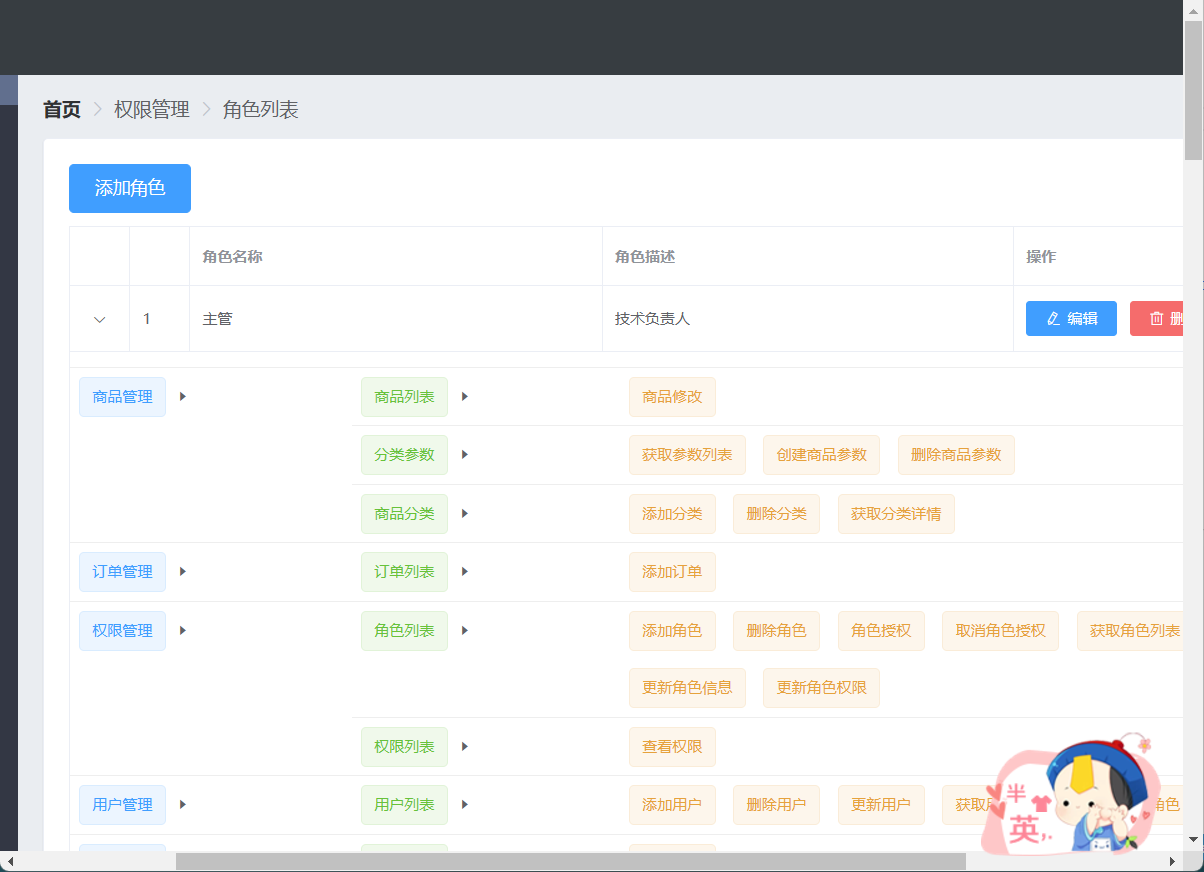
3.5.11 纵向上居中的效果

.vcenter{
    display: flex;
    align-items:center
}
<el-row :class="['bdbottom', i1 === 0 ? 'bdtop' : '','vcenter']" v-for="(item1, i1) in scope.row.children" :key="item1.id">
<!-- 通过for循环 嵌套渲染二级权限 -->
<el-row :class="[i2 === 0 ? '' : 'bdtop','vcenter']" v-for="(item2, i2) in item1.children" :key="item2.id"
3.5.12 为tag标签 去添加点击事件
  async removeRightById(){
       const confirmResult = await this.$confirm('此操作将永久删除该文件, 是否继续?', '提示', {
          confirmButtonText: '确定',
          cancelButtonText: '取消',
          type: 'warning'
        }).catch(err=>err)
        if(confirmResult!=='confirm'){
            return this.$message.info('取消了删除')
        }
        console.log('确认了删除')
    }
                  <!-- 渲染三级权限 -->
                  <el-col :span="18">
                    <el-tag type="warning" v-for="(item3, i3)
                    in item2.children" :key="item3.id" closable @close="removeRightById()">
                      {{ item3.authName }}
                    </el-tag>
                  </el-col>
3.5.13 实现点击tag删除的功能
async removeRightById(role,rightId){
   const confirmResult = await this.$confirm('此操作将永久删除该权限, 是否继续?', '提示', {
      confirmButtonText: '确定',
      cancelButtonText: '取消',
      type: 'warning'
    }).catch(err=>err)
    if(confirmResult!=='confirm'){
        return this.$message.info('取消了删除')
    }
    const {data:res} = await this.$http.delete(`roles/${role.id}/rights/${rightId}`)
    if(res.meta.status!==200){
      return this.$message.error('删除权限失败')
    }
    this.getRolesList()
}
3.5.14 实现点击tag之后权限不折叠
每当点击确定之后
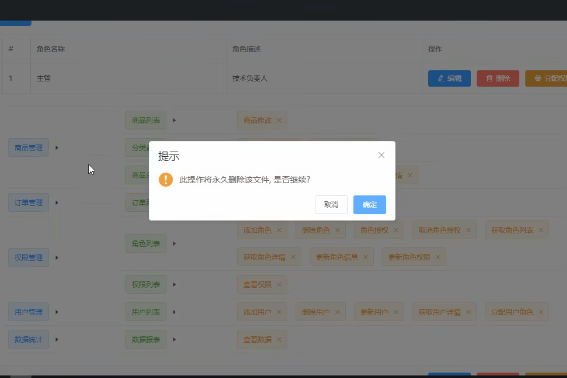
这个列表就合上了
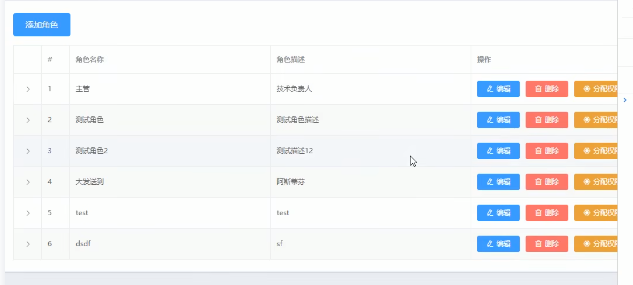
删除完成之后他会获取整个table列表,整个列表会重新渲染一次。所以不建议调用getRolesList,因为会发生页面的完整渲染。咱们可以为角色信息重新赋值一下权限
// this.getRolesList()
role.children = res.data
3.5.15 分配权限
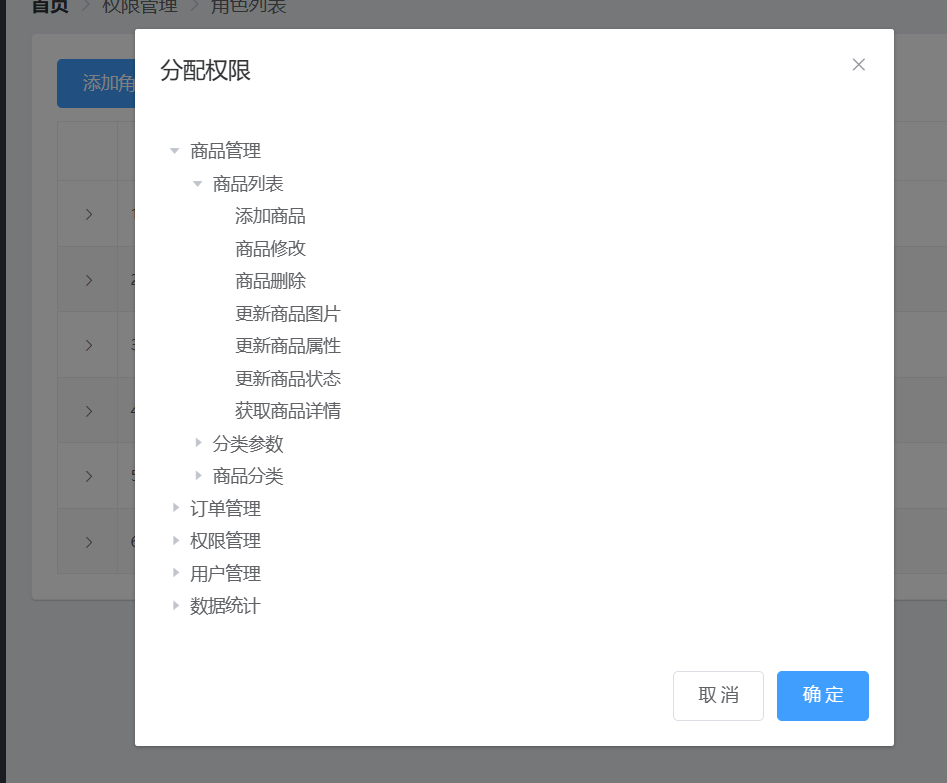
把所有的权限,渲染成一个树形结构
Vue.use(Tree)
<!-- 树形控件 -->
<el-tree :data="rightlist" :props="treeProps">
</el-tree>
:data是数据绑定的数据源
3.5.16 树形节点的属性优化
可以勾选:show-checkbox
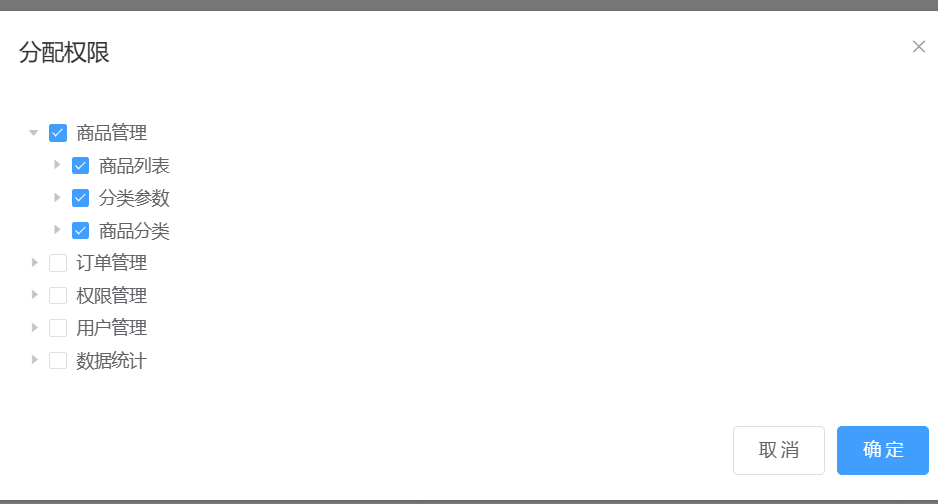
实现唯一的值:node-key="id"

默认全部展开:default-expand-all
默认勾选的节点的数组 defKeys:[101,103]
:default-checked-keys="defKeys"
定义递归函数,通过递归函数把三级节点的id都保存到数组中,然后将数组赋值给defKeys,这样就可以实现点击已有权限将那些默认的权限都加上
// 展示分配权限的对话框
    async showSetRightDialog(role) {

      //获取所有权限的数据
      const {data:res} = await this.$http.get('rights/tree')
      if(res.meta.status!==200){
        return this.$message.error('获取权限数据失败!')
      }

      this.rightlist = res.data
      console.log(this.rightlist)
      //递归获取三级节点的id
      this.getLeafKeys(role,this.defKeys)

      this.setRightDialogVisible = true
    },
    //通过递归的形式,获取角色下所有三级权限的id,并保存到defkeys数组中
    getLeafKeys(node,arr){
      //如果当前node不包含children属性,则是三级节点
      if(!node.children){
        return arr.push(node.id)
      }
      // 没有return说明还不是三级节点,需要进一步通过调用递归来获取三级节点
      node.children.forEach(item =>this.getLeafKeys(item,arr))

    }
这里scope.row传入的就是我们当前的角色
<el-button type="warning" size="mini" icon="el-icon-setting" @click="showSetRightDialog(scope.row)">分配权限</el-button>
3.5.17 分配权限bug解决
每次点击分配按钮的时候都会把当前角色已有的三级权限id保存到数组中,但是
当关闭上一个对话框的时候我们并没有清空这个数组,所以长此以往我们数组里面的项数会越来越多,为了防止这个bug,我们应该在每次对话框关闭期间都清空一下数组里面的元素项
<!-- 分配权限的对话框 -->
<el-dialog title="分配权限" :visible.sync="setRightDialogVisible"
width="50%" @close="setRightDialogClosed" >
//监听分配权限对话框的关闭事件
setRightDialogClosed(){
    this.defKeys = {}
}
3.5.18 实现权限全选
获取所有已选中节点的id值,以数组的形式返回

获取所有半选中的结点的id值,以数组的形式返回

在点击分配按钮的时候,我们立即把id先保存到了data中,供我们后续进行使用
 //当前即将分配权限的角色id
      roleId:''
然后在点击确定按钮的时候,获取到了树形结构中半选或者全选的id值,把它们合并为一个完整的数组。然后通过join方法,进行了一个字符串的拼接,用英文的,拼接成为了一个字符串,然后发起了请求把刚才保存的字符串发送到服务器端,同时刷新用户列表,关闭分配权限的对话框
//点击为角色分配权限
    async allotRights(){
      const keys = [
        ...this.$refs.treeRef.getCheckedKeys(),
        ...this.$refs.treeRef.getHalfCheckedKeys()
      ]
      const idStr = keys.join(',')
      const {data:res} = await this.$http.post(`roles/${this.roleId}/rights`,{rids:idStr})
      if(res.meta.status!==200){
          return this.$message.error('分配权限失败!')
      }
      this.$message.success('分配权限成功!')
      this.getRolesList()
      this.setRightDialogVisible = false
    }
3.6 用户权限分配
3.6.1 显示对话框
  // 控制分配角色对话框的显示与隐藏
      setRoleDialogVisible: false,
// 显示分配角色的对话框
async setRole(userInfo){

 this.setRoleDialogVisible = true
}
3.6.2 渲染用户列表
      //需要被分配角色的用户信息
      userInfo:{},
      //所有角色的数据列表
      rolesList:[]
// 显示分配角色的对话框
async setRole(userInfo){
  this.userInfo = userInfo
  //在展示对话框之前,获取所有角色的列表
 const {data:res} = await this.$http.get('roles')
 if(res.meta.status!==200){
    return this.$message.error('获取角色列表失败!')
 }
 this.rolesList = res.data
 this.setRoleDialogVisible = true
}
3.6.3 分配新角色下拉菜单
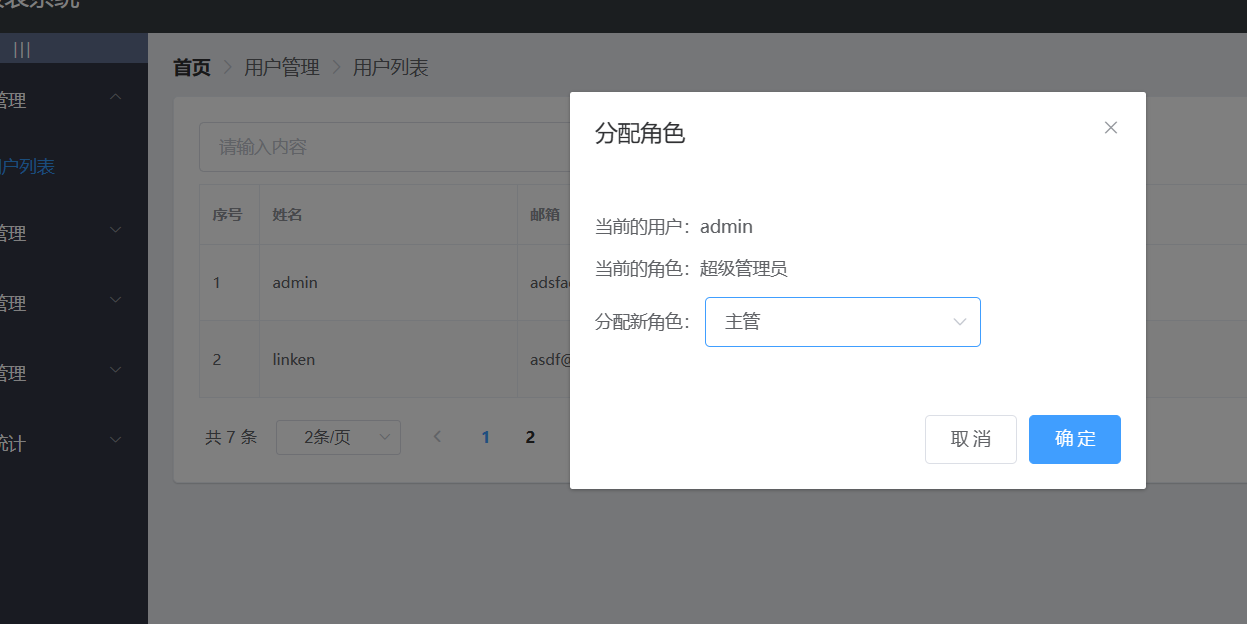
  <div>
    <p>当前的用户:{{ userInfo.username }}</p>
    <p>当前的角色:{{ userInfo.role_name }}</p>
    <p>
      分配新角色:
      <el-select v-model="selectedRoleId" placeholder="请选择">
        <el-option v-for="item in rolesList" :key="item.id" :label="item.roleName" :value="item.id"> </el-option>
      </el-select>
    </p>
  </div>


通过v-model具体绑定到一个具体的值上,:label是我们所能看到的那个文本
:value才是我们真正选中的值

3.6.4分配完成再次点击清空已选状态
//监听分配角色对话框的关闭事件
setRoleDialogClosed(){
  this.selectedRoleId=''
  this.userInfo={}
}
3.6.5 提交权限模块的开发
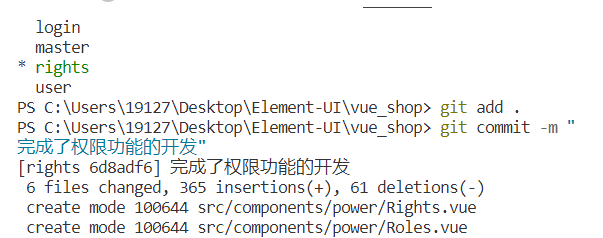

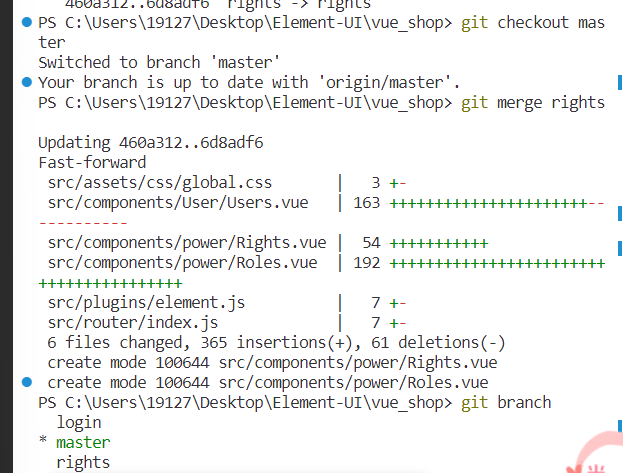
再切换到主分支进行合并
3.7 分类管理相关
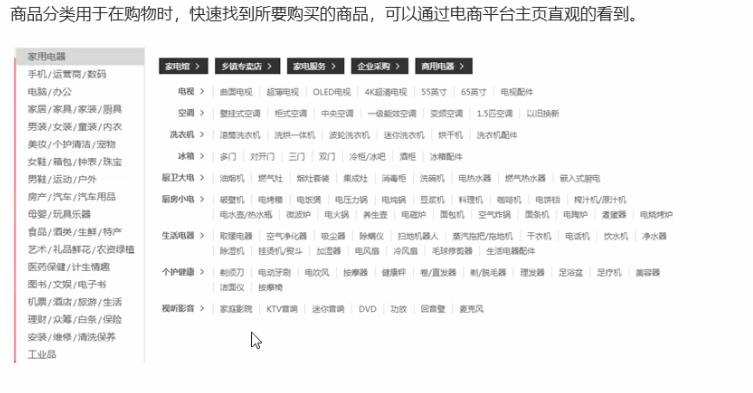
3.7.1 介绍作用
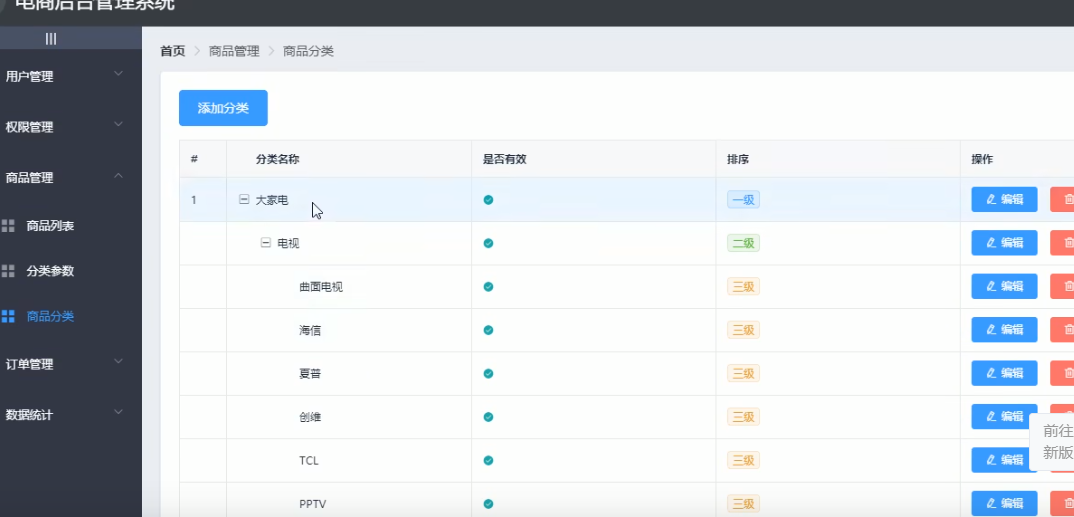
3.7.2 创建子分支
git checkout -b goods_cate
git push -u origin goods_cate
3.7.3 获取商品数据
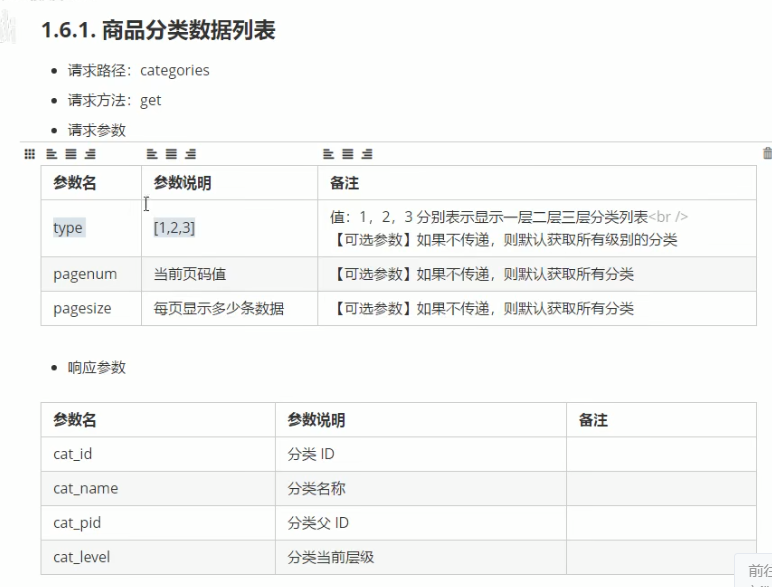
type = 1/2/3 分别获取n层的分类,不写默认全部
import Cate from '../components/goods/Cate.vue'
{ path: '/categories',component: Cate}
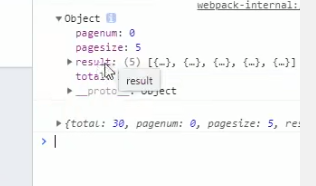
//商品分类的数据列表,默认为空
        catelist:[],
        //查询条件
        queryInfo:{
            type:3,
            pagenum:1,
            pagesize:5
        },
//总数据条数
        total:0
created(){
    this.getCateList()
},
// 获取商品分类数据
   async  getCateList(){
    const {data:res}    =  await this.$http.get(`categories`,{params:this.queryInfo})
    if(res.meta.status!==200){
        return this.$message.error('获取商品分类失败!')
    }
    // 把数据列表赋值给 catelist
    this.catelist = res.data.result
    //为总数据条数赋值
    this.total = res.data.total

    // console.log(res.data)
}
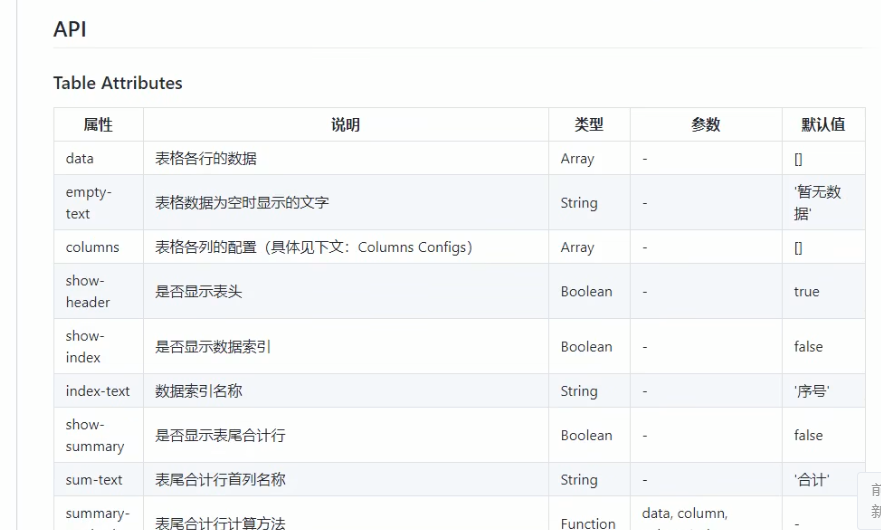
3.7.4安装插件
第一步、安装插件
npm install vue-table-with-tree-grid@0.2.4
第二步、将插件导入到项目中
导入对应插件,通过Vue.use进行自动注册
或者通过Vue.component进行手动注册
//注册为全局可用的组件
Vue.component('tree-table',TreeTable)


 浙公网安备 33010602011771号