Nginx代理的方式(反向代理)
目录
一:Nginx 正向代理与反向代理
1.什么是代理服务器?
所谓代理服务器就是位于发起请求的客户端与原始服务器端之间的一台跳板服务器,正向代理可以隐藏客户端,反向代理可以隐藏原始服务器
- 应用:VPN
2.正向代理的概念
- 正向代理:客户端 <一> 代理 一>服务端
正向代理,是一个位于客户端和原始服务器(origin server)之间的服务器,为来从原始服务器取得内容,客户端向代理发送一个请求并指定目标(原始服务器),然后代理向原始服务器转交请求并将获得的内容返回给客户端。

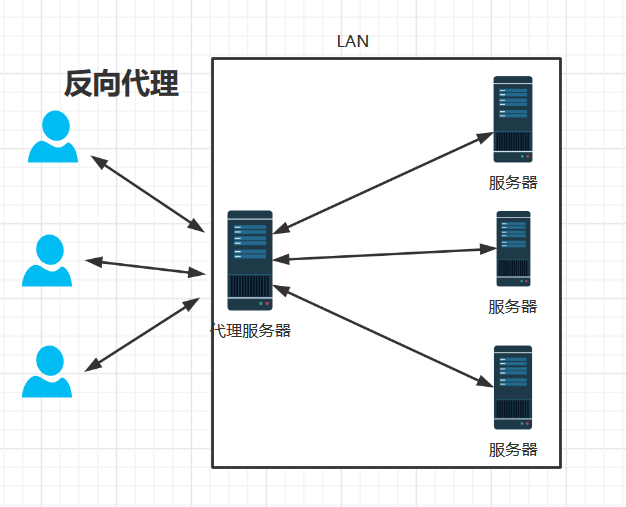
3. 反向代理的概念
客户端 一>代理 <一> 服务端
反向代理正好相反,对于客户端而言它就像是原始服务器,并且客户端不需要进行任何特别的设置。客户端向反向代理命名空间(name-space)中的内容发送普通请求,接着反向代理将判断向何处(原始服务器)转交请求,并将获得的内容返回给客户端,就像这些内容原本就是它自己的一样。
- 应用:负载均衡
二:Nginx代理服务支持的协议
ngx_http_uwsgi_module		: Python
ngx_http_fastcgi_module		: PHP
ngx_http_scgi_module		: Java
ngx_http_v2_module			: Golang
ngx_http_proxy_module		: HTTP
三:Nginx代理实践
1.部署web01
[root@web01 conf.d]# cat game5.conf
server {
    listen 80;
    server_name 192.168.15.7;
    location / {
        root /opt/Super_Marie;
	index index.html;
    }
    location ~ /images {
        root /opt/image;
    }
}
2.部署lb01
- 部署Nginx
1.下载Nginx源代码包
[root@lb01 ~]# wget https://nginx.org/download/nginx-1.20.2.tar.gz

2.解压
[root@lb01 ~]# tar -xf nginx-1.20.2.tar.gz

3.进入源代码目录
[root@lb01 ~]# cd nginx-1.20.2

4.安装依赖包
[root@lb01 nginx-1.20.2]# yum install openssl openssl-devel zlib zlib-devel -y

5.设置编译参数
[root@lb01 nginx-1.20.2]# ./configure  --with-http_gzip_static_module    --with-stream     --with-http_ssl_module

6.编译
[root@lb01 nginx-1.20.2]# make

7.安装
[root@lb01 nginx-1.20.2]# make install

8.优化
cd /usr/local/nginx

[root@lb01 nginx]# mkdir /etc/nginx
mv conf/* /etc/nginx/

[root@lb01 nginx]# mkdir /etc/nginx/conf.d

9.配置nginx.conf文件
cd /etc/nginx/

1.web01服务器
2.将etc/nginx/nginx.conf配置文件
3.复制到lb01 nginx.conf 内

[root@lb01 nginx]# vi nginx.conf
user  www;
worker_processes  auto;

error_log  /var/log/nginx/error.log notice;
pid        /var/run/nginx.pid;


events {
    worker_connections  1024;
}


http {
    include       /etc/nginx/mime.types;
    default_type  application/octet-stream;

    log_format  main  '$remote_addr - $http_host - $remote_user [$time_local] "$request" '
                      '$status $body_bytes_sent "$http_referer" '
                      '"$http_user_agent" "$http_x_forwarded_for"';

    access_log  /var/log/nginx/access.log  main;

    sendfile        on;
    #tcp_nopush     on;

    keepalive_timeout  65;

    #gzip  on;

    include /etc/nginx/conf.d/*.conf;
}
四:lb01服务器部署Nginx
1.增加属组 属主
[root@lb01 nginx]# groupadd www -g 666
[root@lb01 nginx]# useradd www -u 666 -g 666 -M -r -s /sbin/nologin
2.增加配置文件
[Unit]
Description=nginx - high performance web server
Documentation=http://nginx.org/en/docs/
After=network-online.target remote-fs.target nss-lookup.target
Wants=network-online.target

[Service]
Type=forking
PIDFile=/var/run/nginx.pid
ExecStart=/usr/sbin/nginx -c /etc/nginx/nginx.conf
ExecReload=/bin/sh -c "/bin/kill -s HUP $(/bin/cat /var/run/nginx.pid)"
ExecStop=/bin/sh -c "/bin/kill -s TERM $(/bin/cat /var/run/nginx.pid)"

[Install]
WantedBy=multi-user.target
3.移动
[root@lb01 sbin]# mv /usr/local/nginx/sbin/nginx /usr/sbin/
4.测试是否成功
/usr/sbin/nginx -h
5.重载
systemctl daemon-reload
6.创建
[root@lb01 sbin]# mkdir /var/log/nginx
7.测试
nginx -t
8.重启
systemctl restart nginx
五:lb01部署反向代理
1.修改配置文件
[root@lb01 conf.d]# vim /etc/nginx/conf.d/game.conf
server {
    listen 80;
    server_name _;
    location / {
        proxy_pass http://172.16.1.7:80;
    }
}
2.创建软连接
[root@lb01 sbin]# ln -s /etc/nginx/nginx.conf /usr/local/nginx/conf/nginx.conf
3.测试
nginx -t
4.重启
systemctl restart nginx
5.DNS域名解析
192.168.15.5
6.网址
192.168.15.5


 浙公网安备 33010602011771号