10-RabbitMQ-整合SpringBoot
RabbitMQ整个SpringBoot
SpringBoot因其配置简单、快速开发,已经成为热门的开发之一
消息中间件的工作过程可以用生产者消费者模型来表示.即,生产者不断的向消息队列发送信息
而消费者从消息队列中消费信息.具体过程如下:
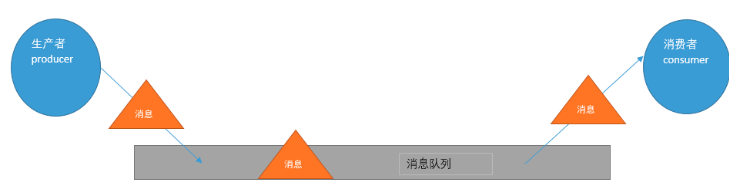
从上图可看出,对于消息队列来说,生产者,消息队列,消费者是最重要的三个概念
生产者发消息到消息队列中去,消费者监听指定的消息队列,并且当消息队列收到消息之后,
接收消息队列传来的消息,并且给予相应的处理.消息队列常用于分布式系统之间互相信息的传递.
使用SpringBoot进行整合RabbitMQ
1.pom文件的引入
这是操作RabbitMQ的starter必须要进行引入的
     <dependency>
            <groupId>org.springframework.boot</groupId>
            <artifactId>spring-boot-starter-amqp</artifactId>
        </dependency>
2.配置文件进行基础的配置
spring.rabbitmq.virtual-host=/user
spring.rabbitmq.port=5672
spring.rabbitmq.password=user
spring.rabbitmq.username=user
spring.rabbitmq.host=192.168.43.157
RabbitMQ的模式
1、direct模式
配置Queue(消息队列).那注意由于采用的是Direct模式,需要在配置Queue的时候,指定一个键
使其和交换机绑定.
DirectQueue.java
import org.springframework.amqp.core.Queue;
import org.springframework.context.annotation.Bean;
import org.springframework.context.annotation.Configuration;

@Configuration
public class DirectQueue {
   //若队列不存在则进行创建队列
   //返回的是队列名字
    @Bean
    public Queue queue(){
        return new Queue("direct_queue");
    }
}
消息生产者
Sender.java
import org.springframework.amqp.core.AmqpTemplate;
import org.springframework.beans.factory.annotation.Autowired;
import org.springframework.stereotype.Component;

@Component
public class Sender {

    @Autowired
    private AmqpTemplate amqpTemplate;

    public void send(){
        String msg = "direct_queue";
        User user = new User();
        user.setName("MrChegns");
        user.setAge(12);
        amqpTemplate.convertAndSend("direct_queue",user);
    }

}
此时发送的消息是一个User类型的对象
对于发送对象需要实现序列化接口
User.java
package com.cr.rabbitmqs.direct;
import java.io.Serializable;
public class User implements Serializable {
     private String name;
     private int age;
    public String getName() {
        return name;
    }
    public void setName(String name) {
        this.name = name;
    }
    public int getAge() {
        return age;
    }
    public void setAge(int age) {
        this.age = age;
    }
    public User(String name, int age) {this.name = name;
        this.age = age;
    }
    public User() {
    }
    @Override
    public String toString() {
        return "User{" +
                "name='" + name + '\'' +
                ", age=" + age +
                '}';
    }
}
消费者
Receive.java
import org.springframework.amqp.rabbit.annotation.RabbitListener;
import org.springframework.stereotype.Component;

@Component
public class Receive {
   //对队列进行监听
   //同时可以监听多个队列
    @RabbitListener(queues = "direct_queue")
    public void listen(User msg){
        System.out.println(msg);
    }
}
测试:
 @Autowired
    private  Sender sender;

    @Test
    public void test1(){
        sender.send();
    }
得到的结果i:

2、topic模式
首先我们看发送端,我们需要配置队列Queue,再配置交换机(Exchange)
再把队列按照相应的规则绑定到交换机上
Topic.java
import org.springframework.amqp.core.Binding;
import org.springframework.amqp.core.BindingBuilder;
import org.springframework.amqp.core.Queue;
import org.springframework.amqp.core.TopicExchange;
import org.springframework.beans.factory.annotation.Qualifier;
import org.springframework.context.annotation.Bean;
import org.springframework.context.annotation.Configuration;

@Configuration
public class Topic {

    //创建队列
    @Bean(name = "message")
    public Queue Aqueue(){
        return  new Queue("message.topic");
    }

    @Bean(name = "message1")
    public Queue BQueue(){
        return  new Queue("message.topics");
    }

    //交换机
    //若不存在则进行创建交换机
    @Bean
    public TopicExchange exchange(){
        return new TopicExchange("topic_exchange");
    }

    //交换机和队列进行绑定
    @Bean
    Binding bindingExchangeTopic(@Qualifier("message")Queue message,TopicExchange exchange){
        return BindingBuilder.bind(message).to(exchange).with("message.topic");
    }
    @Bean
    Binding bindingExchangeTopics(@Qualifier("message1")Queue message,TopicExchange exchange){
        return BindingBuilder.bind(message).to(exchange).with("message.#");
    }
}
消费者
Receive1.java
import com.cr.rabbitmqs.direct.User;
import org.springframework.amqp.rabbit.annotation.RabbitListener;
import org.springframework.stereotype.Component;

@Component
public class Receive1 {

    @RabbitListener(queues = "message.topic")
    public void tes(User user){
        System.out.println( "user1111:" + user);
    }
}
Receive2.java
import com.cr.rabbitmqs.direct.User;
import org.springframework.amqp.rabbit.annotation.RabbitListener;
import org.springframework.stereotype.Component;

@Component
public class Receive2 {

    @RabbitListener(queues = "message.topics")
    public void tes(User user){
        System.out.println("user222:" + user);
    }
}
消息生产者:
TopicSend.java
import com.cr.rabbitmqs.direct.User;
import org.springframework.amqp.core.AmqpTemplate;
import org.springframework.beans.factory.annotation.Autowired;
import org.springframework.stereotype.Component;

@Component
public class TopicSend {
    @Autowired
    private AmqpTemplate amqpTemplate;

    //发送消息
    public void send(){
        User user = new User("name",12);

        amqpTemplate.convertSendAndReceive("topic_exchange","message.dev",user);
    }

    //发送消息
    public void send1(){
User user = new User("name",12);
amqpTemplate.convertSendAndReceive("topic_exchange","message.topic",user );
}
}
在开发中这种模式的使用还是相对比较多的,此时测试的是两种方法
一个方法所有的队列都可以进行获取
一个方法只有一个队列可以获取到消息
测试:
    @Autowired
    private TopicSend topicSend;

    @Test
    public  void ttt(){
        topicSend.send();
    }

测试:
    @Autowired
    private TopicSend topicSend;

    @Test
    public  void ttt(){
        topicSend.send1();
    }

后台查看交换机和队列的绑定关系以机相关的路由键

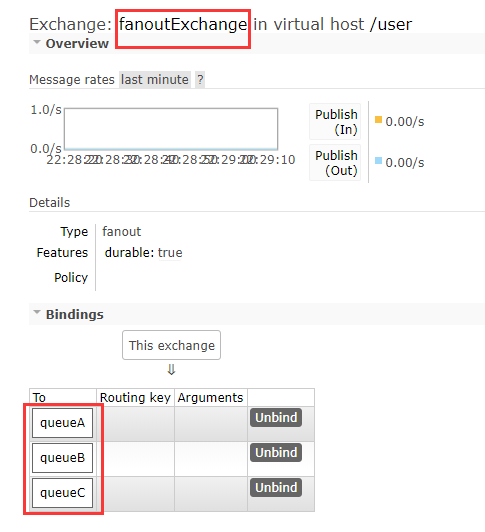
3、fanout
那前面已经介绍过了,Fanout Exchange形式又叫广播形式,因此我们发送到路由器的消息会使
得绑定到该路由器的每一个Queue接收到消息,这个时候就算指定了Key,或者规则(即上文中
convertAndSend方法的参数2),也会被忽略!那么直接上代码,发送端配置如下:
Fanout.java
import org.springframework.amqp.core.Binding;
import org.springframework.amqp.core.BindingBuilder;
import org.springframework.amqp.core.FanoutExchange;
import org.springframework.amqp.core.Queue;
import org.springframework.context.annotation.Bean;
import org.springframework.context.annotation.Configuration;

@Configuration
public class Fanout {

    //队列
    //如果队列不存在会自动创建队列
    @Bean
    public Queue queueA(){
        return new Queue("queueA");
    }

    @Bean
    public Queue queueB(){
        return new Queue("queueB");
    }

    @Bean
    public Queue queueC(){
        return new Queue("queueC");
    }

    //交换机
    //如果交换机不存在会自动创建队列
    @Bean
    public FanoutExchange fanoutExchange(){
        return new FanoutExchange("fanoutExchange");
    }

    //将交换机和队列进行绑定
    @Bean
    Binding bindingExchangequeueA(Queue queueA,FanoutExchange fanoutExchange){
        return BindingBuilder.bind(queueA).to(fanoutExchange);
    }

    @Bean
    Binding bindingExchangequeueB(Queue queueB,FanoutExchange fanoutExchange){
        return BindingBuilder.bind(queueB).to(fanoutExchange);
    }

    @Bean
    Binding bindingExchangequeueC(Queue queueC,FanoutExchange fanoutExchange){
        return BindingBuilder.bind(queueC).to(fanoutExchange);
    }
}
消费者:
FanoutReceive.java
import org.springframework.amqp.rabbit.annotation.RabbitHandler;
import org.springframework.amqp.rabbit.annotation.RabbitListener;
import org.springframework.stereotype.Component;

@Component
//监听器
@RabbitListener(queues = "queueA")
public class FanoutReceive {

    //监听的方法
    @RabbitHandler
    public void listen(String  msg){
        System.out.println("queueA" + msg);
    }


}

FanoutSender.java
import org.springframework.amqp.core.AmqpTemplate;
import org.springframework.beans.factory.annotation.Autowired;
import org.springframework.stereotype.Component;

@Component
public class FanoutSender {

    @Autowired
    private AmqpTemplate amqpTemplate;

    //发送消息
    public void send(){
        String  msg = "test fanout....";
        //发送消息:参数依次是  交换机名字--路由键(此时设置路由键没有作用)--消息
        amqpTemplate.convertAndSend("fanoutExchange","",msg);
    }
}
测试:
@RunWith(SpringRunner.class)
@SpringBootTest
public class BpptandrabbitmqApplicationTests {
    //测试fanout
    @Autowired
    private FanoutSender fanoutSender;

    @Test
    public void fanout() {
        fanoutSender.send();
    }

}
此时3个队列都能接收到消息

交换机、队列以及路由键

 浙公网安备 33010602011771号