Vue:实践学习笔记(3)——组件使用
Vue:实践学习笔记(3)——组件使用
全局注册
1.注册组件
1 2 3 | Vue.component('my-component',{//选项}) |
说明:my-component就是注册的组件自定义的标签名称,推荐使用小写加减号的形式分割命名。
2.显示组件内容
1 2 3 4 5 6 7 8 9 10 11 | <div id="app1"> <my-component></my-component></div><script> Vue.component("my-component", { template: '<div>Hello World</div>' }); var app = new Vue({ el: '#app1' })</script> |
说明:template的 DOM 结构必须被一个元素包含,如果直接写内容,不带div是无法渲染的。
局部注册
1.注册组件
1 2 3 4 5 6 7 8 9 10 11 12 13 14 | <div id="app2"> <my-component1></my-component1> </div> <script> var child ={ template:'<div>Hello World!!</div>' } var app2 = new Vue({ el:"#app2", components:{ 'my-component1':child } }) </script> |
说明:局部注册后的组件只在该实例范围内有效。
说明:组件模板会在某些条件下受到制约,比如table下只允许有tr、td、th等这些表格元素。
2.使用JS属性来挂载组件
1 2 3 4 5 6 7 8 9 10 11 12 13 14 15 16 | <div id="app1"> <!-- 使用标签加载组件 --> <my-component></my-component> <!-- 下面使用JS来挂载组件 --> <table> <tbody is='my-component'></tbody> </table></div><script> Vue.component("my-component", { template: '<div>Hello World</div>' }); var app = new Vue({ el: '#app1' })</script> |
说明:这里用到了 is 属性,用来指明挂载的组件名称,来实现动态挂载。
Data属性
1.data函数返回数据
1 2 3 4 5 6 7 8 9 10 11 12 13 | <script> Vue.component("my-component", { template: '<div>{{message}}</div>', data:function(){ return{ message:"Hello MrSaber" } } }); var app = new Vue({ el: '#app1' }) </script> |
说明:除了template属性外,还有其他属性,比如data、computed、method等。但是在使用data时,data必须是函数,然后将数据return出去。
2.注意引用实现复用
JavaScript 对象是引用关系,所以如果 return 出的对象引用了外部的一个对象,那这个对象就是共享的,任何一方修改都会同步。
1 2 3 4 5 6 7 8 9 10 11 12 13 14 15 16 17 18 19 20 21 22 | <div id="app3"> <my-component2> </my-component2> <my-component2> </my-component2> <my-component2> </my-component2> </div> <script> var data = { counter: 0 } Vue.component('my-component2', { template: '<button @click="counter++">{{counter}}</button>', data: function(){ return data; } }) var app = new Vue({ el:'#app3' }) </script> |
组件使用了 3 次 , 但是点击任意一个<button> , 3个的数字都会加 1 ,那是因为组件的 data 引用的是外部的对象,这肯定不是我们期望的效果 , 所以给组件返回一个新的 data 对象来独立 , 修改如下 :
1 2 3 4 5 6 7 8 | Vue.component('my-component2', { template: '<button @click="counter++">{{counter}}</button>', data: function(){ return { counter:0 }; } }) |
Props属性
1.基本用法
组件不仅仅要把模板的内容进行复用,更重要的是组件间要进行通信。通常父组件的模板包含子组件,父组件要正向地向子组件传递数据或参数,子组件接收到后根据参数的不同来渲染不同的内容或执行操作。这个正向传递过程要通过Pros属性进行传递。
props的值可以是两种:字符串数组或对象,此处为数组的渲染代码:
1 2 3 4 5 6 7 8 9 10 11 12 13 14 | <!--Props属性 --><div id="app4"> <!-- 使用标签加载组件 --> <my-components message='来自父组件的数据'></my-component></div><script> Vue.component("my-components", { props:['message'], template: '<div>{{message}}</div>' }); var app = new Vue({ el: '#app4' })</script> |
说明:props 中声明的数据与组件 data 函数 return 的数据主要区别就是 props 的来自父级而 data中的是组件自己的数据,作用域是组件本身。
2.关于属性驼峰的处理:
1 2 3 4 5 6 7 8 9 10 11 12 | <div id="app"> <my-component warning-text ="提示信息"></ my-component></div><script>Vue.component ('my-component', { props: ['warningText'], template:' <div>{{ warningText }} </div>'})var app =new Vue({ el:'#app'})</script> |
说明:由于HTML特性不区分大小写,当使用 DOM 模板时,驼峰命名 CcamelCase )的 props 名称要转为短横分隔命名。
3.动态获取
1 2 3 4 5 6 7 8 9 10 11 12 13 14 15 16 | <div id="app5"> <input type="text" v-model='parentMessage' /> <my-componentss :message='parentMessage'></my-componentss> </div> <script> Vue.component("my-componentss", { props: ['message'], template: '<div>{{message}}</div>' }); var app = new Vue({ el: '#app5', data: { parentMessage: '' } }) </script> |
说明:这里用 v-model 绑定了父级的数据 parentMessage,当通过输入框任意输入时,子组件接收到的 props “ message”也会实时响应,并更新组件模板。
4.传递数组
1 2 | <my-component message="[1,2,3]"></my-component><my-component :message="[1,2,3]"></my-component> |
说明:如果要传递数组话,第一个长度为7,因为被解析成字符串,第二个使用v-bind才会被解析成数组。
5.数据验证
1 2 3 4 5 6 7 8 9 10 11 12 13 14 15 16 17 18 19 20 21 22 23 24 25 26 | Vue.component ('my-component', { props { //必须是数字类型 propA : Number , //必须是字符串或数字类型 propB : [String , Number] , //布尔值,如果没有定义,默认值就是 true propC: { type : Boolean , default : true //数字,而且是必传 propD: { type: Number , required : true },//如果是数组或对象,默认值必须是一个函数来返回 propE: { type : Array , default : function () { return [] ; //自定义一个验证函数 propF: { validator : function (value) { return value > 10; } }} ) |
组件通信
1.自定义事件
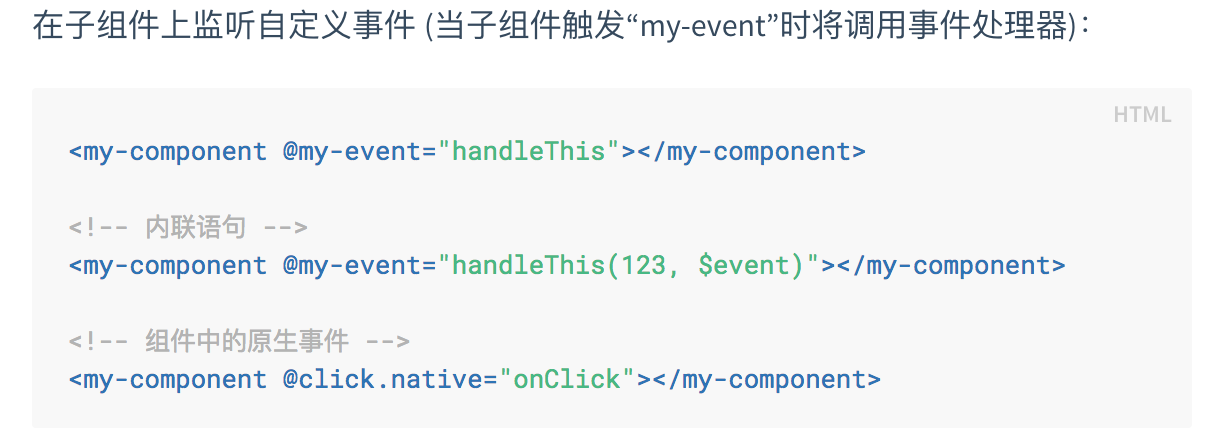
当子组件要向父组件传递数据时,需要用到自定义事件。这里我们用到的指令时v-on,用在普通元素上时,只能监听原生DOM 事件。用在自定义元素组件上时,也可以监听子组件触发的自定义事件。子组件用$emit来触发事件,父组件用$on来监听子组件的事件。
父组件也可以直接在子组件的自定义标签上使用v-on来监听子组件的触发事件.
我们先在完成一个Demo,当我们点击按钮的时候,父组件获取到子组件现在的值。示例代码如下:
1 2 3 4 5 6 7 8 9 10 11 12 13 14 15 16 17 18 19 20 21 22 23 24 25 26 27 28 29 30 31 32 33 34 35 36 | <template> <div> {{total}} <my-component @increase = "handleGetTotal"></my-component> </div></template><style></style><script> var child = { template:'<button @click="increaseNum">+1</button>', data:function(){ return {counter:0} }, methods:{ increaseNum:function() { this.counter++; this.$emit("increase",this.counter); } } }; export default { components:{ "my-component":child }, data:function(){ return {total:0} }, methods:{ handleGetTotal:function(total){ this.total =total; } } }</script> |
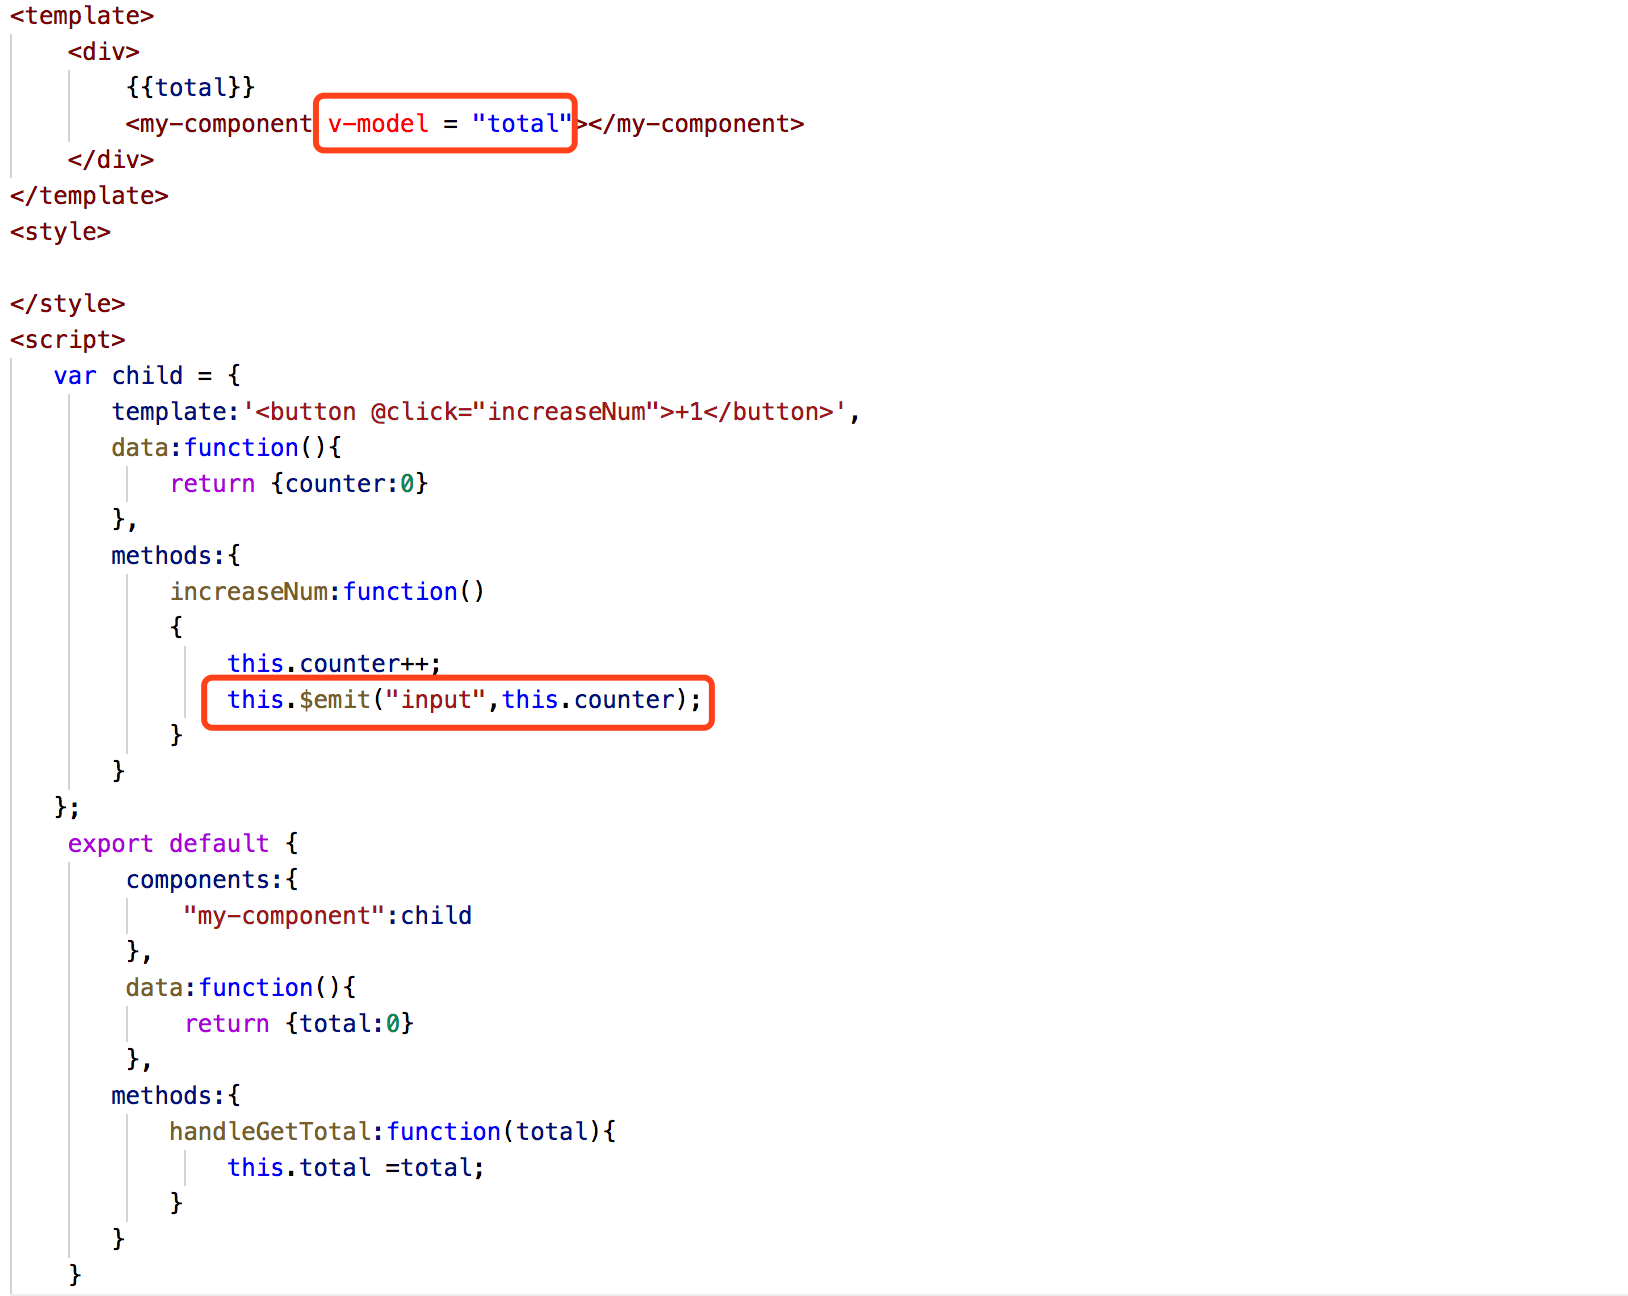
2.使用v-model
仍然是点击按钮+1的效果,不过这次组件$emit的事件名是特殊的input,在使用组件的父级,并没有在<my-component>上使用@input="handler",而是直接使用v-model绑定的一个数据total,这也可以称作一个语法糖。
说明:
下面与上面的原理一样,但是下面这种方便理解!

在Vue-CLi中使用自定义组件
到现在为止,我们已经基本梳理了组件的各个使用功能。在实际开发中,即在使用Vue脚手架的时候,需要快速引入我们的组件
首先编写组件
组件分三部门,template、style、script,此处我们用了props属性来方便父级传值。
1 2 3 4 5 6 7 8 9 10 11 12 13 14 15 16 17 18 19 20 | <template> <div class="line">{{message}}</div></template><style> .line{ height: 45px; border-bottom: 3px solid #f8f8f9; }</style><script> export default { props:['message'], data () { return { value5: '', value6: '' } } }</script> |
在Main.js中注册全局组件
1 2 3 4 5 | import blockLine from './views/components/block-line';......Vue.component('blockLine',blockLine); |
说明:
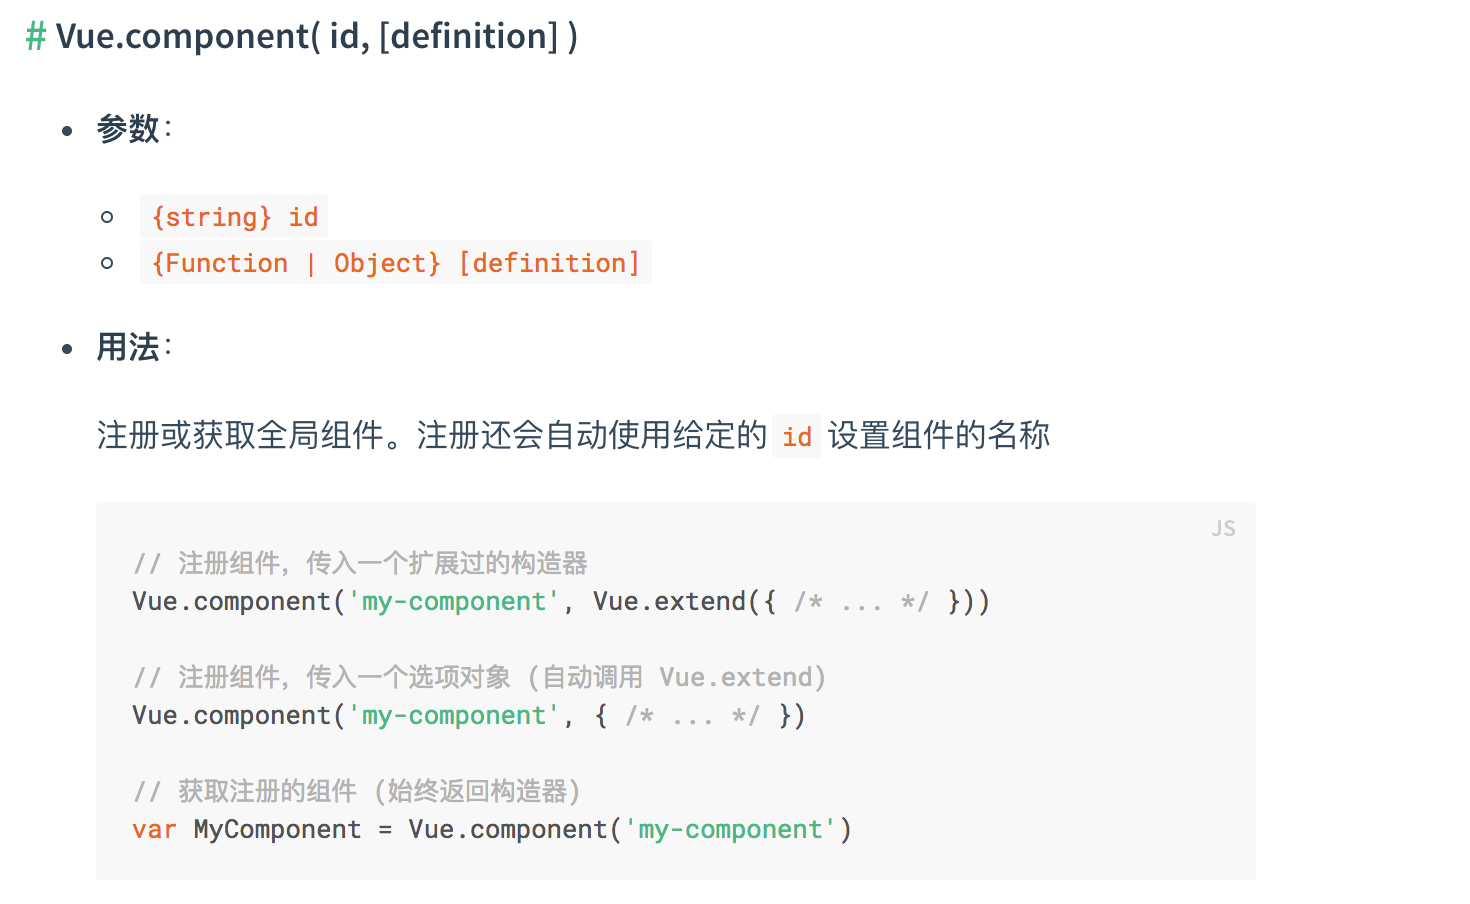
Vue.Component的API解释:
注册局部组件
其实在刚开始的时候,我们已经说了组件的注册方式分为两种,第一种是全局注册、第二种是局部注册,局部注册,我们只需要在要使用自定义组件的Vue文件中的components属性中声明即可:
1 2 3 4 5 6 7 8 9 10 11 12 13 | <script> import recomList from './recom-list.vue'; export default { data() { return { value1: 0 } }, components: { recomList } }</script> |


· 长文讲解 MCP 和案例实战
· Hangfire Redis 实现秒级定时任务,使用 CQRS 实现动态执行代码
· Android编译时动态插入代码原理与实践
· 解锁.NET 9性能优化黑科技:从内存管理到Web性能的最全指南
· 通过一个DEMO理解MCP(模型上下文协议)的生命周期
· 工良出品 | 长文讲解 MCP 和案例实战
· 多年后再做Web开发,AI帮大忙
· centos停服,迁移centos7.3系统到新搭建的openEuler
· 记一次 .NET某旅行社酒店管理系统 卡死分析
· 上周热点回顾(4.14-4.20)