
opencv学习(四):复杂的图像变换(canny边缘检测,图像金字塔,降采样)
复杂的图像变换:canny边缘检测器(图像金字塔,降采样)
借鉴:https://www.pianshen.com/article/1151552511/(讲的详细)
(1)关于图像金字塔:
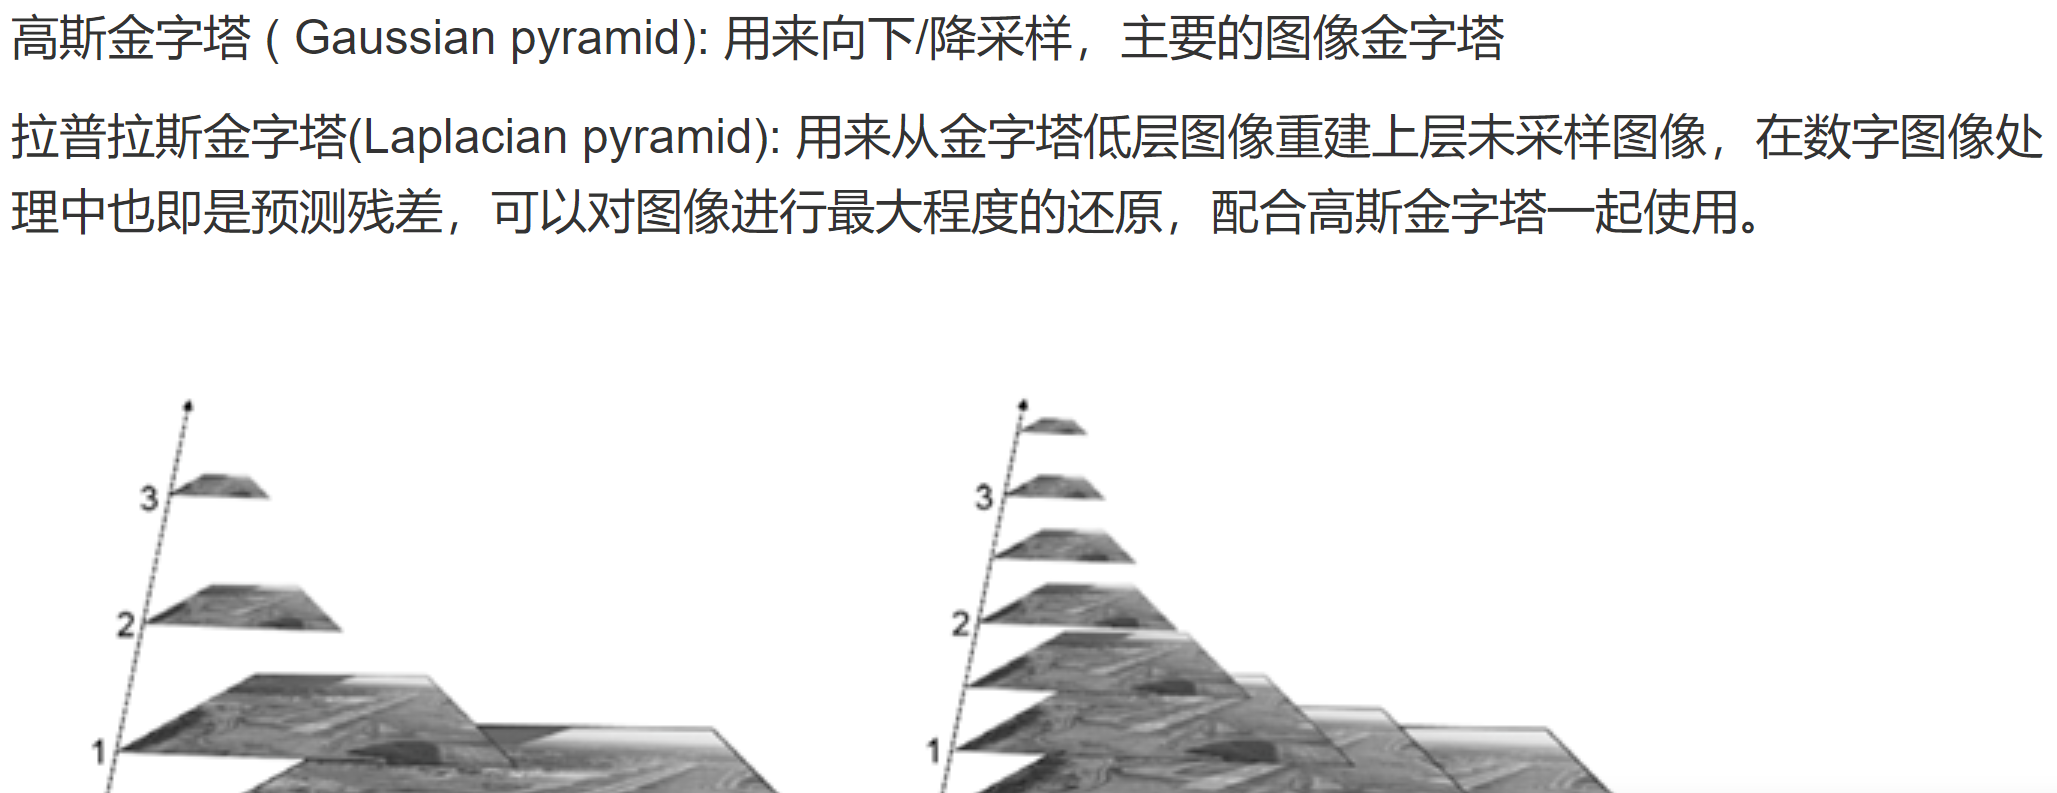
两者的简要区别:高斯金字塔用来向下降采样图像,注意降采样其实是由金字塔底部向上采样,分辨率降低,它和我们理解的金字塔概念相反(注意);而拉普拉斯金字塔则用来从金字塔底层图像中向上采样重建一个图像。
具体见:https://blog.csdn.net/zhu_hongji/article/details/81536820
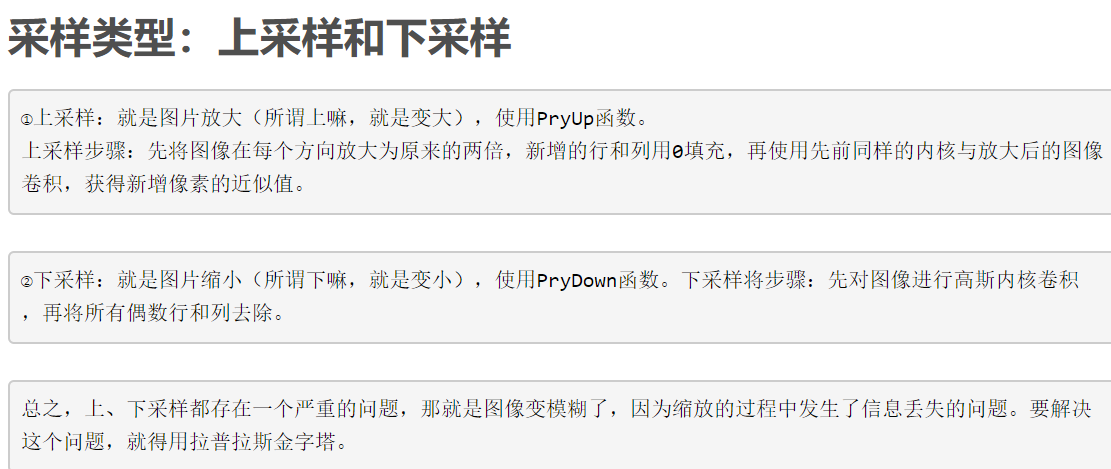
(2)关于上下采样:
(3)canny边缘检测:
1 2 3 4 5 6 7 8 9 10 11 12 13 14 15 16 17 18 19 20 21 22 23 24 25 26 27 28 29 30 31 32 33 34 35 36 37 38 39 40 41 42 43 44 45 46 47 48 49 50 51 52 53 54 55 56 57 58 59 60 61 62 63 64 65 66 67 68 69 70 71 72 73 74 75 76 77 78 79 80 81 82 83 84 85 86 87 88 89 90 91 92 93 94 95 96 97 98 99 100 101 102 103 104 105 106 107 108 109 110 111 112 113 114 115 116 117 118 119 120 121 122 123 124 125 126 127 128 129 130 131 132 133 134 135 136 137 138 139 140 141 142 143 144 145 146 147 148 149 150 151 152 153 154 155 156 157 158 159 160 161 162 163 164 165 166 167 168 169 170 171 172 173 174 175 176 177 178 179 180 181 182 183 184 185 186 187 188 189 190 191 192 193 194 195 196 197 198 199 200 201 202 203 204 205 206 207 208 209 210 211 212 213 214 215 216 217 218 219 220 221 222 223 224 225 226 227 228 229 230 231 232 233 234 235 236 237 238 239 240 241 242 243 244 245 246 247 248 249 250 251 252 253 254 255 256 257 258 259 260 261 262 263 264 265 266 267 268 269 270 271 272 273 274 275 276 277 278 279 280 281 282 283 284 285 286 287 288 289 290 291 292 293 294 295 296 297 298 299 300 301 302 303 | #include <iostream>#include "opencv2/opencv.hpp"using namespace std;using namespace cv;/*生成高斯卷积核 kernel*/void Gaussian_kernel(int kernel_size, int sigma, Mat& kernel){ const double PI = 3.1415926; int m = kernel_size / 2; kernel = Mat(kernel_size, kernel_size, CV_32FC1); float s = 2 * sigma * sigma; for (int i = 0; i < kernel_size; i++) { for (int j = 0; j < kernel_size; j++) { int x = i - m; int y = j - m; kernel.at<float>(i, j) = exp(-(x * x + y * y) / s) / (PI * s); } }}/*计算梯度值和方向imageSource 原始灰度图imageX X方向梯度图像imageY Y方向梯度图像gradXY 该点的梯度幅值pointDirection 梯度方向角度*/void GradDirection(const Mat imageSource, Mat& imageX, Mat& imageY, Mat& gradXY, Mat& theta){ imageX = Mat::zeros(imageSource.size(), CV_32SC1); imageY = Mat::zeros(imageSource.size(), CV_32SC1); gradXY = Mat::zeros(imageSource.size(), CV_32SC1); theta = Mat::zeros(imageSource.size(), CV_32SC1); int rows = imageSource.rows; int cols = imageSource.cols; int stepXY = imageX.step; int step = imageSource.step; /* Mat.step参数指图像的一行实际占用的内存长度, 因为opencv中的图像会对每行的长度自动补齐(8的倍数), 编程时尽量使用指针,指针读写像素是速度最快的,使用at函数最慢。 */ uchar* PX = imageX.data; uchar* PY = imageY.data; uchar* P = imageSource.data; uchar* XY = gradXY.data; for (int i = 1; i < rows - 1; i++) { for (int j = 1; j < cols - 1; j++) { int a00 = P[(i - 1) * step + j - 1]; int a01 = P[(i - 1) * step + j]; int a02 = P[(i - 1) * step + j + 1]; int a10 = P[i * step + j - 1]; int a11 = P[i * step + j]; int a12 = P[i * step + j + 1]; int a20 = P[(i + 1) * step + j - 1]; int a21 = P[(i + 1) * step + j]; int a22 = P[(i + 1) * step + j + 1]; double gradY = double(a02 + 2 * a12 + a22 - a00 - 2 * a10 - a20); double gradX = double(a00 + 2 * a01 + a02 - a20 - 2 * a21 - a22); //PX[i*stepXY + j*(stepXY / step)] = abs(gradX); //PY[i*stepXY + j*(stepXY / step)] = abs(gradY); imageX.at<int>(i, j) = abs(gradX); imageY.at<int>(i, j) = abs(gradY); if (gradX == 0) { gradX = 0.000000000001; } theta.at<int>(i, j) = atan(gradY / gradX) * 57.3; theta.at<int>(i, j) = (theta.at<int>(i, j) + 360) % 360; gradXY.at<int>(i, j) = sqrt(gradX * gradX + gradY * gradY); //XY[i*stepXY + j*(stepXY / step)] = sqrt(gradX*gradX + gradY*gradY); } } convertScaleAbs(imageX, imageX); convertScaleAbs(imageY, imageY); convertScaleAbs(gradXY, gradXY);}/*局部非极大值抑制沿着该点梯度方向,比较前后两个点的幅值大小,若该点大于前后两点,则保留,若该点小于前后两点任意一点,则置为0;imageInput 输入得到梯度图像imageOutput 输出的非极大值抑制图像theta 每个像素点的梯度方向角度imageX X方向梯度imageY Y方向梯度*/void NonLocalMaxValue(const Mat imageInput, Mat& imageOutput, const Mat& theta, const Mat& imageX, const Mat& imageY){ imageOutput = imageInput.clone(); int cols = imageInput.cols; int rows = imageInput.rows; for (int i = 1; i < rows - 1; i++) { for (int j = 1; j < cols - 1; j++) { if (0 == imageInput.at<uchar>(i, j))continue; int g00 = imageInput.at<uchar>(i - 1, j - 1); int g01 = imageInput.at<uchar>(i - 1, j); int g02 = imageInput.at<uchar>(i - 1, j + 1); int g10 = imageInput.at<uchar>(i, j - 1); int g11 = imageInput.at<uchar>(i, j); int g12 = imageInput.at<uchar>(i, j + 1); int g20 = imageInput.at<uchar>(i + 1, j - 1); int g21 = imageInput.at<uchar>(i + 1, j); int g22 = imageInput.at<uchar>(i + 1, j + 1); int direction = theta.at<int>(i, j); //该点梯度的角度值 int g1 = 0; int g2 = 0; int g3 = 0; int g4 = 0; double tmp1 = 0.0; //保存亚像素点插值得到的灰度数 double tmp2 = 0.0; double weight = fabs((double)imageY.at<uchar>(i, j) / (double)imageX.at<uchar>(i, j)); if (weight == 0)weight = 0.0000001; if (weight > 1) { weight = 1 / weight; } if ((0 <= direction && direction < 45) || 180 <= direction && direction < 225) { tmp1 = g10 * (1 - weight) + g20 * (weight); tmp2 = g02 * (weight)+g12 * (1 - weight); } if ((45 <= direction && direction < 90) || 225 <= direction && direction < 270) { tmp1 = g01 * (1 - weight) + g02 * (weight); tmp2 = g20 * (weight)+g21 * (1 - weight); } if ((90 <= direction && direction < 135) || 270 <= direction && direction < 315) { tmp1 = g00 * (weight)+g01 * (1 - weight); tmp2 = g21 * (1 - weight) + g22 * (weight); } if ((135 <= direction && direction < 180) || 315 <= direction && direction < 360) { tmp1 = g00 * (weight)+g10 * (1 - weight); tmp2 = g12 * (1 - weight) + g22 * (weight); } if (imageInput.at<uchar>(i, j) < tmp1 || imageInput.at<uchar>(i, j) < tmp2) { imageOutput.at<uchar>(i, j) = 0; } } }}/*双阈值的机理是:指定一个低阈值A,一个高阈值B,一般取B为图像整体灰度级分布的70%,且B为1.5到2倍大小的A;灰度值小于A的,置为0,灰度值大于B的,置为255;*/void DoubleThreshold(Mat& imageInput, const double lowThreshold, const double highThreshold){ int cols = imageInput.cols; int rows = imageInput.rows; for (int i = 0; i < rows; i++) { for (int j = 0; j < cols; j++) { double temp = imageInput.at<uchar>(i, j); temp = temp > highThreshold ? (255) : (temp); temp = temp < lowThreshold ? (0) : (temp); imageInput.at<uchar>(i, j) = temp; } }}/*连接处理:灰度值介于A和B之间的,考察该像素点临近的8像素是否有灰度值为255的,若没有255的,表示这是一个孤立的局部极大值点,予以排除,置为0;若有255的,表示这是一个跟其他边缘有“接壤”的可造之材,置为255,之后重复执行该步骤,直到考察完之后一个像素点。其中的邻域跟踪算法,从值为255的像素点出发找到周围满足要求的点,把满足要求的点设置为255,然后修改i,j的坐标值,i,j值进行回退,在改变后的i,j基础上继续寻找255周围满足要求的点。当所有连接255的点修改完后,再把所有上面所说的局部极大值点置为0;(算法可以继续优化)。参数1,imageInput:输入和输出的梯度图像参数2,lowTh:低阈值参数3,highTh:高阈值*/void DoubleThresholdLink(Mat& imageInput, double lowTh, double highTh){ int cols = imageInput.cols; int rows = imageInput.rows; for (int i = 1; i < rows - 1; i++) { for (int j = 1; j < cols - 1; j++) { double pix = imageInput.at<uchar>(i, j); if (pix != 255)continue; bool change = false; for (int k = -1; k <= 1; k++) { for (int u = -1; u <= 1; u++) { if (k == 0 && u == 0)continue; double temp = imageInput.at<uchar>(i + k, j + u); if (temp >= lowTh && temp <= highTh) { imageInput.at<uchar>(i + k, j + u) = 255; change = true; } } } if (change) { if (i > 1)i--; if (j > 2)j -= 2; } } } for (int i = 0; i < rows; i++) { for (int j = 0; j < cols; j++) { if (imageInput.at<uchar>(i, j) != 255) { imageInput.at<uchar>(i, j) = 0; } } }}int main(){ Mat image = imread("001.jpg"); imshow("origin image", image); //转换为灰度图 Mat grayImage; cvtColor(image, grayImage, CV_RGB2GRAY); imshow("gray image", grayImage); //高斯滤波 Mat gausKernel; int kernel_size = 5; double sigma = 1; Gaussian_kernel(kernel_size, sigma, gausKernel); Mat gausImage; filter2D(grayImage, gausImage, grayImage.depth(), gausKernel); imshow("gaus image", gausImage); //计算XY方向梯度 Mat imageX, imageY, imageXY; Mat theta; GradDirection(grayImage, imageX, imageY, imageXY, theta); imshow("XY grad", imageXY); //对梯度幅值进行非极大值抑制 Mat localImage; NonLocalMaxValue(imageXY, localImage, theta, imageX, imageY);; imshow("Non local maxinum image", localImage); //双阈值算法检测和边缘连接 DoubleThreshold(localImage, 60, 100); DoubleThresholdLink(localImage, 60, 100); imshow("canny image", localImage); Mat temMat; Canny(image, temMat, 60, 100); imshow("opencv canny image", temMat); waitKey(0); return 0;} |
https://blog.csdn.net/u010551600/article/details/80739610大佬的代码,画个饼,以后再学(没有数字图像处理基础)


【推荐】国内首个AI IDE,深度理解中文开发场景,立即下载体验Trae
【推荐】编程新体验,更懂你的AI,立即体验豆包MarsCode编程助手
【推荐】抖音旗下AI助手豆包,你的智能百科全书,全免费不限次数
【推荐】轻量又高性能的 SSH 工具 IShell:AI 加持,快人一步
· TypeScript + Deepseek 打造卜卦网站:技术与玄学的结合
· 阿里巴巴 QwQ-32B真的超越了 DeepSeek R-1吗?
· 如何调用 DeepSeek 的自然语言处理 API 接口并集成到在线客服系统
· 【译】Visual Studio 中新的强大生产力特性
· 2025年我用 Compose 写了一个 Todo App