NS2的整体实现
1. NS 的整体实现
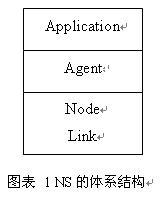
固定网络的仿真是通过下面三层合作来实现的。

Application 这个层是实现数据流的层次。 Agent 这个层是实现所有各层协议的的层次。 Node 这个部分由多个分类器( Classifier)实现了所有接收数据包进行判断是否进行转发或接收到 Agent 的部分。 Link 实现了队列、时延、 Agent 、记录 Trace 等一系列的仿真问题。
2.
|
TclObject |
|
Handler |
|
ParentNode |
|
Process |
|
NsObject |
|
Node |
|
Application |
|
Connector |
|
Classifier |
|
Delay |
|
Queue |
|
Agent |
|
Trace |
|
AddressClassifier |
|
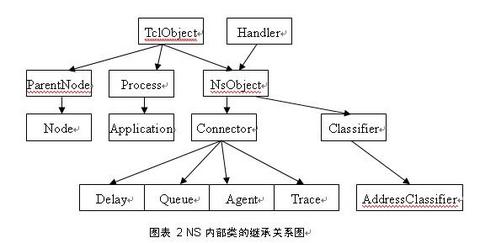
图表 2 NS 内部类的继承关系图 |

此图为 NS 内部类的继承关系,可以看出一些类是由那些类继承来的,这样相同的属性调用的函数就可以很方便的找到出处。
3.NS 中函数调用的分层
在用 gdb 跟踪 NS 发送一个 cbr 数据包的过程可以看到一下顺序:
CBR_Traffic::start
TrafficGenerator::timeout
Application::send
UdpAgent::sendmsg
Classifier::recv
Connect::recv
Connect::send
Trace::recv 写一条数据包加入队列的记录
Connector::send
Queue::recv
DropTail::enque
DequeTrace::recv 写一条数据包弹出队列的记录
Connector::send
LinkDelay::recv 插入事件到 scheduler
Scheduler::dispatch
Scheduler::run
从上面的顺序可以看出,数据包在发送以后先通过应用层( Application::send )进行发送;然后通过 Agent 层(UdpAgent::sendmsg ), UdpAgent 是在初始化 Agent 的时候确定的。 UdpAgent 还有一个作用是生成相应的数据包;然后进入 Node 部分的分类器 Classifier ( Classifier::recv ),通过 find ()函数返回下一跳地址。这个函数是通过读取 Packet 的内容得到下一跳地址的,返回给 recv 函数后调用 node->recv() 进入 connector ;经过 connector::recv 和 connector::send 后确定数据包可发,进入 Trace::recv ,记录这个数据包加入队列的记录;之后通过 connector::send ,进入 Queue::recv 函数,将数据包正式加入发送队列,再根据已经设定好的方法确定加入队列是否成功,是否要被丢弃;再调用 DequeTrace::recv 记录数据包弹出队列的记录;再通过 connector::send 进入LinkDelay::recv ,先判断目的节点是否可达,根据不同的结果将事件写入 scheduler ,等待按序执行。
上述的过程只是一个数据包从生成到发送出去的过程,因为 NS 是一个根据一个一个离散事件调度执行的,后面的过程用 gdb 跟不进去。但可以看出,数据包是发送给下一跳节点,可知数据包是通过每个中间节点的。
4.NS 中主要函数的分析
4.1.CBR 数据源
开始从下面函数进入 CBR 数据源发送:
 1 void CBR_Traffic::start()
 2
 3 {
 4
 5         init();   // 初始化
 6
 7         running_ = 1;
 8
 9         timeout();   // 进入发送数据的循环
10
11 }
12
13 void TrafficGenerator::timeout()
14
15 {
16
17         if (! running_)   // 判断是否要发送数据
18
19              return;
20
21
22
23       /* send a packet */
24
25       send(size_);    // 发送一个设定好大小的数据包
26
27       /* figure out when to send the next one */
28
29       nextPkttime_ = next_interval(size_);
30
31       /* schedule it */
32
33       if (nextPkttime_ > 0)
34
35              timer_.resched(nextPkttime_);
36
37       else
38
39              running_ = 0;
40
41 }
4.2. 中间几个函数只是体现分层
 1 void Application::send(int nbytes)
 2
 3 {
 4
 5       agent_->sendmsg(nbytes);
 6
 7 }
 8
 9 void Agent::sendmsg(int /*sz*/, AppData* /*data*/, const char* /*flags*/)
10
11 {
12
13       fprintf(stderr,
14
15       "Agent::sendmsg(int, AppData*, const char*) not implemented/n");
16
17       abort();
18
19 }
上述两个函数其实并没有什么实质的操作,只是这样可以看出其经过了应用层和 Agent 层。
4.3. Classifier 的函数
 1 void Classifier::recv(Packet* p, Handler*h)
 2
 3 {
 4
 5       NsObject* node = find(p);   // 查找目的节点
 6
 7       if (node == NULL) {  // 只要返回了目的节点就调用节点的 recv 函数
 8
 9              /*
10
11                * 这个将被丢弃,不用记录在 trace 文件中
12
13                */
14
15              Packet::free(p);
16
17              return;
18
19       }
20
21       node->recv(p,h);
22
23 }
24
25 NsObject* Classifier::find(Packet* p)
26
27 {
28
29       NsObject* node = NULL;
30
31       int cl = classify(p);  // 根据发送的 packet 的记录找到 slot
32
33       if (cl < 0 || cl >= nslot_ || (node = slot_[cl]) == 0) { // 根据 slot 得到下一跳 node
34
35              if (default_target_)
36
37                     return default_target_;
38
39              /*
40
41                * 不能将数据包发送出去,因为返回结果不是一个对象 .
42
43                */
44
45              Tcl::instance().evalf("%s no-slot %ld", name(), cl);
46
47              if (cl == TWICE) {
48
49                     /*
50
51                       * Try again.  Maybe callback patched up the table.
52
53                       */
54
55                     cl = classify(p);
56
57                     if (cl < 0 || cl >= nslot_ || (node = slot_[cl]) == 0)
58
59                            return (NULL);
60
61              }
62
63       }
64
65       return (node); // 返回给 classifier::recv 得到的 node 的值
66
67 }
这个地址分类器就是根据数据包的内容,通过偏移查找接收的节点,然后调用接收节点的 recv 函数。而 find 函数是根据数据包的内容得到 slot 的值从而查询出谁是接收方的 node 。
4.4. Connector 的函数
1 void Connector::recv(Packet* p, Handler* h)
2
3 {
4
5       send(p, h);
6
7 }
8
9 inline void send(Packet* p, Handler* h) { target_->recv(p, h); }
connector 的 recv 和 send 函数是一个接口。这个函数中最重要的是 target_ 这个值,这个值的不同会不同的调用 Trace::recv 、Queue::recv 、 LinkDelay::recv 等等,但是这个值在那确定还没有看出来。
4.5. Queue 的函数
 1 void Queue::recv(Packet* p, Handler*)
 2
 3 {
 4
 5       double now = Scheduler::instance().clock();
 6
 7       enque(p);   // 根据规定的规则加入队列
 8
 9       if (!blocked_) {
10
11              /*
12
13                * 这里没有堵塞 .  将一个数据包发送出去 .
14
15                * 我们执行一个附加的检查,因为这个队列可能丢弃这个数据包
16
17                * 即使它前面是空的。   ( 例如 , RED 队列就可能发生 .)
18
19                */
20
21              p = deque();
22
23              if (p != 0) {
24
25                     utilUpdate(last_change_, now, blocked_);
26
27                     last_change_ = now;
28
29                     blocked_ = 1;
30
31                     target_->recv(p, &qh_);  // 调用 dequetrace
32
33              }
34
35       }
36
37 }
Queue::recv 这个函数调用 DropTail 规则将数据包加入队列,然后判断是否堵塞,如果没有则发送一个数据包,之前判断是认定这个包是否要被发送出去。这里也使用了 target_->recv() ,这里调用的是 DequeTrace::recv 函数,将记录一个数据包出队列的记录。
4.6. LinkDelay 的函数
 1 void LinkDelay::recv(Packet* p, Handler* h)
 2
 3 {
 4
 5       double txt = txtime(p);
 6
 7       Scheduler& s = Scheduler::instance();
 8
 9       if (dynamic_) { // 这个是动态链路的标志,判断这个值确定链路是否为 动态链
10
11              Event* e = (Event*)p;
12
13              e->time_= txt + delay_;
14
15              itq_->enque(p); // 用一个队列来储存数据包
16
17              s.schedule(this, p, txt + delay_);
18
19       } else if (avoidReordering_) {
20
21              // 预防重新安排带宽或时延改变
22
23              double now_ = Scheduler::instance().clock();
24
25              if (txt + delay_ < latest_time_ - now_ && latest_time_ > 0) {
26
27                     latest_time_+=txt;
28
29                     s.schedule(target_, p, latest_time_ - now_ );// 在 schedule 里面加入事件
30
31              } else {
32
33                     latest_time_ = now_ + txt + delay_;
34
35                     s.schedule(target_, p, txt + delay_); // 在 schedule 里面加入事件
36
37              }
38
39
40
41       } else {
42
43              s.schedule(target_, p, txt + delay_); // 在 schedule 里面加入事件
44
45       }
46
47       s.schedule(h, &intr_, txt); // 在 schedule 里面加入事件
48
49 }
这个函数非常重要,这个是数据包最后离开这个节点的出口,由这个函数写一个事件加入 schedule ,在一定的时间后调用。
本文来自博客园,作者:Mr-xxx,转载请注明原文链接:https://www.cnblogs.com/MrLiuZF/p/13959641.html

