Scrapy elasticsearch 使用示例
1.安装elasticsearch-dsl 包
pip3 install elasticsearch-dsl
2.创建scrapy 项目
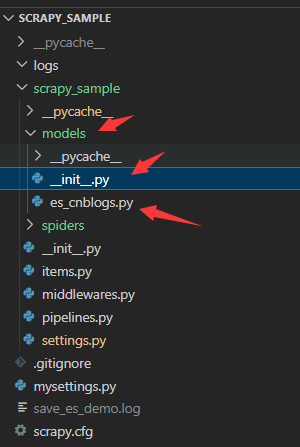
在项目结构中创建一个models文件夹, 有二个py文件,一个是__init__.py空文件,一个es操作的es_cnblogs.py文件

3. es_cnblogs.py文件代码如下
from datetime import datetime
from elasticsearch_dsl import Document, Date, Nested, Boolean, InnerDoc, Completion, Keyword, Text, Integer,query
from elasticsearch_dsl import Search
from elasticsearch_dsl.connections import connections
from mysettings  import get_setting

index_name="scrapy_cnblogs"
client =connections.create_connection(hosts=get_setting("ES_HOST_PORT") ,http_auth=get_setting("ES_HTTP_AUTH"))
#创建document实例
cnblogs_search=Search(using=client,index=index_name)

#继承了es的Document
class CnblogsType(Document):
    title=Text(analyzer="ik_max_word")
    author=Keyword()
    viewcount=Integer()
    createtime=Date()
    updatetime=Date()

    class Index:
        name=index_name
        settings = {
          "number_of_shards": 1,
          "number_of_replicas":1
        }

    #判断文章是否存在,返回True或False
    def exist_some_title(self):
      print(f"exist_some_title:{self.title}")
      s=cnblogs_search.query("match",title=self.title)
      #执行count查询,返回数字 https://elasticsearch-dsl.readthedocs.io/en/latest/api.html?highlight=count#elasticsearch_dsl.Search.count
      count=s.count()
      #三元表达式,大于0返回True
      return True if count>0 else False

    #获取相同title的es源数据
    def get_some_title(self):
      s=cnblogs_search.query("match",title=self.title)
      #执行搜索并返回Response包装所有数据的实例。
      res=s.execute()
      total = res.hits.total
      print('total hits', total.relation, total.value)
      #这里的hits下的hits是es返回的josn格式。可以在kibana中执行scrapy_cnblogs/_search命令查看
      hits=res.hits.hits
      return hits;

    def mysave(self):
        if self.exist_some_title()==True:
          print('更新文章,viewcount会有变化')
          hits=self.get_some_title()
          self.meta.id=hits[0]["_id"]
          print(hits[0])
          self.createtime=hits[0]['_source']['createtime']
          self.updatetime=datetime.now()
          self.save()
        else:
            print('新增')
            #如果文档不存在,则创建它,否则将覆盖它。
            self.createtime=datetime.now()
            self.save();


#init 创建索引并填充映射
CnblogsType.init()
其中ES_HOST_PORT 与ES_HTTP_AUTH 是es的数据库连接地址和用户名密码
4.创建scrapy的item数据结构
在items.py文件中,添加一个CnblogsItem的数据类,相当于c#的model类
class CnblogsItem(scrapy.Item):
    title=scrapy.Field()
    author=scrapy.Field()
    viewcount=scrapy.Field()
5.在pipelines.py文件中添加es代码如下
首先导入es_cnblogs.py文件中CnblogsType类
接着创建ElasticSearchPipeline 中间件类,将item(CnblogsItem)数据赋值给esmodel
调用CnblogsType类的mysave()方法将数据保存到es的scrapy_cnblogs索引中
#定义一个item pipeline,CnblogsType继承了es的Document类
from  .models.es_cnblogs  import CnblogsType
class ElasticSearchPipeline:
    def process_item(self, item, spider):
        cnblog=CnblogsType()
        cnblog.title=item['title']
        cnblog.author=item['author']
        cnblog.viewcount=item['viewcount']
        cnblog.mysave()
        return item
6.创建spider抓取类
将抓取的数据存入CnblogsItem结构中,并返回。 同时使用自定义设置,启用ElasticSearchPipeline中间件
import scrapy
from scrapy_sample.items import CnblogsItem

#此示例中解析保存到es中,这里使用pipelines方式实现es保存
#1.这里直接返回item
#2.在pipelines.py中定义一个类ElasticSearchPipeline,用来保存
#3.在settings.py中启动ITEM_PIPELINES节点,指定该Pipeline用来激活项目管道

class EsDemoSpider(scrapy.Spider):
    name = 'save_es_demo'
    allowed_domains = ['cnblogs.com']
    start_urls = ['https://www.cnblogs.com/SunSpring/p/16193997.html']

    def parse(self, response):
        #w 代表如果文件已存在就覆盖
        item=CnblogsItem()
        item['title']=response.xpath('//a[@id="cb_post_title_url"]/span/text()').get()
        item['author']=response.xpath('//a[@id="Header1_HeaderTitle"]/text()').get()
        item['viewcount']= response.xpath('//span[@id="post_view_count"]/text()').get()
        yield item

    custom_settings = {
        'LOG_FILE': "save_es_demo.log",
        'ITEM_PIPELINES':{'scrapy_sample.pipelines.ElasticSearchPipeline':301}
    }
elasticsearch-dsl-py源码:https://github.com/elastic/elasticsearch-dsl-py
elasticsearch-dsl-py文档:https://elasticsearch-dsl.readthedocs.io/en/latest/
