jenkins Pipeline构建.net core 持续集成 CI 简单示例(6)
介绍
第3章中,jenkins配置了腾讯工蜂的仓库,在此基础上用pipeline来构建.net core的示例,此示例只是演示,真实的生产环境下构建还需要补充和完善。
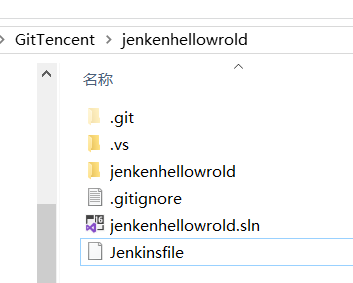
项目结构目录如下所示:

下面是Jenkinsfile文件的配置
pipeline {
    agent any
    options{
     //pipeline超时时间
     timeout(time:10, unit:'MINUTES')
     //pipeline重试次数
     retry(1)
     //同一个pipeline,禁止同时执行
     disableConcurrentBuilds()
     //daysToKeepStr保持构建的天数,numToKeepStr保持构建的最大个数
     buildDiscarder logRotator(artifactDaysToKeepStr: '', artifactNumToKeepStr: '', daysToKeepStr: '3', numToKeepStr: '10')
    }
    stages {
        stage('Checkout') {
            steps {
               //restore会从解决方案或项目的根目录寻找 NuGet.config 文件,如果找不到,则会使用全局的 NuGet.config,也可以自己指定NuGet.config路径
               //还可以是还原项目如:dotnet ./jenkenhellowrold/jenkenhellowrold.csproj
               //-nowarn不显示警告
               bat 'dotnet restore -nowarn:msb3202,nu1503,cs1591 jenkenhellowrold.sln'
               //清理解决方案中所有生成的文件,如obj和bin件
               bat 'dotnet clean --nologo jenkenhellowrold.sln'
            }
        }
        stage('Build'){
            steps{
                //生成项目及其所有依赖项
                bat 'dotnet build -nowarn:msb3202,nu1503,cs1591 --no-restore jenkenhellowrold.sln'
            }
        }
        stage('Publish'){
            steps{
                 //--nologo不显示启动版权标志或版权消息,。netcore 3.0可用
                 //-o|--output 输出指定的目录
                 //-c|--configuration 指定是Debug或Release
                 bat 'dotnet publish --nologo -nowarn:msb3202,nu1503,cs1591 --no-restore  ./jenkenhellowrold/jenkenhellowrold.csproj -c Release  -o C:/JenkinsBuilds/'+env.JOB_NAME+'/'+env.BUILD_NUMBER
            }
        }
    }
    post{
        failure{
            echo '执行失败需要发送邮件'
        }
        success
        {
            echo '执行成功时需要发送邮件'
        }
    }
}
在jenkins中构建后,输出日志,拿 出了重要信息如下所示:
Started by user hushaoren
Obtained Jenkinsfile from git git@git.code.tencent.com:Studies/pipeline-hello-world.git
[Pipeline] Start of Pipeline
[Pipeline] node
Running on Jenkins in C:\Users\AndyH\AppData\Local\Jenkins\.jenkins\workspace\pipeline-hello-world
1. 源代码拉取后,放在了 C:\Users\AndyH\AppData\Local\Jenkins\.jenkins\workspace\pipeline-hello-world 下,后面的所有dotnet命令都是执行此目录的文件。
构建成功后,发布的文件在C:/JenkinsBuilds(文件夹是自动创建的),如下所示:

分类:
jenkins


【推荐】国内首个AI IDE,深度理解中文开发场景,立即下载体验Trae
【推荐】编程新体验,更懂你的AI,立即体验豆包MarsCode编程助手
【推荐】抖音旗下AI助手豆包,你的智能百科全书,全免费不限次数
【推荐】轻量又高性能的 SSH 工具 IShell:AI 加持,快人一步
· 无需6万激活码!GitHub神秘组织3小时极速复刻Manus,手把手教你使用OpenManus搭建本
· C#/.NET/.NET Core优秀项目和框架2025年2月简报
· Manus爆火,是硬核还是营销?
· 一文读懂知识蒸馏
· 终于写完轮子一部分:tcp代理 了,记录一下
2018-11-30 redis 系列17 持久化 AOF