【转】代码控制UI,View
【转】Android 步步为营 第5营 代码控制UI,View
在前面的几讲中,我们都是使用xml layout 来去控制UI组件,其实我们也可以完全抛开XML,用纯代码来控制我们的界面UI。
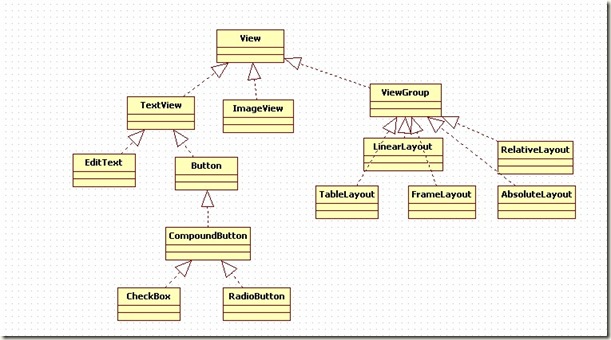
回顾我们学过的,遇到过的UI组件,有容器类的Layout:LinearLayout,RelativeLayout等, 也有视图类UI:TextView, EditText, Button, ImageView等。对应到代码中,我们会发现,他们都是View子类,具体关系如下:
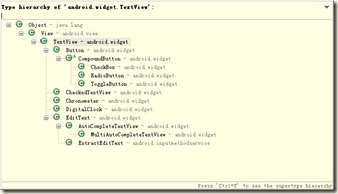
Tips:在Eclipse中,可以用Ctrl+T键来查看某个类的类层次关系:
ViewGroup 与View 的关系,是一个典型的“组合”设计模式。
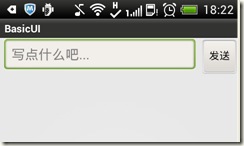
我们来用代码,实现一个简单的UI布局:
只有一个EditText和一个Button, 看看代码是怎么写的:
public class MainActivity extends Activity {

    @Override
    protected void onCreate(Bundle savedInstanceState) {
        super.onCreate(savedInstanceState);

        LinearLayout container = new LinearLayout(this);
        container.setOrientation(LinearLayout.HORIZONTAL);

        this.setContentView(container);

        EditText content = new EditText(this);
        content.setHint("写点什么吧...");
        Button submit = new Button(this);
        submit.setText("发送");

        container.addView(content);
        container.addView(submit);

    }
}
我们来分析一下代码,
不管LinearLayout, EditText 还是Button, 他们的构造函数都是this. 其实查看源码后我们发现,所有的View及其子类的构造都至少包含三个构造方法:
public View(Context context)

public View(Context context, AttributeSet attrs)

public View(Context context, AttributeSet attrs, int defStyle)
后两个是为XML layout 定义的,用代码创建View时,一般都是用第一个构造函数,这里用this, 是因为Activity其实就是Context的子类。
this.setContentView()这个方法,以前我们都是传一个R.layout进去,其实它有多个重载,也可以直接传入根视图View。
这里的线性布局container 就是根视图(容器视图),要往容器视图里面添加View,使用addView方式,addView 方法有几个重载版本:
public void addView(View child)
public void addView(View child, int index)
public void addView(View child, int index, LayoutParams params)
public void addView(View child, int width, int height)
public void addView(View child, LayoutParams params)
LayoutParams 我们之后会讲到。
总结一下,用代码添加UI组件的步骤是:
- New 组件对应的类;
- 把它添加到父容器中。
运行结果就如上图的一样。你也许会想到,不是说width, height是必须的吗?怎么没有设置也可以啊?是因为,addView默认使用wrap_content.
但是光是这样不够,我们还想添加边距,权重等。
为View指定LayoutParams
添加宽,高,边距,权重这些属性,对应的类是LayoutParams,它一般都是作为一个内部类出现在某个ViewGroup的子类中。对于线性布局,我们使用LinearLayout.LayoutParams,
weight, leftMargin, rightMargin…..这些属性都在它的公有变量里面。
LinearLayout.LayoutParams contentLayoutParams = new LinearLayout.LayoutParams(0,
                LinearLayout.LayoutParams.WRAP_CONTENT);
        contentLayoutParams.weight = 1;
        contentLayoutParams.leftMargin = 10;

        container.addView(content, contentLayoutParams);

        LinearLayout.LayoutParams buttonLayoutParams = new LinearLayout.LayoutParams(
                LinearLayout.LayoutParams.WRAP_CONTENT, LinearLayout.LayoutParams.WRAP_CONTENT);
        buttonLayoutParams.leftMargin = 10;
        container.addView(submit, buttonLayoutParams);
在addView之前,我们设置好LayoutParams 的值,调用addView(View child, LayoutParams params)这个重载方法。
相对布局的RelativeLayout.LayoutParams
我们来看看, 在代码中,调用那些方法来定位布局
因为在相对布局中, 定位的方法有很多种类,所以API提供了一个统一的方法:
addRule(int verb, int anchor)
addRule(int verb)
verb是动词的意思,就是用来表达above, below, toRightOf, toLeftOf, alignParentLeft…..等等。
这些动词的int 值在RelativeLayout下有常量定义。例如:
RelativeLayout.ABOVE
RelativeLayout.BELOW
RelativeLayout.ALIGN_LEFT
RelativeLayout.LEFT_OF
RelativeLayout.RIGHT_OF
anchor的值,可以是RelativeLayout.TRUE,0表示false, 或者其它View 的Id, 根据具体的verb, 填入相应的值:
@Override
    protected void onCreate(Bundle savedInstanceState) {
        super.onCreate(savedInstanceState);

        this.setContentView(this.addRelativeLayout());
    }

    private RelativeLayout addRelativeLayout() {
        RelativeLayout container = new RelativeLayout(this);
        Button btn1 = new Button(this);
        btn1.setId(11);
        btn1.setText("上");
        Button btn2 = new Button(this);
        btn2.setId(12);
        btn2.setText("下");
        Button btn3 = new Button(this);
        btn3.setId(13);
        btn3.setText("左");
        Button btn4 = new Button(this);
        btn4.setId(14);
        btn4.setText("右");
        Button btn5 = new Button(this);
        btn5.setId(15);
        btn5.setText("中");
        RelativeLayout.LayoutParams lp1 = new RelativeLayout.LayoutParams(100,
                RelativeLayout.LayoutParams.WRAP_CONTENT);

        RelativeLayout.LayoutParams lp2 = new RelativeLayout.LayoutParams(lp1);
        RelativeLayout.LayoutParams lp3 = new RelativeLayout.LayoutParams(lp1);
        RelativeLayout.LayoutParams lp4 = new RelativeLayout.LayoutParams(lp1);
        RelativeLayout.LayoutParams lp5 = new RelativeLayout.LayoutParams(lp1);
        lp5.addRule(RelativeLayout.CENTER_IN_PARENT, RelativeLayout.TRUE);

        lp1.addRule(RelativeLayout.ABOVE, btn5.getId());
        lp1.addRule(RelativeLayout.ALIGN_LEFT, btn5.getId());
        lp2.addRule(RelativeLayout.BELOW, btn5.getId());
        lp2.addRule(RelativeLayout.ALIGN_LEFT, btn5.getId());
        lp3.addRule(RelativeLayout.LEFT_OF, btn5.getId());
        lp3.addRule(RelativeLayout.ALIGN_BASELINE, btn5.getId());
        lp4.addRule(RelativeLayout.RIGHT_OF, btn5.getId());
        lp4.addRule(RelativeLayout.ALIGN_TOP, btn5.getId());

        container.addView(btn5, lp5);
        container.addView(btn1, lp1);
        container.addView(btn2, lp2);
        container.addView(btn3, lp3);
        container.addView(btn4, lp4);

        return container;
    }
注意:LayoutParams的构造函数也可以是另外一个已经存在的LayoutParams对象,他的width, height值被克隆到当前对象中去。
FrameLayout, TableLayout的LayoutParams, 读者可自行研究一下。


![L{HDSP]0NSR]QI`@V%UPVMF L{HDSP]0NSR]QI`@V%UPVMF](https://images.cnblogs.com/cnblogs_com/vivid-stanley/201208/201208222002315085.jpg)


![H$5Z~Y`M$QI]095GSLL9HBH H$5Z~Y`M$QI]095GSLL9HBH](https://images.cnblogs.com/cnblogs_com/vivid-stanley/201208/201208222002339314.jpg)


【推荐】国内首个AI IDE,深度理解中文开发场景,立即下载体验Trae
【推荐】编程新体验,更懂你的AI,立即体验豆包MarsCode编程助手
【推荐】抖音旗下AI助手豆包,你的智能百科全书,全免费不限次数
【推荐】轻量又高性能的 SSH 工具 IShell:AI 加持,快人一步
· .NET Core 中如何实现缓存的预热?
· 从 HTTP 原因短语缺失研究 HTTP/2 和 HTTP/3 的设计差异
· AI与.NET技术实操系列:向量存储与相似性搜索在 .NET 中的实现
· 基于Microsoft.Extensions.AI核心库实现RAG应用
· Linux系列:如何用heaptrack跟踪.NET程序的非托管内存泄露
· TypeScript + Deepseek 打造卜卦网站:技术与玄学的结合
· 阿里巴巴 QwQ-32B真的超越了 DeepSeek R-1吗?
· 【译】Visual Studio 中新的强大生产力特性
· 【设计模式】告别冗长if-else语句:使用策略模式优化代码结构
· 10年+ .NET Coder 心语 ── 封装的思维:从隐藏、稳定开始理解其本质意义