
centos8 yum安装zabbix6.4
一、系统环境
1.1、查看系统版本
[root@zabbix ~]# cat /proc/version
Linux version 4.18.0-373.el8.x86_64 (mockbuild@kbuilder.bsys.centos.org) (gcc version 8.5.0 20210514 (Red Hat 8.5.0-10) (GCC)) #1 SMP Tue Mar 22 15:11:47 UTC 2022
1.2、关闭selinux
sed -i '7s/enforcing/disabled/' /etc/selinux/config
之后重启系统使其配置生效
验证selinux是否关闭成功
[root@zabbix ~]# getenforce
Disabled
二、安装
2.1、配置zabbix rpm源
配置zabbix rpm源
rpm -Uvh https://repo.zabbix.com/zabbix/6.4/rhel/8/x86_64/zabbix-release-6.4-1.el8.noarch.rpm

清理yum缓存
dnf clean all

重新建立缓存
dnf makecache
2.2、yum安装zabbix、nginx、mysql等相关服务
安装所需服务
dnf -y install zabbix-server-mysql zabbix-web-mysql zabbix-nginx-conf zabbix-sql-scripts zabbix-selinux-policy zabbix-agent zabbix-sender

切换php版本
dnf module switch-to php:7.4

安装mysql8
创建文件夹
mkdir downloads

下载mysqlrpm包
cd /downloads
wget https://dev.mysql.com/get/mysql80-community-release-el8-8.noarch.rpm

rpm -ivh https://dev.mysql.com/get/mysql80-community-release-el8-8.noarch.rpm

yum -y install mysql-community-server
说明:如果执行yum -y install mysql-community-server出现“无法匹配的问题”可以先执行yum module disable mysql命令关闭centos8本地的mysql模块,字后再重新执行安装mysql的命令
yum module disable mysql
yum -y install mysql-community-server

以下服务根据自己的需求可选
dnf -y install --skip-broken  libxml2 libxml2-devel libevent libevent-devel  net-snmp net-snmp-devel

dnf -y install  ipmitool

dnf -y install  OpenIPMI

dnf -y install java

说明:

zabbix(核心)
zabbix-agent(客户端)
zabbix-sender(客户端,用于主动与服务器端联系并主动向服务器端发送数据报文)
zabbix-server(服务器端)
zabbix-server-mysql(服务器端用于联系mysql)
zabbix-web-nginx(提供zabbix-gui)
ipmitool (监控智能平台管理接口(IPMI)设备的运行状况和可用性)
libxml2(被 VMware 监控 所需要)
net-snmp(被 SNMP 支持 所需要)
2.3、启动服务并设为开机自启
systemctl start nginx
systemctl start mysqld
systemctl start php-fpm
systemctl start zabbix-server.service
systemctl start zabbix-agent.service
systemctl enable zabbix-agent.service
systemctl enable zabbix-server.service
systemctl enable nginx.service
systemctl enable mysqld.service
systemctl enable php-fpm.service
2.4、开启服务端口并重启防火墙,使其配置生效
firewall-cmd --permanent --zone=public --add-service=http
firewall-cmd --permanent --zone=public --add-service=https
firewall-cmd --permanent --zone=public --add-service=zabbix-server
firewall-cmd --permanent --zone=public --add-service=zabbix-agent
systemctl restart firewalld
三、配置
3.1、配置mysql
进入安全设置,并对数据库进行安全设置
说明:
mosql默认密码可以通过 /var/log/mysqld.log文件查找
cat /var/log/mysqld.log|grep 'A temporary password'
2023-09-29T20:16:07.888115Z 6 [Note] [MY-010454] [Server] A temporary password is generated for root@localhost: lYujYd2CHb_o

说明:第一次登录需要修改密码

登录数据库
mysql -uroot -p密码

创建zabbix数据库
mysql> create database zabbix character set utf8mb4 collate utf8mb4_bin;
Query OK, 1 row affected (0.00 sec)

创建zabbix用户并设置密码
mysql> create user zabbix@localhost identified by '086530';
Query OK, 0 rows affected (0.01 sec)

授权访问数据库
mysql> grant all privileges on zabbix.* to zabbix@localhost;
Query OK, 0 rows affected (0.01 sec)

mysql> set global log_bin_trust_function_creators = 1;
Query OK, 0 rows affected (0.00 sec)

刷新权限
flush privileges;

退出数据库
mysql> quit;
Bye


导入初始架构和数据
zcat /usr/share/zabbix-sql-scripts/mysql/server.sql.gz | mysql --default-character-set=utf8mb4 -uzabbix -p zabbix

导入数据库架构后禁用log_bin_trust_function_creators选项。
# mysql -uroot -p
password
mysql> set global log_bin_trust_function_creators = 0;
mysql> quit;


想要修改mysql密码强度 可以通过下面的命令进行修改

修改密码的验证强度等级
set global validate_password.policy=LOW;
设置密码的长度
set global validate_password.length=6;
修改密码
ALTER user 'root'@'localhost' IDENTIFIED WITH caching_sha2_password BY '123456';
刷新权限
flush privileges;
3.2、修改zabbix_server.conf配置文件
vim /etc/zabbix/zabbix_server.conf

修改下面三个参数:
[...]
DBName=zabbix
[...]
DBUser=zabbix
[...]
DBPassword=086530
[...]
3.3、修改zabbix_agentd.conf配置文件
vim /etc/zabbix/zabbix_agentd.conf

修改下面三个参数:

[...]
Server=127.0.0.1
[...]
ServerActive=127.0.0.1
[...]
Hostname=zabbix-server
[...]
3.4、修改php.ini文件
vim /etc/php.ini

找到下面的参数并修改:
max_execution_time = 300  #每个脚本的最大执行时间(秒)
max_input_time = 300    #每个脚本分析请求数据的最长时间。默认值:-1(无限制),开发值:60(60秒),生产值:60(60秒)
memory_limit = 256M     #脚本可能消耗的最大内存量(默认128MB)
post_max_size = 32M    #PHP将接受的POST数据的最大大小
upload_max_filesize = 16M  #上传文件的最大允许大小
date.timezone = Asia/Shanghai  #定义日期函数使用的默认时区
3.5、修改zabbix.conf文件
vim /etc/nginx/conf.d/zabbix.conf

取消下面2行的注释
listen          80;
server_name     localhost;
3.6、修改nginx配置文件
vim /etc/nginx/nginx.conf

root         /usr/share/zabbix;   #设置根目录为/usr/share/zabbix;
重启服务,并使用IP测试访问
systemctl restart nginx zabbix-server.service zabbix-agent.service php-fpm.service
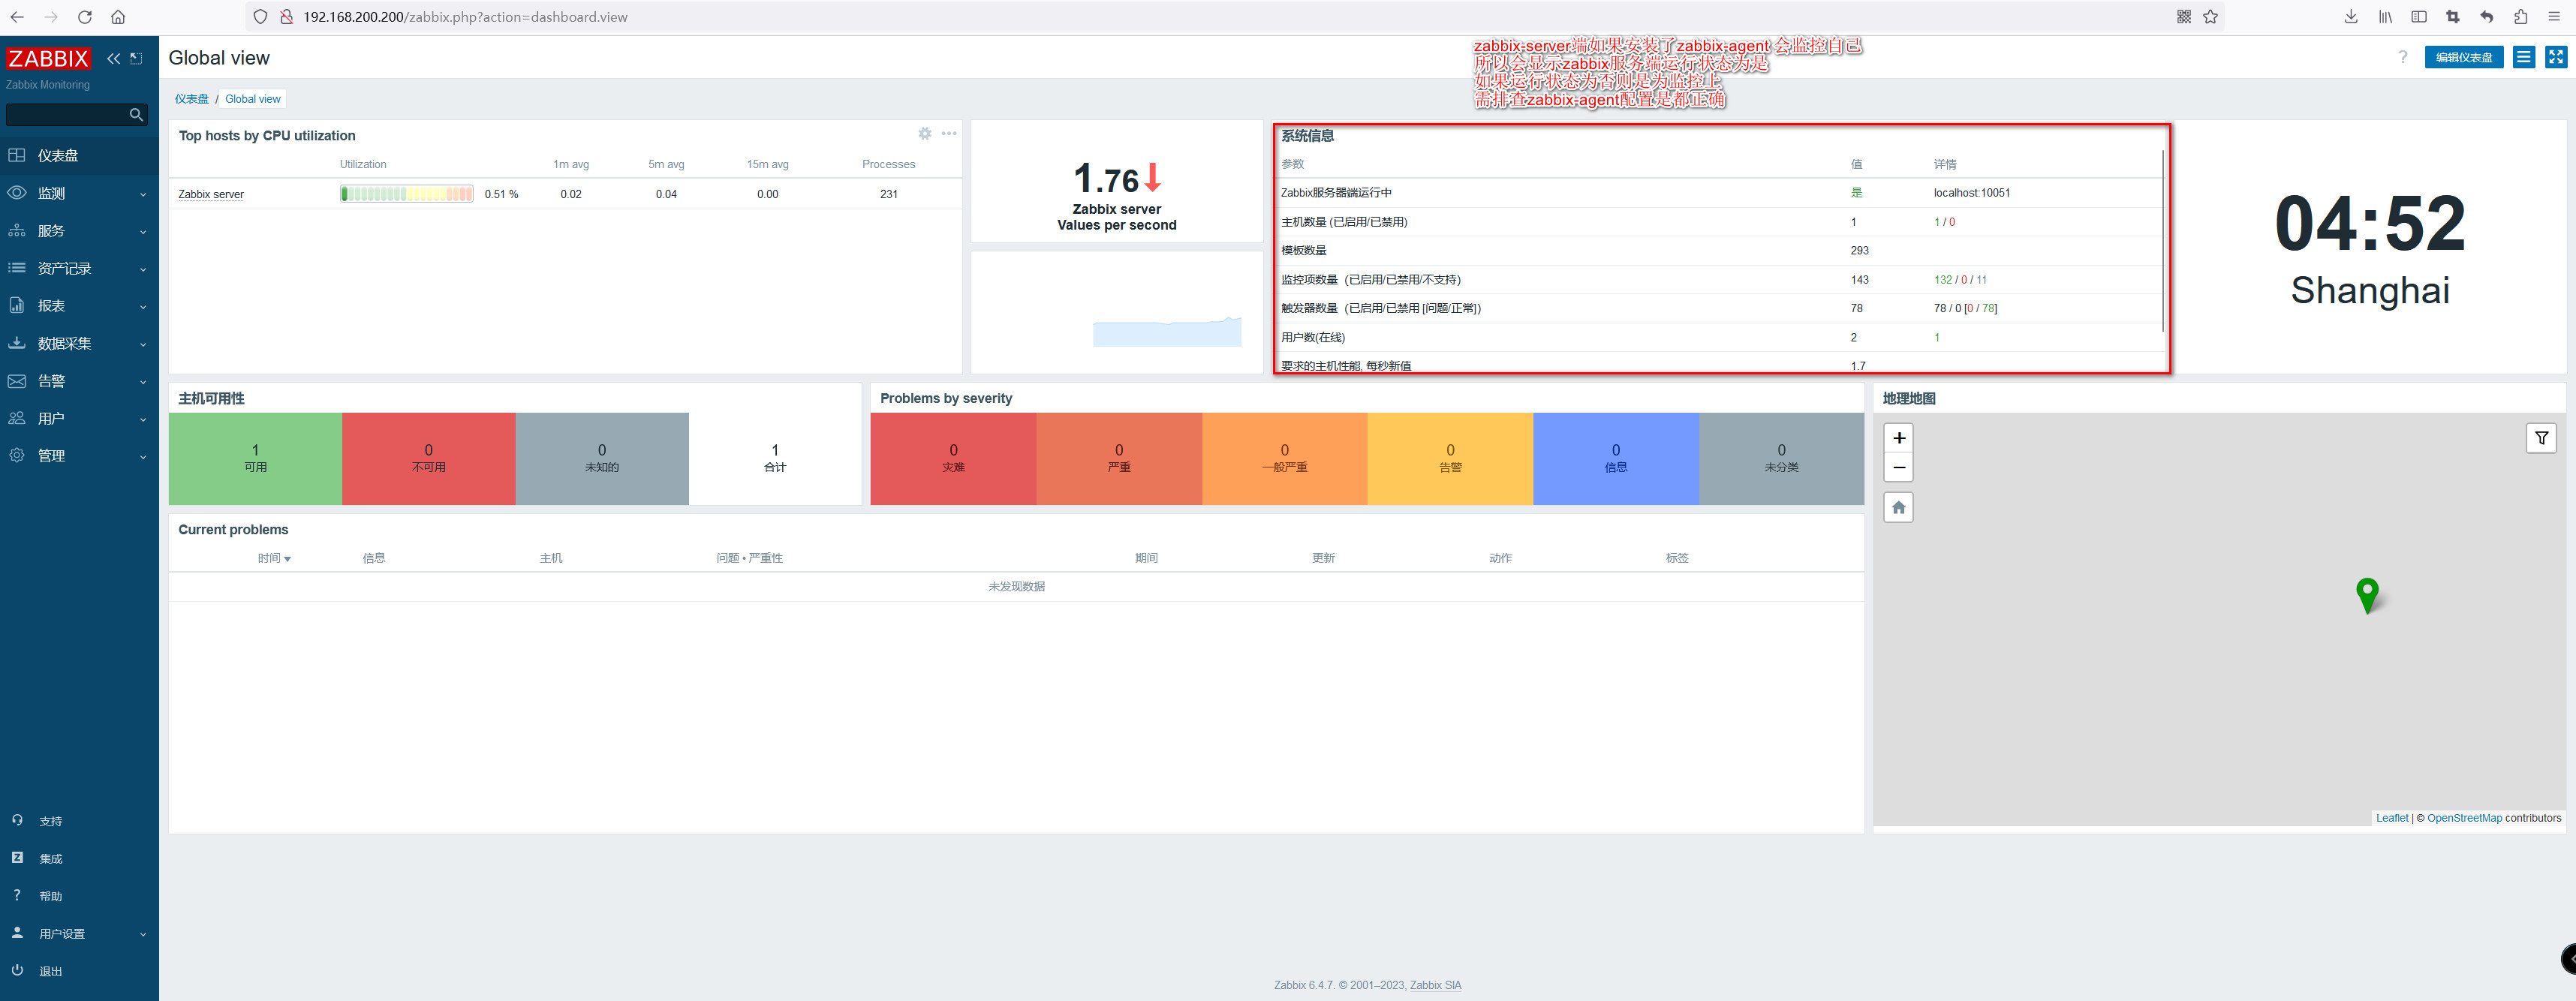
四、配置web界面
在web界面使用IP或域名打开zabbix安装界面
更改默认语言为中文:

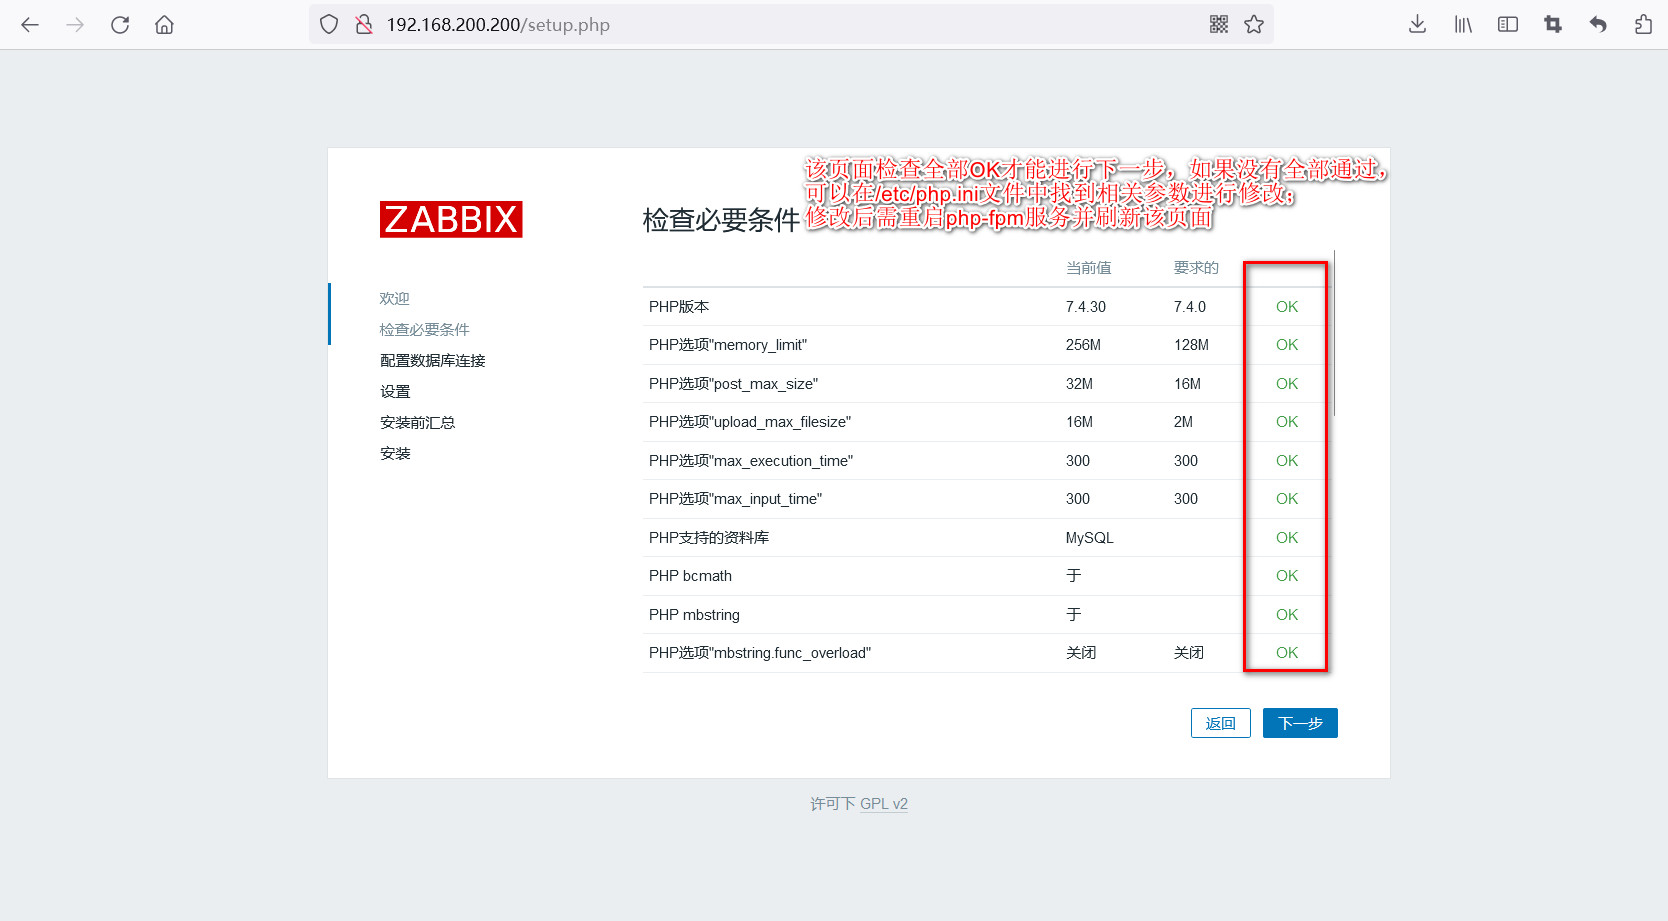
点击下一步:
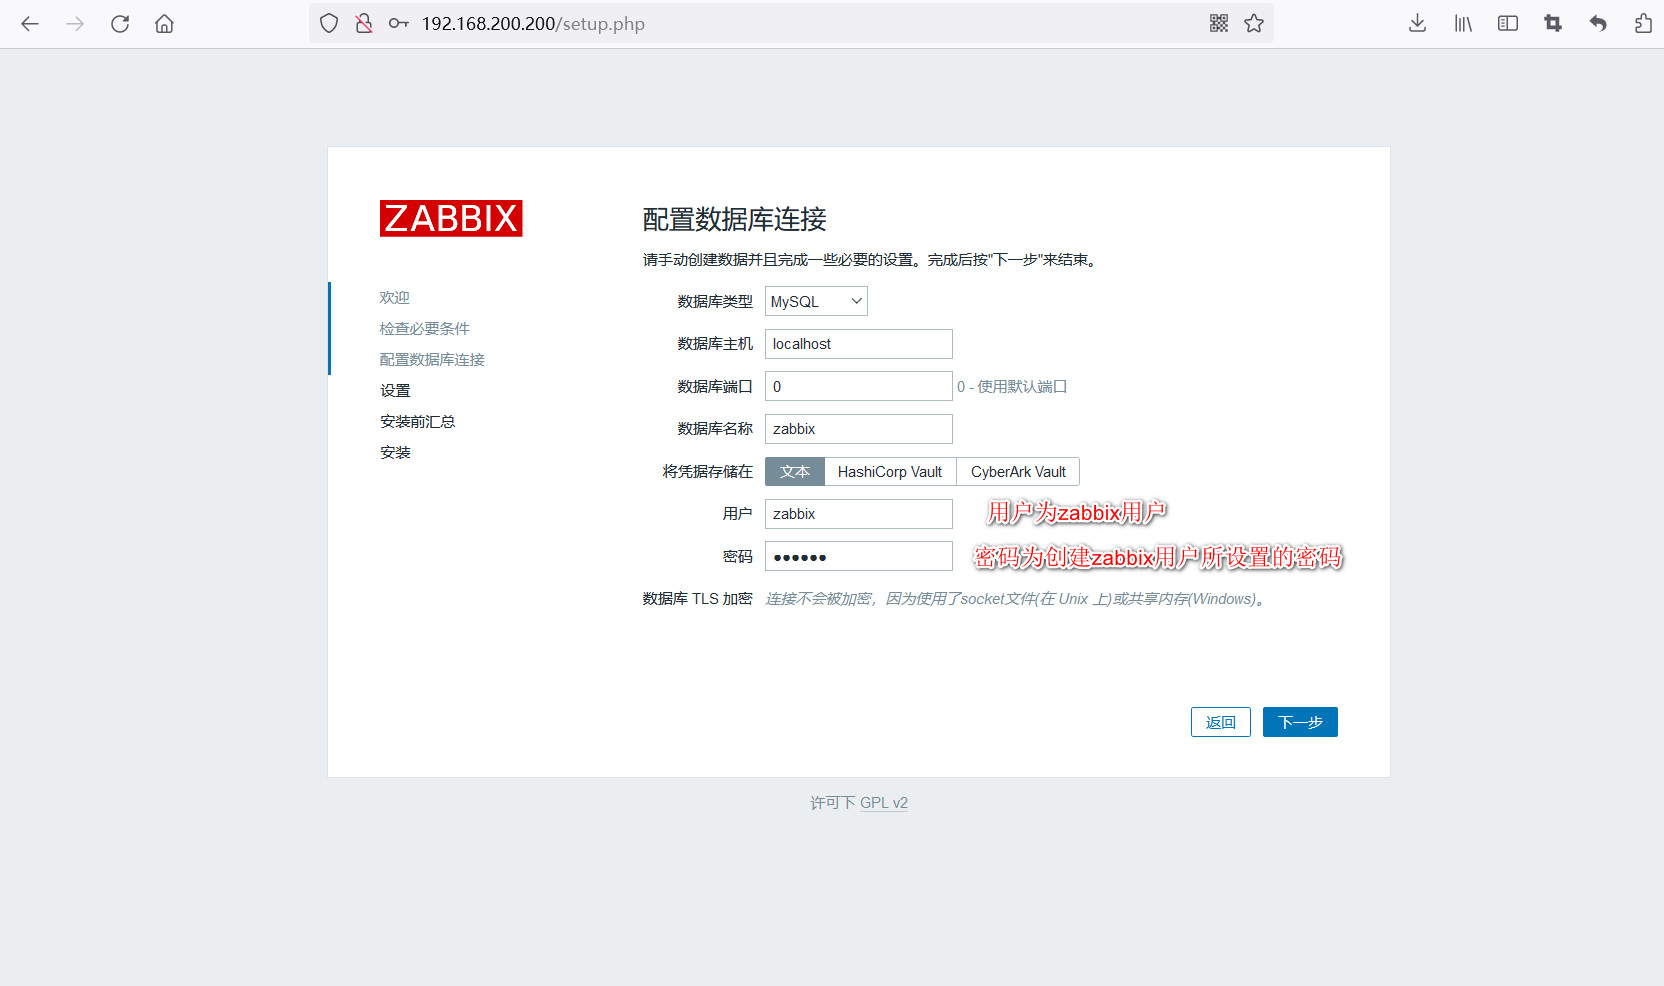
点击下一步配置数据库:
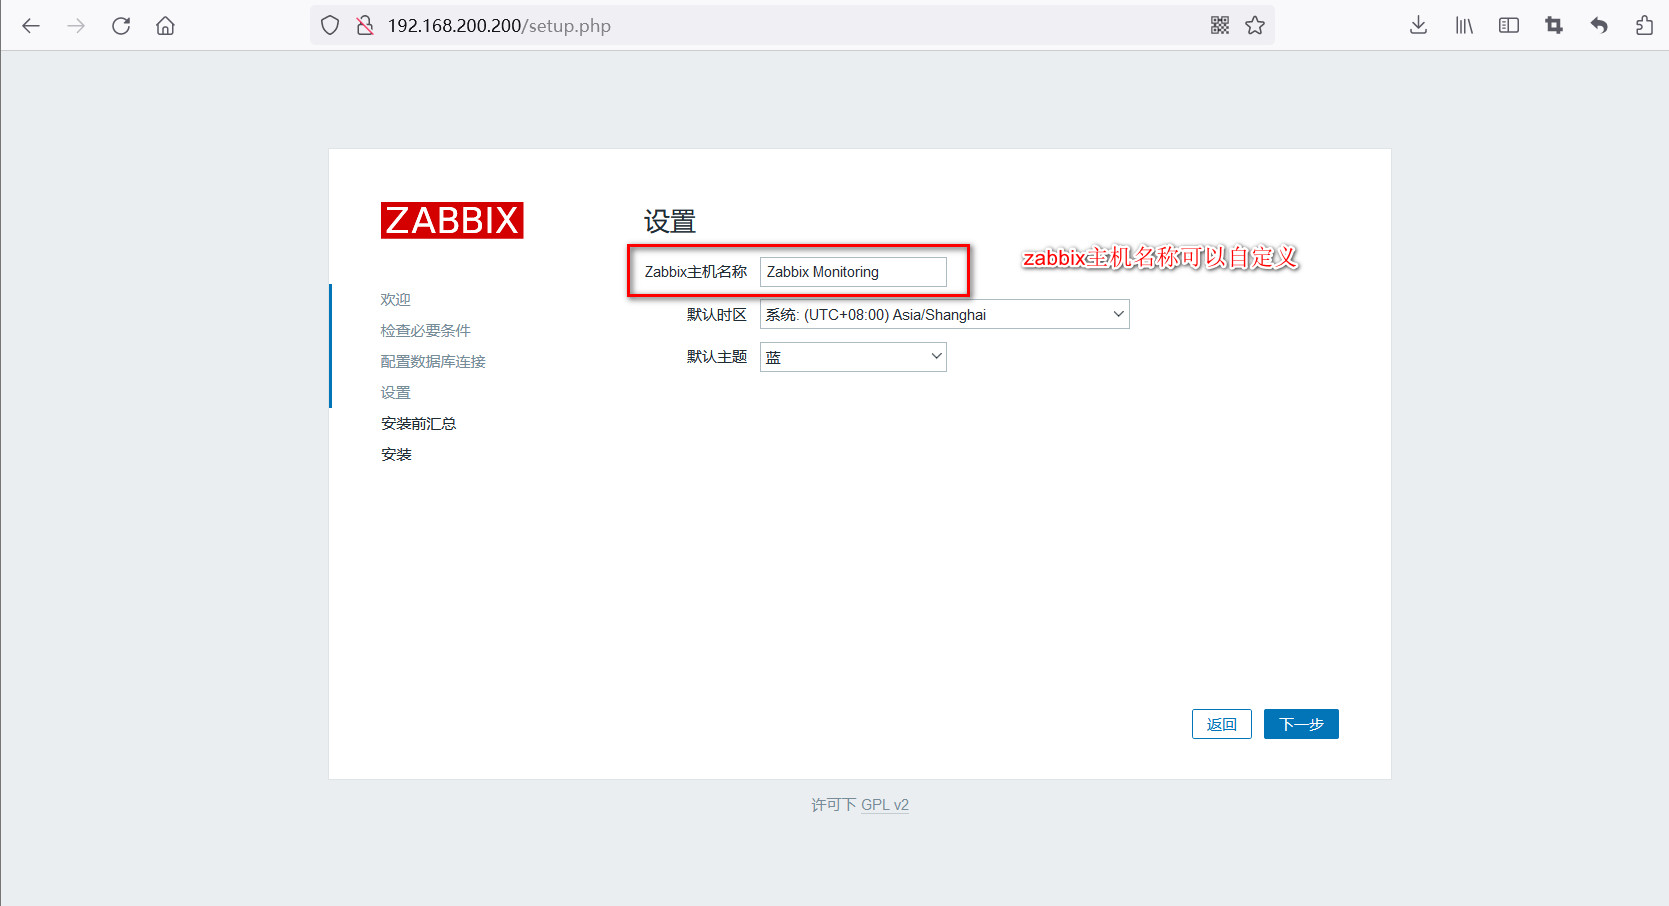
下一步设置:
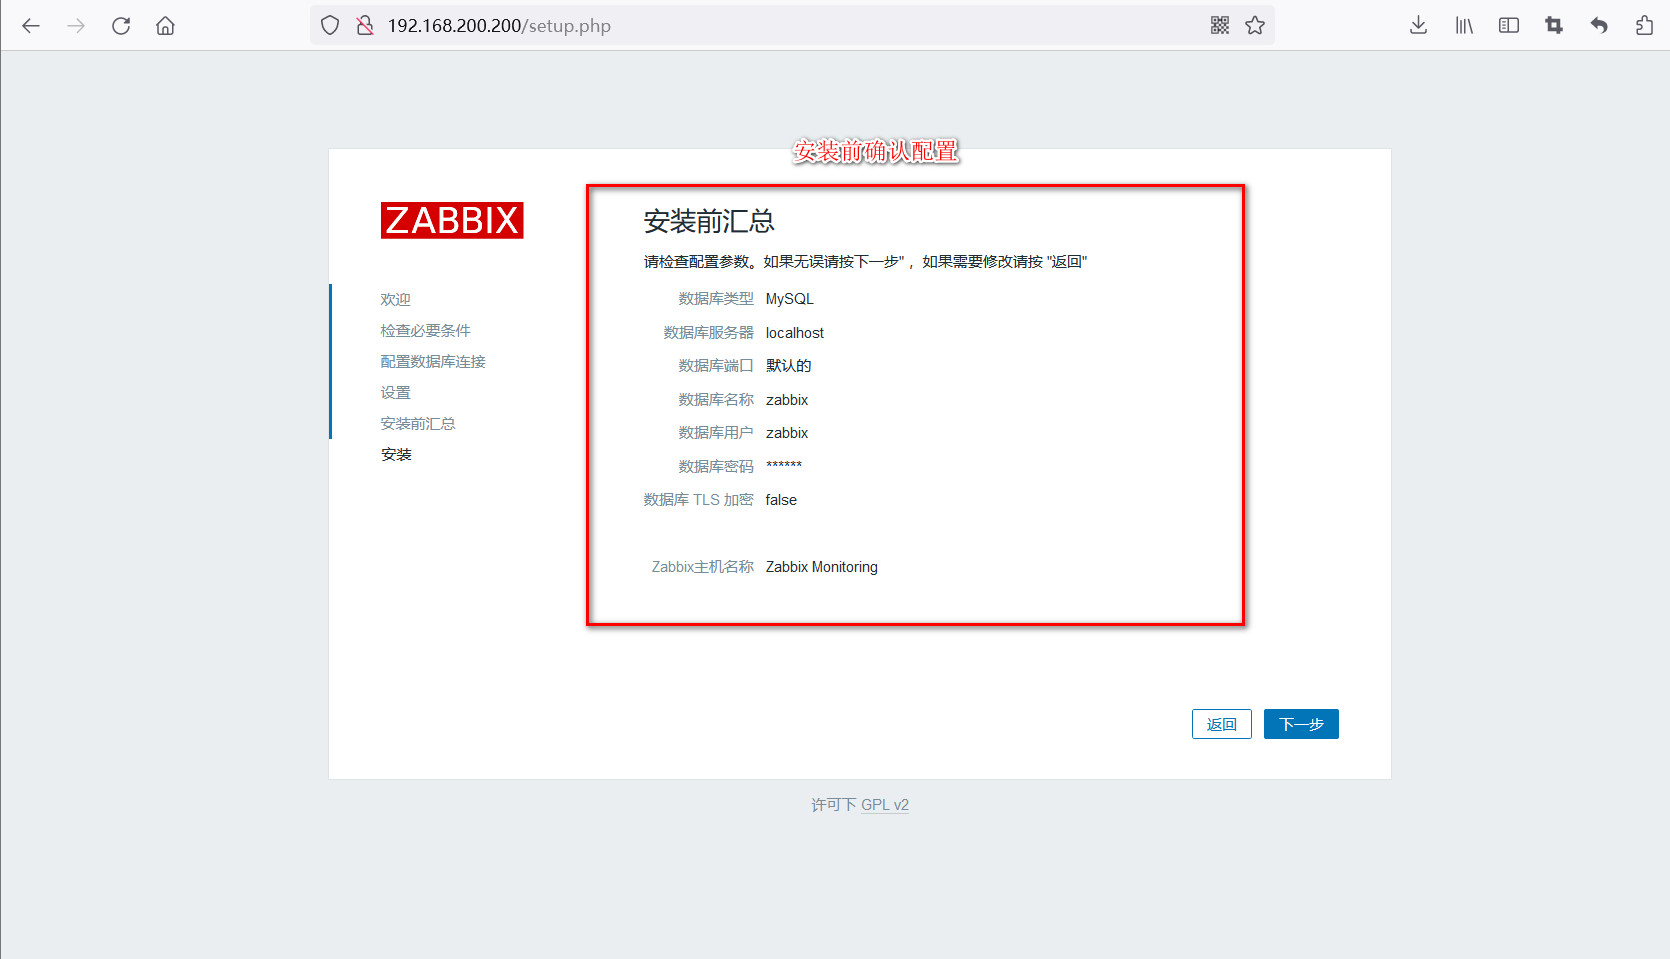
确认配置:
下一步安装点击完成即可登录
zabbix默认账号:Admin
默认密码:zabbix
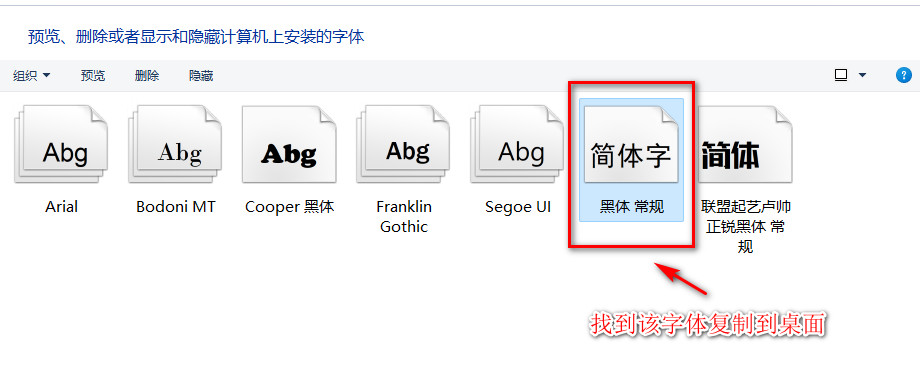
五、关于中文乱码的问题:
在电脑C盘C:\Windows\Fonts文件夹中找到相应的中文字体放到/usr/share/zabbix/assets/fonts/下并修改替换/usr/share/zabbix/include/defines.inc.php文件中原来的字体 把graphfont替换为simhei(一共2处)

之后上传到Linux /usr/share/zabbix/assets/fonts/下

修改替换/usr/share/zabbix/include/defines.inc.php文件中原来的字体 把graphfont替换为simhei(一共2处)
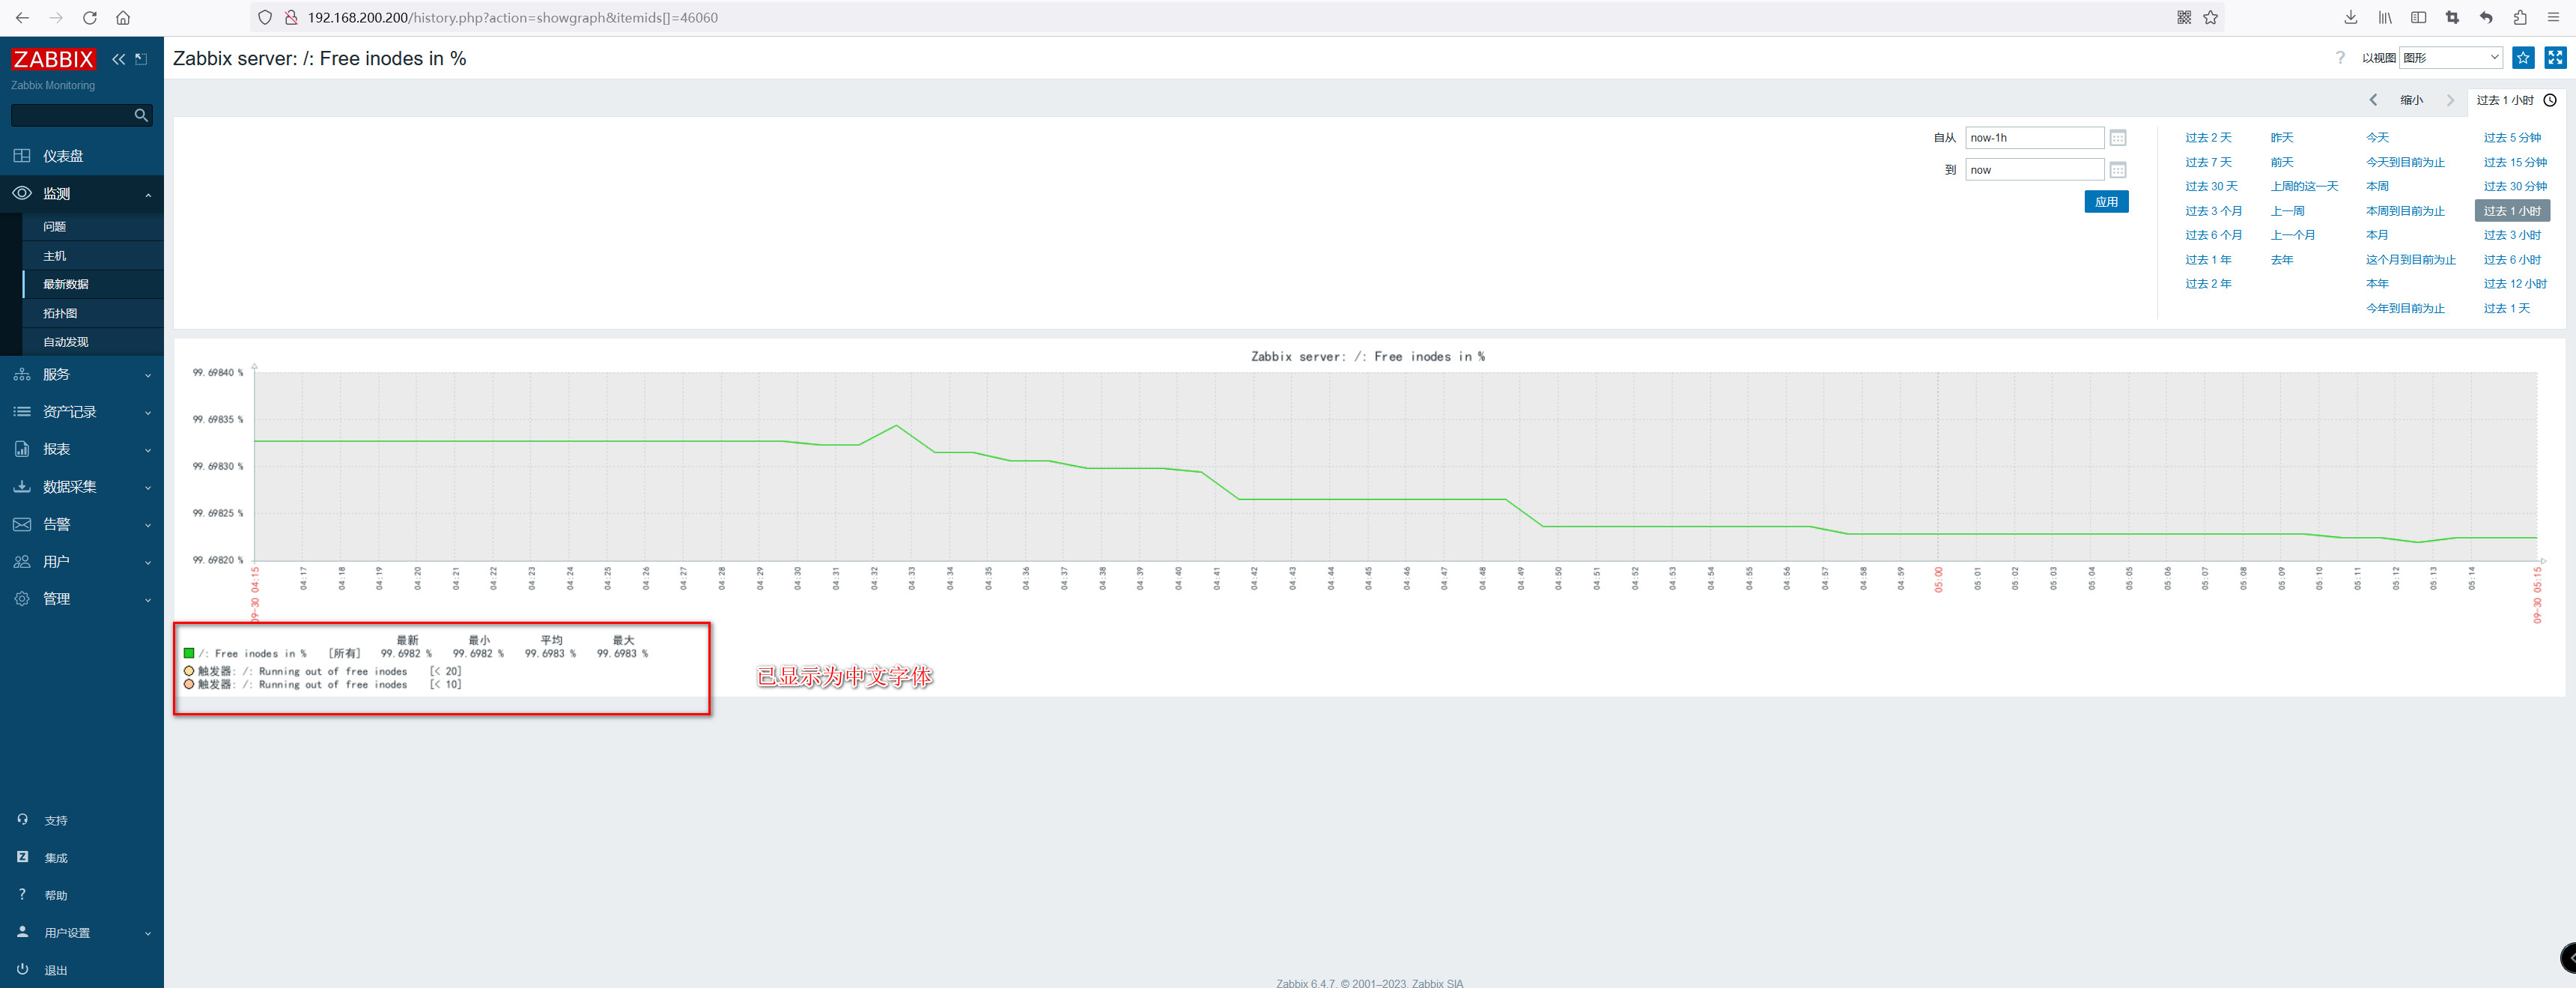
替换完成后重启zabbix-server服务刷新web界面即可
六、安全加固
5.1、为 Zabbix 前端设置 SSL
安装 mod_ssl 包
yum install -y mod_ssl
为 SSL keys 创建目录
mkdir -p /etc/nginx/ssl/private
chmod 700 /etc/nginx/ssl/private
创建 SSL 证书:
openssl req -x509 -nodes -days 365 -newkey rsa:2048 -keyout /etc/nginx/ssl/private/nginx-selfsigned.key -out /etc/nginx/ssl/nginx-selfsigned.crt
请用户根据需求适当填写下列提示内容。最重要的参数是请求 Common Name 参数。 您需要输入要与服务器关联的域名。 如果您没有域名,则可以输入公共IP地址。 下面将使用 example.com。
Country Name (两个字母) [XX]:
       State or Province Name (全名) []:
       Locality Name (eg, city) [默认的城市]:
       Organization Name (eg, company) [默认的公司名]:
       Organizational Unit Name (eg, section) []:
       Common Name (eg, your name or your server's hostname) []:example.com
       Email Address []:
修改 Nginx 配置文件
vim /etc/nginx/nginx.conf

    server {
        listen       443 ssl http2 default_server;
        listen       [::]:443 ssl http2 default_server;
        server_name  _;
        root         /usr/share/zabbix;

        ssl_certificate "/etc/nginx/ssl/nginx-selfsigned.crt";
        ssl_certificate_key "/etc/nginx/ssl/private/nginx-selfsigned.key";
        ssl_session_cache shared:SSL:1m;
        ssl_session_timeout  10m;
        ssl_ciphers PROFILE=SYSTEM;
        ssl_prefer_server_ciphers on;

        # Load configuration files for the default server block.
        include /etc/nginx/default.d/*.conf;

        location / {
        }

        error_page 404 /404.html;
            location = /40x.html {
        }

        error_page 500 502 503 504 /50x.html;
            location = /50x.html {
        }
    }
配置http强制跳转https
    server {
        listen       80 default_server;
        listen       [::]:80 default_server;
        server_name  _;
        root         /usr/share/zabbix;
        #添加下面这一行
      rewrite ^(/.*)$ https://$host$1 permanent;

        # Load configuration files for the default server block.
        include /etc/nginx/default.d/*.conf;
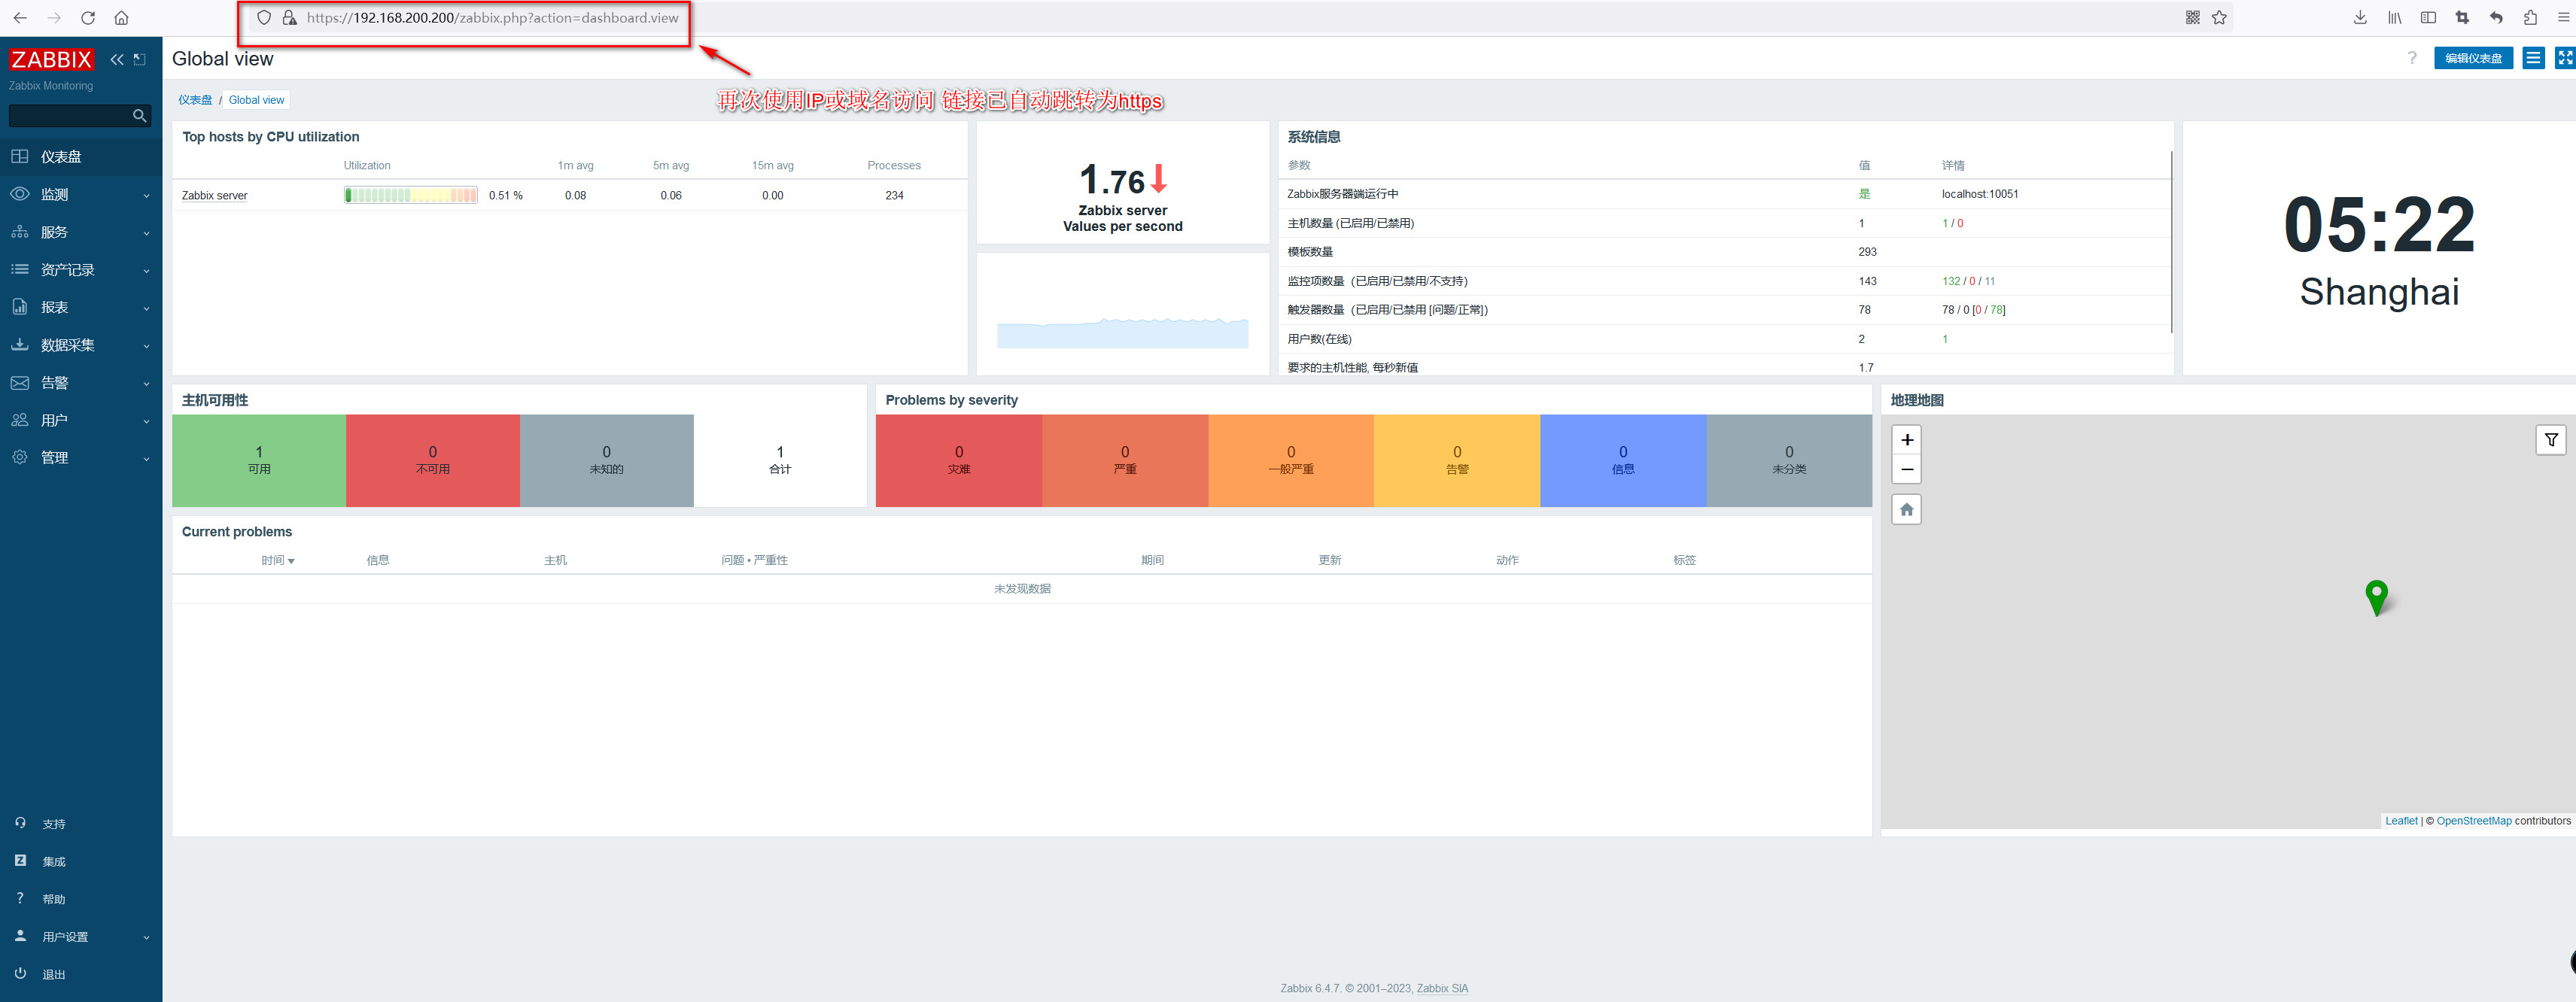
重启 Nginx 服务使以上修改的配置生效:
systemctl restart nginx
再次使用ip或域名在web界面访问,链接已跳转为https
5. 2、隐藏nginx版本号信息
查看nginx版本信息:
curl -I 192.168.200.200
HTTP/1.1 301 Moved Permanently
Server: nginx/1.14.1
Date: Fri, 29 Sep 2023 21:26:01 GMT
Content-Type: text/html
Content-Length: 185
Connection: keep-alive
Location: https://192.168.200.200/
隐藏nginx版本号只需要在nginx.conf文件中的http标签段内加入“server_tokens off”参数即可。
vim /etc/nginx/nginx.conf

重启nginx服务后再次查看nginx版本信息
curl -I 192.168.200.200
HTTP/1.1 301 Moved Permanently
Server: nginx
Date: Fri, 29 Sep 2023 21:33:31 GMT
Content-Type: text/html
Content-Length: 178
Connection: keep-alive
Location: https://192.168.200.200/
5.3、禁用 PHP 签名
更改 php.ini 配置文件来禁用 PHP 签名(X-Powered-By HTTP header)(默认情况下禁用签名)
vim /etc/php.ini

找到expose_php = on
修改为expose_php = Off

之后重启php-fpm和nginx服务
5.4、通过fiwalld防火墙来设置只允许固定IP访问
查询打开的端口或服务

firewall-cmd --zone=public --list-ports

firewall-cmd --zone=public --list-services
cockpit dhcpv6-client http https ssh zabbix-agent zabbix-server

关闭https服务或443端口

firewall-cmd --zone=public --remove-service=https --permanent

firewall-cmd --zone=public --remove-port=443/tcp --permanent

重启防火墙使其生效
firewall-cmd --reload


允许ip192.168.100.200访问443端口或https服务
firewall-cmd --permanent --add-rich-rule="rule family="ipv4" source address="192.168.100.200" service name="https" accept"

firewall-cmd --permanent --add-rich-rule="rule family="ipv4" source address="192.168.100.200" port protocol="tcp" port="443" accept"

允许ip192.168.100.0/24访问443端口或https服务
firewall-cmd --permanent --add-rich-rule="rule family="ipv4" source address="192.168.100.0/24" service name="https" accept"

firewall-cmd --permanent --add-rich-rule="rule family="ipv4" source address="192.168.100.0/24" port protocol="tcp" port="443" accept"

限制IP访问443端口或https服务
firewall-cmd --permanent --add-rich-rule="rule family="ipv4" source address="192.168.100.0/24" port protocol="tcp" port="443" reject"

firewall-cmd --permanent --add-rich-rule="rule family="ipv4" source address="192.168.100.0/24" service name="https" reject”

删除访问策略
firewall-cmd --permanent --remove-rich-rule="rule family="ipv4" source address="192.168.100.0/24" port protocol="tcp" port="443" accept"

firewall-cmd --permanent --remove-rich-rule="rule family="ipv4" source address="192.168.100.0/24" service name="https" accept"

重新载入一下防火墙设置,使设置生效
firewall-cmd --reload

查看已设置规则
firewall-cmd --zone=public --list-rich-rules

 浙公网安备 33010602011771号