Mysql5.7安装
一、yum方式安装:
从CentOS 7.0发布以来,yum源中开始使用Mariadb来代替MySQL的安装。即使你输入的是yum install -y mysql , 显示的也是Mariadb的安装内容。
使用源代码进行编译安装又太麻烦。因此,如果想使用yum安装MySQL的话,就需要去下载官方指定的yum源.
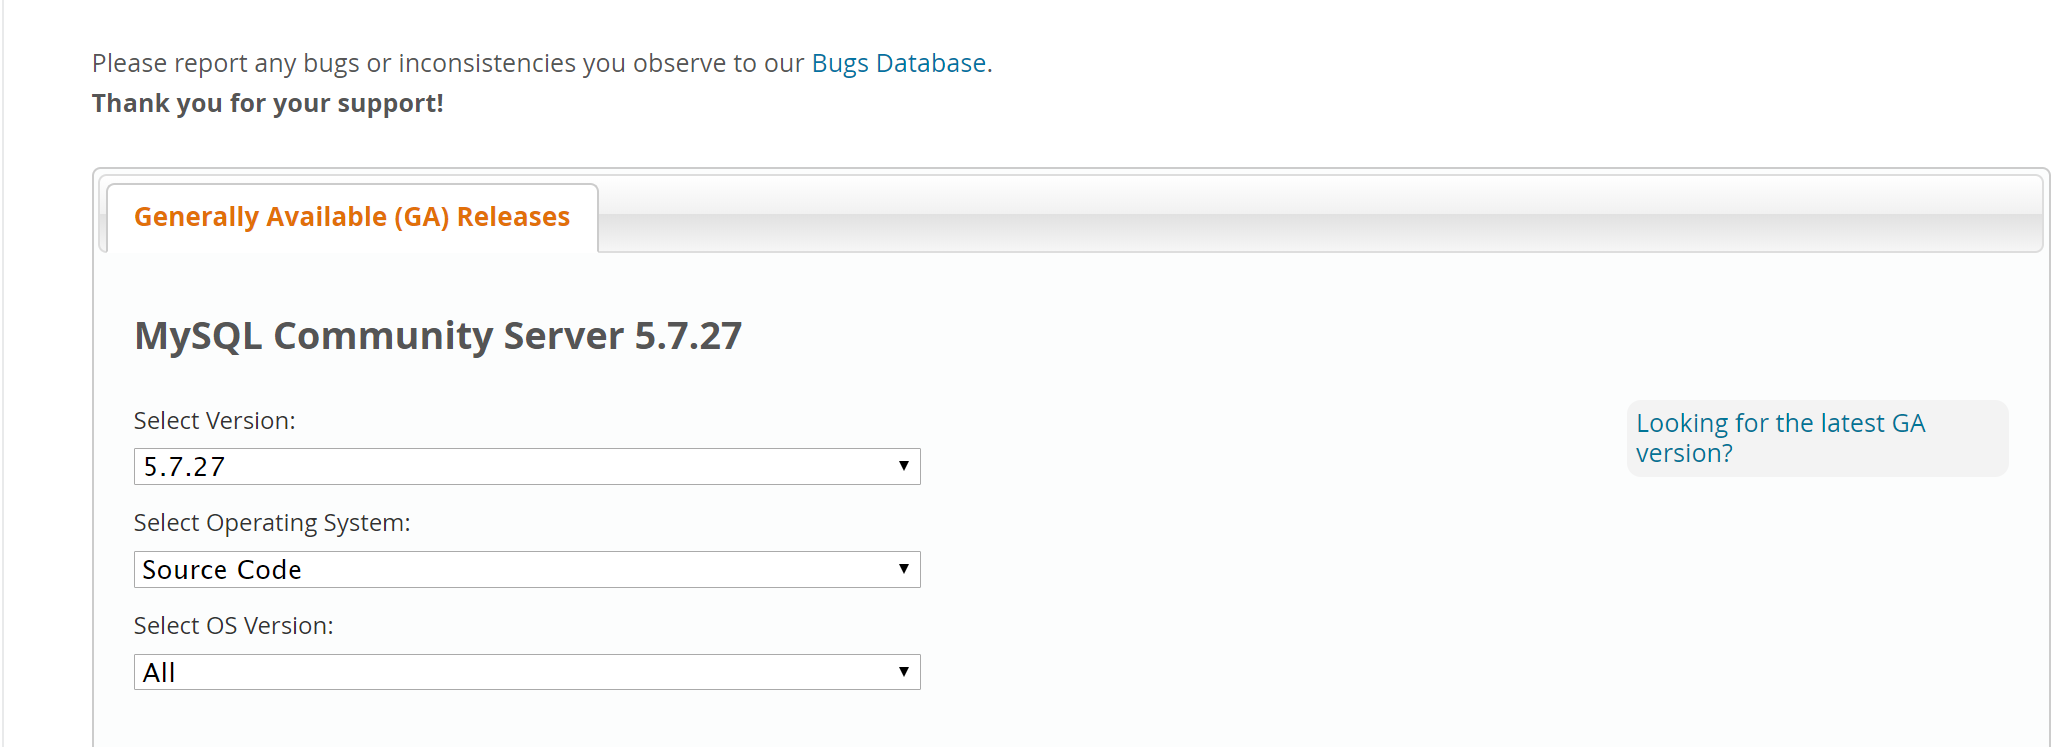
yum下载网址为:https://dev.mysql.com/downloads/repo/yum/
找到Red Hat Enterprise Linux 7 / Oracle Linux 7 (Architecture Independent), RPM Package,单击后面的Download,
在新的页面中单击最下面的No thanks, just start my download.就可以下载到yum源了。
1)安装MySQL YUM资源库
[root@kevin ~]# yum localinstall https://dev.mysql.com/get/mysql57-community-release-el7-8.noarch.rpm
2)安装MySQL 5.7
[root@kevin ~]# yum install -y mysql-community-server
3)启动MySQL服务器和MySQL的自动启动
[root@kevin ~]# systemctl start mysqld.service
[root@kevin ~]# systemctl enable mysqld.service
4)密码问题
由于MySQL从5.7开始不允许首次安装后使用空密码进行登录!为了加强安全性,系统会随机生成一个密码以供管理员首次登录使用,
这个密码记录在/var/log/mysqld.log文件中,使用下面的命令可以查看此密码:
[root@kevin ~]# cat /var/log/mysqld.log|grep 'A temporary password'
2018-01-24T02:32:20.210903Z 1 [Note] A temporary password is generated for root@localhost: DOqInortw9/<
最后一行冒号后面的部分DOqInortw9/<就是初始密码。
使用此密码登录MySQL:
[root@kevin ~]# mysql -p
Enter password:
Welcome to the MySQL monitor. Commands end with ; or \g.
Your MySQL connection id is 4
Server version: 5.7.21
Copyright (c) 2000, 2018, Oracle and/or its affiliates. All rights reserved.
Oracle is a registered trademark of Oracle Corporation and/or its
affiliates. Other names may be trademarks of their respective
owners.
Type 'help;' or '\h' for help. Type '\c' to clear the current input statement.
使用随机生产的密码登录到服务端后,必须马上修改密码,不然会报如下错误:
mysql> show databases;
ERROR 1820 (HY000): You must reset your password using ALTER USER statement before executing this statement.
有两种方法解决上面的报错(如下的123456是修改后的密码):
mysql> set password=password("123456");
或者
mysql> alter user 'root'@'localhost' identified by '123456';
刷新权限
mysql> flush privileges;
===============================================================================================
如果上面在执行set password=password("123456");命令后出现下面的报错:
ERROR 1819 (HY000): Your password does not satisfy the current policy requirements
解决办法:
这个与Mysql 密码安全策略validate_password_policy的值有关,validate_password_policy可以取0、1、2三个值:
0 or LOW Length
1 or MEDIUM Length; numeric, lowercase/uppercase, and special characters
2 or STRONG Length; numeric, lowercase/uppercase, and special characters; dictionary
默认的数值是1,符合长度,且必须含有数字,小写或大写字母,特殊字符。
所以刚开始设置的密码必须符合长度,且必须含有数字,小写或大写字母,特殊字符。
有时候,只是为了自己测试,不想密码设置得那么复杂,譬如说,我只想设置root的密码为123456。
必须修改两个全局参数:
mysql> set global validate_password_policy=0;
Query OK, 0 rows affected (0.00 sec)
mysql> set global validate_password_length=1;
Query OK, 0 rows affected (0.00 sec)
修改上面两个参数后,就可以解决这个报错了。
=======================================================================================================
注意一点:
mysql5.7之后的数据库里mysql.user表里已经没有password这个字段了,password字段改成了authentication_string。
所以修改密码的命令如下:
mysql> update mysql.user set authentication_string=password('kevin@123') where user='root';
Query OK, 1 row affected, 1 warning (0.00 sec)
Rows matched: 1 Changed: 1 Warnings: 1
mysql> flush privileges;
Query OK, 0 rows affected (0.00 sec)
mysql>
=======================================================================================================
查看mysql版本
mysql> select version();
+-----------+
| version() |
+-----------+
| 5.7.21 |
+-----------+
1 row in set (0.00 sec)
mysql>
=======================================================================================================
修改mysql5.7的编码由latin1为utf8
默认编码:
mysql> show variables like "%character%";show variables like "%collation%";
+--------------------------+----------------------------+
| Variable_name | Value |
+--------------------------+----------------------------+
| character_set_client | utf8 |
| character_set_connection | utf8 |
| character_set_database | latin1 |
| character_set_filesystem | binary |
| character_set_results | utf8 |
| character_set_server | latin1 |
| character_set_system | utf8 |
| character_sets_dir | /usr/share/mysql/charsets/ |
+--------------------------+----------------------------+
8 rows in set (0.00 sec)
+----------------------+-------------------+
| Variable_name | Value |
+----------------------+-------------------+
| collation_connection | utf8_general_ci |
| collation_database | latin1_swedish_ci |
| collation_server | latin1_swedish_ci |
+----------------------+-------------------+
3 rows in set (0.01 sec)
调整操作:
[root@kevin ~]# cat /etc/my.cnf
......
[mysqld]
......
character-set-server=utf8 //注意这个不能写成default-character-set=utf8,否则会导致5.7版本mysql无法打开
[client]
default-character-set=utf8
[root@kevin~]# systemctl restart mysqld.service
[root@kevin~]# mysql -p
......
mysql> show variables like "%character%";show variables like "%collation%";
+--------------------------+----------------------------+
| Variable_name | Value |
+--------------------------+----------------------------+
| character_set_client | utf8 |
| character_set_connection | utf8 |
| character_set_database | utf8 |
| character_set_filesystem | binary |
| character_set_results | utf8 |
| character_set_server | utf8 |
| character_set_system | utf8 |
| character_sets_dir | /usr/share/mysql/charsets/ |
+--------------------------+----------------------------+
8 rows in set (0.01 sec)
+----------------------+-----------------+
| Variable_name | Value |
+----------------------+-----------------+
| collation_connection | utf8_general_ci |
| collation_database | utf8_general_ci |
| collation_server | utf8_general_ci |
+----------------------+-----------------+
3 rows in set (0.00 sec)
二、编译安装:
1)卸载系统自带的 mysql和mariadb-lib
rpm -e $(/bin/rpm -qa | grep mysql|xargs) --nodeps
rpm -e $(/bin/rpm -qa | grep mariadb|xargs) --nodeps
2)安装编译代码需要的包
yum -y install make gcc-c++ cmake bison-devel ncurses-devel
3)安装boost
[root@kevin ~]# mkdir -p /usr/local/boost
[root@kevin ~]# cd /usr/local/boost
[root@kevin boost]# wget http://www.sourceforge.net/projects/boost/files/boost/1.59.0/boost_1_59_0.tar.gz
[root@kevin boost]# tar -zvxf boost_1_59_0.tar.gz
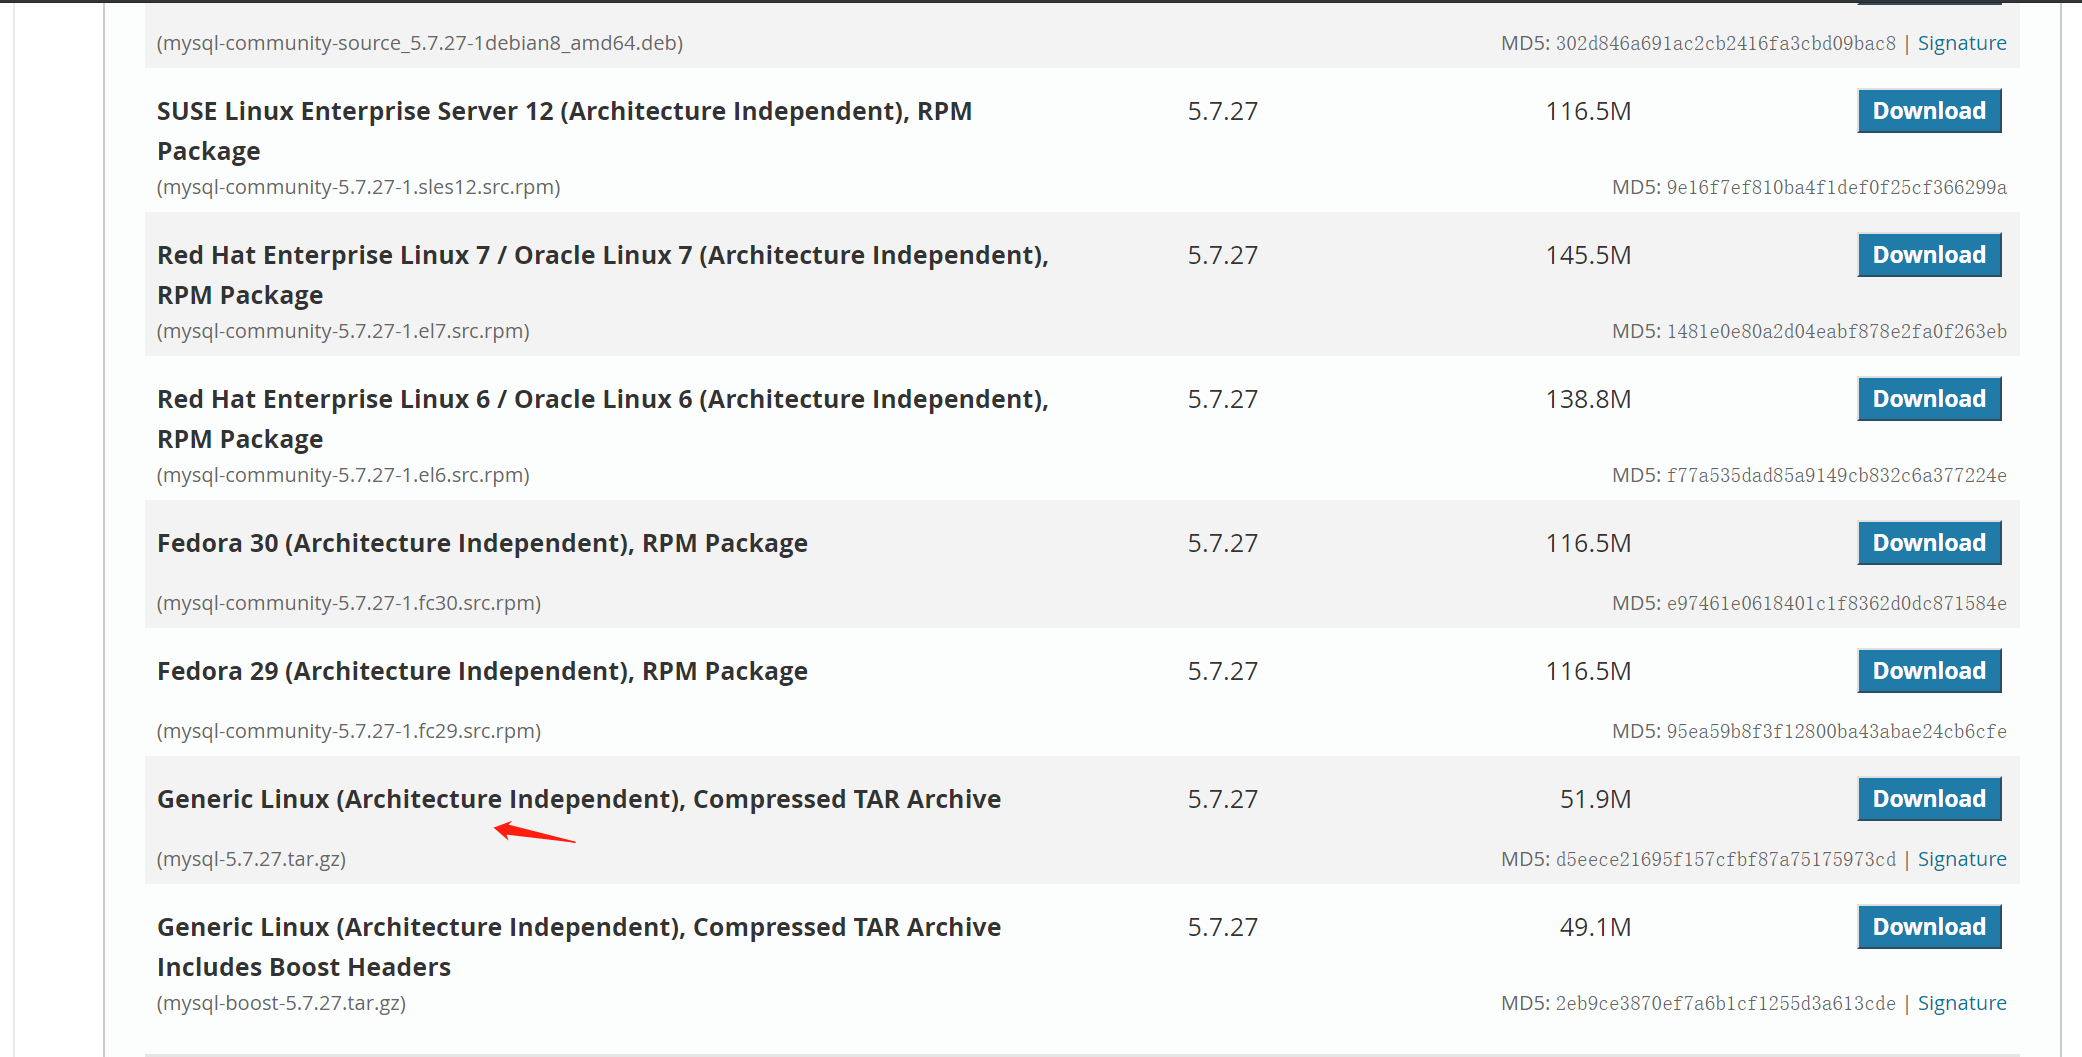
4)下载Mysql5.7.27
https://dev.mysql.com/downloads/mysql/5.7.html#downloads
5)编译安装mysql5.7.27
    [root@kevin ~]# /usr/sbin/groupadd mysql

    [root@kevin ~]# /usr/sbin/useradd -g mysql mysql -M -s /sbin/nologin

    [root@kevin ~]# cd /usr/local/src
    把下载下来的Mysql安装包上传到这个文件夹中
    [root@kevin src]# /bin/tar -zxvf mysql-5.7.27.tar.gz

    [root@kevin src]# cd mysql-5.7.21/

    [root@kevin mysql-5.7.27]# /usr/bin/cmake -DCMAKE_INSTALL_PREFIX=/data/mysql -DMYSQL_DATADIR=/data/mysql/data -DSYSCONFDIR=/etc
-DWITH_MYISAM_STORAGE_ENGINE=1 -DWITH_INNOBASE_STORAGE_ENGINE=1 -DWITH_MEMORY_STORAGE_ENGINE=1 -DWITH_READLINE=1
-DMYSQL_UNIX_ADDR=/var/lib/mysql/mysql.sock -DMYSQL_TCP_PORT=3306 -DENABLED_LOCAL_INFILE=1 -DWITH_PARTITION_STORAGE_ENGINE=1
-DEXTRA_CHARSETS=all -DDEFAULT_CHARSET=utf8 -DDEFAULT_COLLATION=utf8_general_ci -DWITH_BOOST=/usr/local/boost

    [root@kevin mysql-5.7.21]# make && make install

6)修改/data/mysql权限

    [root@kevin mysql-5.7.21]# mkdir -p /data/mysql/data

    [root@kevin mysql-5.7.21]# /bin/chown -R mysql:mysql /data/mysql

    [root@kevin mysql-5.7.21]# /bin/chown -R mysql:mysql /data/mysql/data

7)执行初始化配置脚本,创建系统自带的数据库和表

    [root@kevin mysql-5.7.21]# /data/mysql/bin/mysql_install_db --basedir=/data/mysql --datadir=/data/mysql/data --user=mysql

8)配置my.cnf
[root@kevin mysql-5.7.21]# cat /data/mysql/my.cnf
[client]
port = 3306
socket = /data/mysql/var/mysql.sock

[mysqld]
port = 3306
socket = /data/mysql/var/mysql.sock

basedir = /data/mysql/
datadir = /data/mysql/data
pid-file = /data/mysql/data/mysql.pid
user = mysql
bind-address = 0.0.0.0
server-id = 1
sync_binlog=1
log_bin = mysql-bin

skip-name-resolve
#skip-networking
back_log = 600

max_connections = 3000
max_connect_errors = 3000
##open_files_limit = 65535
table_open_cache = 512
max_allowed_packet = 16M
binlog_cache_size = 16M
max_heap_table_size = 16M
tmp_table_size = 256M

read_buffer_size = 1024M
read_rnd_buffer_size = 1024M
sort_buffer_size = 1024M
join_buffer_size = 1024M
key_buffer_size = 8192M

thread_cache_size = 8

query_cache_size = 512M
query_cache_limit = 1024M

ft_min_word_len = 4

binlog_format = mixed
expire_logs_days = 30

log_error = /data/mysql/data/mysql-error.log
slow_query_log = 1
long_query_time = 1
slow_query_log_file = /data/mysql/data/mysql-slow.log

performance_schema = 0
explicit_defaults_for_timestamp

##lower_case_table_names = 1

skip-external-locking

default_storage_engine = InnoDB
##default-storage-engine = MyISAM
innodb_file_per_table = 1
innodb_open_files = 500
innodb_buffer_pool_size = 40960M
innodb_write_io_threads = 1000
innodb_read_io_threads = 1000
innodb_thread_concurrency = 8
innodb_purge_threads = 1
innodb_flush_log_at_trx_commit = 2
innodb_log_buffer_size = 4M
innodb_log_file_size = 32M
innodb_log_files_in_group = 3
innodb_max_dirty_pages_pct = 90
innodb_lock_wait_timeout = 120

bulk_insert_buffer_size = 8M
#myisam_sort_buffer_size = 8M
#myisam_max_sort_file_size = 1G
#myisam_repair_threads = 1

interactive_timeout = 28800
wait_timeout = 28800

[mysqldump]
quick
max_allowed_packet = 16M

[myisamchk]
key_buffer_size = 8M
sort_buffer_size = 8M
read_buffer = 4M
write_buffer = 4M

sql_mode=NO_ENGINE_SUBSTITUTION,STRICT_TRANS_TABLES
port = 3306

8) 启动mysql服务
    [root@kevin mysql-5.7.21]# cd /data/mysql

    [root@kevin mysql]# /bin/mkdir var

    [root@kevin mysql]# /bin/chown -R mysql.mysql var

    [root@kevin mysql]# cp support-files/mysql.server /etc/init.d/mysql

    [root@kevin mysql]# /sbin/chkconfig mysql on

    [root@kevin mysql]# service mysql start

9) 设置环境变量
    [root@kevin mysql]# echo "export PATH=$PATH:/data/mysql/bin" >> /etc/profile

    [root@kevin mysql]# source /etc/profile

10)设置mysql登陆密码,初始密码为zx@123
    [root@kevin mysql]# /bin/mkdir -p /var/lib/mysql

    [root@kevin mysql]# ln -s /data/mysql/var/mysql.sock /var/lib/mysql/mysql.sock

11)修改密码
由于MySQL从5.7开始不允许首次安装后默认使用空密码进行登录!并且mysql5.7之后的数据库里mysql.user表里已经没有password这个字段了,
password字段改成了authentication_string。
所以修改密码的命令如下:
[root@kevin mysql]# vim /data/mysql/my.cnf
......
[mysqld]
......
skip-grant-tables                //先设置无密码登陆

[root@kevin mysql]# service mysql restart

[root@kevin mysql]# mysql -p

mysql> update mysql.user set authentication_string=password('zx@123') where user='root';
Query OK, 1 row affected, 1 warning (0.00 sec)
Rows matched: 1  Changed: 1  Warnings: 1

mysql> flush privileges;
Query OK, 0 rows affected (0.00 sec)

mysql>

然后再将/data/mysql/my.cnf配置文件中的"skip-grant-tables"去掉,重启mysql服务,就可以使用上面重置后的新密码zx@123登陆了!
温馨提示:

如果是mysql5.7.23版本, 则就不能使用mysql_install_db进行初始化了, 需要使用mysqld --initialize!


[root@lamp-new mysql-5.7.23]# /data/mysql/bin/mysql_install_db --basedir=/data/mysql --datadir=/data/mysql/data --user=mysql
2018-11-22 14:16:02 [WARNING] mysql_install_db is deprecated. Please consider switching to mysqld --initialize
2018-11-22 14:16:18 [WARNING] The bootstrap log isn't empty:
2018-11-22 14:16:18 [WARNING] 2018-11-22T06:16:02.633498Z 0 [Warning] --bootstrap is deprecated. Please consider using --initialize instead
2018-11-22T06:16:02.645463Z 0 [Warning] Changed limits: max_open_files: 1024 (requested 5000)
2018-11-22T06:16:02.645476Z 0 [Warning] Changed limits: table_open_cache: 431 (requested 2000)

可以看到mysql_install_db is deprecated,说不赞同使用mysql_install_db,推荐使用的方法是:
Please consider switching to mysqld --initialize ,Please consider using --initialize instead

所以正确的初始方式是使用mysqld --initialize, 而不是之前的mysql_install_db, mysql5.7新特性!!!!!
[root@lamp-new mysql]# /data/mysql/bin/mysqld --basedir=/data/mysql --datadir=/data/mysql/data --user=mysql --initialize
2018-11-22T06:25:33.481308Z 0 [Warning] TIMESTAMP with implicit DEFAULT value is deprecated. Please use --explicit_defaults_for_timestamp server option (see documentation for more details).
2018-11-22T06:25:34.192747Z 0 [Warning] InnoDB: New log files created, LSN=45790
2018-11-22T06:25:34.473292Z 0 [Warning] InnoDB: Creating foreign key constraint system tables.
2018-11-22T06:25:34.664979Z 0 [Warning] No existing UUID has been found, so we assume that this is the first time that this server has been started. Generating a new UUID: 6b50ba05-ee1f-11e8-afc3-005056880f83.
2018-11-22T06:25:34.689381Z 0 [Warning] Gtid table is not ready to be used. Table 'mysql.gtid_executed' cannot be opened.
2018-11-22T06:25:34.690649Z 1 [Note] A temporary password is generated for root@localhost: JR6wA4ezp3&M

注意上面:
MySQL 5.7初始化完后会生成一个临时的密码,A temporary password is generated for root@localhost: )vyd3aXj8hhC 如果想初始化表空间,
在后面加上 --innodb_data_file_path=ibdata1:1G:autoextend即可。

 浙公网安备 33010602011771号