WCF服务是个讨人喜欢的东西, 但是每个网络中的人都可以任意使用服务, 这就是个问题了, 这一组文章简单列举几种身份验证的方法. 本篇文章讨论的是证书验证.
使用X509证书进行身份验证应该说是WCF安全模型中最”正常”的做法, 因为WCF强制要求使用证书加密身份数据, 离开了证书, 所有的身份验证机制拒绝工作, WCF支持的身份验证机制也相当复杂, 这里仅为了让程序按照我们的期望动起来, 所以并不展开讨论其它的验证方法, 有了一种做法做为基础, 也很容易查到其它的实现方法.
1. 本文所使用的软件环境:
windows 7
Visual studio 2010
2. 用vs创建一个"WCF Service Library” 项目, 此时生成一个默认的IService1接口, 一个默认的GetData函数. 在当前解决方案中再增加一个Windows Forms Application项目, 作为服务的测试客户端, 直接在client中添加服务引用, 然后discover一下, Service1就显示出来了, 直接确定.
3. 现在开始写代码, 在client的form上放一个按钮, 在此按钮的点击事件中写上对服务的调用:
 var proxy = new ServiceReference1.Service1Client();
 MessageBox.Show(proxy.GetData(0));
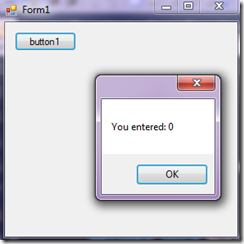
把client项目设为起始项目, F5运行, 点击按钮:
4. 测试完成, 我们的基础环境没有任何问题. 现在开始考虑身份验证的问题, 首先, 我们采用用户名/密码的模式进行验证, 这就需要有一个验证用户名密码的地方: 在服务项目中添加引用System.IdentityModel, 然后向服务添加一个类, 这里将此类命名为Validator, 这个类的实现如下:
    class Validator : System.IdentityModel.Selectors.UserNamePasswordValidator
    {
        public override void Validate(string userName, string password)
        {
            if (userName != "u" || password != "p")
                throw new UnauthorizedAccessException();
        }
    }
然后右击服务项目的app.config, 选择Edit WCF Configuration.
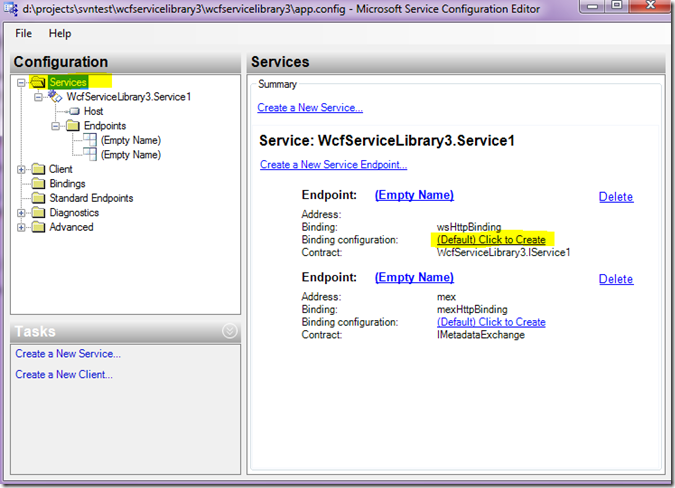
5. 为默认的EndPoint创建一个binding configuration.
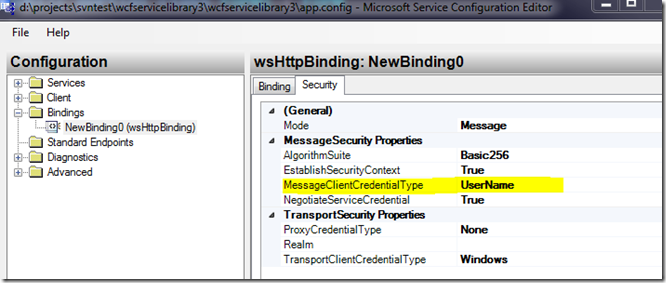
在左侧列表中选中顶级节点services, 右侧就会列出当前的endpoint, 如图所示, 默认有两个, 其中下面那个是元数据的endpoint, 我们不去管它, 上面那个endpoint的binding configuration后面有一个”click to create” 的link, 点击, 自动创建一个binding config, 创建完成以后, 切换到security标签:
将MessageClientCredentialType改为UserName, 如上图所示.
6. 为Service创建一个behavior
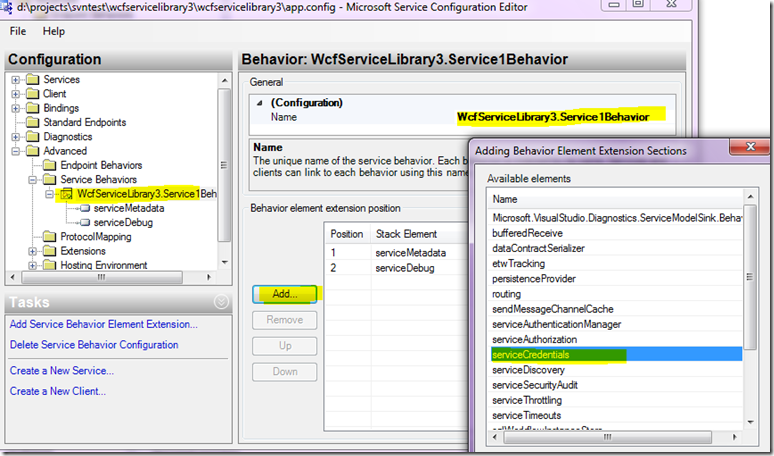
如下图所示:
在左侧panel的Advanced/Service behaviors下面默认有一个Empty name的节点, 先给它起个名字, 这里我是在服务的全名后面加了个Behavior后缀, 然后点击add按钮, 增加一个serviceCredential节点. 然后配置这个新增加的service credential:
在左侧列表中选中serviceCredential下面的serviceCertificate, 对其具体的值做如上配置:
(1) FindValue改为MyTestCert, 这是我们测试证书的名字, 一会儿我们会制作一个这个名字的证书, 导入电脑中.
(2) StoreName改为TrustedPeople
(3) X509FindType改为FindBySubjectName.
7. 使用我们刚才创建的Validator类
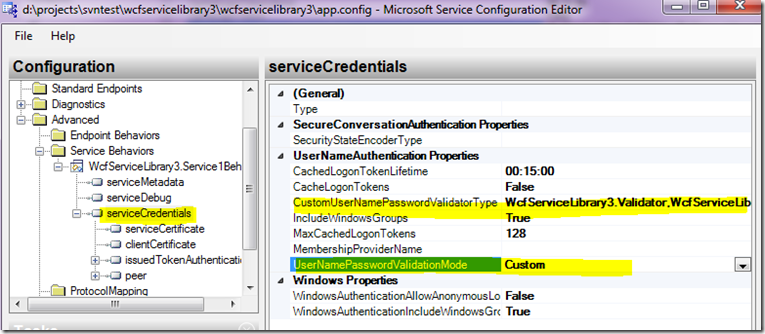
选中serviceCredential节点, 配置一下我们的自定义验证类:
其中CustomUserNamePasswordValidatoryType属性的值是:"WcfServiceLibrary3.Validator,WcfServiceLibrary3”, 前一个WcfServiceLibrary3是命名空间名, 后一个是程序集名, 不可省略. 然后将UserNamePasswordValidationMode设成Custom.
8. 将创建的behavior与服务进行关联.
在左侧面板中选中我们创建的服务Service1, 右侧将刚刚配置好的Service1Behavior与之进行关联, 这样整个服务端的配置就完成了.
保存以后, 完成的app.config如下所示:
<?xml version="1.0" encoding="utf-8" ?>
<configuration>

  <system.web>
    <compilation debug="true" />
  </system.web>
  <!-- When deploying the service library project, the content of the config file must be added to the host's
  app.config file. System.Configuration does not support config files for libraries. -->
  <system.serviceModel>
    <bindings>
      <wsHttpBinding>
        <binding name="NewBinding0">
          <security>
            <message clientCredentialType="UserName" />
          </security>
        </binding>
      </wsHttpBinding>
    </bindings>
    <services>
      <service behaviorConfiguration="WcfServiceLibrary3.Service1Behavior"
        name="WcfServiceLibrary3.Service1">
        <endpoint address="" binding="wsHttpBinding" bindingConfiguration="NewBinding0"
          contract="WcfServiceLibrary3.IService1">
          <identity>
            <dns value="localhost" />
          </identity>
        </endpoint>
        <endpoint address="mex" binding="mexHttpBinding" contract="IMetadataExchange" />
        <host>
          <baseAddresses>
            <add baseAddress="http://localhost:8732/Design_Time_Addresses/WcfServiceLibrary3/Service1/" />
          </baseAddresses>
        </host>
      </service>
    </services>
    <behaviors>
      <serviceBehaviors>
        <behavior name="WcfServiceLibrary3.Service1Behavior">
          <serviceMetadata httpGetEnabled="true" />
          <serviceDebug includeExceptionDetailInFaults="false" />
          <serviceCredentials>
            <serviceCertificate findValue="MyTestCert" storeName="TrustedPeople"
              x509FindType="FindBySubjectName" />
            <userNameAuthentication userNamePasswordValidationMode="Custom"
              customUserNamePasswordValidatorType="WcfServiceLibrary3.Validator,WcfServiceLibrary3" />
          </serviceCredentials>
        </behavior>
      </serviceBehaviors>
    </behaviors>
  </system.serviceModel>

</configuration>
9. 创建证书并导入.
在开始菜单—>Microsoft Visual Studio2010—>Visual Studio Tools下面, 点击Visual Studio Command Prompt, 打开命令行窗口, 输入以下命令:
makecert -r -pe -n "CN=MyTestCert" -ss TrustedPeople -sr LocalMachine -sky exchange
10. 现在F5重新运行, 再次点击按钮1时, 抛出如下异常:
现在我们已经可以确定, 客户端再妄想匿名使用服务是不可能了, 接下来配置客户端的使用凭证.
接下来右击客户端的app.config, 继续选Edit WCF Configuration.
11, 创建endpoint behavior
在Advanced/endpoint behavior下面新建一个endpoint behavior:
然后点击Add, 新增一个clientCredential节点.
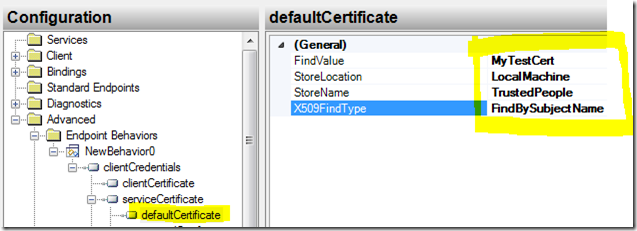
展开它的serviceCertificate节点, 选中defaultCertificate, 编辑它的属性如下图:
这几项的值和服务器端的设置是一致的.
12. 将此behavior绑定到endpoint
13. 指定dns
切换到identity标签, 将dns属性指定为我们的证书名:
至此, 客户端的配置也全部结束. 最终客户端的app.config代码为:
<?xml version="1.0" encoding="utf-8" ?>
<configuration>
  <system.serviceModel>
    <behaviors>
      <endpointBehaviors>
        <behavior name="NewBehavior0">
          <clientCredentials>
            <serviceCertificate>
              <defaultCertificate findValue="MyTestCert" storeLocation="LocalMachine"
                storeName="TrustedPeople" x509FindType="FindBySubjectName" />
            </serviceCertificate>
          </clientCredentials>
        </behavior>
      </endpointBehaviors>
    </behaviors>
    <bindings>
      <wsHttpBinding>
        <binding name="WSHttpBinding_IService1" closeTimeout="00:01:00"
            openTimeout="00:01:00" receiveTimeout="00:10:00" sendTimeout="00:01:00"
            bypassProxyOnLocal="false" transactionFlow="false" hostNameComparisonMode="StrongWildcard"
            maxBufferPoolSize="524288" maxReceivedMessageSize="65536"
            messageEncoding="Text" textEncoding="utf-8" useDefaultWebProxy="true"
            allowCookies="false">
          <readerQuotas maxDepth="32" maxStringContentLength="8192" maxArrayLength="16384"
              maxBytesPerRead="4096" maxNameTableCharCount="16384" />
          <reliableSession ordered="true" inactivityTimeout="00:10:00"
              enabled="false" />
          <security mode="Message">
            <message clientCredentialType="UserName" negotiateServiceCredential="true"
                algorithmSuite="Default" />
          </security>
        </binding>
      </wsHttpBinding>
    </bindings>
    <client>
      <endpoint address="http://localhost:8732/Design_Time_Addresses/WcfServiceLibrary3/Service1/"
        behaviorConfiguration="NewBehavior0" binding="wsHttpBinding"
        bindingConfiguration="WSHttpBinding_IService1" contract="ServiceReference1.IService1"
        name="WSHttpBinding_IService1">
        <identity>
          <dns value="MyTestCert" />
        </identity>
      </endpoint>
    </client>
  </system.serviceModel>
</configuration>
14, 指定用户名和密码.
把客户端的按钮点击代码改为:
        private void button1_Click(object sender, EventArgs e)
        {
            var ser = new ServiceReference1.Service1Client();
            ser.ClientCredentials.UserName.UserName = "u";
            ser.ClientCredentials.UserName.Password = "p";
            MessageBox.Show(ser.GetData(0));
        }
F5运行, 可以看到返回正确的结果, 而如果用户名和密码不正确, 则会抛出异常:
---------------------------------------------
作者:夏狼哉
博客:http://www.cnblogs.com/Moosdau
如需引用,敬请保留作者信息,谢谢


