Bugku-Rev-easy-100(LCTF)
开题看到评论“有手就行”,欣然下载开始做,笑死,根本没手
一道安卓逆向题,JEB反编译,查看 MainActivity

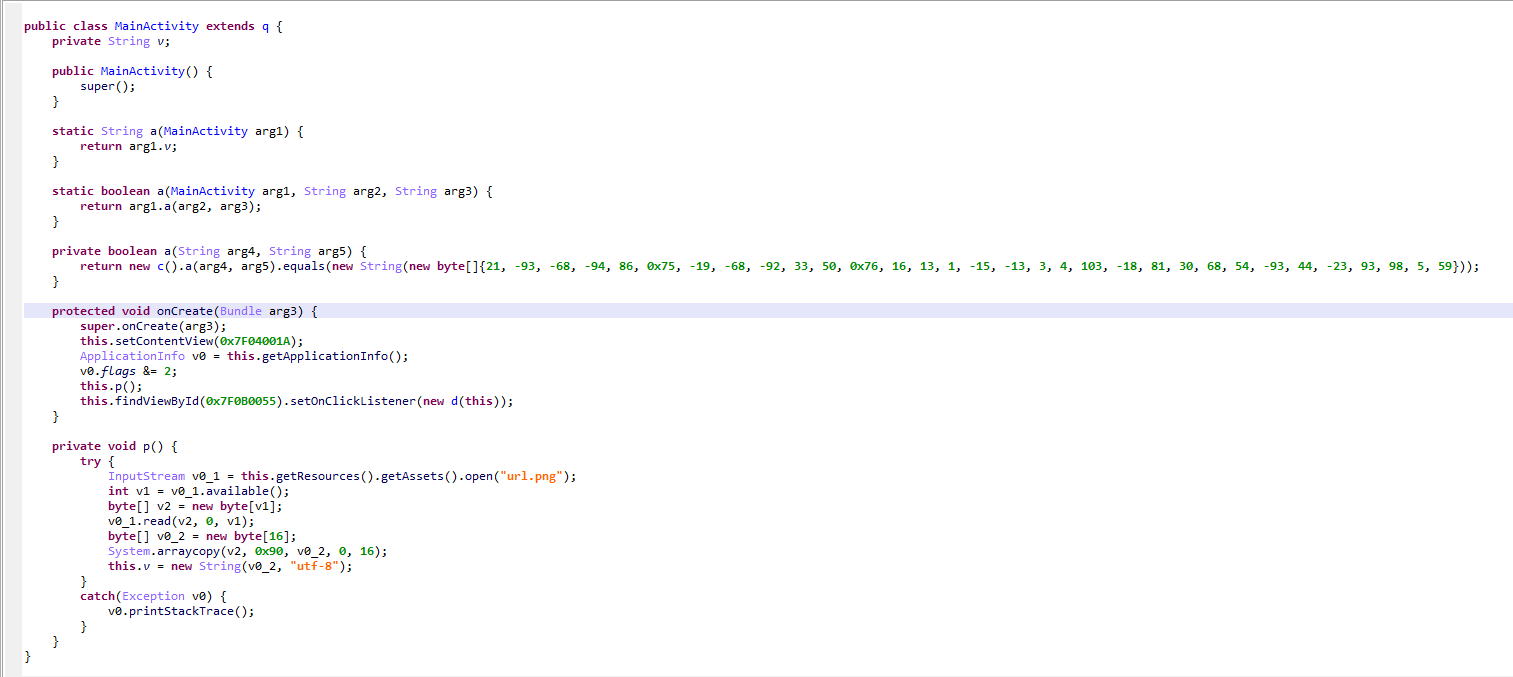
protected void onCreate(Bundle arg3) {
    super.onCreate(arg3);
    this.setContentView(0x7F04001A);
    ApplicationInfo v0 = this.getApplicationInfo();
    v0.flags &= 2;
    this.p();
    this.findViewById(0x7F0B0055).setOnClickListener(new d(this));
}
分析可得,主函数会先执行 p 函数,创建了一个按钮监听事件在 classs d 中,class d 中的 onclick 函数,当我们点击安卓的按钮,触发函数。

public void onClick(View arg5) {
    if(MainActivity.a(this.a, MainActivity.a(this.a), this.a.findViewById(0x7F0B0056).getText().toString())) {
        View v0 = this.a.findViewById(0x7F0B0054);
        Toast.makeText(this.a.getApplicationContext(), "Congratulations!", 1).show();
        ((TextView)v0).setText(0x7F060022);
    }
    else {
        Toast.makeText(this.a.getApplicationContext(), "Oh no.", 1).show();
    }
}
if 条件判断正确就显示 flag,并且调用了 main 中的 a 函数,其中第一个参数是句柄,第二个参数是调用了 a 函数(另外一个a)返回一个字符串,第三个参数是我们输入的字符串。
于是我们查看 a 函数:
private String v;

static String a(MainActivity arg1) {
    return arg1.v;
}
通过调用 a 函数,返回 main 函数中的字符串 v,而字符串 v 的初始化在 main 中的 p 函数中进行
private void p() {
    try {
        InputStream v0_1 = this.getResources().getAssets().open("url.png");
        int v1 = v0_1.available();
        byte[] v2 = new byte[v1];
        v0_1.read(v2, 0, v1);
        byte[] v0_2 = new byte[16];
        System.arraycopy(v2, 0x90, v0_2, 0, 16);
        this.v = new String(v0_2, "utf-8");
    }
    catch(Exception v0) {
        v0.printStackTrace();
    }
}
p 函数的作用就是读取一张图片的二进制数据取出这张图片 byte[144:144+16] 的数据保存在 v 字符串中。
至此,我们回去继续分析 if 判断语句,上面说了 if 语句调用了 main 的 a 函数(三个参数)
static boolean a(MainActivity arg1, String arg2, String arg3) {
    return arg1.a(arg2, arg3);
}

private boolean a(String arg4, String arg5) {
    return new c().a(arg4, arg5).equals(new String(new byte[]{21, -93, -68, -94, 86, 117, -19, -68, -92, 33, 50, 118, 16, 13, 1, -15, -13, 3, 4, 103, -18, 81, 30, 68, 54, -93, 44, -23, 93, 98, 5, 59}));
}
可以看出 a 函数(三个参数)调用了 a 函数(两个参数),而 a 函数(两个参数)调用 c 的 a 函数(两个参数),计算完后和后面的字节比较,如果相等就显示flag
简直有毒这个 a 那个 a 看的眼花缭乱...
看看c函数:

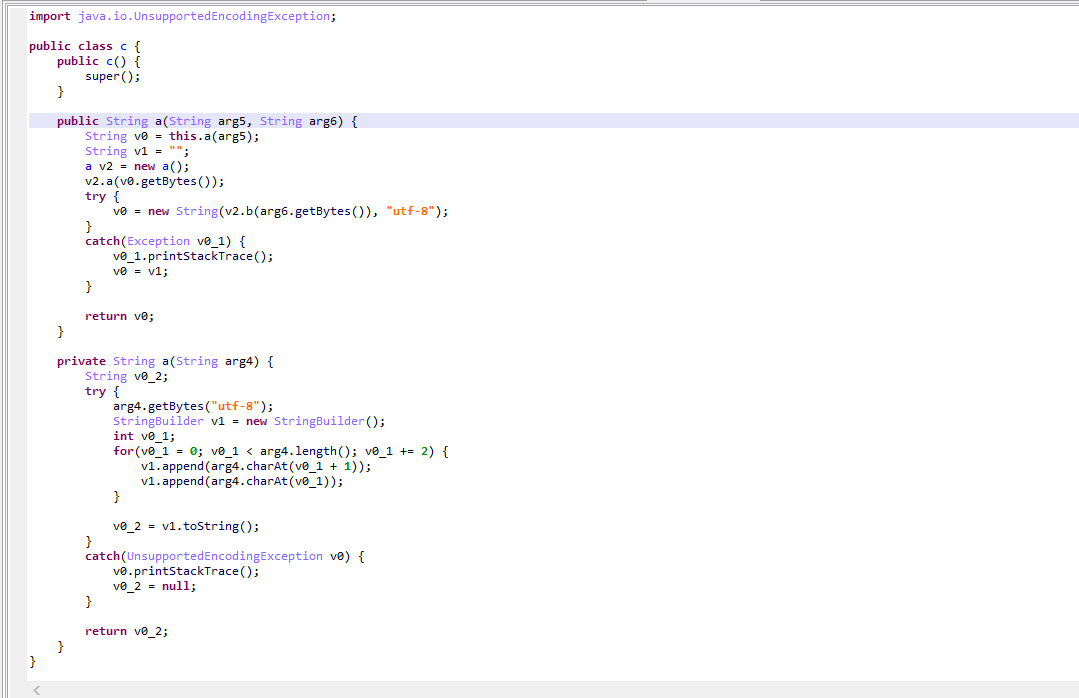
public String a(String arg5, String arg6) {
    String v0 = this.a(arg5);
    String v1 = "";
    a v2 = new a();
    v2.a(v0.getBytes());
    try {
        v0 = new String(v2.b(arg6.getBytes()), "utf-8");
    }
    catch(Exception v0_1) {
        v0_1.printStackTrace();
        v0 = v1;
    }

    return v0;
}
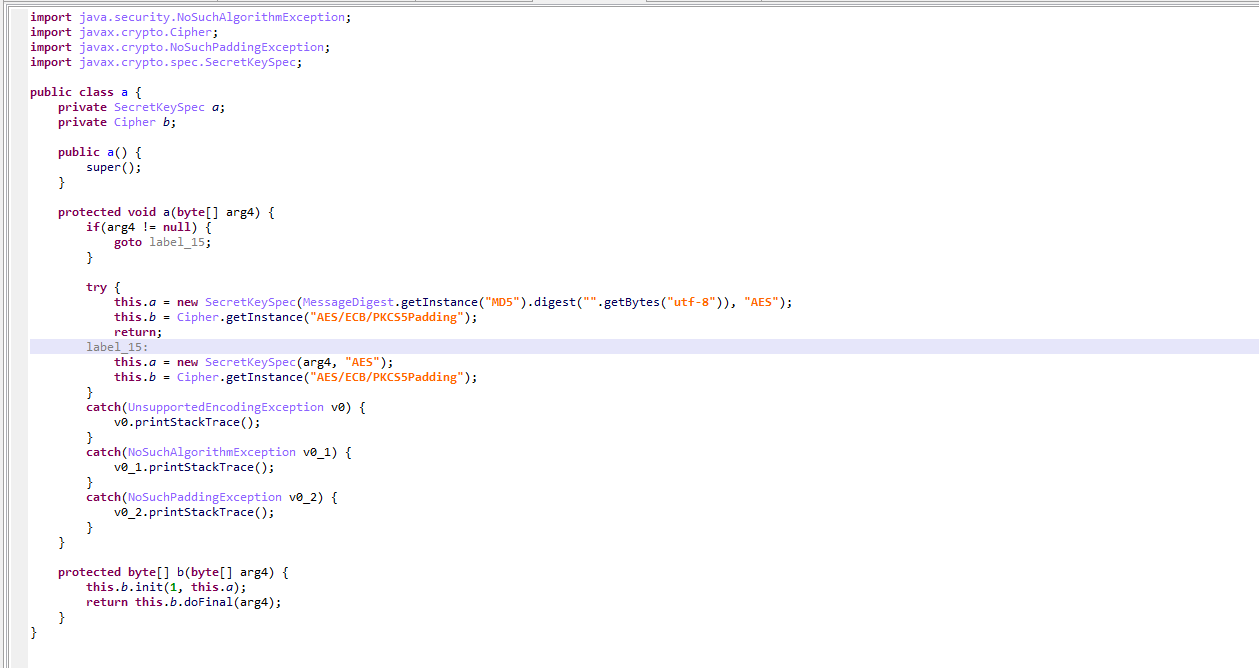
可以看到 c 函数中还会用到 a 函数,我们不妨先看一下 a 函数的亚子

this.a = new SecretKeySpec(arg4, "AES");
this.b = Cipher.getInstance("AES/ECB/PKCS5Padding");
两部分一起分析
arg5 是从图片中获取的字符串,arg6是我们输入的
后面代码主要就是 AES 加密,将 arg5 经过变换后的字符串当做密码,将输入的字符串进行 AES 加密后和后面给出的字符串比较,如果相等得到 flag
那我们就可以直接解密 AES 就可以得到 flag 了
from Crypto.Cipher import AES
from binascii import b2a_hex, a2b_hex

#equals比较的字节数组
byteArray =[21, -93, -68, -94, 86, 117, -19, -68, -92, 33,
            50, 118, 16, 13, 1, -15, -13, 3, 4, 103, -18,
            81, 30, 68, 54, -93, 44, -23, 93, 98, 5, 59]
#读取图片
with open('url.png','rb') as f:
    p =f.read()
str1 =p[144:144+16]
# 字节数组转字符串
byte2str = str1.decode()
print("图片[144:144+16]字符串:"+ byte2str)

# 前后两个字符一组,互换位置,密钥字符串
str2 =""
for i in range(0,len(str1),2):
    str2 += chr(str1[i+1])
    str2 += chr(str1[i])
print("返回互换位置后的图片字符串:" + str2)

# 把密文字节数组转换为16进制字符串
str3 =""
for i in byteArray:
    s=str(hex((i+256)%256))
    if len(s) <4:
        s = s[0:2]+'0'+s[2:]
    str3+=s[2:]
print(str3)

# AES算法解密,ECB的工作模式,PKCS5Padding 的填充
# 去掉 PKCS5Padding 的填充
unpad = lambda s: s[:-ord(s[len(s) - 1:])]
# 通过 密钥,工作模式ECB 进行初始化密码器
cipher = AES.new(str2.encode(), AES.MODE_ECB)
# a2b_hex()16进制转字符串,之后密码器解密字符串,再用unpad表达式去掉 PKCS5Padding 的填充,最后指定utf8的编码格式将bytes解码成字符串str
data_response = unpad(cipher.decrypt(a2b_hex(str3))).decode('utf8')
print("解密得到的明文密码flag:"+data_response)
LCTF
内容参考:


