WLC配置LAG
在一般的网络环境中,为了让网络更加的可靠,冗余性更好,会对WLC和对端的设备配置LAG.
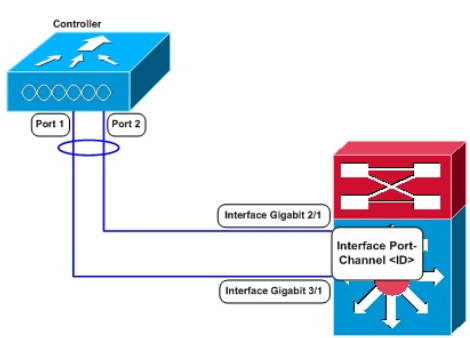
如下是一个基本的示例topo(VSS的情况下建议的连接方式):

一般情况下的连接方式:

一般来说配置比较简单,但是某些注意事项,需要在操作之前心里有数。这里主要记录一下这些需要注意的地方。
1、注意事项:
-你可以将5508的八个分布式端口捆绑到一个单一Port-channel链路。
-LAG需要EtherChannel被配置为“mode on”(在WLC和Catalyst交换机都需要这么做)。
-交换机不能配置LACP或者PAgP协议,应该配置为mode on,因为WLC不支持LACP和PAgP。
-不能将WLC的端口分别配置到不同的LAG Groups。每个WLC只支持一个LAG Group,所以,你也只能将LAG模式的WLC连接到一个邻居设备。
-当你开启了LAG或者对LAG做了什么配置变动的话,你必须立即重启WLC。
-当你开启LAG时,你只可以配置一个AP-manager interface,因为只需要一个逻辑端口。
-当你开启LAG,所有的动态接口和未打标签(untagged)的接口会被删除,并且所有的WLAN被disable并且映射到management接口。因此,management,static AP-manager和VLAN-tagged dynamic interfaces都移动到了LAG端口。
-多个untagged接口到同一个端口时不允许的。
-当你开启LAG,你不能创建超过29个接口。
-启用LAG后,AP将保持与控制器的连接,并且用户的数据服务将继续不间断,直到您重新启动WLC,这是激活LAG模式更改所需的。
-启用LAG后,无需为每个接口配置主备端口。
-当禁用LAG后,management,static AP-manager和dynamic interfaces会移动到port 1上。
-当禁用LAG后,你必须配置每个接口的主备端口。
-当你在AP直接连接协商的WLC2504上开启LAG时,直连的AP会断开,因为LAG仍然处于一个过渡期,所以开启LAG后必须要重启WLC。
-在WLC8500上,当超过1000个AP加入WLC发生flapping时,为了避免这种情况,不要单独在一个Catalyst switch上添加CAPWAP ipv6的AP超过1000个。
2、配置
①WLC上(GUI / CLI)
GUI:
| Step 1 | Choose Controller > General to open the General page. |
| Step 2 | Set the LAG Mode on Next Reboot parameter to Enabled. |
| Step 3 | Save the configuration. |
| Step 4 | Reboot Cisco WLC. |
| Step 5 |
CLI:
②配置交换机
Configuring Neighbor Devices to Support Link Aggregation
The controller’s neighbor devices must also be properly configured to support LAG.
-
Each neighbor port to which the controller is connected should be configured as follows:
interface GigabitEthernet <interface id>
	switchport
	channel-group <id> mode on
	no shutdown
-
The port channel on the neighbor switch should be configured as follows:
interface port-channel <id>
	switchport
	switchport trunk encapsulation dot1q
	switchport trunk native vlan <native vlan id>
	switchport trunk allowed vlan <allowed vlans>
	switchport mode trunk
	no shutdown
参考文档:
https://community.cisco.com/t5/wireless-mobility-documents/lag-link-aggregation/ta-p/3128669/page/2


