

前端Vue之vue的基本操作
vue.js是目前前端web开发最流行的工具库之一,由尤雨溪在2014年2月发布的。
另外几个常见的工具库:react.js /angular.js
官方网站:
官方文档:https://cn.vuejs.org/v2/guide/
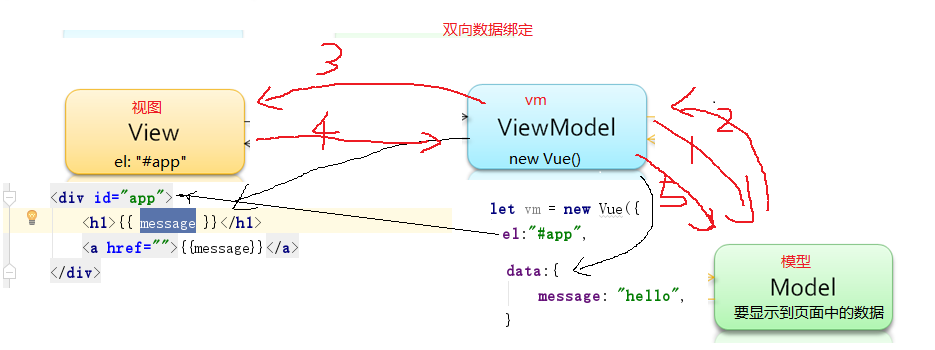
1. vue的使用要从创建Vue对象开始
   var vm = new Vue();

2. 创建vue对象的时候,需要传递参数,是json对象,json对象对象必须至少有两个属性成员
   var vm = new Vue({
     el:"#app",
     data: {
         数据变量:"变量值",
         数据变量:"变量值",
         数据变量:"变量值",
     },
   });

   el:设置vue可以操作的html内容范围,值就是css的id选择器。
   data: 保存vue.js中要显示到html页面的数据。

3. vue.js要控制器的内容外围,必须先通过id来设置。
  <div id="app">
      <h1>{{message}}</h1>
      <p>{{message}}</p>
  </div>
<body>
<div id="a1">
    <h1>{{message}}</h1>
</div>
<script>
    let vm = new Vue({
        el:"#a1",
        data:{
            message:"hello world"
        }
    })

</script>
MVVM 是Model-View-ViewModel 的缩写,它是一种基于前端开发的架构模式。
Model 指代的就是vue对象的data属性里面的数据。这里的数据要显示到页面中。
View 指代的就是vue中数据要显示的HTML页面,在vue中,也称之为“视图模板” 。
ViewModel
简单实例:


<body>

<!--相对路径就是在当前的代码所在的文件里边,根据当前目录,找到想要的文件的地方-->
<!--../ 表示找到此文件的上一级-->
<!--../images表示找到此文件的上一级里边的images文件夹-->
<!--../images/a.jpg表示找到此文件的上一级里边的images文件夹下边的a.jpg-->

<div id="box">
    <h1>{{message}}</h1>
    <input type="text" v-model="message">
</div>

<script>
    let vm = new Vue({
        el:"#box",
        data:{
            message:"hello world"
        }
    })

</script>

通过v-model = {{message}}
可动态展示input标签内容,并且在修改便签内容时message也会跟着改变
-
-
在表单输入框中显示数据要使用v-model来完成数据显示 如input a 标签等
3双花括号仅用输出文本内容,如果要输出html代码,则不能使用这个.要使用v-html来输出. v-html必须在html标签里面作为属性写出来.
简单示例代码:
<div id="box">
    <h1>{{message}}</h1>
    <input type="text" v-model="message">
    <span style="width:100px" v-html="img1"></span>
</div>

<script>
    let vm = new Vue({
        el:"#box",
        data:{
            message:'hello world',
            img1:'<img src="../images/reba.jpg" alt="">'

        }
    })

</script>

如代码中的 img标签 需要通过v-html来显示
 <h1>{{str1.split("").reverse().join("")}}</h1>
    <!-- 3.2 支持js的运算符-->
    <h1>{{num1+3}}</h1>

    <!-- 3.3 js还有一种运算符,三元运算符,类似于python里面的三元表达式
        三元运算符的语法:
         判断条件 ? 条件为true : 条件为false的结果

        python 三元表达式[三目运算符]的语法:
        a if 条件 else b
     -->
    <h1>num1和num2之间进行比较,最大值:{{ num2>num1?num2:num1 }}</h1>
2.操作指令
指令 (Directives) 是带有“v-”前缀的特殊属性。每一个指令在vue中都有固定的作用。
在vue中,提供了很多指令,常用的有:v-if、v-model、v-for等等。
指令会在vm对象的data属性的数据发生变化时,会同时改变元素中的其控制的内容或属性。
因为vue的历史版本原因,所以有一部分指令都有两种写法:
vue1.x写法             vue2.x的写法
v-html         ---->   {{  }}
v-bind:属性名   ---->   :属性
v-on:事件名     ---->   @事件名
2.1 操作属性
格式:
<标签名 :标签属性="data属性"></标签名>
相关操作示例:
<div id="app">
    <h1 v-html="message"></h1>
    <div><img v-bind:src='img1' width="300"></div>
    <br>
    <span v-on:click="func1">点我加谈窗口</span>
    <br>
    <span @click="func2">点我有惊喜{{num}}</span>
</div>

<script>
    let vm = new Vue({
        el:"#app",
        data:{
            message:'hello world',
            img1:'../images/reba.jpg',
            num:0,

        },
        methods:{
            func1:function () {
                alert("hello")
            },
            func2:function () {
                this.num+=1
            }
            }

    })

</script>
2.2事件绑定操作
1. 使用@事件名来进行事件的绑定
语法:
<h1 @click="num++">{{num}}</h1>
2. 绑定的事件的事件名,全部都是js的事件名:
@submit ---> onsubmit
@focus ---> onfocus
....
简单操作示例:
<div id="app">
<button @click="num+=1">+</button>
<input type="text" v-model="num">
<button @click="(num>0?num-=1:0)">-</button>
</div>

<script>
    let vm = new Vue({
        el:"#app",
        data:{
            num:0,
        },

    })

</script>
格式:
<h1 :class="值">元素</h1> 值可以是对象、对象名、数组
以下包含有两种操作cls 以及批量添加cls操作的示例:
<!DOCTYPE html>
<html lang="en">
<head>
    <meta charset="UTF-8">
    <title>Title</title>
    <script src="../js/vue.js"></script>
    <style>
        .box1{color: red;border: 1px solid #000;}
        .box2{background-color: orange;font-size: 32px;}
    </style>
</head>
<body>


<div id="app">
<p :class="{box1:mycls1}">这是一个没有灵魂的P标签</p>
<div @click="mycls3=!mycls3" :class="{box1:mycls2,box2:mycls3}">这是一个没有灵魂的div标签</div>
</div>

<script>
    let vm = new Vue({
        el:"#app",
        data:{
            mycls1:true, // 布尔值变量如果是false,则不会添加对象的属性名作为样式,反之则相反
            mycls2:true,
            mycls3:false,
        },
    })
</script>


<hr>

<!--另外一种操作cls的写法:-->
<style>
    .box4{
        background-color: red;
    }
    .box5{
        color: green;
    }
    </style>
<div id="animal">
    <button @click="my_cls.box4=!my_cls.box4">(背景)</button>
    <button @click="my_cls.box5=!my_cls.box5">(字体)</button>
    <div :class="my_cls">这是一个没有灵魂的小王八</div>
</div>

<script>
    let vm1 = new Vue({
        el:"#animal",
        data:{
            my_cls:{
                box4:true,
                box5:true
                },

        }
    })
</script>


<!-- 批量给元素增加多个class样式类 -->
<style>
    .box6{background-color: red;}
    .box7{color: green;}
    .box8{border: 1px solid green;}
</style>
<div id="app2">
    <button @click="mycls1.box6=!mycls1.box6">背景</button>
    <p :class="[mycls1,mycls2]">这是一条没有灵魂的二哈</p>
</div>
<script>
    let vm3 = new Vue({
        el:"#app2",
        data:{
            mycls1:{
                    box6:true,
                    box7:true,
                },
            mycls2:{
                box8:true,
            }
        }
    })

</script>
</body>
</html>
总结:
1. 给元素绑定class类名,最常用的就是第二种。
    vue对象的data数据:
        data:{
          myObj:{
            complete:true,
            uncomplete:false,
          }
        }

		html元素:
    		<div class="box" :class="myObj">2222</div>
    最终浏览器效果:
		    <div class="box complete">2222</div>
<!DOCTYPE html>
<html lang="en">
<head>
    <meta charset="UTF-8">
    <title>Title</title>
    <script src="../js/vue.js"></script>
</head>
<body>

<!--控制方式一--->
<div id="app">
     <!-- 控制行内样式,值是一个对象
         :style="{color:样式值1,fontSize:样式值2}" # 样式值是一个data里面保存的变量
         -->
  <p :style="{color:'green',backgroundColor:'red'}">这是一只不要脸的加菲猫</p> <!--也可以这样写,没啥意义---->
    <p :style="{color:mycolor,backgroundColor:mybg}">这是一只不要脸的加菲猫</p>
</div>

<script>
    let vm = new Vue({
        el:"#app",
        data:{
           mycolor:'green',
            mybg:'red'
        }
    })

</script>


<!--控制方式二,直接把样式包好,直接整个字典放上去--->
 <div id="app2">
        <p :style="mystyle">这是一只没有尊严哈皮狗</p>
    </div>
<script>
    let vm2 = new Vue({
        el:"#app2",
        data:{
            mystyle:{
                backgroundColor:"yellow",
                color:"orange",
            }
        }
    });
</script>

<!--批量加样式,列表添加-->
<div id="app3">
        <p :style="[my_style1,my_style2]">这是一只只会吃的大笨猪</p>
    </div>
<script>
    let vm3 = new Vue({
        el:"#app3",
        data:{
            my_style1:{
                backgroundColor:"yellow",
                color:"orange",
            },
            my_style2:{
                border: "#0a6999 solid 5px"
            }
        }
    });
</script>


</body>
</html>
<div id="animal">

    <!-- v-else不能单独使用,只能跟着 v-if 或者 v-else-if 后面,表示或者的意思
         v-else会使用上一个标签的v-if作为判断条件,并且v-else和v-if标签必须紧密相连
         -->
    <p v-if="!is_pig">你是猪吗?</p>
    <p v-else="!is_pig">哦,你真的就是猪</p>

     <!-- 一次只会出现一个结果
         v-else-if可以有多个,但是和v-else一样,不能单独使用,必须跟着v-if后面
         -->
    <p v-if="num>10">你是猪吗?</p>
    <p v-else-if="num<10">你是真的猪嘛?</p>
    <p v-else="num=10">哦,你真的就是猪</p>

     <!-- v-show只能单独使用,后面无法使用v-else -->
    <p v-show="num>10">num大于10</p>
    <p v-show="num<=10">num小于等于10</p>

</div>


<script>
    let vm = new Vue({
        el:"#animal",
        data:{
            is_pig:true,
            num:13
        }
    })
</script>
2.6 列表渲染指令
在vue中,可以通过v-for指令可以将一组数据渲染到页面中,数据可以是数组或者对象。
具体用法以及注意点看代码:
<div id="box">
    <ul>
        <!---  v-for="自定义成员变量 in 数据变量数组" -->
        <li v-for="item in students">{{item}}</li>
    </ul>
    <ul>
         <!---  v-for="(成员变量,下标) in 数据变量数组"-->
        <li v-for="item,key in goods">书籍编号:{{key+1}},书籍名称:{{item.name}},书籍价格:{{item.price}}</li>
    </ul>
</div>


<script>
    let vm = new Vue({
        el:"#box",
        data:{
            students:["小黑","小白","小王","小八","刘老师"],
            goods:[
                {"name":"python入门","price":150},
                {"name":"python进阶","price":100},
                {"name":"python高级","price":75},
                {"name":"python研究","price":60},
                {"name":"python放弃","price":110},]
        }
    })
</script>
以下两个小项目可作为练手参考:
1.选项卡练习
<!DOCTYPE html>
<html lang="en">
<head>
    <meta charset="UTF-8">
    <title>Title</title>
    <script src="../js/vue.js"></script>
</head>
<style>
    #all{
        width: 500px;
        height: 350px;
    }
    #title{
         width: 500px;
         height: 50px;
    }
    #title span{
        width: 100px;
         height: 50px;
        background-color: #bbb;
        line-height: 50px;
        text-align: center;
        display: inline-block;

    }
    #content div{
         width: 500px;
         height: 300px;
        background-color: #b2dba1;
        display: none;
    }

     #content .current{
         display: block;
     }
     #title .active{
        background-color: orange;
    }
</style>
<body>
<div id="all">
    <div id="title">
        <span @click="num=1" :class="num==1?'active':'' ">国内新闻</span>
        <span @click="num=2" :class="num==2?'active':'' ">国际新闻</span>
        <span @click="num=3" :class="num==3?'active':'' ">宇宙新闻</span>
    </div >

    <div id="content">
        <div  :class="(num==1?'current':'')">国内新闻内容</div>
        <div  :class="(num==2?'current':'')">国际新闻内容</div>
        <div  :class="(num==3?'current':'')">宇宙新闻内容</div>
    </div>


</div>

<script>
    let vm = new Vue({
        el:"#all",
        data:{
            num:1
        }
    })
</script>


</body>
</html>
2.数据系统(仅用vue在前段完成数据的增删改查)
<!DOCTYPE html>
<html lang="en">
<head>
    <meta charset="UTF-8">
    <title>Title</title>
    <script src="../js/vue.js"></script>
    <!-- 最新版本的 Bootstrap 核心 CSS 文件 -->
    <link rel="stylesheet" href="https://cdn.jsdelivr.net/npm/bootstrap@3.3.7/dist/css/bootstrap.min.css"
          integrity="sha384-BVYiiSIFeK1dGmJRAkycuHAHRg32OmUcww7on3RYdg4Va+PmSTsz/K68vbdEjh4u" crossorigin="anonymous">
    <style>
        .expensive {
            color: red;
            /*background-color: #c1e2b3;*/
        }
        .hiden{
            display: none;
        }
        .show{
            display: block;
        }
        .header{
            text-align: center;
        }
    </style>
</head>
<body>

<h2 class="header">书籍系统</h2>
<div id="app" class="container col-md-6 col-md-offset-3">

    <div id="view_panel" :class="status==false? 'hiden':'show' " >
        <label for="title">书籍名称</label>
        <input name="title" v-model="title" type="text" class="form-control">
        <label for="price">价格</label>
        <input name="price" type="text" v-model="price" class="form-control">
        <div class="pull-right col-offset-2" >
            <button @click="status=false" class="btn btn-danger btn-sm">取消</button>
            <button @click="is_edit_ensure==false?ensure_add():ensure_edit()" class="btn btn-info btn-sm">确认</button></div>
    </div>

    <div :class="status == true? 'hiden':'show'">
         <button @click="add" class="btn btn-info btn-sm">添加书籍</button>
        <table class="table table-hover table-bordered">
            <thead>
            <tr>
                <th>书籍名称</th>
                <th>书籍价格</th>
                <th>操作</th>
            </tr>
            </thead>
            <tbody>
            <tr v-for=" item,key in goods" :class="item.price>70?'expensive':'' ">
                <td>{{item.name}}</td>
                <td>{{item.price}}</td>
                <td>

                    <button @click="edit(key)" class="btn btn-info btn-sm">编辑</button>
                    <button @click="goods.splice(key,1)" class="btn btn-danger btn-sm">删除</button>
                </td>
            </tr>

            </tbody>
        </table>
    </div>


</div>

<script>
    let vm = new Vue({
        el: "#app",
        data: {
            goods: [{"name": "python入门", "price": 100},
                {"name": "python高阶", "price": 120},
                {"name": "python进阶", "price": 70},
                {"name": "python并发编程", "price": 90},
                {"name": "python放弃", "price": 50},
            ],
            title:'',  //title,price都是为了在点编辑按钮时把数据加载到iput标签里面
            price:'',
            status:false, //用来判断是否显示添加和编辑页面并在显示该页面的同时隐藏掉主页面
            is_edit_ensure:false, //在提交确认按钮时用来分别是添加确认还是编辑修改确认
            index:0,

        },
        methods: {
            //添加时确认按钮的函数
            ensure_add:function () {
                this.status=false;
                var dic={};
                dic["name"]=this.title;
                dic["price"]=this.price;
                this.goods.push(dic);

            },
             //编辑时确认按钮的函数
            ensure_edit:function () {
                this.status=false;
                console.log(this.index)
                var dic = this.goods[this.index]
                dic["name"]=this.title;
                dic["price"]=this.price;

            },
            //点击编辑按钮时做的一些操作,如修改status,获取input标签里的内容,修改确认时is_edit_ensure的状态,用以区别此时属于编辑还是添加
            edit:function (key) {
                this.status=true;
                this.title = this.goods[key]['name'];
                this.price = this.goods[key]['price'];
                this.is_edit_ensure=true;
                this.index=key;
            },
            //点击添加按钮时做的一些操作,大概和编辑类似
            add:function () {
                this.status=true;
                this.title = '';
                this.price = '';
                this.is_edit_ensure=false;
            }
        }

    })

</script>
</body>
</html>

 浙公网安备 33010602011771号