
计算机系统实验笔记
lab1_challenge2 打印异常代码
直接make后的情况:
spike ./obj/riscv-pke ./obj/app_errorline
In m_start, hartid:0
HTIF is available!
(Emulated) memory size: 2048 MB
Enter supervisor mode...
Application: ./obj/app_errorline
Application program entry point (virtual address): 0x0000000081000000
Switch to user mode...
Going to hack the system by running privilege instructions.
Illegal instruction!
System is shutting down with exit code -1.
我们是希望本代码在第8行提示后显示runtime error, 内核能够输出触发异常的用户程序的源文件名和对应代码行
- 注意:虽然在示例的app_errorline.c中只触发了非法指令异常,但最终测试时你的内核也应能够对其他会导致panic的异常和其他源文件输出正确的结果。
- 文件名规范:需要包含路径,如果是用户源程序发生的错误,路径为相对路径,如果是调用的标准库内发生的错误,路径为绝对路径。
- 为了降低挑战的难度,本实验在elf.c中给出了debug_line段的解析函数
make_addr_line。这个函数接受三个参数,ctx为elf文件的上下文指针,这个可以参考文件中的其他函数;debug_line为指向.debug_line段数据的指针,你需要读取elf文件中名为.debug_line的段保存到缓冲区中,然后将缓冲区指针传入这个参数;length为.debug_line段数据的长度。 - 函数调用结束后,process结构体的dir、file、line三个指针会各指向一个数组,dir数组存储所有代码文件的文件夹路径字符串指针,如/home/abc/bcd的文件夹路径为/home/abc,本项目user文件夹下的app_errorline.c文件夹路径为user;file数组存储所有代码文件的文件名字符串指针以及其文件夹路径在dir数组中的索引;line数组存储所有指令地址,代码行号,文件名在file数组中的索引三者的映射关系。如某文件第3行为a = 0,被编译成地址为0x1234处的汇编代码li ax, 0和0x1238处的汇编代码sd 0(s0), ax。那么file数组中就包含两项,addr属性分别为0x1234和0x1238,line属性为3,file属性为“某文件”的文件名在file数组中的索引。
- 注意:dir、file、line三个数组会依次存储在debug_line数据缓冲区之后,dir数组和file数组的大小为64。所以如果你用静态数组来存储debug_line段数据,那么这个数组必须足够大;或者你也可以把debug_line直接放在程序所有需映射的段数据之后,这样可以保证有足够大的动态空间。
#include "user_lib.h"
#include "util/types.h"

int main(void) {
  printu("Going to hack the system by running privilege instructions.\n");
  // we are now in U(user)-mode, but the "csrw" instruction requires M-mode privilege.
  // Attempting to execute such instruction will raise illegal instruction exception.
  asm volatile("csrw sscratch, 0");
  exit(0);
}
原代码中, 在第8行引起exceptions(risc.v)至mtrap.c 引起 CAUSE_ILLEGAL_INSTRUCTION 中断。
引起panic异常时, 系统时调用了mtrap.c文件中的 handle_something_fault 函数,但是这个函数目前指挥报错, 并不能显示引发异常的位置,因此我们需要完善这部分的代码。
首先我们回顾一下process结构体和它的作用:
//process 结构体
// the extremely simple definition of process, used for begining labs of PKE
typedef struct process_t {
  // pointing to the stack used in trap handling.
  uint64 kstack;
  // trapframe storing the context of a (User mode) process.
  trapframe* trapframe;

  // added @lab1_challenge2
  char *debugline;
  char **dir;
  code_file *file;
  addr_line *line;
  int line_ind;   //行号数
}process;
这个结构体是用来描述一个进程(process)的基本信息的。在操作系统中,一个进程代表了正在运行的一个程序实例。让我们逐个分析这个结构体中的成员:
kstack:这是一个指向用于处理陷阱(trap)的堆栈(stack)的指针。当进程在内核模式下执行时,它会使用这个堆栈来保存执行上下文和临时数据。trapframe:这是一个指向 trapframe 结构体的指针,用于存储进程的上下文信息。trapframe 中包含了进程在发生中断或异常时需要保存和恢复的寄存器值和其他相关信息。debugline、dir、file、line、line_ind:这些成员似乎是在后续的lab1_challenge2中添加的。debugline可能是一个指向调试信息的字符串的指针,而dir、file、line、line_ind可能用于存储源代码文件、目录和行号等信息。
我们可以设计print_errorline函数, 同时让各种handle_fault函数调用这个函数打印信息
需要注意, 打印异常代码时, 我们需要知道文件路径, 文件名, 异常代码所处行数
在struct process中, 新增加了debugline、dir、file、line、line_ind这些成员, 因此考虑利用这些成员存储相应信息
我们来看elf.c中的 load_bincode_from_host_elf函数
void load_bincode_from_host_elf(process *p) {
  arg_buf arg_bug_msg;

  // retrieve command line arguements
  size_t argc = parse_args(&arg_bug_msg);
  if (!argc) panic("You need to specify the application program!\n");

  sprint("Application: %s\n", arg_bug_msg.argv[0]);

  //elf loading. elf_ctx is defined in kernel/elf.h, used to track the loading process.
  elf_ctx elfloader;
  // elf_info is defined above, used to tie the elf file and its corresponding process.
  elf_info info;

  info.f = spike_file_open(arg_bug_msg.argv[0], O_RDONLY, 0);
  info.p = p;
  // IS_ERR_VALUE is a macro defined in spike_interface/spike_htif.h
  if (IS_ERR_VALUE(info.f)) panic("Fail on openning the input application program.\n");

  // init elfloader context. elf_init() is defined above.
  if (elf_init(&elfloader, &info) != EL_OK)
    panic("fail to init elfloader.\n");

  // load elf. elf_load() is defined above.
  if (elf_load(&elfloader) != EL_OK) panic("Fail on loading elf.\n");

  // entry (virtual, also physical in lab1_x) address
  p->trapframe->epc = elfloader.ehdr.entry;

  // close the host spike file
  spike_file_close( info.f );

  sprint("Application program entry point (virtual address): 0x%lx\n", p->trapframe->epc);
}
这个函数的作用是从主机的 ELF 文件加载二进制代码到一个进程的内存中,并设置该进程的入口地址。具体步骤如下:
- 解析命令行参数,获取要加载的应用程序的文件名。
- 打开指定的应用程序 ELF 文件,如果打开失败则触发 panic。
- 初始化一个用于加载 ELF 文件的 elf_ctx 结构,并将其与进程关联起来。
- 使用 elf_init() 函数初始化 elfloader 上下文,如果初始化失败则触发 panic。
- 使用 elf_load() 函数加载 ELF 文件,如果加载失败则触发 panic。
- 将加载的 ELF 文件的入口地址设置为进程的 trapframe->epc。
- 关闭打开的应用程序 ELF 文件。
- 打印应用程序的入口地址(虚拟地址)。
总体来说,这个函数的目的是将一个应用程序的 ELF 文件加载到指定进程的内存中,并设置该进程的入口地址,以便后续可以执行该应用程序。
在这个函数中, 我们只使用了elf_load来加载程序段
下面是elf_load的实现:
elf_status elf_load(elf_ctx *ctx) {
  // elf_prog_header structure is defined in kernel/elf.h
  elf_prog_header ph_addr;
  int i, off;

  // traverse the elf program segment headers
  for (i = 0, off = ctx->ehdr.phoff; i < ctx->ehdr.phnum; i++, off += sizeof(ph_addr)) {
    // read segment headers
    if (elf_fpread(ctx, (void *)&ph_addr, sizeof(ph_addr), off) != sizeof(ph_addr)) return EL_EIO;

    if (ph_addr.type != ELF_PROG_LOAD) continue;
    if (ph_addr.memsz < ph_addr.filesz) return EL_ERR;
    if (ph_addr.vaddr + ph_addr.memsz < ph_addr.vaddr) return EL_ERR;

    // allocate memory block before elf loading
    void *dest = elf_alloc_mb(ctx, ph_addr.vaddr, ph_addr.vaddr, ph_addr.memsz);

    // actual loading
    if (elf_fpread(ctx, dest, ph_addr.memsz, ph_addr.off) != ph_addr.memsz)
      return EL_EIO;
  }

  return EL_OK;
}
这个
elf_load函数的实现主要是根据 ELF 文件的程序头部表(Program Header Table)中的信息,将 ELF 文件中的程序段(Program Segment)加载到内存中的正确位置。具体来说,函数首先遍历 ELF 文件的程序头部表,每次读取一个程序头部(Program Header),然后根据程序头部的信息进行相应的操作:
- 如果程序头部的类型(type)不是
ELF_PROG_LOAD,则跳过,不处理该程序头部。- 检查程序头部的
memsz(内存大小)是否小于等于filesz(文件大小),如果不是则返回EL_ERR,表示加载出错。- 检查程序头部的虚拟地址加上内存大小是否溢出,如果溢出则返回
EL_ERR,表示加载出错。- 在内存中为该程序段分配一块内存块(使用
elf_alloc_mb函数),用于存放加载后的数据。- 使用
elf_fpread函数将 ELF 文件中的数据加载到内存中相应的位置。最终,函数会返回
EL_OK,表示 ELF 文件的加载成功;如果在加载过程中出现了错误,则会返回相应的错误码(如EL_EIO或EL_ERR)。总的来说,
elf_load函数的实现是根据 ELF 文件的程序头部信息,将程序段加载到内存中的正确位置,为后续程序执行做准备。
从
elf_load函数的实现来看,它只负责加载 ELF 文件的程序段(Program Segment),并没有加载调试信息(debug information)。调试信息通常存储在 ELF 文件的特定节(section)中,如 ".debug_line" 节。加载调试信息需要额外的处理逻辑,包括找到相应的节并将其内容加载到内存中。在
elf_load函数中,并没有包含加载调试信息的逻辑,因此调试信息并未在该函数中被加载。加载调试信息通常在load_debug_line函数或类似的函数中实现,这样可以使代码更清晰、更模块化。
elf_load_debugline实现
根据前文的提示, 我们使用数组存储degbugline内容[1] ,那么首先我们需要shstrtab来解析debugline
节名字符串表(Section Header String Table,shstrtab)是 ELF 文件中的一种特殊节,用于存储所有节的名称。每个节的头部中包含一个指向节名字符串表中对应节名称的偏移量。通过这种方式,可以在不占用额外空间的情况下,为每个节指定一个唯一的名称。
当找到节名字符串表后,可以通过解析该表中的内容来获取每个节的名称。这对于解析 ELF 文件的结构非常有用,特别是在需要查找特定节(如代码段、数据段、调试信息段等)时。通过节名字符串表,可以根据节的名称快速找到对应的节,从而实现对 ELF 文件中不同部分的精确定位和处理。
总之,找到节名字符串表后,主要的操作就是根据需要解析该表,以获取每个节的名称,并根据这些名称进行后续的处理和操作。
试作elf_load_debugline:
elf_sect_header debugline_sh;
char debugline_buf[8096];
elf_status elf_load_debugline(elf_ctx *ctx){

    //find shstrtab to get debugline
    elf_sect_header shstr_sh;
    elf_fpread(ctx,(void*)&shstr_sh,sizeof(shstr_sh),(ctx->ehdr.shoff+(sizeof(elf_sect_header))*(ctx->ehdr.shstrndx)));
    // save shstrtab
    char shstrtab[shstr_sh.size];
    elf_fpread(ctx,(void*)&shstrtab,shstr_sh.size,shstr_sh.offset);

    // find debug line
    elf_sect_header unk_sh;
    for(int i=0;i<ctx->ehdr.shnum;i++){
        elf_fpread(ctx,(void*)&unk_sh,sizeof(unk_sh),(ctx->ehdr.shoff+i*ctx->ehdr.shentsize));
        if(!strcmp(shstrtab[unk_sh.name],".debug_line")){
            debugline_sh=unk_sh;
            break;
        }
    }
    elf_fpread(ctx,(void*)&debugline_buf,debugline_sh.size,debugline_sh.offset);
    make_addr_line(ctx,debugline_buf,debugline_sh.size);
    return EL_EIO;
}
代码思路:
- 先找到
shstrtab的section header, 这个可以利用elf文件的上下文指针ctx中的shstrndx, 它存储了节名字符表的索引 - 通过
shstrtab section header读取shstrtab的内容 - 遍历, 找到名为
.debug_line的节头部
设计好函数后,我们让load_bincode_from_host_elf去调用一下这个函数就好了
回顾函数设计:
目前来说, 我们的函数设计是存在一些小问题的, 和elf_load对比就知道目前是不完善的. 因为我们函数的返回值只有EL_OK, 这个内容就留给后续完善了
print_errorline 的实现
首先我们尝试从mepc中读取异常地址
mepc是 RISC-V 指令集架构中的一个寄存器,用于存储下一条要执行的指令的地址。具体来说,mepc是 Machine Exception Program Counter 的缩写,它在发生异常或中断时用于保存当前正在执行指令的地址,以便在异常处理完成后能够正确地返回到异常发生的位置继续执行。在异常或中断处理过程中,操作系统会根据需要修改
mepc寄存器的值,以指向相应的异常处理程序或中断服务程序的入口地址。这样,在处理完异常或中断后,处理器可以从mepc中读取地址,继续执行下一条指令,实现异常处理的流程。
read_csr是一个用于读取 RISC-V 控制状态寄存器(CSR)的函数。在 RISC-V 架构中,CSR 是一种特殊的寄存器,用于存储控制和状态信息,例如中断使能、异常处理等。mepc是其中一个 CSR,用于存储下一条要执行的指令的地址。
read_csr(mepc)的作用是读取当前mepc寄存器的值,即当前发生异常或中断的指令地址。这样做的目的是为了根据这个地址来确定发生异常的指令在源代码中的位置,从而能够打印出相关的错误信息。为什么需要使用
read_csr函数而不直接使用mepc寄存器呢?这是因为在 RISC-V 架构中,对 CSR 的访问受到权限控制,不是所有的指令都能直接读写 CSR。read_csr函数是一个合法的访问 CSR 的方法,它会在底层处理权限等问题,以确保能够正确地读取到 CSR 的值。
代码思路
- 通过mepc找到errorline
- 利用
process中新增成员dir,file找到完整路径\ - 通过完整路径和
spike_file.c中的函数打开文件并保存到buffer中 - 逐行变量找到errorline的内容
如果使用这样的逻辑
int i=0;
while(i<current->line_ind&&me_addr>current->line[i].addr){
    i++;
}
// error line is found
addr_line *errorline= &(current->line[i]);
结果是
mepc:81000010
Runtime error at user/app_errorline.c:13
  exit(0);
Illegal instruction!
这并不符合预期, 而是显示errorline的下一行
仔细一看找到的确实是第13行, 所以这个逻辑没有错, 反而是后续打印errorline代码时出现了错误, 于是继续排查
当一个指令导致异常时,
mepc寄存器中存储的是导致异常的指令的地址。这个地址通常是指令在内存中的地址,而不是源代码中的行号。让我们通过一个简单的示例来说明这一点。假设有如下的一段 C 语言代码:
int main() {
    int a = 10;
    int b = 0;
    int c = a / b;  // 这里会导致除零异常
    return 0;
}
当程序执行到
int c = a / b;这行代码时,会发生除零异常。这时,处理器会将引起异常的指令的地址存储到mepc寄存器中。假设这行代码对应的机器码指令在内存地址0x1000处,那么mepc寄存器中的值将是0x1000。在这个示例中,
mepc寄存器中的值0x1000是导致异常的指令的地址,而不是int c = a / b;这行代码在源代码中的行号。要确定源代码中的行号,您可能需要使用调试器或其他工具来查看对应机器码指令的源代码映射。
经过排查找到了错误: 因为我们的第n行代码存入buffer时, 是将其对应到第n-1行的 (绕半天没理清楚问题出现原因,改了一下代码结构换个思路对了)
void print_errorline(){
  uint64 me_addr=read_csr(mepc);
  //sprint("mepc:%x\n",me_addr);
  // find error addr
  int i=0;
  while(i<current->line_ind&&me_addr>current->line[i].addr){
      i++;
  }
  // error line is found
  addr_line *errorline= &(current->line[i]);
  //sprint("errorline is %d\n",errorline->line);
  //sprint("errorline:%x\n",errorline->addr);

  // save file path
  strcpy(file_path,current->dir[(current->file[errorline->file]).dir]);
  int dir_len=strlen(current->dir[(current->file[errorline->file]).dir]);
  //TODO / must be added
  file_path[dir_len]='/';
  strcpy((file_path+dir_len+1),current->file[errorline->file].file);

  // get errorline content
  spike_file_t *f=spike_file_open(file_path,O_RDONLY,0);
  struct stat s;
  spike_file_stat(f,&s);
  spike_file_read(f,(void*)file_buf,s.st_size);

  int offset=0;
  int line_id=0;
  while(offset<s.st_size){
    if(line_id==errorline->line-1){
      sprint("Runtime error at %s:%d\n",file_path,errorline->line);
      sprint("%s\n",(file_buf+offset));
      break;
    }
    while(file_buf[offset]!='\n'){
      offset++;
    }
    if(line_id==errorline->line-2){
      int tmp_off=offset+1;
      while(file_buf[tmp_off]!='\n'){
        tmp_off++;
      }
      file_buf[tmp_off]='\0';
    }
    offset++;
    line_id++;
  }
  spike_file_close(f);
}
显然这个修改也不是很好, 最后修改得到这个代码
void print_errorline(){
  uint64 me_addr=read_csr(mepc);
  //sprint("mepc:%x\n",me_addr);
  // find error addr
  int i=0;
  while(i<current->line_ind&&me_addr>current->line[i].addr){
      i++;
  }
  // error line is found
  addr_line *errorline= &(current->line[i]);
  //sprint("errorline is %d\n",errorline->line);
  //sprint("errorline:%x\n",errorline->addr);

  // save file path
  strcpy(file_path,current->dir[(current->file[errorline->file]).dir]);
  int dir_len=strlen(current->dir[(current->file[errorline->file]).dir]);
  //TODO / must be added
  file_path[dir_len]='/';
  strcpy((file_path+dir_len+1),current->file[errorline->file].file);

  // get errorline content
  spike_file_t *f=spike_file_open(file_path,O_RDONLY,0);
  struct stat s;
  spike_file_stat(f,&s);
  spike_file_read(f,(void*)file_buf,s.st_size);
  //sprint("%s",file_buf);
  int offset=0;
  int line_id=1;
  while(offset<s.st_size){
    if(line_id==errorline->line){
      int tmp_off=offset+1;
      while(file_buf[tmp_off]!='\n'){
        tmp_off++;
      }
      file_buf[tmp_off]='\0';
      sprint("Runtime error at %s:%d\n",file_path,errorline->line);
      sprint("%s\n",(file_buf+offset));
      break;
    }
    while(file_buf[offset]!='\n'){
      offset++;
    }
    offset++;
    line_id++;
  }
  spike_file_close(f);
}
lab2_challenge2 堆空间管理
spike ./obj/riscv-pke ./obj/app_singlepageheap
Application: ./obj/app_singlepageheap
Application program entry point (virtual address): 0x000000000001008a
Switch to user mode...
you need to manage the vm space precisely!User exit with code:-1.
System is shutting down with exit code -1.
page_walk 作用
page_walk函数的作用是在页表中进行页表项(Page Table Entry,PTE)的查找和操作。在操作系统中,虚拟内存被划分为固定大小的页面,而页表则用来将虚拟地址映射到物理地址,以实现虚拟内存的管理。page_walk函数通常用于以下几个方面:
- 查找页表项:通过给定的虚拟地址,在页表中查找对应的页表项。这样可以确定虚拟地址对应的物理地址。
- 修改页表项:可以修改页表项的内容,例如修改页面的权限或映射关系。
- 增加新的映射:如果需要在虚拟地址空间中增加新的映射关系(例如,为新分配的内存创建页表项),可以使用
page_walk函数来操作页表。- 页表遍历:可以使用
page_walk函数来遍历整个页表,以便对页表中的所有页表项进行操作。
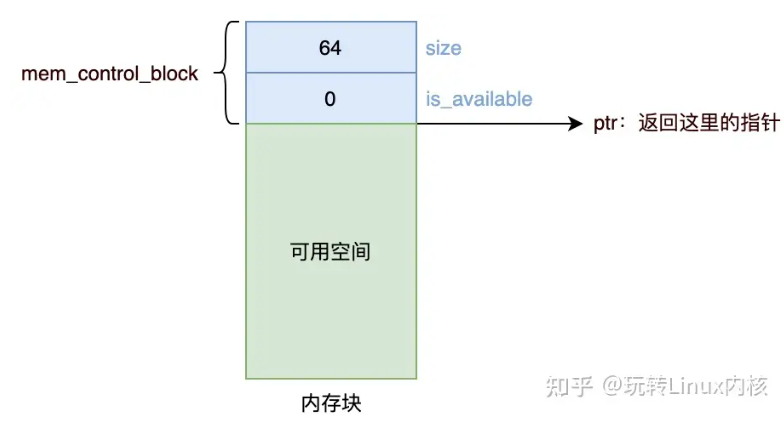
如果我们考虑使用内存控制块链表来实现堆空间管理:
设计内存控制块 mem_control_block
typedef struct mem_control_block_t {
  uint64 addr;
  uint64 size;  /* 数据区大小 */
  struct mem_control_block_t *next;/* 指向下个块的指针 */
  uint64 is_allocated;     /* 是否被占用 */
}Mem_Control_Block;
malloc 使用空闲链表组织堆中的空闲区块,空闲链表有时也用双向链表实现。每个空闲区块都有一个相同的首部,称为“内存控制块” mem_control_block,其中记录了空闲区块的信息,比如指向下一个分配块的指针、当前分配块的长度、或者当前区块是否已经被分配出去。这个首部对于程序是不可见的,malloc 返回的是紧跟在首部后面的地址,即可用空间的起始地址。[2]
malloc 分配时会搜索空闲链表,根据匹配原则,找到一个大于等于所需空间的空闲区块,然后将其分配出去,返回这部分空间的指针。如果没有这样的内存块,则向操作系统申请扩展堆内存。注意,返回的指针是从可用空间开始的,而不是从首部开始的:[2:1]
尝试实现malloc free
下面, 我们尽量选择简化的方案,( 例如, 我们暂时不考虑碎片问题 ,)
如果链表中存在符合条件的空闲块, 我们直接将整个空闲块都分配出去
否则我们创建一个新的空闲块
这时我们会维护两个指针
heap_top表示新开出的页表的空间, 即堆最多可用到的地址
heap_use_top则用来维护我们已经使用的空间, 二者之差则是我们剩余可自由支配的空间
后续, 我们可以在do_malloc的try to find unallocted block代码部分, 在遍历过程中,对空闲内存块进行合并或者对要分配的空闲块进行分割.这样能进一步提高空间的利用率
后续优化
- 加入了自动合并(
automerge) 和分割(autodivide)的功能. 碎片问题得到了初步解决, malloc基本比较完善了
lab3_challenge2 实现信号量
整体设计
- 信号灯的资源是先申请的会抢占后续信号灯, 这样似乎不是很合理, 暂时没解决这个问题
- 在
process中加入新成员sema_need用来记录目前进程需要的信号灯数量
后续设计中, 发现这个新成员其实并没有这么必要, 最后还是把他取消了
相当于最后只设计了P V两个操作的相关函数
然后信号灯的设计如下
typedef struct semaphore_t{
  int value;
  process *queue_head;
}semaphore;
我们使用了队列来管理每个信号灯控制的一些子进程
最后是PV操作的设计
int do_sem_P(int semid){
  //sprint("PPPP\n");
  sems[semid].value--;
  if(sems[semid].value>=0){
    return sems[semid].value;
  }

  process *tmp=sems[semid].queue_head;
  if(tmp==NULL){
    //sprint("P queue\n");
    sems[semid].queue_head=current;
    current->queue_next=NULL;
  }else{
    //sprint("P queueend\n");
    while(tmp->queue_next!=NULL){
      tmp=tmp->queue_next;
    }
    tmp->queue_next=current;
    current->queue_next=NULL;
  }

  current->sema_need++;
  current->status=BLOCKED;
  //sprint("P sechdule\n");
  schedule();
  return -1;
}

int do_sem_V(int semid){
  //sprint("VVVV\n");
  sems[semid].value++;
  if(sems[semid].queue_head==NULL){
    //sprint("V OK\n");
    return sems[semid].value;
  }
  //sprint("V ready insert\n");
  sems[semid].queue_head->sema_need--;
  //sprint("V insert\n");
  if(sems[semid].queue_head->sema_need==0){
    process *readyproc=sems[semid].queue_head;
    sems[semid].queue_head=sems[semid].queue_head->queue_next;
    insert_to_ready_queue(readyproc);
  }else{
    sprint("sem V warning :: sema need is OK?");
  }
  return -1;
}
整体设计起来还是比较简单的
lab4_challenge2 重载执行
我们先来回顾一下文件系统中新增的文件管理结构体:
// data structure that manages all openned files in a PCB
typedef struct proc_file_management_t {
  struct dentry *cwd;  // vfs dentry of current working directory
  struct file opened_files[MAX_FILES];  // opened files array
  int nfiles;  // the number of files opened by a process
} proc_file_management;
这段代码定义了一个名为
proc_file_management的结构体,用于管理进程打开的所有文件。结构体中包含了以下成员:
cwd:一个指向struct dentry类型的指针,表示当前工作目录的虚拟文件系统(VFS)目录项。opened_files:一个包含MAX_FILES个元素的数组,每个元素是一个struct file类型的结构体,用于存储已打开文件的信息。struct file通常包含有关文件的指针、文件状态等信息。nfiles:一个整数,表示进程打开的文件数量。这个结构体可以被用作进程控制块(PCB)中的一部分,用于跟踪进程的文件操作。
为了便于在文件系统操作中使用,例如在加载文件时需要分配内存并进行映射的情况
参考elf_alloc_mb的设计, 实现了vfs_elf_alloc_mb 函数:
static void *vfs_elf_alloc_mb(process *p, uint64 elf_pa, uint64 elf_va, uint64 size) {
  // we assume that size of proram segment is smaller than a page.
  kassert(size < PGSIZE);
  void *pa = alloc_page();
  if (pa == 0) panic("uvmalloc mem alloc falied\n");

  memset((void *)pa, 0, PGSIZE);
  user_vm_map((pagetable_t)p->pagetable, elf_va, PGSIZE, (uint64)pa,
         prot_to_type(PROT_WRITE | PROT_READ | PROT_EXEC, 1));

  return pa;
}
基于同样的思路, 我们还实现了:
static uint64 vfs_elf_pread(struct file *elf_file, void *dest, uint64 nb, uint64 offset)
{
  vfs_lseek(elf_file, offset, 0);
  return vfs_read(elf_file, dest, nb);
}
elf_status vfs_elf_init(elf_ctx *ctx, struct file *elf_file)
{
  if (vfs_elf_pread(elf_file, &ctx->ehdr, sizeof(ctx->ehdr), 0) != sizeof(ctx->ehdr))
  {
    return EL_EIO;
  }
  if (ctx->ehdr.magic != ELF_MAGIC)
  {
    return EL_NOTELF;
  }
  return EL_OK;
}
通过一系列的修改, 我们使得加载elf文件的方式改为从vfs文件系统中读取
void vfs_load_bincode_from_host_elf(process *p) {
  arg_buf arg_bug_msg;

  // retrieve command line arguements
  size_t argc = parse_args(&arg_bug_msg);
  if (!argc) panic("You need to specify the application program!\n");

  sprint("Application: %s\n", arg_bug_msg.argv[0]);

  //elf loading. elf_ctx is defined in kernel/elf.h, used to track the loading process.
  elf_ctx elfloader;

  struct file *elf_file=vfs_open(arg_bug_msg.argv[0], O_RDONLY);

  // IS_ERR_VALUE is a macro defined in spike_interface/spike_htif.h

  // init elfloader context. elf_init() is defined above.
  if (vfs_elf_init(&elfloader, elf_file) != EL_OK)
    panic("fail to init elfloader.\n");

  // load elf. elf_load() is defined above.
  if (vfs_elf_load(&elfloader,p,elf_file,) != EL_OK) panic("Fail on loading elf.\n");

  // entry (virtual, also physical in lab1_x) address
  p->trapframe->epc = elfloader.ehdr.entry;

  // close the host spike file
  vfs_close(elf_file);

  sprint("Application program entry point (virtual address): 0x%lx\n", p->trapframe->epc);
}
通过对原来elf加载程序的修改, 我们实现了通过VFS文件系统读取
最后实现do_exec
int do_exec(char *path){
  sprint("do_exec start\n");
  spike_file_t *file=spike_file_open(path,O_RDONLY,0);
  if(IS_ERR_VALUE(file)){
    panic("Fail on openning the input application program.\n");
  }
  elf_ctx elf_loader;
  elf_info info;
  info.f = file;
  info.p = current;
  if(elf_init(&elf_loader, &info) != EL_OK){
    panic("fail to init elfloader.\n");
    return -1;
  }
  sprint("elf_loader: phnum:%d\n", elf_loader.ehdr.phnum);
  if(elf_reload(&elf_loader, &info) != EL_OK){
    panic("Fail on loading elf.\n");
    return -1;
  }
  current->trapframe->epc = elf_loader.ehdr.entry;
  spike_file_close(file);
  sprint("do_exec done\n");
  return 0;
}
lab1_challenge3 多核启动及运行
如果要获取hart_id, 我们必须使用tp寄存器获取线程的信息
在计算机科学中,"TP 寄存器" 通常指的是线程指针寄存器(Thread Pointer Register),它是一个专门用于存储当前线程信息的寄存器。在一些体系结构中,比如 SPARC 和 MIPS,TP 寄存器用于存储指向线程控制块(Thread Control Block,TCB)的指针,而 TCB 包含了线程的状态信息、程序计数器和栈指针等。
TP 寄存器的作用是让操作系统能够追踪和管理多线程程序中的不同线程,通过切换 TP 寄存器的值,操作系统可以切换不同线程的上下文,实现多线程的并发执行。
static inline void sync_barrier(volatile int *counter, int all) {

  int local;

  asm volatile("amoadd.w %0, %2, (%1)\n"
               : "=r"(local)
               : "r"(counter), "r"(1)
               : "memory");

  if (local + 1 < all) {
    do {
      asm volatile("lw %0, (%1)\n" : "=r"(local) : "r"(counter) : "memory");
    } while (local < all);
  }
}
这段代码是一个同步屏障(synchronization barrier)的实现。同步屏障用于确保多个线程在某个点上同步执行,即等待所有线程都到达同步点后再继续执行。
函数
sync_barrier接受两个参数:一个是指向int类型的 volatile 变量counter的指针,另一个是表示参与同步的线程数量all。它的作用是让所有线程等待,直到所有线程都调用了该函数,然后再一起继续执行。在函数内部,首先使用原子操作
amoadd.w(原子加法)将counter所指向的值加 1,并将结果存储在local变量中。然后通过比较local + 1和all的大小,判断是否所有线程都已经到达同步点。如果还有线程没有到达,就通过一个循环等待,不断读取counter的值,直到所有线程都到达。需要注意的是,这段代码使用了一些嵌入式汇编(inline assembly),这是一种在 C/C++ 代码中直接嵌入汇编代码的技术。在这里,使用了
amoadd.w和lw汇编指令来实现原子操作和内存读取操作。
- 理解在多核场景下,什么资源是唯一的,什么资源是多份的。唯一的资源有:模拟器相关接口、内存和设备。多份的资源有:每个核的所有寄存器和状态信息。
- 对于唯一的资源,所有核会共享,所以需要控制并发。对于多份的资源,所有核应当独立占有,所以需要隔离资源。
对于需要多份的资源, 我们通过数组增加了相关资源, 为其分配了栈空间
参考
dir、file、line三个数组会依次存储在debug_line数据缓冲区之后,dir数组和file数组的大小为64。所以如果你用静态数组来存储debug_line段数据,那么这个数组必须足够大;或者你也可以把debug_line直接放在程序所有需映射的段数据之后,这样可以保证有足够大的动态空间。 ↩︎
本文作者:Mintisn
本文链接:https://www.cnblogs.com/Mintisn/p/18130852
版权声明:本作品采用知识共享署名-非商业性使用-禁止演绎 2.5 中国大陆许可协议进行许可。


【推荐】国内首个AI IDE,深度理解中文开发场景,立即下载体验Trae
【推荐】编程新体验,更懂你的AI,立即体验豆包MarsCode编程助手
【推荐】抖音旗下AI助手豆包,你的智能百科全书,全免费不限次数
【推荐】轻量又高性能的 SSH 工具 IShell:AI 加持,快人一步