1.微服务注册中心Consul
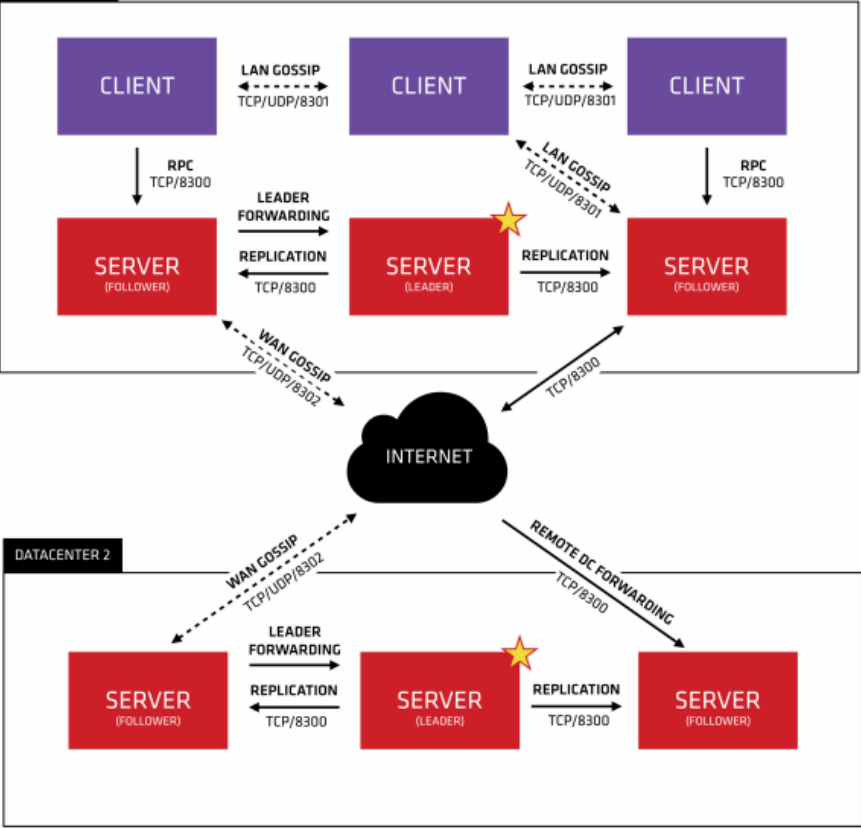
Consul 是HashiCorp公司推出的开源工具,Consul由Go语言开发,部署起来非常容易,只需要极少的可执行程序和配置文件,具有绿色、轻量级的特点。 Consul 是 分布式 的、 高可用 的、 可横向扩展 的用于实现分布式系统的服务发现与配置。
中文网:Consul 中文文档 - Consul 中文文档 (gitbook.io)
1. Consul具有哪些特点
服务发现(Service Discovery): Consul 提供了通过DNS或者HTTP接口的方式来注册服务和发现服务。一些外部的服务通过Consul很容易的找到它所依赖的服务。
健康检查(Health Checking):Consul的Client可以提供任意数量的健康检查,既可以与给定的服务相关联(“webserver是否返回200 OK”),也可以与本地节点相关联(“内存利用率是否低于
90%”)。操作员可以使用这些信息来监视集群的健康状况,服务发现组件可以使用这些信息将流量从不健康的主机路由出去。
Key/Value存储:应用程序可以根据自己的需要使用Consul提供的Key/Value存储。 Consul提供了简单易用的HTTP接口,结合其他工具可以实现动态配置、功能标记、领袖选举等等功能。
安全服务通信:Consul可以为服务生成和分发TLS证书,以建立相互的TLS连接。意图可用于定义允许哪些服务通信。服务分割可以很容易地进行管理,其目的是可以实时更改的,而不是使用复杂的网络拓扑和静态防火墙规则。
多数据中心: Consul支持开箱即用的多数据中心。这意味着Consul的用户不必担心建立额外的抽象层来发展到多个区域。

consul.exe agent -dev
sudo yum install -y yum-utils
sudo yum-config-manager --add-repo
https://rpm.releases.hashicorp.com/RHEL/hashicorp.repo
sudo yum -y install consul
[root@yushangxue ~]# consul version
Consul v1.10.3
Revision c976ffd2d
Protocol 2 spoken by default, understands 2 to 3 (agent will automatically use
protocol >2 when speaking to compatible agents)
consul agent -dev
$ docker pull consul # 默认拉取latest
$ docker pull consul:1.15.4 # 拉取指定版本
docker run -d -p 8500:8500 --restart=always --name=consul consul agent -server -
bootstrap -ui -node=1 -client='0.0.0.0'
Consul.AspNetCore 1.6.10.8
"Consul": {
"ConsulHost": "http://localhost:8500",
"ServiceName": "ServiceName",
"ServiceIP": "x.x.x.x",
"ServicePort" : 5009
}
public class ConsulOption
{
     public string ConsulHost { get; set; }
     public string ServiceName { get; set; }
     public string ServiceIP { get; set; }
     public int ServicePort { get; set; }
}

public static class ConsulServiceExtension
{
    public static IServiceCollection AddConsulService(this IServiceCollection services, IConfiguration configuration )
    {
        var consulSection = configuration.GetSection("Consul");
        services.Configure<ConsulOption>(consulSection);
        var consulOption = consulSection.Get<ConsulOption>();

        services.AddConsul(p =>
        {
            p.Address = new Uri(consulOption.HostAddress);
        });

        services.AddConsulServiceRegistration(p =>
        {
            p.ID = Guid.NewGuid().ToString();
            p.Name = consulOption.ServerName;
            p.Address = consulOption.ServiceAddress;
            p.Port = consulOption.Port;

            // 健康检查
            p.Check = new()
            {
                // 1. 如果服务不可用(健康检查失败)的情况下,多久将当前服务移除
                DeregisterCriticalServiceAfter = TimeSpan.FromSeconds(5),
                // 2. 健康检查间隔时间
                Interval = TimeSpan.FromSeconds(10),
                // 3. 健康检查地址(心跳地址)
                HTTP = $"http://{p.Address}:{p.Port}/health"
                // 4. 超时时间
                ,Timeout = TimeSpan.FromSeconds(5)
            };
        });

        return services;
    }
}
builder.Services.AddConsulService(builder.Configuration);
[Route("[controller]")]
[ApiController]
public class HealthCheckController : ControllerBase
{
[HttpGet]
public ActionResult GetHealthCheck()
{
Console.WriteLine($"进行心跳检测:{DateTime.Now}");
return Ok("连接正常");
}
}
6.两个服务端控制器写一个方法
服务端1:
[Route("[controller]/[action]")]
[ApiController]
public class ProductController:ControllerBase
{
    [HttpGet]
    public IActionResult GetProduct()
    {
        List<ProductInfo> list = new()
        {
            new() {Id = 1, Name = "商品1"},
            new() {Id = 2, Name = "商品2"}
        };
        return Ok(list);
    }
}
服务端2:
[Route("[controller]/[action]")]
[ApiController]
public class ProductController:ControllerBase
{
    [HttpGet]
    public IActionResult GetProduct()
    {
        List<ProductInfo> list = new()
        {
            new() {Id = 3, Name = "商品3"},
            new() {Id = 4, Name = "商品4"}
        };
        return Ok(list);
    }
}
7客户端调用
[Route("[controller]/[action]")]
[ApiController]
public class ClientController:ControllerBase
{
    private readonly IConsulClient _consulClient;

    public ClientController(IConsulClient consulClient)
    {
        _consulClient = consulClient;
    }

    [HttpGet]
    public async Task<IActionResult> GetProductByClient()
    {
        var instanceList = (await _consulClient.Catalog.
            Service("Consul.Service")).Response;

        //如果要轮询调用可以自己写一个方法,这里是随机调用。
        var instance = instanceList[new Random().Next(instanceList.Length)];

        using HttpClient client = new();
        var json = await client.GetStringAsync($"http://{instance.ServiceAddress}:{instance.ServicePort}/Product/GetProduct");
        var result = JsonConvert.DeserializeObject<List<ProductInfo>>(json);

        return Ok(result);
    }
}
单服务情况下一般创建一个 appsettings.json 配置文件即可。
多服务情况下利用文件夹分层的方式,在Consul客户端上一个项目对应一个文件夹,然后在各自文件夹下放各自的appsettings.json, 如:ConfigCenterTest/appsettings.json、GoodsService/appsettings.json,然后在Program加载配置文件的时候,动态获取项目名称,进行路径的组装即可。
{
  "Logging": {
    "LogLevel": {
      "Default": "Information",
      "Microsoft.AspNetCore": "Warning"
    }
  },
  "ConsulUrl": "http://localhost:8500"
}
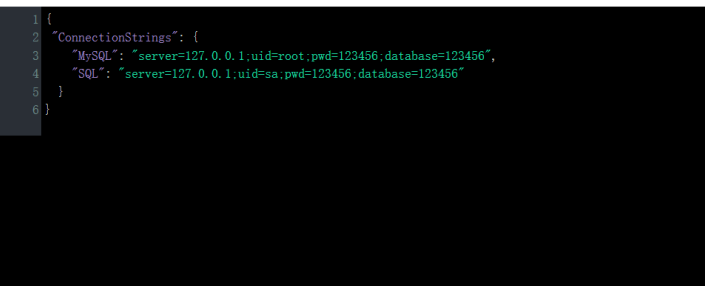
2.Consul服务Key/Value里去配置

3.添加Consul 配置中心
// 添加Consul 配置中心
builder.WebHost.ConfigureAppConfiguration((context, config) =>
{
    var env = context.HostingEnvironment;
    context.Configuration = config.Build();
    string consul_url = context.Configuration["ConsulUrl"];

    // 单服务文件命名
    // string configFileName = $"appsettings.{env.EnvironmentName}.json";
    // 多服务情况下,建议 服务名/文件名命名 ,例如 OrderService/appsettings.json
    string configFileName = $"{env.ApplicationName}/appsettings.{env.EnvironmentName}.json";

    config.AddConsul(configFileName, options =>
    {
        options.Optional = true;
        options.ReloadOnChange = true;
        options.OnLoadException = exceptionContext => { exceptionContext.Ignore = true; };
        options.ConsulConfigurationOptions = cco => { cco.Address = new Uri(consul_url); };
    });

    context.Configuration = config.Build();
});

// 添加Consul 服务注册与发现
builder.Services.AddConsulService(builder.Configuration);
4.控制器中获取配置中心数据
[Route("[controller]/[action]")]
[ApiController]
public class HomeController:ControllerBase
{
    private readonly IConfiguration _configuration;

    public HomeController(IConfiguration configuration)
    {
        _configuration = configuration;
    }

    [HttpGet]
    public IActionResult GetConfig()
    {
        var config = _configuration.GetConnectionString("MySQL");
        return Ok(config);
    }
}
注意:launchSettings.json里的ASPNETCORE_ENVIRONMENT配置。

