使用Netty与前端请求进行交互实现实时通讯
引言
因为不满足与一般的SpringBoot CRUD开发
(太无聊了)所以去学一下网络编程,第一站就是通过B站老罗的EasyChat项目了解到了Netty这个网络框架,在学习这个项目之前也是去学习了一下Netty框架的使用以及相关的原理知识所以是有一定了解的,但是只是一味的学习不去实践总感觉是空中楼阁,于是我在学习了一些API和运行的模型原理之后就直接开始了这个项目的实践
Netty的初始化
在这之前,跳过一些例如导入依赖以及前面的一些功能的CRUD直接开始步入到InitNetty环节
>要注意一点的是学习的时候学习的是两个client进行通讯,但是我想学的是通过JS的http协议升级到ws协议进行通讯
1.初始化NettySocketServerStater
- 服务端启动
服务端这里的初始化准备工作和之前学的还是差不多的代码如下
NettySocketStarter
@Component
public class NettySocketStarter {

    private static final Logger log = LoggerFactory.getLogger(NettySocketStarter.class);
    private static EventLoopGroup BOSS_GROUP = new NioEventLoopGroup(1);
    private static EventLoopGroup WORKER_GROUP = new NioEventLoopGroup();
    @Resource
    private HandlerWebSocket handlerWebSocket;
    @Resource
    private AppConfig appConfig;

    @PreDestroy
    public void close() {
        BOSS_GROUP.shutdownGracefully();
        WORKER_GROUP.shutdownGracefully();
    }

    public void startNettyServer() {

        try {
            Integer wsPort = appConfig.getWsPort();
            String property = System.getProperty("ws.port");
            if (!StringTools.isEmpty(property)) {
                wsPort = Integer.parseInt(property);
            }
            ChannelFuture sync = new ServerBootstrap()
                    .group(BOSS_GROUP, WORKER_GROUP)
                    .channel(NioServerSocketChannel.class)
                    .handler(new LoggingHandler(LogLevel.DEBUG))
                    .childHandler(new ChannelInitializer() {
                        @Override
                        protected void initChannel(Channel channel) throws Exception {
                            ChannelPipeline pipeline = channel.pipeline();
//                        设置几个重要的处理器
//                        对Http协议的支持,使用http的解码器,编码器
                            pipeline.addLast(new HttpServerCodec());
//                        聚合解码 httpRequest/httpContent/lastHttpContent到fullHttpRequest
//                        保证接收到的http请求的完整性
                            pipeline.addLast(new HttpObjectAggregator(60 * 1024));
//                        心跳机制  long readerIdleTime, long writerIdleTime, long allIdleTime, TimeUnit unit
//                        readIdleTime读超时时间 即测试端一定时间内未接收到被测试的消息
//                        writerIdleTime写超时时间 即测试段一定时间内未向测试端发送测试消息
//                        allIdleTime所有类型的超时时间
                            pipeline.addLast(new IdleStateHandler(60, 0, 0, TimeUnit.SECONDS));
                            pipeline.addLast(new HandlerHeartBeat());
//                        将http协议升级到ws协议,对websocket支持
                            pipeline.addLast(new WebSocketServerProtocolHandler(Constants.WS_PROTOCOL, null, true, 64 * 1024, true, true, 10000L));
                            pipeline.addLast(handlerWebSocket);

                        }
                    })
                    .bind(wsPort)
                    .sync();
            log.info("Netty客户端启动成功");
            sync.channel().closeFuture().sync();
        } catch (InterruptedException e) {
            throw new RuntimeException(e);
        }
    }

}
sync.channel().closeFuture().sync(); 这一行,这时候我们需要在初始化的init类当中使用多线程,新建一个线程来给Netty服务
netty初始化
@Component
public class InitRun implements ApplicationRunner {

    @Resource
    private NettySocketStarter nettySocketStarter;

    @Resource
    private HandlerWebSocket handlerWebSocket;

    private static final Logger logger = LoggerFactory.getLogger(InitRun.class);

    private static final ExecutorService executorService = Executors.newFixedThreadPool(5);

    @Override
    public void run(ApplicationArguments args) throws Exception {

        try {
            executorService.execute(() -> {
                nettySocketStarter.startNettyServer();
            });
            logger.info("SpringBoot启动成功!");
        } catch (Exception e) {

        }
    }
}
这里就完成了Netty初始化的准备,这当中涉及了很多之前学习两个client之间连接的时候没有学到的Handler上面的注解都写了(什么时候想深入了解的时候再去深入学习)
- 自定义Handler
在pipline当中我们使用了自己定义的一个Handler
HandlerWebSocket
@Component
@ChannelHandler.Sharable
public class HandlerWebSocket extends SimpleChannelInboundHandler<TextWebSocketFrame> {

    private static final Logger logger = LoggerFactory.getLogger(HandlerWebSocket.class);
    @Resource
    private RedisComponent redisComponent;
    @Resource
    private ChannelContextUtils channelContextUtils;

    @Override

    protected void channelRead0(ChannelHandlerContext ctx, TextWebSocketFrame msg) throws Exception {
        Channel channel = ctx.channel();
//        logger.info("收到消息{}", msg.text());
//        channel.writeAndFlush(new TextWebSocketFrame("客户端返回消息" + msg.text()));
        Attribute<String> attr = channel.attr(AttributeKey.valueOf(channel.id().toString()));
        String userId = attr.get();
//        logger.info("收到用户[{}]的信息: {}", userId, msg.text());
        redisComponent.saveUserHeartBeat(userId);
    }

    @Override
    public void userEventTriggered(ChannelHandlerContext ctx, Object evt) throws Exception {
        if (evt instanceof WebSocketServerProtocolHandler.HandshakeComplete) {
            WebSocketServerProtocolHandler.HandshakeComplete e = (WebSocketServerProtocolHandler.HandshakeComplete) evt;
            String s = e.requestUri();
            logger.info("url{}", s);
            String token = getToken(s);
            if (token == null) {
                ctx.writeAndFlush(new TextWebSocketFrame("Token校验不通过!"));
                ctx.close();
            }
            TokenUserInfoDto tokenUserInfo = redisComponent.getTokenUserInfo(token);
            if (tokenUserInfo == null) {
                ctx.writeAndFlush(new TextWebSocketFrame("Token校验不通过"));
                ctx.close();
                return;
            }
            logger.info("redisToken: {}", tokenUserInfo.getToken());
            logger.info("token:{}", token);
            channelContextUtils.addContext(tokenUserInfo.getUserId(), ctx.channel());
//            ctx.writeAndFlush(new TextWebSocketFrame("成功链接到服务器"));
        }
    }

    private String getToken(String uri) {
        if (StringTools.isEmpty(uri) || uri.indexOf("?") == -1) {
            return null;
        }
        String[] queryParams = uri.split("\\?");
        if (queryParams.length != 2) {
            return null;
        }
        String[] params = queryParams[1].split("=");
        if (params.length != 2) {
            return null;
        }
        return params[1];
    }

    /**
     * 通道就绪后调用,一般用来做初始化
     *
     * @param ctx
     * @throws Exception
     */
    @Override
    public void channelActive(ChannelHandlerContext ctx) throws Exception {
        logger.info("有新的链接加入");
    }

    @Override
    public void channelInactive(ChannelHandlerContext ctx) throws Exception {

        logger.info("有链接断开");
        channelContextUtils.removeContext(ctx.channel());
    }
}
这里有个比较有意思的事情:
我当时想测试服务器向前端的返回,然后我在channelActive方法当中向ctx写入输出了数据,但是在调试的时候客户端并没有接收到这个数据,后来了解到是因为服务器和客户端的握手没有完成,所以此时服务器和客户端其实还没真正建立起数据传输连接,所以这时候发送数据客户端并接收不到.
这里重写了userEventTriggered方法并且监听WebSocketServerProtocolHandler.HandshakeComplete事件,这个就是服务器与客户端完成握手,此时服务器与客户端建立了数据传输连接,这时后就可以通过channel向客户端写入数据了
2.连接到NettySocketServer并管理channel
在连接到netty的时候,我们的handler会记录并且管理channel的状态
addContext
    private static final ConcurrentMap<String, Channel> USER_CONTEXT_MAP = new ConcurrentHashMap<>();
    private static final ConcurrentMap<String, ChannelGroup> GROUP_CONTEXT_MAP = new ConcurrentHashMap<>();


    public void addContext(String userId, Channel channel) {
        String channelId = channel.id().toString();
        AttributeKey attributeKey = null;
        if (!AttributeKey.exists(channelId)) {
            attributeKey = AttributeKey.newInstance(channelId);
        } else {
            attributeKey = AttributeKey.valueOf(channelId);
        }

        channel.attr(attributeKey).set(userId);

        List<String> contactIdList = redisComponent.getUserContact(userId);

        for (String s : contactIdList) {
            if (s.startsWith(UserContactTypeEnum.GROUP.getPrefix())) {
                add2Group(s, channel);
            }
        }

        USER_CONTEXT_MAP.put(userId, channel);

        redisComponent.saveUserHeartBeat(userId);

//        更新用户最后连接时间
        UserInfo updateInfo = new UserInfo();
        updateInfo.setLastLoginTime(new Date());
        userInfoMapper.updateByUserId(updateInfo, userId);

//        给用户发送消息
        UserInfo userInfo = this.userInfoMapper.selectByUserId(userId);
        Long sourceLastOffTime = userInfo.getLastOffTime();
        Long lastOffTime = sourceLastOffTime;
        if (sourceLastOffTime != null && System.currentTimeMillis() - Constants.MILLISSECONDS_3DAYS_BEFORE > sourceLastOffTime) {
            lastOffTime = Constants.MILLISSECONDS_3DAYS_BEFORE;
        }
//        1.查询会话信息 查询用户所有会话信息,保证换了设备会同步
        ChatSessionUserQuery chatSessionUserQuery = new ChatSessionUserQuery();
        chatSessionUserQuery.setUserId(userId);
        chatSessionUserQuery.setOrderBy("last_receive_time desc");
        List<ChatSessionUser> chatSessionUsers = chatSessionUserMapper.selectList(chatSessionUserQuery);

        WsInitData wsInitData = new WsInitData();
        wsInitData.setChatSessionList(chatSessionUsers);

//        2.查询聊天消息
//        查询所有的联系人

        List<String> groupIdList = contactIdList.stream()
                .filter((item) -> item.startsWith(UserContactTypeEnum.GROUP.getPrefix()))
                .collect(Collectors.toList());
        groupIdList.add(userId);

        ChatMessageQuery chatMessageQuery = new ChatMessageQuery();
        chatMessageQuery.setContactIdList(groupIdList);
        chatMessageQuery.setLastReceiveTime(lastOffTime);
        List<ChatMessage> chatMessages = this.chatMessageMapper.selectList(chatMessageQuery);
        wsInitData.setChatMessageList(chatMessages);
//        3.查询好友申请

        UserContactApplyQuery userContactApplyQuery = new UserContactApplyQuery();
        userContactApplyQuery.setReceivceUserId(userId);
        userContactApplyQuery.setStatus(UserContactApplyStatusEnum.INIT.getStatus());
        userContactApplyQuery.setLastApplyTimestamp(lastOffTime);
        Integer i = userContactApplyMapper.selectCount(userContactApplyQuery);
        wsInitData.setApplyCount(i);
//        发送消息
        MessageSendDto messageSendDto = new MessageSendDto();
        messageSendDto.setMessageType(MessageTypeEnum.INIT.getType());
        messageSendDto.setContactId(userId);
        messageSendDto.setExtendData(wsInitData);

        sendMsg(messageSendDto, userId);
    }
在每个channel当中,都独自维护一个DefaultAttributeMap(里面好像是个链表结构?反正我在调试的时候看着像) 正解: 1.什么是 DefaultAttributeMap? **DefaultAttributeMap 是一个 数组 + 链表 结构的线程安全Map。**
根据是用户还是群组来分别管理,这里提到了一个比较有意思的API,那就是channelGroup
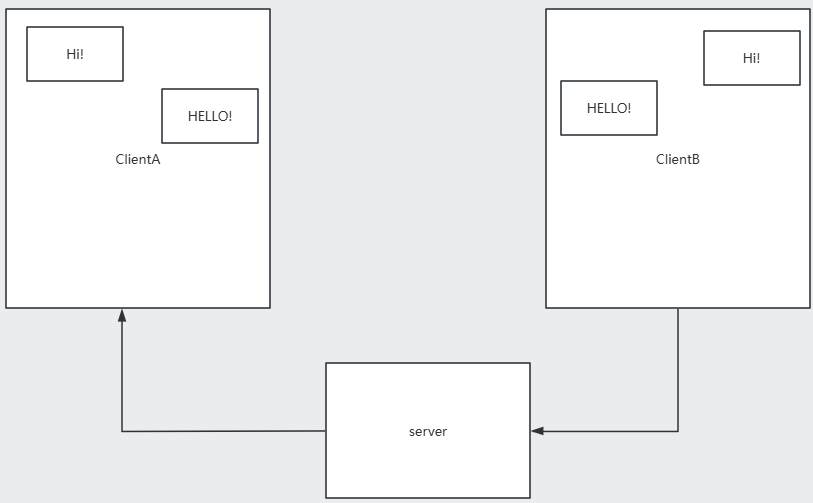
在之前的学习过程当中学习Netty群聊使用的都是普通的Map当中套一个Map,例如
Map<String,Map<String,Channel>>这里第一个key是群组的id,第二个map的kv值则是该群组里用户id和channel的对应值
让我们来看下ChannelGroup的源码
我们可以看到这个类其实就是自动管理一群channel的,比之前的map效率会高很多.
我们用户上限之后只需要将个人的channel加入到USERMAP当中,因为在redis里存储了当前用户userid对应的contactID list表,这时后只需要从redis里获取list并且遍历,找到group的ID然后再加入对应channelgroup就可以了.
3.发送消息
-
思考: 在发送消息之前,有个问题需要我们去解决------集群发送消息,假如我们的服务器是A,负责的用户有123,另外一台集群服务器是B,负责的用户是456,因为channel无法序列化所以无法存在redis或者SQL当中而是存在服务器的内存当中,这时后如果A的用户1想发消息给用户4,此时用户4的channel存储在服务器B的内存当中,所以在服务器A当并读取不到用户4的channel,这时候就无法实现channel通讯,怎么办呢?
-
解决方案: 使用中间件,例如redis和mq消息队列等进行集群消息的分发
-
解决方法: 在这里就拿简单轻量化的reidsson来实现简单的消息队列.我们首先先配置一下我们的redisson
@Value("${spring.redis.host}")
    private String redisHost;
    @Value("${spring.redis.port}")
    private String redisPort;

    @Bean(name = "redissonClient", destroyMethod = "shutdown")
    public RedissonClient redissonClient() {
        try {
            Config config = new Config();
            config.useSingleServer().setAddress("redis://" + redisHost + ":" + redisPort);
            RedissonClient redissonClient = Redisson.create(config);
            return redissonClient;
        } catch (Exception e) {
            logger.error("redis配置错误,请检查redis配置", e);
        }
        return null;
    }
在redisconfig配置类当中配置一个bean,配置redisson连接到redisson的配置
之后创建一个MessageHandler类来进行topic的监听和发布
@Component
public class MessageHandler {

    @Resource
    private RedissonClient redissonClient;

    @Resource
    private ChannelContextUtils channelContextUtils;

    private static final Logger logger = LoggerFactory.getLogger(MessageHandler.class);

    private static final String MESSAGE_TOPIC = "message.topic";


    @PostConstruct
    public void lisMessage() {
        RTopic rTopic = redissonClient.getTopic(MESSAGE_TOPIC);
        rTopic.addListener(MessageSendDto.class, (MessageSendDto, sendDto) -> {
            logger.info("收到广播消息{}", JsonUtils.convertObj2Json(sendDto));
            channelContextUtils.sendMessage(sendDto);
        });
    }

    public void sendMessage(MessageSendDto sendDto) {

        RTopic rTopic = redissonClient.getTopic(MESSAGE_TOPIC);
        rTopic.publish(sendDto);

    }

}
redisson的topic生命周期和mq消息队列的并不一样,redisson的topic可以理解为一个动态生成的自定义name的channel,当用户监听指定name的topic的时候就会生成对应name的channel,当用户监听的时候就会一直保有这个channel,当没有消费者监听的时候就会销毁.
mq消息队列的topic则是会持久化保存,而且有更多的功能和消息,比如消息的保存和offset偏移量和消费组这些
生产者发布消息到topic的时候会通过对应name的channeltopic,发布完之后不再持有
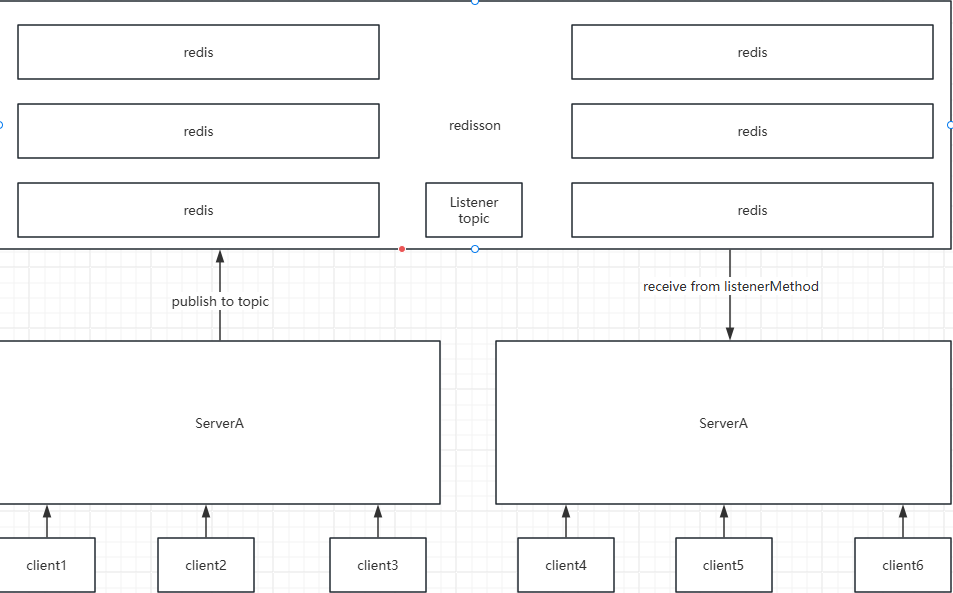
这样子就能通过redisson的轻量级消息分发到集群服务器上了
随后就是正常的将消息发送到对应的channel当中了.这里其实比较简单,就是有个关于对于客户端来说发送人和联系人的问题
public void sendMsg(MessageSendDto messageSendDto, String reciveId) {
        Channel userChannel = USER_CONTEXT_MAP.get(reciveId);
        if (userChannel == null) {
            return;
        }
//        相对于A客户端客户端而言,B的联系人就是在看A看来就是A像B发送消息的人
        if (MessageTypeEnum.ADD_FRIEND_SELF.getType().equals(messageSendDto.getMessageType())) {
            UserInfo userInfo = (UserInfo) messageSendDto.getExtendData();
            messageSendDto.setMessageType(MessageTypeEnum.ADD_FRIEND.getType());
            messageSendDto.setContactId(userInfo.getUserId());
            messageSendDto.setContactName(userInfo.getNickName());
            messageSendDto.setExtendData(null);
        } else {
            messageSendDto.setContactId(messageSendDto.getSendUserId());
            messageSendDto.setContactName(messageSendDto.getSendUserNickName());
        }

        userChannel.writeAndFlush(new TextWebSocketFrame(JsonUtils.convertObj2Json(messageSendDto)));

    }
对于B来说,B是发送人A是联系人,对于A来说,A是发送人,B是联系人
其实我一直觉得这个逻辑有点混乱,让我来设计的话就是这个会话里面获取自己的id,如果sendid不是自己的话那么消息就是别人发送的放左边,如果sendid为自己的userid则是自己发送的放在右边,这样子只需要根据sessionID查询出该session的chatMessage之后再根据sendUserId来进行分类就可以了,具体知道netty怎么与前端实现http升级ws长连接之后就差不多了,像这些问题感觉都是设计上的事情,之后再去看一下前端的代码看看

 浙公网安备 33010602011771号