
微信小游戏flappy bird开发详解
一.设计
二.创建框架类
微信小游戏中game.js和game.json是必备的两个文件。
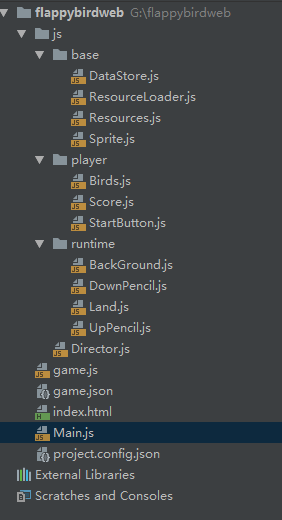
首先创建js文件夹中存放base、player、和runtime三个文件夹用来存放相关类,以及一个导演类。
1.base
base中存放为基本类,包括变量缓冲器(DataStore)变量缓存器,方便我们在不同的类中访问和修改变量。资源文件加载器(ResourceLoader),确保canvas在图片资源加载完成后才进行渲染。Resources类,以及精灵类(Sprite)精灵的基类,负责初始化精灵加载的资源和大小以及位置。
2.player
player中存放与玩家发生交互的类。包括小鸟类(Birds),计分器类(Score),开始按钮类(StartButton)。
3.runtime
runtime类存放与游戏进行有关的类,背景类(BackGround),陆地类(Land)不断移动的陆地,上半部分障碍物类(UpPencil)这里是铅笔和下半部分铅笔类(DownPencil)。
之外js中还包括一个导演类(Director),用来控制游戏的逻辑。
外层还有一个main.js,初始化整个游戏的精灵,作为游戏开始的入口。
此时目录列表如下:
三. 导入图片文件
资源类resources:
1 /*创建一个数组 background对应的是相应的资源*/
2 export const Resources = [
3     ['background', 'res/background.png'],
4     ['land', 'res/land.png'],
5     ['pencilUp', 'res/pie_up.png'],
6     ['pencilDown', 'res/pie_down.png'],
7     ['birds', 'res/birds.png'],
8     ['startButton', 'res/start_button.png']
9 ]
资源文件加载器 resourceloader:
 1 //资源文件加载器,确保canvas在图片资源加载完成后才进行渲染
 2 import {Resources} from "./Resources.js";
 3
 4 export class ResourceLoader {
 5
 6     constructor() {
 7         //直接this.map自动创建对象
 8         /*Map是一个数据类型,实质上是一个键值对,前面是名后面是值,
 9         可以通过set的方法来设置  m.set(o,'content')
10         也可以直接传入一个数组来设置,这里传入Resource数组*/
11         this.map = new Map(Resources);
12         for (let [key, value] of this.map) {
13             //将map里的value替换,将相对路径替换为图片image本身
14             const image = new Image();
15             image.src = value;
16             this.map.set(key, image);
17         }
18     }
19
20     /*确保所有图片加载完毕*/
21     onLoaded(callback) {
22         let loadedCount = 0;
23         for (let value of this.map.values()) {
24             value.onload = () => {
25                 //this指向外部的实力对象
26                 loadedCount++;
27                 if (loadedCount >= this.map.size) {
28                     callback(this.map)
29                 }
30             }
31         }
32     }
33
34     //静态工厂
35     static create(){
36         return new ResourceLoader();
37     }
38 }
四.主体开发
1、导演类单例开发
DircDirector类:
1 //导演类,控制游戏的逻辑 2 /*单例模式,是一种常用的软件设计模式。在它的核心结构中只包含一个被称为单例的特殊类。
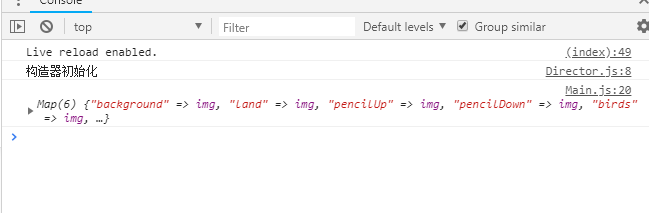
通过单例模式可以保证系统中,应用该模式的类一个类只有一个实例。即一个类只有一个对象实例 3 */ 4 export class Director { 5 6 //验证单例成功 即只可以有一个实例 7 constructor(){ 8 console.log('构造器初始化') 9 } 10 11 /*使用getInstance方法为定义一个单例对象,如果实例创建了则返回创建类 12 若没有创建则创建instance*/ 13 static getInstance() { 14 if (!Director.instance) { 15 Director.instance = new Director(); 16 } 17 return Director.instance; 18 } 19 }
我们可以通过主体函数Main.js中验证是否导演类为单例。如下:
 1 import {ResourceLoader} from "./js/base/ResourceLoader.js";
 2 import {Director} from "./js/Director.js";
 3
 4 export class Main {
 5     constructor() {
 6         this.canvas = document.getElementById('game_canvas');
 7         this.ctx = this.canvas.getContext('2d');
 8         const loader = ResourceLoader.create();
 9         loader.onLoaded(map => this.onResourceFirstLoaded(map))
10
11         Director.getInstance();
12         Director.getInstance();
13         Director.getInstance();
14
15     }
16
17     onResourceFirstLoaded(map) {
18         console.log(map)
19     }
20 }
我们可以看到在主体函数中我们调用了三次导演类的构造函数,而浏览器中的显示为下,说明只是创建了一个类,而之后则是反复调用之前的实例。
2.canvas添加图片示例
 1 let image = new Image();
 2 image.src='../res/background.png';
 3
 4 image.onload = () => {
 5             /*第一个参数是image对象,要渲染的一张图
 6             * 第二、三个参数是图片剪裁起始位置 x.y轴
 7             * 第四、五个参数是被剪裁的图片的宽度,即剪多大
 8             * 第六、七个参数是放置在画布上的位置,图形的左上角
 9             * 第八九个参数是要使用的图片的大小*/
10             this.ctx.drawImage(
11                 image,
12                 0,
13                 0,
14                 image.width,
15                 image.height,
16                 0,
17                 0,
18                 image.width,
19                 image.height,
20             );
21         }
具体事项见另一片填坑随笔里。
(这是一个示例图片加载的一个代码,并不是项目代码)
3.基础精灵类的封装和静态背景的实现
精灵类:
写一个构造函数,包括的绘制图片的相关参数,并把这些值附到这个类的原型链上。
再在精灵类中写一个draw函数用来绘制图像,在函数中通过this.ctx.drawImage具体方法来进行绘制,并传入相关参数。
 1 //精灵的基类,负责初始化精灵加载的资源和大小以及位置
 2 export class Sprite {
 3
 4     /*
 5      * img 传入Image对象
 6      * srcX 要剪裁的起始X坐标
 7      * srcY 要剪裁的起始Y坐标
 8      * srcW 剪裁的宽度
 9      * srcH 剪裁的高度
10      * x 放置的x坐标
11      * y 放置的y坐标
12      * width 要使用的宽度
13      * height 要使用的高度
14      */
15     constructor(ctx = null,
16                 img = null,
17                 srcX = 0,
18                 srcY = 0,
19                 srcW = 0,
20                 srcH = 0,
21                 x = 0,
22                 y = 0,
23                 width = 0,
24                 height = 0
25     ) {
26         //    把这些值都附到这个类的原型链上
27         this.ctx = ctx;
28         this.img = img;
29         this.srcX = srcX;
30         this.srcY = srcY;
31         this.srcW = srcW;
32         this.srcH = srcH;
33         this.x = x;
34         this.y = y;
35         this.width = width;
36         this.height = height;
37     }
38
39     /*绘制函数,通过调用具体的drawImage方法来绘制image*/
40     draw(){
41         this.ctx.drawImage(
42             this.img,
43             this.srcX,
44             this.srcY,
45             this.srcW,
46             this.srcH,
47             this.x,
48             this.y,
49             this.width,
50             this.height,
51         );
52     }
53
54 }
背景类:
背景类继承自精灵类,所以在构造函数时传入ctx,image两个值后在方法中要包括super的构造方法,并传入精灵类构造方法所需要的参数。
 1 import {Sprite} from "../base/Sprite.js";
 2
 3 export class BackGround extends Sprite{
 4     constructor(ctx,image){
 5         super(ctx,image,
 6             0,0,
 7             image.width,image.height,
 8             0,0,
 9             window.innerWidth,window.innerHeight);
10     }
11
12 }
主函数:
在第一次的加载方法中,传入的map类型数据(里面是键值对,相对存放着对应的图片文件)。
在这个方法中初始化背景图,并传入背景类所需要的两个参数(ctx,map),因为背景类是继承精灵类的,可以使用精灵类中刚刚写的draw方法,所以传入后构造之后,通过background的draw方法即可将背景绘制出来。
1 onResourceFirstLoaded(map) {
2
3         let background = new BackGround(this.ctx, map.get('background'));
4         background.draw();
5
6     }
4.资源管理器的封装
实际上 应该把逻辑放在diractor里 初始化的创建放在main里 把所有的数据关联放在DataStore里。
所以要对上面的背景类进行重新的逻辑封装,将draw等放在导演类中。
首先将数据都放在DataStore类中,DataStore在整个程序中只有一次所以是个单例类,用之前的getinstance创建单例。之后创建一个存储变量的容器map,写出put、get、和delate等方法。
 1 //全局只有一个 所以用单例
 2 export class DataStore {
 3
 4     //单例
 5     static getInstance() {
 6         if (!DataStore.instance) {
 7             DataStore.instance = new DataStore();
 8         }
 9         return DataStore.instance;
10     }
11
12 //    创建一个存储变量的容器
13     constructor() {
14         this.map = new Map();
15     }
16
17     //链式操作put
18     put(key, value) {
19         this.map.set(key, value);
20         return this;
21     }
22
23     get(key) {
24         return this.map.get(key);
25     }
26
27     //销毁资源 将资源制空
28     destroy() {
29         for (let value of this.map.value()) {
30             value = null;
31         }
32     }
33 }
然后在main类中先初始化DataStore,在第一次创建时,将不需要销毁的数据放在单例的类变量中,随游戏一局结束销毁的数据放在map中。
在main中,写一个开始的init方法,把值放在datastore中,用datastore中的put方法将background值放在类中,这时就不用开始用的let background方法了。
传入之后的绘制图像,调用导演类中的单例run方法。
 1     onResourceFirstLoaded(map) {
 2
 3         //初始化Datastore附固定值 不需要每局销毁的元素放在ctx中 每局销毁的放在map中
 4         this.datastore.ctx = this.ctx;
 5         this.datastore.res = map;
 6         this.init();
 7
 8     }
 9     init()
10     {
11         this.datastore
12             .put('background',
13                 new BackGround(this.ctx,
14                     this.datastore.res.get('background')));
15         Director.getInstance().run();
16
17     }
因为逻辑要放在导演类中,所以创建一个run方法,游戏运行方法。导演类先在构造函数中引入DataStore数据类(注意引入时要加完整的 .js)。
在run方法中,调用背景类的draw。
1     run() {
2         const backgroundSprite = this.datastore.get('background');
3         backgroundSprite.draw();
4     }
这样就可以实现背景类的绘制了,虽然效果和上面一样,但是这样的封装逻辑更加清晰也更加方便操控。
5.代码优化和代码封装
对精灵基类的优化:
将datastore直接传入精灵类,将draw方法传入值中传入相关值,无参数时可以进行默认值的传入,有具体参数时可以完成方法的重构。
在精灵内创建一个静态的取image的方法,方便背景函数取背景用。精灵基类如下:
 1 constructor(
 2         img = null,
 3         srcX = 0,
 4         srcY = 0,
 5         srcW = 0,
 6         srcH = 0,
 7         x = 0,
 8         y = 0,
 9         width = 0,
10         height = 0
11     ) {
12         //    把这些值都附到这个类的原型链上
13         this.datastore = DataStore.getInstance();
14         this.ctx = this.datastore.ctx;
15         this.img = img;
16         this.srcX = srcX;
17         this.srcY = srcY;
18         this.srcW = srcW;
19         this.srcH = srcH;
20         this.x = x;
21         this.y = y;
22         this.width = width;
23         this.height = height;
24     }
25
26     //取image static类型的方法在调用时,可以不用访问类的实例,直接可以访问类的方法。
27     static getImage(key) {
28         return DataStore.getInstance().res.get(key);
29     }
30
31     /*绘制函数,通过调用具体的drawImage方法来绘制image*/
32     draw(
33         img = this.img,
34         srcX = this.srcX,
35         srcY = this.srcY,
36         srcW = this.srcW,
37         srcH = this.srcH,
38         x = this.x,
39         y = this.y,
40         width = this.width,
41         height = this.height
42     ) {
43         this.ctx.drawImage(
44             img,
45             srcX,
46             srcY,
47             srcW,
48             srcH,
49             x,
50             y,
51             width,
52             height,
53         );
在背景类中,因为在构造方法super之前无法访问类的属性,所以用静态方法去调用sprite中的getImage方法得到背景图。
 1 export class BackGround extends Sprite {
 2
 3     constructor() {
 4
 5         const image = Sprite.getImage('background');
 6         super(image,
 7             0, 0,
 8             image.width, image.height,
 9             0, 0,
10             window.innerWidth, window.innerHeight);
11     }
12
13 }
6.canvas运动渲染地板移动
因为地板是匀速运动的精灵类,首先完善land类。land类继承自sprite类,注意引入时的js问题。
在构造函数中先调出land资源,应用父类sprite时传入相关参数,这里图片放置的高度需要注意,因为要放在底部,所以高度的设置为窗口高度减去图片高度,为起始的高度,这样就贴合在了底部。(window.innerHeight - image.height,)。此外,还要初始化两个参数,landX表示地板水平变化的坐标和landSpeed表示变化的速度。
之后再在land类中写一个绘制的方法,首先因为要避免穿帮,要在图像移动完之前将图像重新置位,造成一种地板可以无限延伸的错觉,所以要先做一个判断,如果坐标要出界,则重置坐标。之后在super的draw方法中,因为地板是从右往左移动,所以变化的坐标landX也应该是 -landX。代码如下:
 1 export class Land extends Sprite {
 2
 3     constructor() {
 4         const image = Sprite.getImage('land');
 5         super(image, 0, 0,
 6             image.width, image.height,
 7             0, window.innerHeight - image.height,
 8             image.width, image.height);
 9
10         //地板的水平变化坐标
11         this.landX = 0;
12         //地板的水平移动速度
13         this.landSpeed = 2;
14     }
15
16     draw() {
17         this.landX = this.landX + this.landSpeed;
18         //避免穿帮 ,要达到边界时,将左边开头置回
19         if (this.landX > (this.img.width - window.innerWidth)) {
20             this.landX = 0;
21         }
22         super.draw(this.img,
23             this.srcX,
24             this.srcY,
25             this.srcW,
26             this.srcH,
27             -this.landX,
28             this.y,
29             this.width,
30             this.height)
31     }
32 }
之后再对导演类的逻辑进行相关的处理,首先将地板展现在画面上,之后通过内置方法使其运动。如下:
1 run() {
2         this.datastore.get('background').draw();
3         this.datastore.get('land').draw();
4         let timer = requestAnimationFrame(() => this.run());
5         this.datastore.put('timer',timer);
6         // cancelAnimationFrame(this.datastore.get('timer'));
7     }
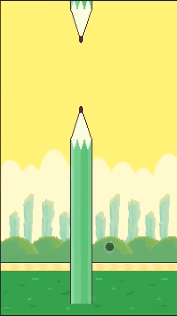
此时界面如下:

7.上下铅笔阻碍
首先先创建一个铅笔的父类Pencil,继承自精灵类Sprite。
构造函数传入image和top两个参数,这里先说一下top函数的意义。top为铅笔高度标准点, 上铅笔top为上铅笔的最下点 下铅笔top为最高点加上空开的间隔距离。
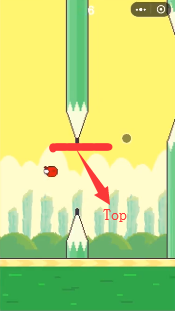
然后在构造函数中引入父类构造,传入相关参数,这里要注意一点是,放置元素的x位置时放在屏幕的最右点,也就是刚刚好放出屏幕看不到的位置。同时写出top。
在铅笔类中再写一个draw方法,因为铅笔和地板都以相同的速度向后退,所以可以在导演类中的构造中设置一个固定的值moveSpeed=2,铅笔类中的x为x-speed,这里也注意改一下land中也是这个速度值。然后调用父类方法的draw传入相关参数。铅笔类代码如下:
 1 export class Pencil extends Sprite {
 2
 3     //top为铅笔高度 上铅笔为top为上铅笔的最下点 下铅笔top为最高点加上空开距离
 4     constructor(image, top) {
 5         super(image,
 6             0, 0,
 7             image.width, image.height,
 8             //放置位置刚好在canvas的右侧,屏幕右侧刚好看不到的位置
 9             window.innerWidth, 0,
10             image.width, image.height);
11         this.top = top;
12     }
13
14     draw() {
15         this.x = this.x - Director.getInstance().moveSpeed;
16         super.draw(this.img,
17             0, 0,
18             this.width, this.height,
19             this.x, this.y,
20             this.width, this.height)
21     }
22 }
这时有了父类,在写具体的上铅笔 和 下铅笔类。上下铅笔类继承自铅笔类,在构造函数传入top值,取用相关的image图像,然后用铅笔类的构造函数,传入image和top两个相关参数。
再在上下铅笔类中写一个绘制方法draw。方法中确认放置高度this.y,上铅笔为top-height,下铅笔为top+gap(间隙),代码如下:
 1 export class UpPencil extends Pencil {
 2     constructor(top) {
 3         const image = Sprite.getImage('pencilUp')
 4         super(image, top);
 5     }
 6
 7     // 铅笔的左上角高度 为top-图像高度 是一个负值
 8     draw() {
 9         this.y = this.top-this.height;
10         super.draw();
11     }
12
13     /*下铅笔为:
14         draw() {
15         //空开的间隙距离为gap
16         let gap = window.innerHeight / 5;
17         this.y = this.top + gap;
18         super.draw();
19     }*/
20
21 }
以上便是绘制铅笔的过程,下面为铅笔的逻辑相关部分。
在绘制铅笔之前,需要创建一组一组(一组两梗)的铅笔。而且每组的高度随机。所以在导演类中创建一个新的方法 createPencil用来创建铅笔。在此方法中实现控制高度和随机高度。
屏幕的1/8 1/2分别为最高高度和最低高度。真实高度随机就可以算出为 Mintop+math.rand()*(maxtop-mintop)。
高度确定后,需要一个数组值来存储每组铅笔。在main的put链里先输入铅笔到数组里。然后在运行逻辑之前创建第一组铅笔。
在createPencil方法中还需要把上下铅笔插在铅笔数组里。所以createPencil方法如下:
1 //创建铅笔类。有个高度限制,这里取屏幕的2和8分之一,以一个数组的类型存储。
2     createPencil() {
3         const minTop = window.innerHeight / 8;
4         const maxTop = window.innerHeight / 2;
5         const top = minTop + Math.random() * (maxTop - minTop);
6         this.datastore.get('pencils').push(new UpPencil(top));
7         this.datastore.get('pencils').push(new DownPencil(top));
8     }
然后在run中绘制每一个pancil,pencil在铅笔数组中,所以需要一个循环。
1 this.datastore.get('pencils').forEach(function (value,) {
2             value.draw();
3         });
此时我们做出来的画面有一个问题,那就是铅笔会盖在地板上面,而且只会出现一组铅笔。这是和canvas的图层覆盖有关系,以及需要判断屏幕中铅笔量来重复产生铅笔。
因为canvas是按顺序绘制图层的,所以要把铅笔放在地板后面,只需要在run中将铅笔的绘制放在地板绘制的前面。
其次是铅笔的重复问题,这里要在run的循环方法中写两个判断,先通过const取出铅笔数组,数组的第一二个元素就是第一组铅笔,第三四个元素就是第二组。第一个判断用来销毁已经走出屏幕的铅笔,先判断如果第一个铅笔的左坐标加上铅笔宽度(就是右坐标)在屏幕之外,而且铅笔数组长度为4时,推出前两个元素(第一组铅笔)。推出时用shift方法,shift方法为将数组的第一个元素推出数组并将数组长度减一。
而第二个判断是创建新的一组铅笔,当铅笔走到中间位置时,而且屏幕上只有两个铅笔(数组长度为2)时,调用createPencil方法创建一组新的铅笔。因为run方法不停循环,所以铅笔也是不断循环判断。如下:
 1 run() {
 2         //绘制背景
 3         this.datastore.get('background').draw();
 4
 5         //数组的第一二个元素就是第一组铅笔,第三四个元素就是第二组
 6         //先判断如果第一个铅笔的左坐标加上铅笔宽度(就是右坐标)在屏幕之外,
 7         //而且铅笔数组长度为4时,推出前两个元素(第一组铅笔)
 8         //shift方法为将数组的第一个元素推出数组并将数组长度减一
 9         const pencils = this.datastore.get('pencils');
10         if (pencils[0].x + pencils[0].width <= 0 && pencils.length === 4) {
11             pencils.shift();
12             pencils.shift();
13         }
14         //当铅笔在中间位置时,而且屏幕上只有两个铅笔,创建新的一组铅笔
15         if (pencils[0].x <= (window.innerWidth - pencils[0].width) / 2
16             && pencils.length === 2) {
17             this.createPencil();
18         }
19
20         //绘制铅笔组中的铅笔
21         this.datastore.get('pencils').forEach(function (value,) {
22             value.draw();
23         });
24
25         //绘制地板
26         this.datastore.get('land').draw();
27
28         //不断调用同一方法达到动画效果,刷新速率和浏览器有关,参数为回调函数。
29         let timer = requestAnimationFrame(() => this.run());
30         this.datastore.put('timer', timer);
31         // cancelAnimationFrame(this.datastore.get('timer'));
32     }

8.游戏控制逻辑整合
小游戏需要一个整体的开始结束状态,在main中的初始化中构造一个导演类中的isGameOver属性,先设置其为false,判断游戏是否结束的状态。
然后在导演类中的run方法就使用这个属性来进行判断,如果isGameOver是false,就执行run方法下面的具体步骤,如果是ture的话,就停止canvas的刷新,销毁相关数据,游戏结束。
9小鸟类创建和逻辑分析
首先在Main类中将小鸟志愿put进datastore里,在导演类中绘制小鸟类,因为小鸟是最高层,所以在地板层后写小鸟层。
在小鸟类中,小鸟类继承自精灵类,构造时先使用原始方法,这是没有进行图片剪裁,三种小鸟一起出现在图像上。所以需要一定的裁剪。

在裁剪时,首先要给小鸟类添加一些属性,小鸟的三种状态需要一个数组来存储,然后在数组中0,1,2不断的调用三种状态,从而使小鸟有飞翔的状态。所以在构造函数中添加以下属性:新建起始剪切点的x,y坐标,元素的剪切宽高度,图像起始时的横纵坐标,以及要使用的图像的宽高度。以及记录状态和小标的count和index,坠落时间time。
 1 constructor() {
 2         const image = Sprite.getImage('birds');
 3         super(image, 0, 0,
 4             image.width, image.height,
 5             0, 0,);
 6
 7         // 小鸟的三种状态需要一个数组去存储
 8         // 小鸟的宽是34 高是24,上下边距是10,小鸟左右边距是9
 9         //clippingX开始剪裁的x坐标,clippingWidth是剪切的宽度
10         this.clippingX = [
11             9,
12             9 + 34 + 18,
13             9 + 34 + 18 + 34 + 18];
14         this.clippingY = [10, 10, 10];
15         this.clippingWidth = [34, 34, 34];
16         this.clippingHeight = [24, 24, 24];
17         //起始时小鸟的横坐标位置,纵坐标位置
18         this.birdX = window.innerWidth / 4;
19         this.birdsX = [this.birdX, this.birdX, this.birdX];
20         this.birdY = window.innerHeight / 2;
21         this.birdsY = [this.birdY, this.birdY, this.birdY];
22         //小鸟的宽高
23         this.birdHeight = 24;
24         this.birdWidth = 34;
25         this.birdsWidth = [this.birdWidth, this.birdWidth, this.birdWidth];
26         this.birdsHeight = [this.birdHeight, this.birdHeight, this.birdHeight];
27         //小鸟在飞动的过程只有y坐标在有变化,y为变化y坐标
28         this.y = [this.birdY, this.birdY, this.birdY];
29         //count计小鸟状态 index为角标,time小鸟下落时间
30         this.index = 0;
31         this.count = 0;
32         this.time = 0;
33     }
同时小鸟类需要重新写绘制方法,因为在绘制是要不停的在小鸟数组中循环,以达到飞行的效果,首先初始化一个speed为1,然后 this.count = this.count + speed,这样每次刷新绘制时,count都会加上速度,count为小鸟不同的状态,这时还需要做一个判断,如果角标大于等于2了,说明已经到了最后一个状态,令count置0,回到最初的状态。令角标index等于count,这时小鸟就会随着刷新的频率来循环数组。
这时看效果会发现小鸟刷新的速度过快,所以需要降低speed的值,但是因为小鸟是数组存储,如果角标是小数那么小鸟就不会绘制出来,会出现闪动的情况,所以在给角标赋值的时候采用Math.floor去掉小数向下取整。然后传入相关参数进行绘制。
 1 draw() {
 2         //切换三只小鸟的速度
 3         const speed = 0.15;
 4         this.count = this.count + speed;
 5         //0,1,2
 6         if(this.index>=2){
 7             this.count=0;
 8         }
 9         //减速器的作用,向下取整
10         this.index=Math.floor(this.count);
11
12         super.draw(
13             this.img,
14             this.clippingX[this.index],
15             this.clippingY[this.index],
16             this.clippingWidth[this.index],
17             this.clippingHeight[this.index],
18             this.birdsX[this.index],
19             this.birdsY[this.index],
20             this.birdsWidth[this.index],
21             this.birdsHeight[this.index]
22         );
这时小鸟开始飞行了,但是是直线飞行,而且没有碰撞,没有下坠。
先做出小鸟下坠的重力加速度。下坠位移为s=1/2gt^2;初始化重力加速度g(之后发现下降太快,除2.4),小鸟的位移为 const offsetY = (g * this.time * this.time) / 2; 做一个循环使绘制的y坐标为本来y坐标加变化的y坐标。时间自增。
设置一个初始向上的速度offsetUp,位移公式为s=vt+1/2g*t^2。这时小鸟会有个上飞的动作再下落。
 1         //模拟重力加速度 。重力位移 1/2*g*t^2
 2         const g = 0.98 / 2.4;
 3         //设置一个向上的加速度
 4         const offsetUp = 7;
 5         //小鸟的位移
 6         //const offsetY = (g * this.time * (this.time-offsetUp)) / 2;
 7         //位移公式为s=vt+1/2g*t^2
 8         const offsetY=(g*this.time*this.time)/2-offsetUp*this.time;
 9
10         for (let i = 0; i <= 2; i++) {
11             this.birdsY[i] = this.y[i] + offsetY;
12         }
13         this.time++;
这里设置一个向上的初速度,是为了小鸟飞行更加自然,每当有触摸屏幕事件时,设置剪切小鸟图像放置的y坐标为此时的y坐标,而反应在屏幕上,则是点击屏幕一下,小鸟向上飞一个速度再下坠。
这里开始设计触摸事件,首先在main中创建registerEvent方法,在main的init方法中使用该方法。在这个方法中添加一个点击事件,点击后先消除js事件冒泡,然后进行判断,如果游戏状态为结束,则重新调用init初始化新游戏,否则游戏没有结束,则掉用导演类中的birdsEvent方法。
 1 //注册事件
 2     registerEvent(){
 3         //用箭头函数指针指向main,可以取到main中的导演类等
 4         this.canvas.addEventListener('touchstart',e=>{
 5             //屏蔽掉js事件冒泡
 6             e.preventDefault();
 7             //判断游戏是否结束  如果结束重新开始
 8             if(this.director.isGameOver){
 9                 console.log('游戏重新开始');
10                 this.init();
11             }
12             //游戏没有结束
13             else{
14                 this.director.birdsEvent();
15             }
16         })
17     }
在导演类中的小鸟事件birdsEvent,不断刷新三只小鸟,当点击事件发生,即调用这个方法时,为他们的起始y坐标赋值现在的y坐标,并将下坠的事件重置为0。
1     //小鸟事件,为每只小鸟绑定相应事件
2     birdsEvent() {
3         for (let i = 0; i <= 2; i++) {
4             this.datastore.get('birds').y[i] =
5                 this.datastore.get('birds').birdsY[i];
6         }
7         this.datastore.get('birds').time = 0;
8     }
10 小鸟与地板和铅笔的碰撞
在导演类中创建一个check方法,用来检测是否有碰撞。方法先取用到的元素小鸟和地板以及铅笔。
然后在run方法开始时调用check方法,这样就可以一直检测是否有碰撞了。
回到check方法,先做小鸟与地板碰撞的逻辑,判断如果小鸟的左上角y坐标加上小鸟的高度超过了地板的左上角,即与地板发生了碰撞,则设置isGameOver状态为true,并return停止游戏。
而判断小鸟与铅笔是否有撞击有些复杂,首先需要建立小鸟和铅笔的边框模型,即他们的上下左右边框。上下分别是元素的y坐标和加上高度的值,左右分别是x坐标和加上宽度的值。
在建立铅笔模型时需要注意一点,因为一个屏幕内有最多四个铅笔。所以需要做一个循环,遍历到屏幕中所有的铅笔。每一次循环,首先先建立铅笔边框模型,同上。然后进行判断小鸟与铅笔是否撞击,用方法isStrike,如果判断为true,则改变游戏状态isGameOver为true,并return结束游戏。
 1 //判断小鸟是否有撞击
 2     check() {
 3         const birds = this.datastore.get('birds');
 4         const land = this.datastore.get('land');
 5         const pencils = this.datastore.get('pencils');
 6
 7         //地板撞击判断
 8         if (birds.birdsY[0] + birds.birdsHeight[0] >= land.y) {
 9             console.log('撞击地板');
10             this.isGameover = true;
11             return;
12         }
13
14         //小鸟的边框模型
15         const birdsBroder = {
16             top: birds.y[0],
17             bottom: birds.y[0] + birds.birdsHeight[0],
18             left: birds.birdsX[0],
19             right: birds.birdsX[0] + birds.birdsWidth[0]
20         };
21
22         const length = pencils.length;
23         for (let i = 0; i < length; i++) {
24             const pencil = pencils[i];
25             const pencilBorder = {
26                 top: pencil.y,
27                 bottom: pencil.y + pencil.height,
28                 left: pencil.x,
29                 right: pencil.x + pencil.width
30             };
31
32             if (Director.isStrike(birdsBroder, pencilBorder)) {
33                 console.log('撞到铅笔');
34                 this.isGameover = true;
35                 return;
36             }
37         }
38     }
这里用到了一个isStrike的方法用来判断小鸟与铅笔是否有撞击,判断方法为小鸟的左右上下与铅笔的右左下上是否有碰撞,并返回一个布尔值,方法如下:
 1 //小鸟是否与铅笔有碰撞
 2     static isStrike(bird, pencil) {
 3         let s = false;
 4         if (bird.top > pencil.bottom ||
 5             bird.bottom < pencil.top ||
 6             bird.right < pencil.left ||
 7             bird.left > pencil.right) {
 8             s = true;
 9         }
10         return !s;
11     }
注意这里的返回逻辑,这里初始化 s = false,如果不做检测直接 return !s,返回的就是 true 代表撞到铅笔了。
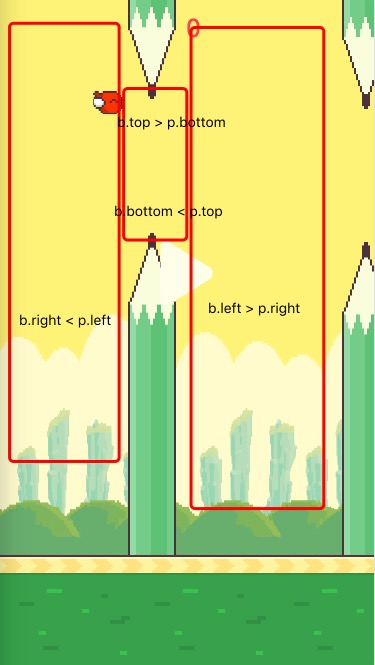
中间检测的代码是图中的区域,意思是当小鸟在这些区域的时候表示没有碰撞 赋值 s = true,return !s。返回的就是 false 了。
其实这是个反向逻辑,假设是碰撞的,然后看哪些情况是没有碰撞,如果符合条件就把 s = true,return 的就是 false,剩下的情况就是碰撞了,直接 return true;
11.重新开始图标绘制
在main函数中想datastore中put相关的资源,再startbutton中引入图片资源,如下:
 1 export class StartButton extends Sprite{
 2     constructor(){
 3         const image=Sprite.getImage('startButton');
 4         super(image,
 5             0,0,
 6             image.width,image.height,
 7             (window.innerWidth-image.height)/2,
 8             (window.innerHeight-image.height)/2.5,
 9             image.width,image.height);
10     }
11 }
在run中的游戏停止的部分加上绘制这张图片的语句:
1 else {
2             //停止不断canvas的刷新
3             this.datastore.get('startButton').draw();
4             cancelAnimationFrame(this.datastore.get('timer'));
5             this.datastore.destroy();
6         }
12积分器的构建
先在main里put相关的资源,在分数类中,构造方法时取用ctx实例,初始化分数scoreNumber为0,因为canvas的刷新频率很快,所以需要一个分数开关,只有当其为true时才可以增加分数。然后在屏幕上绘制出分数。如下:
 1 export class Score {
 2     constructor() {
 3         this.ctx = DataStore.getInstance().ctx;
 4         this.scoreNumber = 0;
 5
 6         //因为canvas的刷新频率很快 需要一个加分开关来控制不让一次加太多分
 7         this.isScore = true;
 8     }
 9
10     draw() {
11         this.ctx.font = '25px Arial';
12         this.ctx.fillStyle = '#76b8ff';
13         this.ctx.fillText(
14             this.scoreNumber,
15             window.innerWidth / 2,
16             window.innerHeight / 18,
17             1000
18         );
19     }
20 }
然后在导演类中做分数增加逻辑,在每次碰撞遍历过整租铅笔后,如果小鸟的左坐标飞过了铅笔的右坐标并且加分开关为开,说明小鸟飞过了一组铅笔,应该加分。分数自增。加分之后将加分开关关闭。
1 //加分逻辑
2         if (birds.birdsX[0] > pencils[0].x + pencils[0].width
3         &&score.isScore) {
4             score.isScore=false;
5             score.scoreNumber++;
6         }
而加分逻辑应该在每当销毁一组铅笔之后重新打开。
1 if (pencils[0].x + pencils[0].width <= 0 && pencils.length === 4) {
2                 pencils.shift();
3                 pencils.shift();
4                 //重新开启计分器
5                 this.datastore.get('score').isScore=true;
6             }
到这里flappy bird的所有逻辑就已经实现了。下面要进行的是在微信开发者工具上的迁移。
持续更新

 浙公网安备 33010602011771号