
Flume的简单使用
一.flume介绍
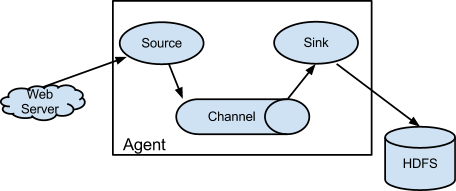
1.flume是一个分布式的日志采集系统
2.在flume系统中,最核心的是agent,每个agent都相当于一个数据传递员。
在agent内部有source,sink,channel
source是获取数据的来源
sink是采集数据的传送目的,往下一级agent传递或者网存储系统传递数据
channel是agent内部传输通道,用于将数据从source传到sink
3.单个agent采集
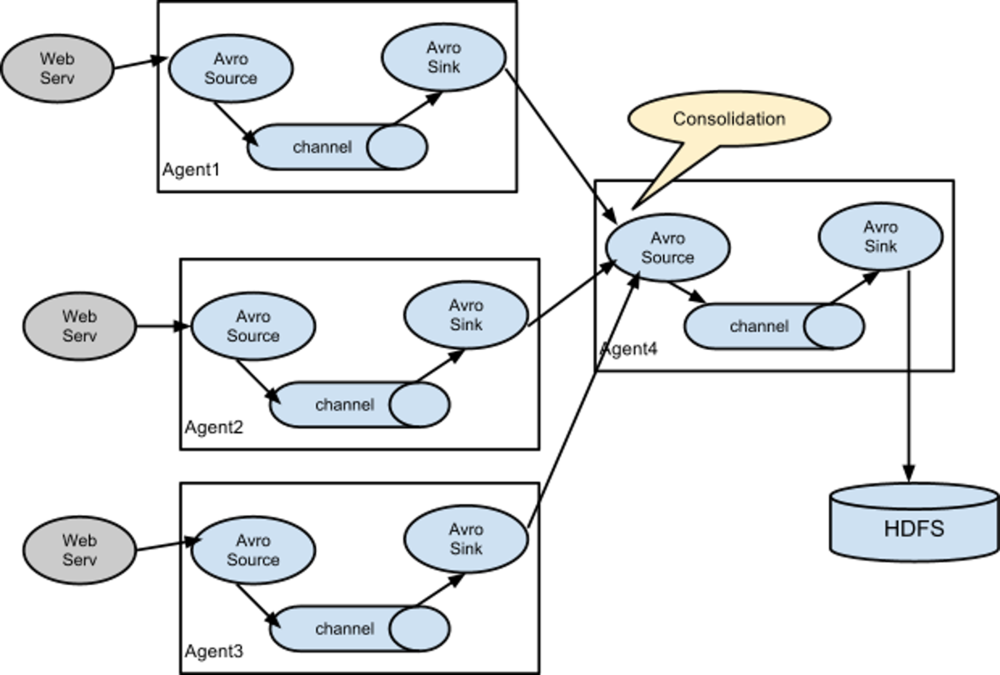
多个agent采集
二.flume的简单使用--采集来自端口的信息
1.首先要在flume的conf目录下新建一个文件netcat-logger.conf(文件名自定义)
2.在该文件下编写以下内容
a1.sources = r1
a1.sinks = k1
a1.channels = c1

# describe source
a1.sources.r1.type = netcat
a1.sources.r1.bind = localhost
a1.sources.r1.port = 44444

# describe sink
a1.sinks.k1.type = logger

# describe channel
a1.channels.c1.type = memory
a1.channels.c1.capacity = 1000
a1.channels.c1.transactionCapacity = 100

# describe the ralationship between source channel sink
a1.sources.r1.channels = c1
a1.sinks.k1.channel = c1
注意:最后一行的a1.sinks.k1.channel就是这么写,而不是a1.sinks.k1.channels
3.启动flume
在flume目录下输入如下命令
bin/flume-ng agent -c conf -f conf/netcat-logger.conf -n a1 -Dflume.root.logger=INFO,console
其中 -c是指定配置文件所在目录
-f是配置采集方案的文件
-n是指定我们的agent的名字
-Dflume.root.logger=INFO,console 是设置日志等级
4.测试
首先打开telnet,并向flume监听的端口发送消息
telnet localhost 44444
这时候在telnet发送的消息,flume都会在终端打印出来
telnet发送内容:

flume采集到的内容:

三.flume的简单使用--采集文件流信息
1.首先要在flume的conf目录下新建一个文件netcat-logger.conf(文件名自定义)
2.在该文件下编写以下内容
a1.sources = r1
a1.sinks = k1
a1.channels = c1

# describe source
a1.sources.r1.type = spooldir
a1.sources.r1.spoolDir = [监测的本地文件目录地址]
a1.sources.r1.fileHeader = true

# describe sink
a1.sinks.k1.type = logger

# describe channel
a1.channels.c1.type = memory
a1.channels.c1.capacity = 1000
a1.channels.c1.transactionCapacity = 100

# describe the ralationship between source channel sink
a1.sources.r1.channels = c1
a1.sinks.k1.channel = c1
3.启动flume
在flume目录下输入如下命令
bin/flume-ng agent -c conf -f conf/netcat-logger.conf -n a1 -Dflume.root.logger=INFO,console
其中 -c是指定配置文件所在目录
-f是配置采集方案的文件
-n是指定我们的agent的名字
-Dflume.root.logger=INFO,console 是设置日志等级
4.测试
首先向待检测目录粘贴一个文件
flume采集之后会在终端输出信息
在检测目录中,传入的文件会被修改文件名,即在文件名后边添加.COMPLETED.
四.flume的简单使用--采集文件流信息到hdfs
1.首先要在flume的conf目录下新建一个文件netcat-logger.conf(文件名自定义)
2.在该文件下编写以下内容
a1.sources = r1
a1.sinks = k1
a1.channels = c1

# describe source,here is the file test.log
a1.sources.r1.type = exec
# we will wirte something to the test.log
a1.sources.r1.command = tail -F [本地文件路径]
a1.sources.r1.channels = c1

# describe the sink
a1.sinks.k1.type = hdfs
a1.sinks.k1.channel = c1
a1.sinks.k1.hdfs.path = /flume/events/%y-%m-%d/%H%M/
a1.sinks.k1.hdfs.filePrefix = events-

a1.sinks.k1.hdfs.round = true
a1.sinks.k1.hdfs.roundValue = 10
a1.sinks.k1.hdfs.roundUnit = minute

# 以下三个条件满足一条就会将记录下沉到hdfs
# 条件1:时间间隔是3s
a1.sinks.k1.hdfs.rollInterval = 3
# 条件2:文件写入字符数量超过500字节
a1.sinks.k1.hdfs.rollSize = 500
# 条件3:文件的更新事件超过20条
a1.sinks.k1.hdfs.rollCount = 20

a1.sinks.k1.hdfs.batchSize = 5

a1.sinks.k1.hdfs.useLocalTimeStamp = true

a1.sinks.k1.hdfs.fileType = DataStream

a1.channels.c1.type = memory
a1.channels.c1.capacity = 1000
a1.channels.c1.transactionCapacity = 100

a1.sources.r1.channels = c1
a1.sinks.k1.channel = c1
3.启动flume
在flume目录下输入如下命令
bin/flume-ng agent -c conf -f conf/netcat-logger.conf -n a1 -Dflume.root.logger=INFO,console
其中 -c是指定配置文件所在目录
-f是配置采集方案的文件
-n是指定我们的agent的名字
-Dflume.root.logger=INFO,console 是设置日志等级
4.测试
首先要建立一个本地文件,之后要定时写入数据定时写入数据脚本如下,直接在终端输入这些命令就可以做到定时向文件写入数据"1111"
while true
do
echo 1111 >> [文件路径]
sleep 1
done
之后在flume终端会打印消息

此时查看hdfs,会发现指定目录下也会有文件产生

此时说明数据已经写入到hdfs

 浙公网安备 33010602011771号