QT基础:QT 定时器学习
定时器在编程中经常要用到,有必要学习一下,记记笔记!
Qt中定时器的使用有两种方法,一种是使用QObject类提供的定时器,还有一种就是使用QTimer类。
1、QObject中的定时器的使用,需要用到三个函数
int QObject::startTimer ( int interval ) ; // 开启定时器并设定间隔,返回定时器ID
void QObject::timerEvent ( QTimerEvent * event ); // 定时器到时处理函数
void QObject::killTimer ( int id ); // 关闭定时器
2、使用QTimer定时器类(可以使用信号与槽)
QTimer *timer = new QTimer(this); // 设置定时器
connect(timer, SIGNAL(timeout()), this, SLOT(onTimeout())); // 连接定时器到时槽函数
void QTimer::start ( int msec ); // 开启定时器并设定间隔
void QTimer::stop(); // 关闭定时器
关于定时器精度:
int QObject::startTimer(int interval, Qt::TimerType timerType = Qt::CoarseTimer);
void QTimer::setTimerType(Qt::TimerType atype);
Qt Assitant中的原文如下:
enum Qt::TimerType
The timer type indicates how accurate a timer can be.

|
1
2 3 4 5 6 7 8 9 10 11 12 13 14 15 16 17 18 19 20 21 22 23 24 25 26 27 28 29 30 31 32 33 34 35 36 37 |
#ifndef QTIMERDISPLAY_H
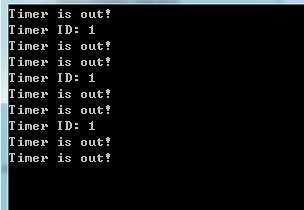
#define QTIMERDISPLAY_H #include <QObject> #include <QTimer> #include <QTimerEvent> #include <QDebug> class QTimerDisplay : public QObject { Q_OBJECT public: explicit QTimerDisplay(QObject *parent = nullptr); protected: // ![0] virtual void timerEvent(QTimerEvent *event); // ![0] signals: public slots: // ![1] void onTimeout(); // ![1] private: // ![0] int m_nTimerID; // ![0] // ![1] QTimer *m_pTimer; // ![1] }; #endif // QTIMERDISPLAY_H |
|
1
2 3 4 5 6 7 8 9 10 11 12 13 14 15 16 17 18 19 20 21 22 23 24 25 26 27 28 29 30 31 32 33 |
#include "qtimerdisplay.h"
#define TIMER_TIMEOUT (2*1000) QTimerDisplay::QTimerDisplay(QObject *parent) : QObject(parent) { // ![0] m_nTimerID = startTimer(TIMER_TIMEOUT); // ![0] // ![1] m_pTimer = new QTimer(this); connect(m_pTimer, SIGNAL(timeout()), this, SLOT(onTimeout())); m_pTimer->start(1000); // ![1] } // ![0] void QTimerDisplay::timerEvent(QTimerEvent *event) { if(event->timerId() == m_nTimerID) { qDebug() << "Timer ID:" << event->timerId(); } } // ![0] // ![1] void QTimerDisplay::onTimeout() { qDebug() << "Timer is out!"; } // ![1] |


 浙公网安备 33010602011771号