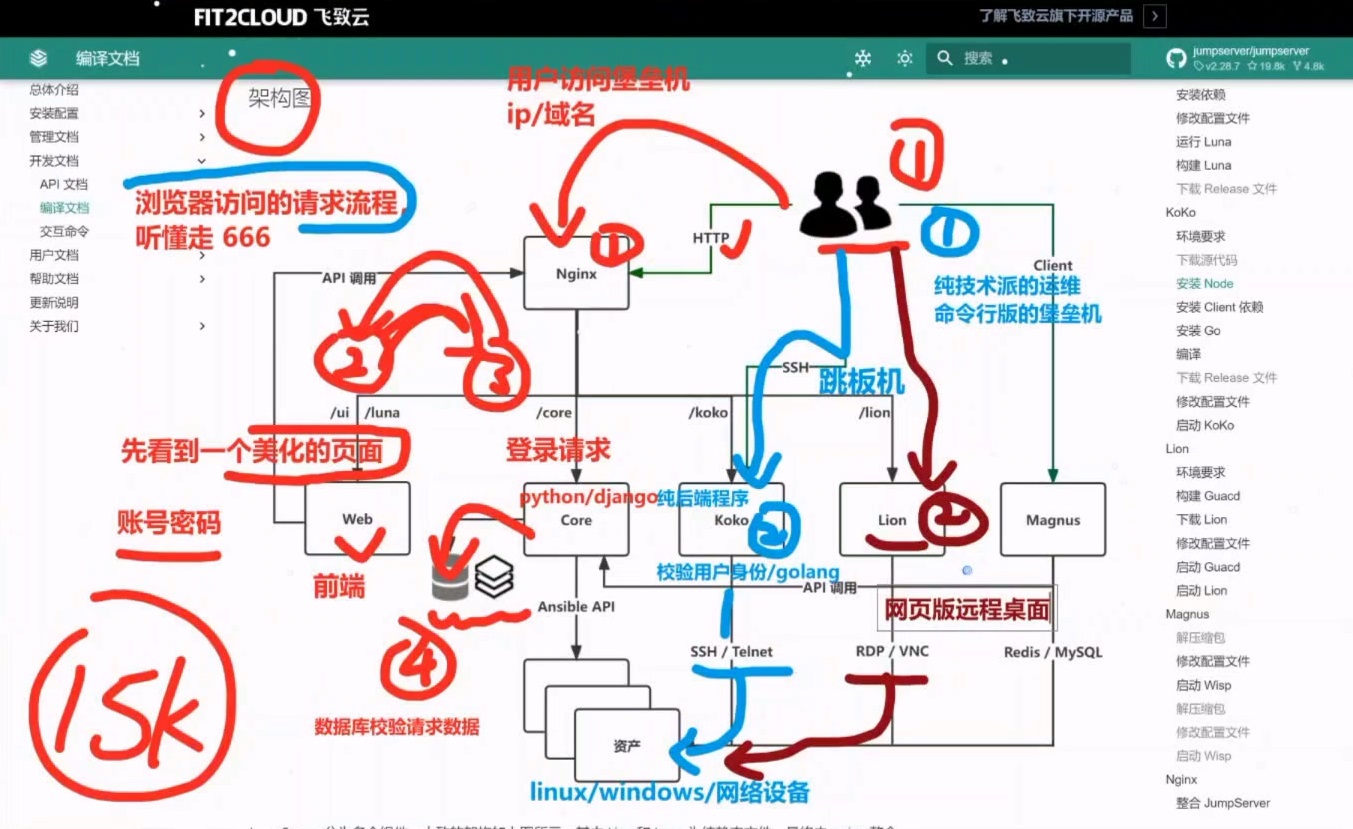
安装
netstat -tunlp |grep

# 设置pip源,可选# 设置pip安装模块源,都是开发工程师,会告诉你的操作。
python -m pip    install --upgrade pip -i https://pypi.tuna.tsinghua.edu.cn/simple

pip3 config set global.index-url https://pypi.tuna.tsinghua.edu.cn/simple

# 检查pip源
pip3 config list

# 每次运行项目都需要先执行 source /opt/py3/bin/activate 载入此环境。
# 首先确保在python虚拟环境下:我创建的虚拟环境名称叫venv1_jump
source venv1_jump/bin/activate

# 下载并解压v2最后一版本 2.28.7
cd /opt
mkdir /opt/jumpserver-v2.28.7
wget -O /opt/jumpserver-v2.28.7.tar.gz https://github.com/jumpserver/jumpserver/archive/refs/tags/v2.28.7.tar.gz
tar -xf jumpserver-v2.28.7.tar.gz -C /opt/jumpserver-v2.28.7 --strip-components 1

# 创建软连接,方便以后换版本号依旧可用
ln -s /opt/jumpserver-v2.28.7/ /opt/jumpserver
ls

# 按照jumpserver的需求环境列表安装软件版本
cd /opt/jumpserver/requirements

# 升级安装pip setuptools wheel
pip install -U pip setuptools wheel
# 从给定的需求文件requirements.txt安装软件
pip install -r requirements.txt


cd /opt/jumpserver
rm -f apps/common/utils/ip/geoip/GeoLite2-City.mmdb apps/common/utils/ip/ipip/ipipfree.ipdb
wget https://download.jumpserver.org/files/ip/GeoLite2-City.mmdb -O apps/common/utils/ip/geoip/GeoLite2-City.mmdb
wget https://download.jumpserver.org/files/ip/ipipfree.ipdb -O apps/common/utils/ip/ipip/ipipfree.ipdb

# 执行脚本安装包
source requirements/rpm_pkg.sh

# 拷贝样例配置文件config_example变为标准配置文件config.yml
cp config_example.yml config.yml

# 然后执行两条命令:

cat /dev/urandom | tr -dc A-Za-z0-9 | head -c 50;echo
rwnnnzNNsVPPEZbHLiJL8hodCEkPGGxujdlIeFFF1jcJHTIgr

cat /dev/urandom | tr -dc A-Za-z0-9 | head -c 16;echo
chPBhw4uFLz8z14PchPBhw4uFLz8z14P
# 修改core配置文件
vim/config.yml
# 把rwnnnzNNsVPPEZbHLiJL8hodCEkPGGxujdlIeFFF1jcJHTIgr第一个数赋值给SECRET_KEY:
# 把chPBhw4uFLz8z14PchPBhw4uFLz8z14P第二个数赋值给BOOTSTRAP_TOKEN:

# 处理国际化,删除apps的文件
rm -f apps/locale/zh/LC_MESSAGES/django.mo apps/locale/zh/LC_MESSAGES/djangojs.mo
python /opt/jumpserve/apps/manage.py compilemessages

#执行这两步可能没有效果
python /opt/jumpserver/apps/manage.py makemigrations
python /opt/jumpserver/apps/manage.py migrate

# 后台启动core -d
./jms start -d
# 正确的显示应该如下:
查看代码
 (venv1_jump) root@jumpserver-app-t02:/opt/jumpserver#./jms start -d
2023-02-24 18:14:19 [common DEBUG] Start subscribe for expire orgs mapping from memory
2023-02-24 18:14:19 [node_assets_mapping DEBUG] Start subscribe for expire node assets id mapping from memory
2023-02-24 18:14:19 [signal_handlers DEBUG] Start subscribe setting change
2023-02-24 18:14:19 [signal_handlers INFO] Init db port mapper
2023-02-24 18:14:19 Check database connection: 0
System check identified no issues (0 silenced).
2023-02-24 18:14:19 Database connect success
2023-02-24 18:14:19 Collect static files
2023-02-24 18:14:19 Collect static files done
2023-02-24 18:14:19 Check database structure change ...
2023-02-24 18:14:19 Migrate model change to database ...
Operations to perform:
  Apply all migrations: acls, admin, applications, assets, audits, auth, authentication, captcha, common, contenttypes, django_cas_ng, django_celery_beat, jms_oidc_rp, notifications, ops, orgs, perms, rbac, sessions, settings, terminal, tickets, users
Running migrations:
  No migrations to apply.
After migration, update builtin role permissions
2023-02-24 18:14:21 Fri Feb 24 18:14:21 2023
2023-02-24 18:14:21 JumpServer version 2.0.0, more see https://www.jumpserver.org
daphne is running: 154232.
celery_default is running: 154201.
celery_ansible is running: 154308.
gunicorn is running: 154327.
beat is running: 154211.
flower is running: 154217.
daphne is running: 154232.
celery_default is running: 154201.
celery_ansible is running: 154308.
gunicorn is running: 154327.
beat is running: 154211.
flower is running: 154217.
(venv1_jump) root@jumpserver-app-t02:/opt/jumpserver#cd /opt
wget https://nodejs.org/download/release/v14.16.1/node-v14.16.1-linux-x64.tar.xz
tar -xf node-v14.16.1-linux-x64.tar.xz
mv node-v14.16.1-linux-x64 /usr/local/node
chown -R root:root /usr/local/node
export PATH=/usr/local/node/bin:$PATH
echo 'export PATH=/usr/local/node/bin:$PATH' >> ~/.bashrc
[root@server01 /opt/node-v14.16.1-linux-x64/bin]#node -v
v14.16.1
[root@server01 /opt/node-v14.16.1-linux-x64/bin]#npm -v
6.14.12
npm config set registry https://registry.npm.taobao.org
# 完全是前端开发工程师,发给你的文档,不理解就问前端就好
npm install -g yarn
yarn config set registry https://registry.npm.taobao.org
[root@server01 ~]#cat ~/.npmrc
registry=https://registry.npm.taobao.org/
sass_binary_site=https://npm.taobao.org/mirrors/node-sass/phantomjs_cdn
url=http://cnpmjs.org/downloads
electron_mirror=https://npm.taobao.org/mirrors/electron/
sqlite3_binary_host_mirror=https://foxgis.oss-cn-shanghai.aliyuncs.com/
profiler_binary_host_mirror=https://npm.taobao.org/mirrors/node-inspector/
[root@server01 ~]#cd /opt
mkdir /opt/lina-v2.28.7
wget -O /opt/lina-v2.28.7.tar.gz https://github.com/jumpserver/lina/archive/refs/tags/v2.28.7.tar.gz
tar -xf lina-v2.28.7.tar.gz -C /opt/lina-v2.28.7 --strip-components 1
cd /opt/lina-v2.28.7
# 今天部署,难度很大,公司里也得是,一周时间,调通,涨知识。。
# 官网给的最新的玩法,人家也建议用docker,难度很大
# #彻底玩明白,linux稍微复杂点的部署操作,前后端,golang环境设置,
# 有不太懂的可以问
# 演示堡垒机神奇之处
[root@server01 /opt/lina-2.28.7]#yarn install
yarn install v1.22.19
sed -i "s@Version <strong>.*</strong>@Version <strong>v2.28.7</strong>@g" src/layout/components/Footer/index.vue
vi .env.development
-----------------
# 全局环境变量 请勿随意改动
ENV = 'development'
# base api
VUE_APP_BASE_API = ''
VUE_APP_PUBLIC_PATH = '/ui/'
# vue-cli uses the VUE_CLI_BABEL_TRANSPILE_MODULES environment variable,
# to control whether the babel-plugin-dynamic-import-node plugin is enabled.
# It only does one thing by converting all import() to require().
# This configuration can significantly increase the speed of hot updates,
# when you have a large number of pages.
# Detail: https://github.com/vuejs/vue-cli/blob/dev/packages/@vue/babel-preset-app/index.js
VUE_CLI_BABEL_TRANSPILE_MODULES = true
# External auth
VUE_APP_LOGIN_PATH = '/core/auth/login/'
VUE_APP_LOGOUT_PATH = '/core/auth/logout/'
# Dev server for core proxy
VUE_APP_CORE_HOST = 'http://localhost:8080' # 修改成 Core 的 url 地址
VUE_APP_CORE_WS = 'ws://localhost:8070'
VUE_APP_ENV = 'development'
# 启动lina
nohup yarn serve &
yarn build
cp -rf lina lina-v2.28.7
tar -czf lina-v2.28.7.tar.gz lina-v2.28.7


【推荐】国内首个AI IDE,深度理解中文开发场景,立即下载体验Trae
【推荐】编程新体验,更懂你的AI,立即体验豆包MarsCode编程助手
【推荐】抖音旗下AI助手豆包,你的智能百科全书,全免费不限次数
【推荐】轻量又高性能的 SSH 工具 IShell:AI 加持,快人一步
· DeepSeek 开源周回顾「GitHub 热点速览」
· 物流快递公司核心技术能力-地址解析分单基础技术分享
· .NET 10首个预览版发布:重大改进与新特性概览!
· AI与.NET技术实操系列(二):开始使用ML.NET
· .NET10 - 预览版1新功能体验(一)