

IOS开发之小实例--UIImagePickerController
摘自:http://www.cnblogs.com/goodboy-heyang/p/5403947.html
前言:本篇博文是本人阅读国外的IOS Programming Tutorial的一篇入门文章的学习过程总结,难度不大,因为是入门。主要是入门UIImagePickerController这个控制器,那么这个 控制器是干嘛的呢?就是调用设备摄像机功能用的。到后面可能需要您在真机上测试,因为iPhone模拟器无法支持摄像机功能,运行测试会崩溃的哦。
网址:http://www.appcoda.com/ios-programming-camera-iphone-app/
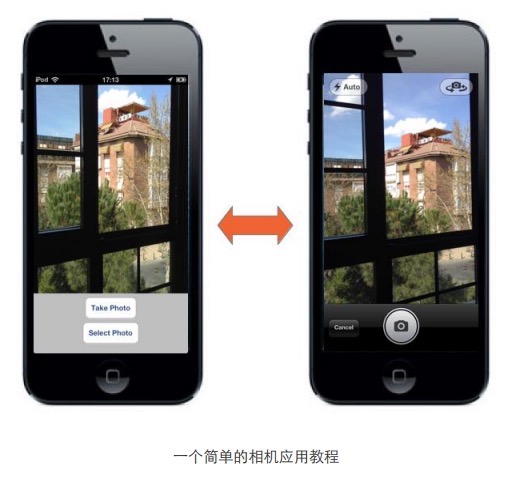
1、首先简单的创建一个工程,然后在storyboard和对应的.m文件中添加相关的代码,这个简明教程没有使用自动布局,不多说,看图识字:

2、下面是这个ViewController.m的完整实现:
#import "ViewController.h"

@interface ViewController () <UIImagePickerControllerDelegate,UINavigationControllerDelegate>

@property (strong, nonatomic) IBOutlet UIImageView *imageView;

@end

@implementation ViewController

- (void)viewDidLoad {
    [super viewDidLoad];

    // 这段代码会自动判断当前设备是否有摄像机功能,如果没有,会弹窗提示
    if (![UIImagePickerController isSourceTypeAvailable:UIImagePickerControllerSourceTypeCamera]) {

        UIAlertView *myAlertView = [[UIAlertView alloc] initWithTitle:@"Error"
                                                              message:@"Device has no camera"
                                                             delegate:nil
                                                    cancelButtonTitle:@"OK"
                                                    otherButtonTitles: nil];

        [myAlertView show];

    }
}
- (IBAction)takePhotot:(UIButton *)sender {
    // 创建UIImagePickerController控制器对象
    UIImagePickerController *picker = [[UIImagePickerController alloc] init];
    picker.delegate = self;
    picker.allowsEditing = YES;
    picker.sourceType = UIImagePickerControllerSourceTypeCamera;

    [self presentViewController:picker animated:YES completion:nil];
}
- (IBAction)selectPhoto:(UIButton *)sender {
    // 创建UIImagePickerController控制器对象
    UIImagePickerController *picker = [[UIImagePickerController alloc] init];
    picker.delegate = self;
    picker.allowsEditing = YES;
    picker.sourceType = UIImagePickerControllerSourceTypePhotoLibrary;

    [self presentViewController:picker animated:YES completion:nil];
}
#pragma mark - 代理方法
-(void)imagePickerController:(UIImagePickerController *)picker didFinishPickingMediaWithInfo:(NSDictionary<NSString *,id> *)info{
    UIImage* chosenImage = info[UIImagePickerControllerEditedImage];
    self.imageView.image = chosenImage;

    [picker dismissViewControllerAnimated:YES completion:nil];
}
-(void)imagePickerControllerDidCancel:(UIImagePickerController *)picker{
    [picker dismissViewControllerAnimated:YES completion:nil];
}

@end

