


Libgdx Pixmap 的使用
Pixmap 的基本用法比较简单:
FileHandle internal = Gdx.files.internal("run1.png");
Pixmap runPixmap = new Pixmap(internal);
// 生成纹理
Texture runTexture = new Texture(runPixmap, Pixmap.Format.RGBA8888, false);
由 Pixmap 对象生成 Texture 对象,再绘制到屏幕上。流程比较简单,图片显示正常!
由 Pixmap 对象,再生成一个新的 Pixmap 对象,然后生成新的 Texture 对象,再绘制到屏幕上。如下代码:
FileHandle internal = Gdx.files.internal("run1.png");
Pixmap runPixmap = new Pixmap(internal);
// 生成纹理
Texture runTexture = new Texture(runPixmap, Pixmap.Format.RGBA8888, false);

// 生成一个新的 Pixmap 对象
int pwidth = runPixmap.getWidth();
int pheight =runPixmap.getHeight();

Pixmap newPixmap = new Pixmap(pwidth, pheight, Pixmap.Format.RGBA8888);
newPixmap.drawPixmap(runPixmap, 0, 0, 0, 0, pwidth, pheight);

// 再由新的 Pixmap 对象生成一个新的 Texture 对象
Texture newRunTexture = new Texture(newPixmap, Pixmap.Format.RGBA8888, false);
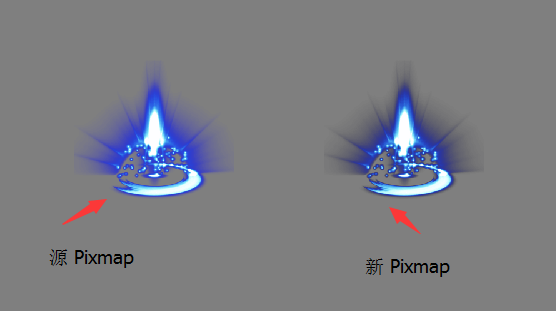
在屏幕上显示的时候,由新生成的 Pixmap 所生成的 Texture 对象,绘制到屏幕上,颜色比源 Pixmap 生成的 Texture 对象要暗很多,如下图所示:
因此在生成新的 Pixmap 对象的时候,需要调整代码,如下所示:
FileHandle internal = Gdx.files.internal("run1.png");
Pixmap runPixmap = new Pixmap(internal);
// 生成纹理
Texture runTexture = new Texture(runPixmap, Pixmap.Format.RGBA8888, false);

// 生成一个新的 Pixmap 对象
int pwidth = runPixmap.getWidth();
int pheight =runPixmap.getHeight();

// 生成新 Pixmap 对象前,需要设置 Blending 模式
Pixmap.Blending blend = Pixmap.getBlending();
Pixmap.setBlending(Pixmap.Blending.None);

Pixmap newPixmap = new Pixmap(pwidth, pheight, Pixmap.Format.RGBA8888);
newPixmap.drawPixmap(runPixmap, 0, 0, 0, 0, pwidth, pheight);

// 为了避免其它 Pixmap 的 Blending 模式改变,最后需要恢复原 Blending
Pixmap.setBlending(blend);

// 再由新的 Pixmap 对象生成一个新的 Texture 对象
Texture newRunTexture = new Texture(newPixmap, Pixmap.Format.RGBA8888, false);
经如上调整,两个 Texture 绘制到屏幕上的效果,视觉上看就没有区别了。

编程之美。
