WPF 基础学习
WPF 基础
一、布局容器
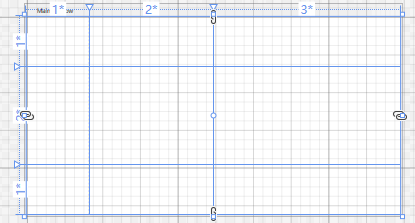
- Grid 特点:表格布局
使用代码:
   <Grid ShowGridLines="True">
        <Grid.ColumnDefinitions >
            <ColumnDefinition Width="*"/>
            <ColumnDefinition Width="2*"/>
            <ColumnDefinition Width="3*"/>
        </Grid.ColumnDefinitions>
        <Grid.RowDefinitions>
            <RowDefinition Height="*"/>
            <RowDefinition Height="2*"/>
            <RowDefinition Height="1*"/>
        </Grid.RowDefinitions>
    </Grid>
使用* 用来表示比例关系。也可以使用固定值
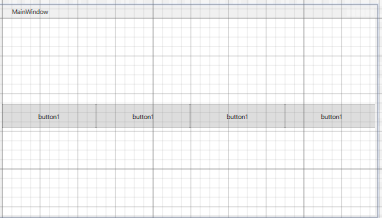
- StackPanel 特点:当设置为横向(或者纵向)时,如果界面位置不够用,将会有控件被遮挡
代码:当前行只能放置3个控件,第四个有半截被遮挡
    <StackPanel Orientation="Horizontal">
        <Button Width="200" Height="50" Content="button1"/>
        <Button Width="200" Height="50" Content="button1"/>
        <Button Width="200" Height="50" Content="button1"/>
        <Button Width="200" Height="50" Content="button1"/>
        <Button Width="200" Height="50" Content="button1"/>
        <Button Width="200" Height="50" Content="button1"/>
        <Button Width="200" Height="50" Content="button1"/>
        <Button Width="200" Height="50" Content="button1"/>
        <Button Width="200" Height="50" Content="button1"/>
        <Button Width="200" Height="50" Content="button1"/>
    </StackPanel>
-
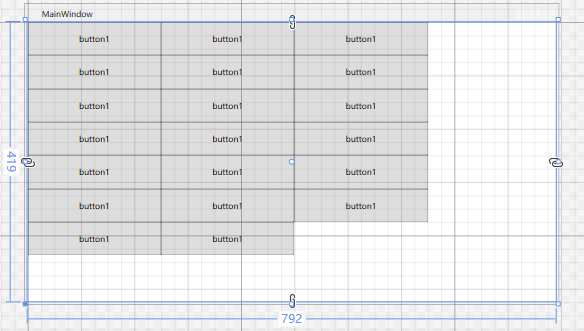
WrapPanel 环绕面板 特点:如果当前行位置不够放下控件,会把剩下的控件放到下一行
代码:当前行只能放下3个控件。另起一行
    <WrapPanel Orientation="Horizontal">
        <Button Width="200" Height="50" Content="button1"/>
        <Button Width="200" Height="50" Content="button1"/>
        <Button Width="200" Height="50" Content="button1"/>
        <Button Width="200" Height="50" Content="button1"/>
        <Button Width="200" Height="50" Content="button1"/>
        <Button Width="200" Height="50" Content="button1"/>
        <Button Width="200" Height="50" Content="button1"/>
        <Button Width="200" Height="50" Content="button1"/>
        <Button Width="200" Height="50" Content="button1"/>
        <Button Width="200" Height="50" Content="button1"/>
        <Button Width="200" Height="50" Content="button1"/>
        <Button Width="200" Height="50" Content="button1"/>
        <Button Width="200" Height="50" Content="button1"/>
        <Button Width="200" Height="50" Content="button1"/>
        <Button Width="200" Height="50" Content="button1"/>
        <Button Width="200" Height="50" Content="button1"/>
        <Button Width="200" Height="50" Content="button1"/>
        <Button Width="200" Height="50" Content="button1"/>
        <Button Width="200" Height="50" Content="button1"/>
        <Button Width="200" Height="50" Content="button1"/>
    </WrapPanel>
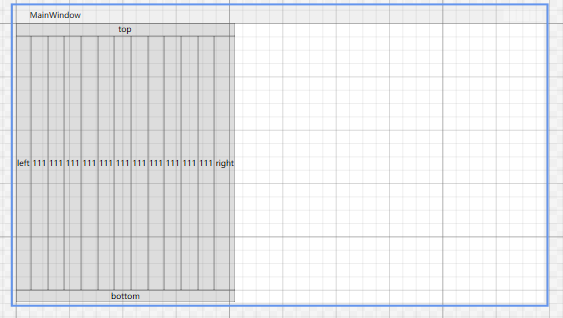
- DockPanel 特定:可以为放入的控件设置停靠方向(上下左右),同时可以设置最后一个控件是否填充整个控件。如果想设置容器所有内控件的停靠方向可以使用HorizontalAlignment属性
代码如下:
    <DockPanel LastChildFill="False" HorizontalAlignment="Left">
        <Button Content="top" DockPanel.Dock="Top"/>
        <Button Content="bottom" DockPanel.Dock="Bottom"/>
        <Button Content="left" DockPanel.Dock="Left"/>
        <Button Content="right" DockPanel.Dock="Right"/>
        <Button Content="111" />
        <Button Content="111" />
        <Button Content="111" />
        <Button Content="111" />
        <Button Content="111" />
        <Button Content="111" />
        <Button Content="111" />
        <Button Content="111" />
        <Button Content="111" />
        <Button Content="111" />
        <Button Content="111" />
    </DockPanel>
-
Canvas 画布控件 特定:可以精确设置控件的停靠位置
    <Canvas>
        <Button Width="200" Height="50" Content="111" Canvas.Left="100" Canvas.Top="100"/>
        <Button  Width="200" Height="50" Content="222"  Canvas.Left="150" Canvas.Top="150"/>
        <Button  Width="200" Height="50" Content="333"  Canvas.Left="200" Canvas.Top="280"/>
    </Canvas>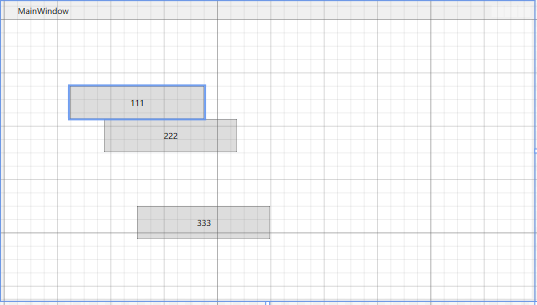
二、样式(Style)
简单说明:
-
Style样式:对于控件外观属性的封装。用于统一设置控件的外观的资源。
-
Windows.Resources:只是对于当前窗体有效
-
Application.Resources:对于项目中所有的窗体都能生效
-
Style 一般属于静态资源
想法:给MainWindow中的Button控件设置样式
- 第一个按钮使用窗体的全局Button样式
- 第二个按钮使用自定义的buttonStyle1样式
- 第三个按钮使用自定义的buttonStyle2样式(buttonStyle2是在buttonStyle1的基础上进行修改的)
- 第三个按钮使用自定义的buttonStyle2样式,但是进行了背景颜色的修改。
- 在当前控件中自定义样式。(略)
    <Window.Resources>
        <Style  TargetType="Button">
            <Setter Property="Foreground" Value="Red"/>
            <Setter Property="Background" Value="Yellow"/>
            <Setter Property="FontFamily" Value="仿宋"/>
            <Setter Property="FontSize" Value="30"/>
            <Setter Property="FontStyle" Value="Italic"/>
            <Setter Property="FontWeight" Value="UltraBold"/>
        </Style>

        <Style x:Key="buttonStyle1" TargetType="Button" >
            <Setter Property="FontSize" Value="35"/>
            <Setter Property="FontFamily" Value="黑体"/>

        </Style>

        <Style x:Key="buttonStyle2" TargetType="Button" BasedOn="{StaticResource buttonStyle1}">
            <Setter Property="FontSize" Value="35"/>
            <Setter Property="FontFamily" Value="隶书"/>
        </Style>

    </Window.Resources>
    <Grid>
        <StackPanel Orientation="Horizontal">
            <Button x:Name="button1" Content="按钮1" Width="100" Height="45"/>
            <Button x:Name="button2" Content="按钮2" Width="100" Height="45" Style="{StaticResource buttonStyle1}"/>
            <Button x:Name="button3" Content="按钮3" Width="100" Height="45" Style="{StaticResource buttonStyle2}"/>
            <Button x:Name="button4" Content="按钮4" Width="100" Height="45" Style="{StaticResource buttonStyle2}" Background="Pink"/>
        </StackPanel>
    </Grid>
首先:样式必须指定TargetType
- 在使用的时候需要
- 样式可以被继承,BasedOn
- 样式,如果没有指定key,那么是对于所有的对应类型的控件都生效。
- 控件内的标签声明优先级>指定Key的声明>不指定key的声明
补充:隐式写法的另外一种写法,和直接写Button效果是一致的。
<Style TargetType="{x:Type Button}"></Style>
三、模板
数据模板与控件模板
第一部分:控件模板:对于控件样式属性的封装
ControlTemplate
案例:
-
使用Style 嵌套ControlTemplate
-
直接使用ControlTemplate
-
在自定义的控件里面使用模板
代码如下:
首先是:使用Style 嵌套ControlTemplate。控件调用style就行了。
    <Style TargetType="Button" x:Key="buttonStyle1">
            <Setter Property="FontSize" Value="55"/>
            <Setter Property="Template" >
                <Setter.Value>
                    <ControlTemplate TargetType="Button">
                        <Grid Width="200">
                            <Border BorderBrush="Black" BorderThickness="5"/>
                            <Ellipse  Fill="Yellow" StrokeThickness="5" Stroke="red" Name="ellipse1"/>
                            <TextBlock Text="112233" FontSize="30" HorizontalAlignment="Center"/>
                        </Grid>
                        <ControlTemplate.Triggers>
                            <Trigger Property="IsMouseOver" Value="true">
                                <Setter TargetName="ellipse1" Property="Stroke" Value="black"/>
                            </Trigger>

                        </ControlTemplate.Triggers>
                    </ControlTemplate>
                </Setter.Value>
            </Setter>
        </Style>
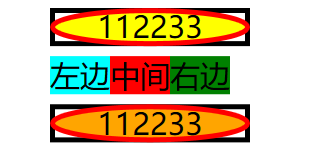
第二种 直接使用ControlTemplate。这种需要声明控件需要使用哪种Template。调用方式和使用style基本相同
       <ControlTemplate x:Key="buttonTemplate1">
            <WrapPanel  Orientation="Horizontal" HorizontalAlignment="Center" Width="200">
                <TextBlock Text="左边" FontSize="30" HorizontalAlignment="Center"  Background="Aqua"/>
                <TextBlock Text="中间" FontSize="30" HorizontalAlignment="Center"  Background="Red" />
                <TextBlock Text="右边" FontSize="30" HorizontalAlignment="Center"  Background="Green"/>
            </WrapPanel>
        </ControlTemplate>
第三种 在使用的控件中自定义模板(只会作用于当前的控件),见调用代码
调用代码:
    <Grid>
        <StackPanel>
            <Button x:Name="Button1"  Margin="5" Style="{StaticResource buttonStyle1}"/>
            <Button  x:Name="Button2" Margin="5" Template="{StaticResource buttonTemplate1}"/>
            <Button  x:Name="Button3" Margin="5">
                <Button.Template>
                    <ControlTemplate>
                        <Grid Width="200" >
                            <Border BorderBrush="Black" BorderThickness="5"/>
                            <Ellipse Fill="Orange" StrokeThickness="5" Stroke="red" Name="ellipse1"/>
                            <TextBlock Text="112233" FontSize="30" HorizontalAlignment="Center"/>
                        </Grid>
                    </ControlTemplate>
                </Button.Template>
            </Button>

        </StackPanel>
    </Grid><Button  x:Name="Button3" Margin="5">
                <Button.Template>
                    <ControlTemplate>
                        <Grid Width="200" >
                            <Border BorderBrush="Black" BorderThickness="5"/>
                            <Ellipse Fill="Orange" StrokeThickness="5" Stroke="red" Name="ellipse1"/>
                            <TextBlock Text="112233" FontSize="30" HorizontalAlignment="Center"/>
                        </Grid>
                    </ControlTemplate>
                </Button.Template>
 </Button>
效果:
第二部分:数据模板
说明:数据模板实质上也是以内容模板为基础,在数据模板中,是对内容模板重复的显示,以达到迭代显示数据的作用,所以在数据模板中,可以添加呈现数据的任意元素。
最重要一点:继承自ItemsControl类的控件才能使用数据模板。例如listbox和ComboBox控件
思路:先考虑数据模板需要长啥样,然后在数据模板中绑定数据
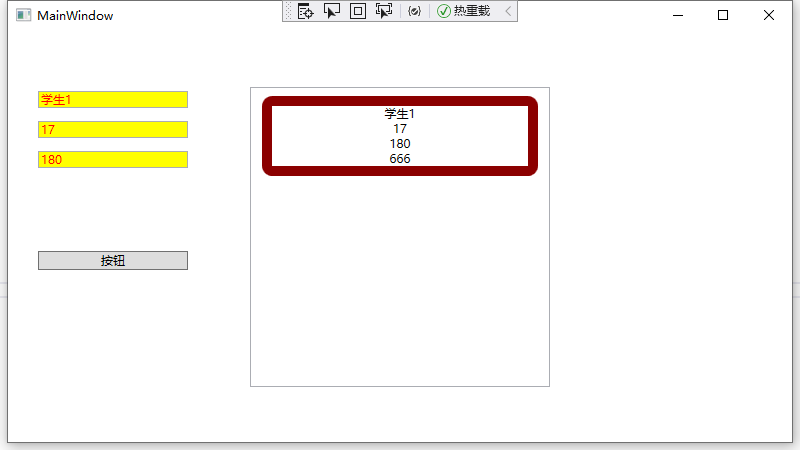
数据模板代码:使用listbox,其中使用3个textblock控件
        <ListBox x:Name="listbox1" Width="300" Height="300" HorizontalContentAlignment="Stretch" >
            <ListBox.ItemTemplate>
                <DataTemplate>
                    <Border Margin="5" BorderThickness="10" BorderBrush="DarkRed" CornerRadius="5">
                        <Grid>
                            <Grid.RowDefinitions>
                                <RowDefinition/>
                                <RowDefinition/>
                                <RowDefinition/>
                                <RowDefinition/>
                            </Grid.RowDefinitions>
                            <TextBlock Grid.Row="0" HorizontalAlignment="Center" Text="{Binding Path=Name}"/>
                            <TextBlock Grid.Row="1" HorizontalAlignment="Center" Text="{Binding Path=Age}"/>
                            <TextBlock Grid.Row="2" HorizontalAlignment="Center" Text="{Binding Path=Height}"/>
                            <TextBlock Grid.Row="3" HorizontalAlignment="Center" Text="666"/>
                        </Grid>
                    </Border>

                </DataTemplate>
            </ListBox.ItemTemplate>
        </ListBox>
调用代码:
    <Button Content="按钮" HorizontalAlignment="Left" VerticalAlignment="Top" Margin="30,220,0,0" Width="150" Click="Button_Click"/>
    <TextBox x:Name="textbox1" HorizontalAlignment="Left"  VerticalAlignment="Top"  Margin="30,60,0,0"  Width="150" Text="textbox" TextWrapping="Wrap" Background="Yellow" Foreground="Red" />
    <TextBox x:Name="textbox2" HorizontalAlignment="Left"  VerticalAlignment="Top"  Margin="30,90,0,0"  Width="150" Text="textbox" TextWrapping="Wrap" Background="Yellow" Foreground="Red"/>
    <TextBox x:Name="textbox3" HorizontalAlignment="Left"  VerticalAlignment="Top"  Margin="30,120,0,0"  Width="150" Text="textbox" TextWrapping="Wrap" Background="Yellow" Foreground="Red"/>
单击事件:
 private void Button_Click(object sender, RoutedEventArgs e)
        {
            People p = new People();
            p.Name = textbox1.Text;
            p.Age = int.Parse(textbox2.Text);
            p.Height = int.Parse(textbox3.Text);
            listbox1.Items.Add(p);
        }
People类:
    class People
    {
        public string Name { get; set; }
        public int Age { get; set; }
        public int Height { get; set; }
    }
结果如下:当点击buttton后,向界面显示数据
四、数据绑定
方式如下:
- 绑定相关联控件的属性
- 绑定静态资源
- (相对)绑定 RelativeSource
- listbox 绑定ItemSource,textblock实现联动
- 控件的DataContext绑定实例化的对象
案例1:TextBox的Text绑定了Slider的数值
                <Slider
                    x:Name="slider1"
                    Width="200"
                    Height="50"
                    Background="Yellow" />
                <TextBox
                    x:Name="tb1"
                    Width="200"
                    Height="50"
                    HorizontalContentAlignment="Center"
                    Background="red"
                    FontSize="45"
                    Text="{Binding ElementName=slider1, Path=Value, UpdateSourceTrigger=PropertyChanged, FallbackValue='NoFound', Mode=OneWayToSource}" />
案例2:绑定静态资源中的string字符串
需要先引入(此处使用了string类型,所以需要引入)
xmlns:sys="clr-namespace:System;assembly=mscorlib"
资源代码如下:
    <Window.Resources>
        <FontFamily x:Key="ff1">宋体字</FontFamily>
        <sys:String x:Key="string111">我真帅</sys:String>
    </Window.Resources>
调用代码如下
<TextBlock x:Name="textblock1" Width="200" Height="50" Background="Blue" Text="{Binding Source={StaticResource string111}}" FontSize="45" Foreground="OrangeRed"/>
案例3:相对资源绑定
向上绑定对应对应控件的属性
    <Grid x:Name="gr1">
        <Grid x:Name="gr2">
            <StackPanel>
                <TextBlock x:Name="textblock1"  Width="200" Height="50"  Background="Blue" Text="{Binding Source={StaticResource ff1}}" FontSize="45" Foreground="OrangeRed"/>
                <TextBlock x:Name="textblock2"  Width="200" Height="50"  Background="Green" Text="{Binding RelativeSource={RelativeSource AncestorType={x:Type Grid},AncestorLevel=2,Mode=FindAncestor},Path=Name}" FontSize="45" Foreground="OrangeRed"/>
            </StackPanel>
        </Grid>
AncestorType :绑定资源来源的控件类型
Mode:寻找方式。FindAncestor找父类,就是向着外层去找。同理也能设置向着内层去找
AncestorLevel:找几层。当前是找2层,就是找到gr1;如果是1,就是gr2。
Path:寻找上层属性。
案例4:绑定到对象集合
(从ItemsControl派生的类都能数据绑定 ListBox,ComboBox,ListView,DataGrid都能使用)
listbox 中绑定一个含有Student类的list,然后当单击listbox 中的某项,Textblock会显示对应项实例的某个属值(Age)
其中MainWindow.xaml.cs
    public partial class MainWindow : Window
    {
        List<Student> list = new List<Student>()
        {
            new Student(){ Name="Tim",Age=22},
            new Student(){ Name="Tom",Age=25},
            new Student(){ Name="Tony",Age=28},
            new Student(){ Name="Kate",Age=30}
        };
        public MainWindow()
        {
            InitializeComponent();
            listbox1.ItemsSource = list;
            listbox1.DisplayMemberPath = "Name";
        }
    }

    class Student
    {
        private string name;

        public String Name
        {
            get { return name; }
            set { name = value;}
        }

        private int age;


        public int Age
        {
            get { return age; }
            set { age = value;  }
        }
    }
<ListBox x:Name="listbox1" Width="200" Height="150" Background="Yellow"/>
<TextBlock x:Name="textblock3"  Width="200" Height="50"  Background="Green" Text="{Binding ElementName=listbox1,Path=SelectedItem.Age}" FontSize="45" Foreground="OrangeRed"/>
案例5 :使用控件的上下文绑定实例化对象
后台:把控件的上下文绑定实例化的对象。前台直接绑定属性
前台:
<TextBlock x:Name="textblock4" Width="200" Height="50" Background="Green" Text="{Binding Age}" FontSize="45" Foreground="OrangeRed"/>
后台:
Student st = new Student() { Name = "张三", Age = 88 };
textblock4.DataContext = st;
五、依赖属性
DependencyProperties
propdp 两下tab
定义:
普通 .NET 属性的值是直接从类中的私有成员读取的,而 DependencyProperty 的值是在调用从 DependencyObject 继承的 GetValue() 方法时动态解析的
优点:
- 减少内存占用:如果多个对象依赖属性的值没有变动,那么在内存中这个依赖属性在堆内存中仅仅存放了一次。而不是多次。
- 值继承
- 更改通知:依赖属性具有内置的更改通知机制。通过在属性元数据中注册回调,您会在属性值更改时收到通知。
使用依赖属性的情景:
-
双向绑定。有了这个,依赖项属性不用写额的代码,也不用实现什么接口,它本身就俱备双向绑定的特性,比如,我把员工对象的姓名绑定到摇文本框,一旦绑定,只要文本框中的值发生改变,依赖项属性员工姓名也会跟着变化,反之亦然;
-
触发器。这个东西在WPF中很重要,比如,一个按钮背景是红色,我想让它在鼠标停留在它上面是背景变成绿色,而鼠标一旦移开,按钮恢复红色。
如果在传统的Windows编程中,你一定会想办法弄一些事件,或者委托来处理,还要写一堆代码。告诉你,有了依赖项属性,你将一行代码都不用写,所有的处理均由WPF属性系统自动处理。而触发器只是临时改变属性的值,当触完成时,属性值自动被“还原”。 -
附加属性。附加属性也是依赖项属性,它可以把A类型的的某些属性推迟到运行时根据B类型的具体情况来进行设置,而且可以同时被多个类型对象同时维护同一个属性值,但每个实例的属性值是独立的。
-
A属性改变时,也同时改变其它属性的值,如TogleButton按下的同时,弹出下拉框。
public class Student : DependencyObject
{
         //声明一个静态只读的DependencyProperty字段
        public static readonly DependencyProperty NameProperty;
        static Student()
        {
            //注册我们定义的依赖属性Name
            NameProperty = DependencyProperty.Register("Name", typeof(string), typeof(Student),
                new PropertyMetadata("名称", OnValueChanged));
        }
        private static void OnValueChanged(DependencyObject o, DependencyPropertyChangedEventArgs e)
        {
             //当值改变时,我们可以在此做一些逻辑处理
         }
        //属性包装器,通过它来读取和设置我们刚才注册的依赖属性
        public string Name
        {
            get { return (string)GetValue(NameProperty); }
            set { SetValue(NameProperty, value); }
        }
}
第一步: 让自己的类继承自 DependencyObject基类。
第二步:依赖属性的定义必须使用 public static 声明一个 DependencyProperty的变量,并且有一个Property作为后缀,该变量才是真正的依赖属性 。
第三步:在静态构造函数中向属性系统注册依赖属性,并获取对象引用。依赖属性是通过调用DependencyProperty.Register静态方法创建,该方法需要传递一个属性名称,这个名称非常重要。
在定义控件Style和Template的时候,Setter的Property属性填入的值就是注册依赖属性时使用的名称。propertyType指明了依赖属性实际的类型,ownerType指明了是哪个类注册了此依赖属性,最后typeMetadata存放了一些依赖属 性的元信息,包括依赖属性使用的默认值,还有属性值发生变更时的通知函数。
第四步:在前面的三步中,我们完成了一个依赖属性的注册,那么我们怎样才能对这个依赖属性进行读写呢?答案就是提供一个依赖属性的实例化包装属性,通过这个属性来实现具体的读写操作。和CLR属性不同,依赖属性不是直接对私有变量的操纵,而是通过GetValue()和SetValue()方法来操作属性值的,可以使用标准的.NET属性定义语法进行封装,使依赖属性可以像标准属性那样来使用。
使用默认值的代码案例:
DependencyProperty.Register("Name", typeof(string), typeof(Student), new PropertyMetadata("小学生"));
PropertyMetadata:默认值
调用代码:
    public partial class MainWindow : Window
    {
        Student student;
        public MainWindow()
        {
            InitializeComponent();
            student = new Student() { Name = "Hello" };
            tb1.DataContext = student;
        }

        private void Button_Click(object sender, RoutedEventArgs e)
        {
            student.Name = "李四";
        }
    }
六、触发器
-
Trigger 简单触发器(监测依赖项属性进行触发)
-
MultiTrigger 多条件触发器(当多个条件后触发)
-
DataTrigger 数据触发器(监测所绑定的数据)
-
EventTrigger 当一个时间发生时,应用一个动画
(1)简单触发器
在控件样式里面设置触发器:
当满足条件以后,TextBox的字体颜色变为黄色,控件背景变为红色
        <Style TargetType="TextBox">
            <Style.Triggers>
                <Trigger Property="Text" Value="5">
                    <Setter Property="Background" Value="red"/>
                    <Setter Property="Foreground" Value="Yellow"/>
                </Trigger>
            </Style.Triggers>
        </Style>
(2)数据触发器
需要设置绑定的数据来源
    <Window.Resources>
        <Style TargetType="TextBox">
            <Style.Triggers>
                <DataTrigger Binding="{Binding RelativeSource={RelativeSource Mode=Self},Path=Text}" Value="51">
                <Setter Property="Background" Value="red"/>
                <Setter Property="Foreground" Value="Yellow"/>
                </DataTrigger>
            </Style.Triggers>
        </Style>
    </Window.Resources>
(3)多条件触发器
需要设置执行执行条件与执行结果:
        <Style TargetType="CheckBox">
            <Style.Triggers>
                <MultiTrigger>
                    <MultiTrigger.Conditions>
                        <Condition Property="IsVisible" Value="true"/>
                        <Condition Property="IsChecked" Value="true"/>
                    </MultiTrigger.Conditions>

                    <MultiTrigger.Setters>
                        <Setter Property="BorderBrush" Value="Yellow"/>
                        <Setter Property="BorderThickness" Value="5"/>
                    </MultiTrigger.Setters>
                </MultiTrigger>
            </Style.Triggers>
        </Style>
(4)事件触发器
七、转换器(值转换器)
负责在目前中显示数据之前转换源数据,并且在数据应用回源之前转换新的目标值。
有以下几个应用场景:
- 将数据格式化为字符串表示形式。
- 创建特定类型的wpf对象。
- 根据绑定数据有条件地改变元素中的属性
案例1:使用值转换器设置字符串的格式
效果:左边TextBox输入数字,右边TextBlock显示奇数还是偶数
第一步 引入命名空间:
xmlns:local="clr-namespace:ConverterLesson"
第二步 编写转换器方法:
MainWindow.xaml.cs
    class IntToStringConverter : IValueConverter
    {
        public bool IsNumber(string str)
        {
            bool isMatch = Regex.IsMatch(str, @"^-?\d+$");
            return isMatch;
        }
        public object Convert(object value, Type targetType, object parameter, CultureInfo culture)
        {

            if (IsNumber(value.ToString())==true&& value.ToString() != "" && int.Parse(value.ToString()) % 2 == 0)
                return "Even";
            else if (IsNumber(value.ToString()) == true && value.ToString() != "" && int.Parse(value.ToString()) % 2 != 0)
                return "Odd";
            else
                return Binding.DoNothing;

        }

        public object ConvertBack(object value, Type targetType, object parameter, CultureInfo culture)
        {
            throw new NotImplementedException();
        }
    }
数据流说明:

说明:根据要求:修改Convert()方法就可以做到,修改显示信息的功能。
MainWindow.xaml
    <Window.Resources>
        <Style TargetType="TextBlock">
            <Setter Property="FontSize" Value="50"/>
            <Setter Property="Margin" Value="5"/>
        </Style>
        <!--引入转换器函数-->
        <local:IntToStringConverter x:Key="inttostring"/>
    </Window.Resources>

    <!--在控件上绑定转换器函数-->
    <TextBox x:Name="tb1" FontSize="30" BorderThickness="5" Margin="5"/>
    <TextBlock Grid.Column="1" Text="{Binding ElementName=tb1,Path=Text,Converter={StaticResource inttostring}}"/>
重点:
- 除了要写绑定函数以外,其他内容和数据绑定一样
- 需要引入转换器函数
- 需要引入数据转换的命名空间
案例2:使用值转换器创建对象
文本框中输入男/女。右侧图像框中显示对应图像
MainWindow.xaml
<Window.Resources>
<local:StringToImageConverter x:Key="stringtoimage"/>
</Window.Resources>

<TextBox x:Name="tb3" FontSize="30" BorderThickness="5" Margin="5" Grid.Row="0" />
<Image Grid.Column="1" Grid.Row="0" Source="{Binding ElementName=tb3,Path=Text,Converter={StaticResource stringtoimage}}"/>
MainWindow.xaml.cs
    class StringToImageConverter : IValueConverter
    {
        public object Convert(object value, Type targetType, object parameter, CultureInfo culture)
        {
            if (value.ToString() == "m")
                return new BitmapImage(new Uri("/image/男人.png", UriKind.Relative));
            else if (value.ToString() == "f")
                return new BitmapImage(new Uri("/image/女人.png", UriKind.Relative));
            else
                return Binding.DoNothing;

        }

        public object ConvertBack(object value, Type targetType, object parameter, CultureInfo culture)
        {
            throw new NotImplementedException();
        }
    }
七、命令
简单用法:
MainWindow.xaml
    public partial class MainWindow : Window
    {
        public MyCommand CommandExecute { get; set; }

        public MainWindow()
        {
            InitializeComponent();
            DataContext = this;
            CommandExecute = new MyCommand(Message);
        }
        private void Message()
        {
            MessageBox.Show("Hello World");
        }


    }
前台代码:
<Button x:Name="tb3" FontSize="30" BorderThickness="5" Margin="5" Grid.Row="0" Command="{Binding CommandExecute}" />
MyCommand.cs
    public class MyCommand : ICommand
    {
        public event EventHandler CanExecuteChanged;
        private Action _action;

        public MyCommand (Action action)
        {
            _action = action;
        }

        public bool CanExecute(object parameter)
        {
            return true;
        }

        public void Execute(object parameter)
        {
            _action();
        }
八、通知
通知:需要实现INotifyPropertyChanged接口
一个语法糖的妙用。需要进行属性变更通知的时候,直接调用OnPropertyChanged()。
    public class ViewModelBase : INotifyPropertyChanged
    {
        public event PropertyChangedEventHandler PropertyChanged;

        public void OnPropertyChanged([CallerMemberName] string propertyName="")
        {
            PropertyChanged?.Invoke(this, new PropertyChangedEventArgs(propertyName));
        }
    }
九、mvvmlight
(1) 初次认识 mvvmlight
1、View负责前端展示,与ViewModel进行数据和命令的交互。
2、ViewModel,负责前端视图业务级别的逻辑结构组织,并将其反馈给前端。
3、Model,主要负责数据实体的结构处理,与ViewModel进行交互。
第一步:先编写Model
StudentModel.cs
代码如下。注意该类需要继承ObservableObject类(该类是对于INotifyPropertyChanged的封装)
需要使用双向绑定的属性,需要写RaisePropertyChanged
    public class StudentModel : ObservableObject
    {
        private int _age;

        public int Age
        {
            get { return _age; }
            set
            {
                _age = value;
                RaisePropertyChanged(() => Age);
            }
        }
        private string _name;

        public string Name
        {
            get { return _name; }
            set { _name = value;
                RaisePropertyChanged(() => Name);
            }
        }

    }
第二步:编写ViewModel
StudentViewModel.cs
首先在构造函数里面实例化了一个Model对象。
然后设置Model的属性字段
代码如下:
    public class StudentViewModel : ViewModelBase
    {

        public StudentViewModel()
        {
            Student = new StudentModel() { Name = "Tom", Age = 17 };
        }


        private StudentModel _student;

        public StudentModel Student
        {
            get { return _student; }
            set
            { _student = value; RaisePropertyChanged(() => Student); }
        }
    }
第三步:注册ViewModel
ViewModelLocator.cs
-
在ViewModelLocator的构造函数中,在Ioc容器中注册StudentViewModel
-
然后在Main函数中,实例化这个StudentViewModel
  public class ViewModelLocator
    {
	 public ViewModelLocator(){
    	 ServiceLocator.SetLocatorProvider(() => SimpleIoc.Default);
         SimpleIoc.Default.Register<StudentViewModel>();}

        #region 实例化
        public StudentViewModel Student
        {get{return ServiceLocator.Current.GetInstance<StudentViewModel>();}}
        #endregion

        public static void Cleanup(){}
     }
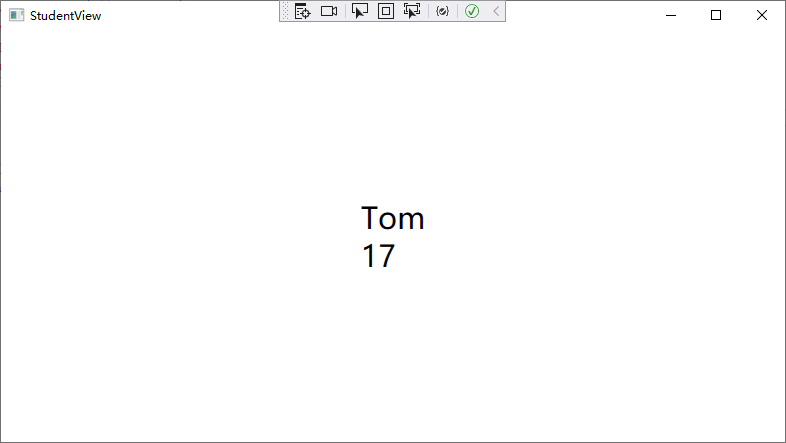
第四步:修改前端样式代码,显示内容
StudentView.xaml
页面样式代码:
        <StackPanel HorizontalAlignment="Center" VerticalAlignment="Center">
            <TextBlock FontSize="30" Text="{Binding Student.Name}" />
            <TextBlock FontSize="30" Text="{Binding Student.Age}" />
        </StackPanel>
StudentView.xaml.cs 中添加上下文引用:
        public StudentView()
        {
            InitializeComponent();
            this.DataContext = new StudentViewModel();
        }
第五步(可以不需要):在App.xml中修改StartupUri
StartupUri="View/StudentView.xaml"

