【原创】(三)Linux paging_init解析
背景
Read the fucking source code!--By 鲁迅A picture is worth a thousand words.--By 高尔基
说明:
- Kernel版本:4.14
- ARM64处理器,Contex-A53,双核
- 使用工具:Source Insight 3.5, Visio
1. 介绍
从(二)Linux物理内存初始化中,可知在paging_init调用之前,存放Kernel Image和DTB的两段物理内存区域可以访问了(相应的页表已经建立好)。尽管物理内存已经通过memblock_add添加进系统,但是这部分的物理内存到虚拟内存的映射还没有建立,可以通过memblock_alloc分配一段物理内存,但是还不能访问,一切还需要等待paging_init的执行。最终页表建立好后,可以通过虚拟地址去访问最终的物理地址了。
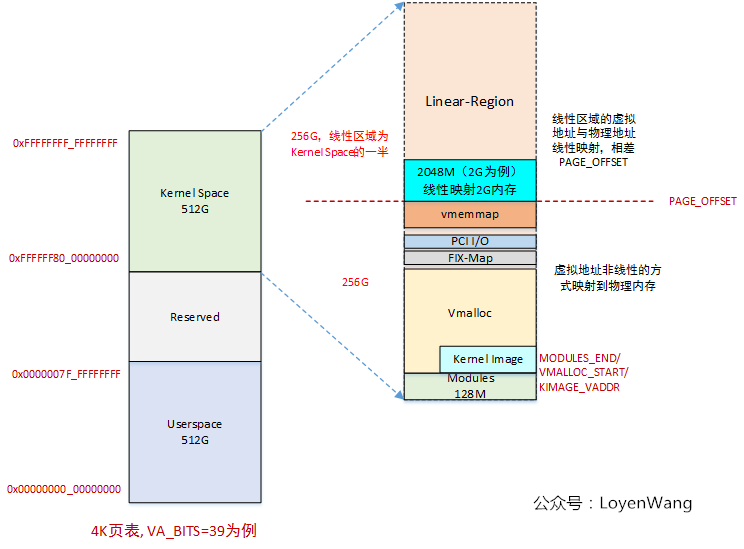
按照惯例,先上图,来一张ARM64内核的内存布局图片吧,最终的布局如下所示:

开启探索之旅吧!
2. paging_init
paging_init源代码短小精悍,直接贴上来,分模块来介绍吧。
/*
 * paging_init() sets up the page tables, initialises the zone memory
 * maps and sets up the zero page.
 */
void __init paging_init(void)
{
	phys_addr_t pgd_phys = early_pgtable_alloc();   /********(mark 1)*******/
	pgd_t *pgd = pgd_set_fixmap(pgd_phys);

	map_kernel(pgd);                                        /********(mark 2)*******/
	map_mem(pgd);                                         /********(mark 3)*******/

	/*
	 * We want to reuse the original swapper_pg_dir so we don't have to
	 * communicate the new address to non-coherent secondaries in
	 * secondary_entry, and so cpu_switch_mm can generate the address with
	 * adrp+add rather than a load from some global variable.
	 *
	 * To do this we need to go via a temporary pgd.
	 */
	cpu_replace_ttbr1(__va(pgd_phys));                 /********(mark 4)*******/
	memcpy(swapper_pg_dir, pgd, PGD_SIZE);
	cpu_replace_ttbr1(lm_alias(swapper_pg_dir));

	pgd_clear_fixmap();
	memblock_free(pgd_phys, PAGE_SIZE);

	/*
	 * We only reuse the PGD from the swapper_pg_dir, not the pud + pmd
	 * allocated with it.
	 */
	memblock_free(__pa_symbol(swapper_pg_dir) + PAGE_SIZE,
		      SWAPPER_DIR_SIZE - PAGE_SIZE);
}
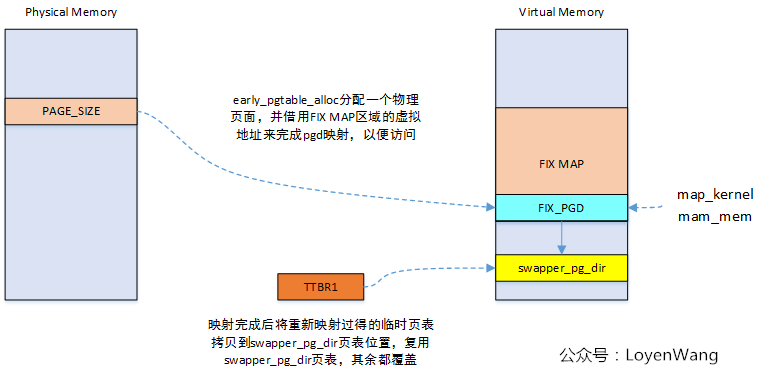
mark 1:分配一页大小的物理内存存放pgd;mark 2:将内核的各个段进行映射;mark 3:将memblock子系统添加的物理内存进行映射;mark 4:切换页表,并将新建立的页表内容替换swappper_pg_dir页表内容;
代码看起来费劲?图来了:

下边将对各个子模块进一步的分析。
3. early_pgtable_alloc
这个模块与FIX MAP映射区域相关,建议先阅读前文(二)Linux物理内存初始化
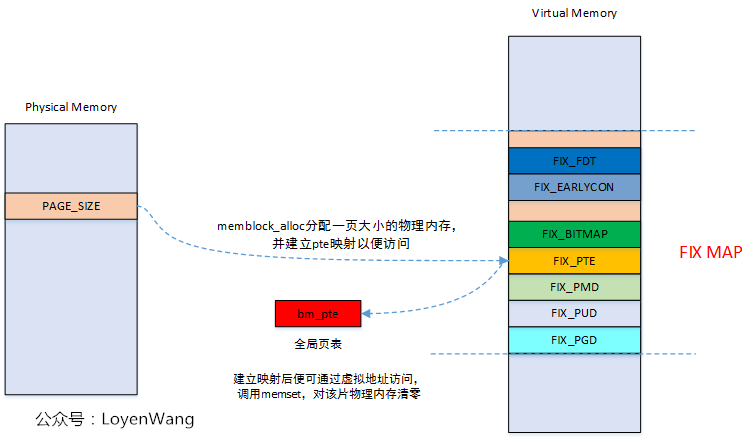
先上图:

FIX MAP的区域划分从图中可以看出来
本函数会先分配物理内存,然后借用之前的全局页表bm_pte,建立物理地址到虚拟地址的映射,这次映射的作用是为了去访问物理内存,把内存清零,所以它只是一个临时操作,操作完毕后,会调用pte_clear_fixmap()来清除映射。
early_pgtable_alloc之后,我们看到paging_init调用了pgd_set_fixmap函数,这个函数调用完后,通过memblock_alloc分配的物理内存,最终就会用来存放pgd table了,这片区域的内容最后也会拷贝到swapper_pg_dir中去。
4. map_kernel
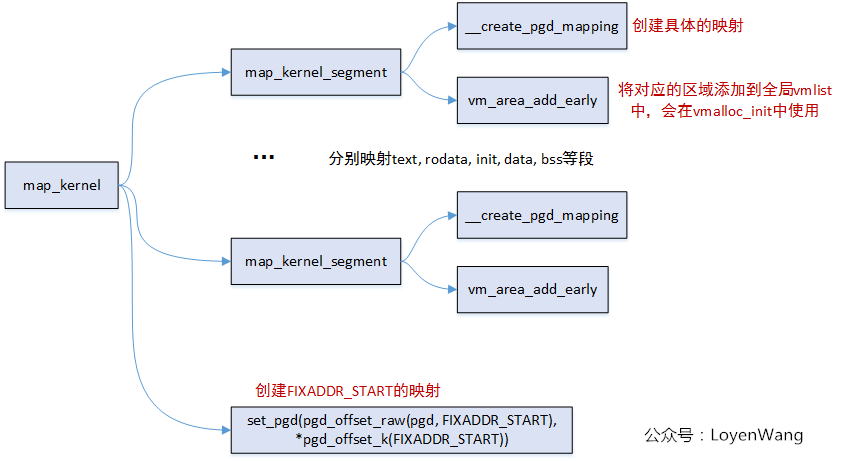
map_kernel的主要工作是完成内核中各个段的映射,此外还包括了FIXADDR_START虚拟地址的映射,如下图:

映射完成之后,可以看一下具体各个段的区域,以我自己使用的平台为例:

这些地址信息也能从System.map文件中找到。
aarch64-linux-gnu-objdump -x vmlinux能查看更详细的地址信息。
5. map_mem
从函数名字中可以看出,map_mem主要完成的是物理内存的映射,这部分的物理内存是通过memblock_add添加到系统中的,当对应的memblock设置了MEMBLOCK_NOMAP的标志时,则不对其进行地址映射。
map_mem函数中,会遍历memblock中的各个块,然后调用__map_memblock来完成实际的映射操作。先来一张效果图:

map_mem都是将物理地址映射到线性区域中,我们也发现了Kernel Image中的text, rodata段映射了两次,原因是其他的子系统,比如hibernate,会映射到线性区域中,可能需要线性区域的地址来引用内核的text, rodata,映射的时候也会限制成了只读/不可执行,防止意外修改或执行。
map_kernel和map_mem函数中的页表映射,最终都是调用__create_pgd_mapping函数实现的:

总体来说,就是逐级页表建立映射关系,同时中间会进行权限的控制等。
细节不再赘述,代码结合图片阅读,效果会更佳噢。
6. 页表替换及内存释放
这部分代码不多,不上图了,看代码吧:
	/*
	 * We want to reuse the original swapper_pg_dir so we don't have to
	 * communicate the new address to non-coherent secondaries in
	 * secondary_entry, and so cpu_switch_mm can generate the address with
	 * adrp+add rather than a load from some global variable.
	 *
	 * To do this we need to go via a temporary pgd.
	 */
	cpu_replace_ttbr1(__va(pgd_phys));
	memcpy(swapper_pg_dir, pgd, PGD_SIZE);
	cpu_replace_ttbr1(lm_alias(swapper_pg_dir));

	pgd_clear_fixmap();
	memblock_free(pgd_phys, PAGE_SIZE);

	/*
	 * We only reuse the PGD from the swapper_pg_dir, not the pud + pmd
	 * allocated with it.
	 */
	memblock_free(__pa_symbol(swapper_pg_dir) + PAGE_SIZE,
		      SWAPPER_DIR_SIZE - PAGE_SIZE);
简单来说,将新建立好的pgd页表内容,拷贝到swapper_pg_dir中,也就是覆盖掉之前的临时页表了。当拷贝完成后,显而易见的是,我们可以把paging_init一开始分配的物理内存给释放掉。
此外,在之前的文章也分析过swapper_pg_dir页表存放的时候,是连续存放的pgd, pud, pmd等,现在只需要复用swapper_pg_dir,其余的当然也是可以释放的了。
好了,点到为止,前路漫漫,离Buddy System,Slab,Malloc以及各种内存的骚操作好像还有很远的样子,待续吧。

出处:https://www.cnblogs.com/LoyenWang/
公众号:LoyenWang
版权:本文版权归作者和博客园共有
转载:欢迎转载,但未经作者同意,必须保留此段声明;必须在文章中给出原文连接;否则必究法律责任


【推荐】国内首个AI IDE,深度理解中文开发场景,立即下载体验Trae
【推荐】编程新体验,更懂你的AI,立即体验豆包MarsCode编程助手
【推荐】抖音旗下AI助手豆包,你的智能百科全书,全免费不限次数
【推荐】轻量又高性能的 SSH 工具 IShell:AI 加持,快人一步
· 从 HTTP 原因短语缺失研究 HTTP/2 和 HTTP/3 的设计差异
· AI与.NET技术实操系列:向量存储与相似性搜索在 .NET 中的实现
· 基于Microsoft.Extensions.AI核心库实现RAG应用
· Linux系列:如何用heaptrack跟踪.NET程序的非托管内存泄露
· 开发者必知的日志记录最佳实践
· TypeScript + Deepseek 打造卜卦网站:技术与玄学的结合
· Manus的开源复刻OpenManus初探
· AI 智能体引爆开源社区「GitHub 热点速览」
· 从HTTP原因短语缺失研究HTTP/2和HTTP/3的设计差异
· 三行代码完成国际化适配,妙~啊~