放大镜特效
掌握页面元素定位和移动
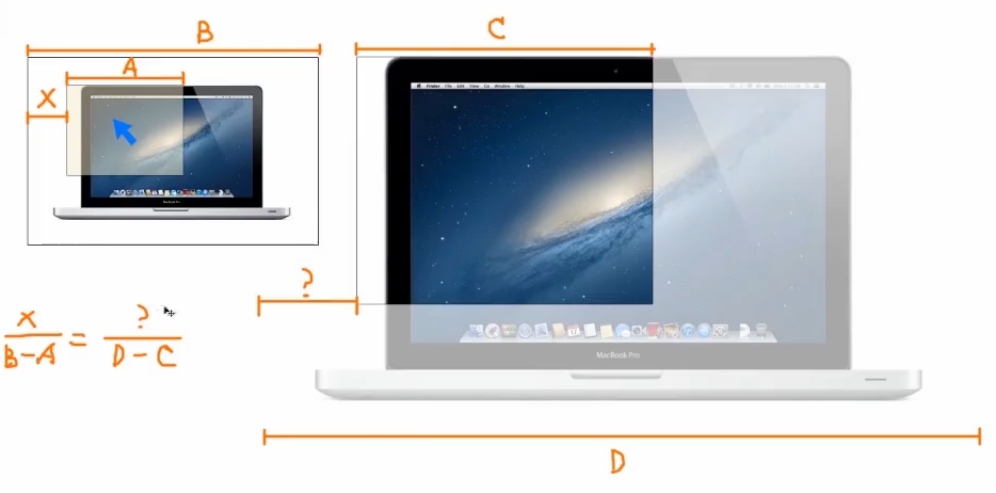
放大镜关键原理:鼠标在小图片上移动时,
通过捕捉鼠标在小图片上的位置定位大图片的相应位置
技术点:事件捕获、定位
offsetLeft与style.left的对比:
1)offsetLeft是与父级元素的距离,不包过滚动条的距离
2)style.left返回的是字符串,如30px,offsetLeft返回的是数值30
3)style.lft是可读写的,offsetLeft是只读的,所以要改变div的位置只能修改style.left
4)style.left的值需要事先定义,否则取到的值为空
难点:计算:如何让小图片的放大镜和大图片同步移动
距离定位图解:
  1 <!DOCTYPE html>
  2 <html>
  3 <head lang="en">
  4     <meta charset="UTF-8">
  5     <title></title>
  6 </head>
  7 <style type="text/css">
  8     *{
  9         margin: 0;
 10         padding: 0;
 11     }
 12     #demo{
 13         display: block;
 14         width: 400px;
 15         height: 255px;
 16         margin: 50px;
 17         position: relative;
 18         border: 1px solid #ccc;
 19     }
 20     #small-box{
 21         position: relative;
 22         z-index: 1;
 23     }
 24     #float-box{
 25         display: none;
 26         width: 160px;
 27         height: 120px;
 28         position: absolute;
 29         background: #ffffcc;
 30         border: 1px solid #ccc;
 31         filter: alpha(opacity=50);
 32         opacity: 0.5;
 33     }
 34     #mark{
 35         position: absolute;
 36         display: block;
 37         width: 400px;
 38         height: 255px;
 39         background-color: #fff;
 40         filter: alpha(opacity=0);
 41         opacity: 0;
 42         z-index: 10;
 43     }
 44     #big-box{
 45         display: none;
 46         position: absolute;
 47         top: 0;
 48         left: 460px;
 49         width: 400px;
 50         height: 300px;
 51         overflow: hidden;
 52         border: 1px solid #ccc;
 53         z-index: 1;
 54     }
 55     #big-box img{
 56         position: absolute;
 57         z-index: 5;
 58     }
 59 </style>
 60 <script>
 61     window.onload=function(){
 62         var $=function(id){
 63             return document.getElementById(id);
 64         }
 65         var Demo = $("demo");
 66         var SmallBox = $("small-box");
 67         var Mark = $("mark");
 68         var FloatBox = $("float-box");
 69         var BigBox = $("big-box");
 70         var BigBoxImage = BigBox.getElementsByTagName("img")[0];
 71         Mark.onmouseover = function(){
 72             FloatBox.style.display = "block";
 73             BigBox.style.display = "block";
 74         }
 75         Mark.onmouseout = function(){
 76             FloatBox.style.display = "none";
 77             BigBox.style.display = "none";
 78         }
 79         Mark.onmousemove = function(e){
 80             var _event = e||window.event//兼容多个浏览器的参数模式
 81             var left = _event.clientX - Demo.offsetLeft - SmallBox.offsetLeft - FloatBox.offsetWidth/2;
 82             var top = _event.clientY - Demo.offsetTop - SmallBox.offsetTop - FloatBox.offsetHeight/2;
 83             if(left < 0){
 84                 left = 0;
 85             }else if(left > Mark.offsetWidth - FloatBox.offsetWidth){
 86                 left = Mark.offsetWidth - FloatBox.offsetWidth;
 87             }
 88             if(top < 0){
 89                 top = 0;
 90             }else if(top > Mark.offsetHeight - FloatBox.offsetHeight){
 91                 top = Mark.offsetHeight - FloatBox.offsetHeight;
 92             }
 93             FloatBox.style.left = left + 'px';
 94             FloatBox.style.top = top + 'px';
 95             var percentX = left / (Mark.offsetWidth - FloatBox.offsetWidth);
 96             var percentY = top / (Mark.offsetHeight - FloatBox.offsetHeight);
 97             BigBoxImage.style.left = -percentX * (BigBoxImage.offsetWidth - BigBox.offsetWidth)+'px';
 98             BigBoxImage.style.top = -percentY * (BigBoxImage.offsetHeight - BigBox.offsetHeight)+'px';
 99         }
100     }
101 </script>
102 <body>
103 <div id="demo">
104     <div id="small-box">
105         <div id="mark"></div>
106         <div id="float-box"></div>
107         <img src="img/macbook-small.jpg" />
108     </div>
109     <div id="big-box">
110         <img src="img/macbook-big.jpg" />
111     </div>
112 </div>
113 </body>
114 </html>


