

前言
- 在spring的官网(http://spring.io)中选择 菜单Projects -> spring cloud -> spring cloud alibaba -> learn中会包含依赖等开发相关的指导
- 相近业务作为单个服务开发,使用单独的后端,包括数据库等。好处是低耦合度,便于扩展等
- 在开发单个模块的过程中,将服务的请求属性注册到Nacos中,方便开发、调整请求属性等操作,应用日志,并且配置日志时支持ELK等分布式日志处理工具,从而使得日志追溯时可以追溯全部微服务日志
开发步骤
注册中心和配置中心nacos
nacos内嵌了Tomcat,默认的监听端口是8848
- 下载:官网下载:Nacos Server 下载 | Nacos 官网
- 配置:配置环境变量 JAVA_HOME
- 解压:解压后通过cmd进入bin目录
- 运行:startup -m standalone,-m的参数代表启动模式为单机模式,而非集群模式
- 访问:访问http://localhost:8848/nacos
- 运维:在解压目录下有一个logs文件夹可以追踪nacos运行状态
开发两个微服务并应用nacos
微服务质检存在消费者和生产者的关系,应用nacos的实质是:生产者将服务信息注册在nacos,消费者通过nacos获取注册的服务信息并访问。
注:注意springboot, springboot cloud alibaba和nacos的版本对应关系,否则有可能版本不对应,服务列表不显示
创建项目
创建web app类型的maven项目 helloapp
在依赖中定义spring boot等的版本,后续基于父项目新建的模块会使用本项目的版本号
<parent>
    <groupId>org.springframework.boot</groupId>
    <artifactId>spring-boot-starter-parent</artifactId>
    <version>3.0.8</version>
    <relativePath/>
  </parent>
  <properties>
    <spring-cloud.version>
      2022.0.0
    </spring-cloud.version>
    <spring-cloud-alibaba.version>
      2022.0.0-RC2
    </spring-cloud-alibaba.version>
  </properties>
创建模块hello-provider
在helloapp项目中创建hello-provider模块:File-New-Moudle
然后添加如下依赖(添加spring cloud alibaba的依赖之前需要先添加dependencyManagement标签,否则会显示远程仓库没有找到这个依赖)
<project xmlns="http://maven.apache.org/POM/4.0.0" xmlns:xsi="http://www.w3.org/2001/XMLSchema-instance"
  xsi:schemaLocation="http://maven.apache.org/POM/4.0.0 http://maven.apache.org/maven-v4_0_0.xsd">
  <modelVersion>4.0.0</modelVersion>
  <groupId>org.example</groupId>
  <artifactId>test</artifactId>
  <packaging>war</packaging>
  <version>1.0-SNAPSHOT</version>
  <name>test Maven Webapp</name>
  <url>http://maven.apache.org</url>
  <parent>
    <groupId>org.springframework.boot</groupId>
    <artifactId>spring-boot-starter-parent</artifactId>
    <version>3.0.8</version>
    <relativePath/>
  </parent>

  <properties>
    <java.version>17</java.version>
    <spring-cloud.version>
      2022.0.0
    </spring-cloud.version>
    <spring-cloud-alibaba.version>
      2022.0.0.0
    </spring-cloud-alibaba.version>
  </properties>

  <dependencies>
    <dependency>
      <groupId>org.springframework.boot</groupId>
      <artifactId>spring-boot-starter-web</artifactId>
    </dependency>

    <dependency>
      <groupId>org.springframework.cloud</groupId>
      <artifactId>spring-cloud-starter</artifactId>
    </dependency>

    <dependency>
      <groupId>com.alibaba.cloud</groupId>
      <artifactId>spring-cloud-starter-alibaba-nacos-discovery</artifactId>
    </dependency>

    <dependency>
      <groupId>org.springframework.boot</groupId>
      <artifactId>spring-boot-starter-actuator</artifactId>
    </dependency>

    <dependency>
      <groupId>org.springframework.boot</groupId>
      <artifactId>spring-boot-starter-test</artifactId>
      <scope>test</scope>
    </dependency>
  </dependencies>

  <dependencyManagement>
    <dependencies>
      <dependency>
        <groupId>org.springframework.cloud</groupId>
        <artifactId>spring-cloud-dependencies</artifactId>
        <version>${spring-cloud.version}</version>
        <type>pom</type>
        <scope>import</scope>
      </dependency>

      <dependency>
        <groupId>com.alibaba.cloud</groupId>
        <artifactId>spring-cloud-alibaba-dependencies</artifactId>
        <version>${spring-cloud-alibaba.version}</version>
        <type>pom</type>
        <scope>import</scope>
      </dependency>
    </dependencies>
  </dependencyManagement>

  <build>
    <finalName>test</finalName>
  </build>
</project>
spring-cloud-starter-alibaba-nacos-discovery启动器会自动装配Nacos Discovery组件,并引入相关依赖。Nacos Discovery组件是Nacos的客户端组件,也是Nacos和微服务质检的通信通道。
spring-boot-starter-actuator启动器会自动装配springboot的actuator的监控组件,负责监控微服务的特定端点。
配置微服务名称和nacos服务器信息
server:
  port: 8081

spring:
  application:
    name: hello-provider-service
  cloud:
    nacos:
      discovery:
        server-addr: 127.0.0.1:8848
编写启动类
package com.yy;

import org.springframework.boot.SpringApplication;
import org.springframework.boot.autoconfigure.SpringBootApplication;
import org.springframework.cloud.client.discovery.EnableDiscoveryClient;

/**
 * 启动类
 *
 * @author yangyu
 * @date 2024/12/10 15:12
 */
@SpringBootApplication
public class Starter {
    public static void main(String[] args) {
        SpringApplication.run(Starter.class,args);
    }
}
开发控制类
package com.yy.contoller;

import org.springframework.web.bind.annotation.GetMapping;
import org.springframework.web.bind.annotation.PathVariable;
import org.springframework.web.bind.annotation.RestController;

/**
 * TODO:
 *
 * @author yangyu
 * @date 2024/12/10 15:47
 */
@RestController
public class HelloController {

    /**
     * 打招呼
     */
    @GetMapping("/greet/{username}")
    public String greet(@PathVariable String username){
        return "hello," + username;
    }
}
启动nacos服务-》启动生产者-》访问127.0.0.1:8848/nacos/index.html,即可在侧边栏服务管理实现发现生产者已注册(还存在一种可能,生产者实际可能已经注册了,但是代码能访问,线上平台不显示)

创建hello-consumer模块
hello-consumer作为消费者,从nacos拿到注册的服务提供者信息后,通过openFeign组件包装的http访问方式访问生产者hello-provider。
导入OpenFeign,Cloud LoadBalancer,spring cloud alibaba,spring cloud,nacos依赖,Cloud LoadBalancer依赖作为管理访问微服务的负载均衡组件,也是老版本中Ribbon的替代品,导入nacos的依赖时要声明不包含ribbon依赖
<project xmlns="http://maven.apache.org/POM/4.0.0" xmlns:xsi="http://www.w3.org/2001/XMLSchema-instance"
  xsi:schemaLocation="http://maven.apache.org/POM/4.0.0 http://maven.apache.org/maven-v4_0_0.xsd">
  <modelVersion>4.0.0</modelVersion>
  <groupId>org.example</groupId>
  <artifactId>consumer</artifactId>
  <packaging>war</packaging>
  <version>1.0-SNAPSHOT</version>
  <name>consumer Maven Webapp</name>
  <url>http://maven.apache.org</url>
  <parent>
    <groupId>org.springframework.boot</groupId>
    <artifactId>spring-boot-starter-parent</artifactId>
    <version>3.0.8</version>
    <relativePath/>
  </parent>

  <properties>
    <java.version>17</java.version>
    <spring-cloud.version>
      2022.0.0
    </spring-cloud.version>
    <spring-cloud-alibaba.version>
      2022.0.0.0
    </spring-cloud-alibaba.version>
  </properties>

  <dependencies>
    <dependency>
      <groupId>org.springframework.boot</groupId>
      <artifactId>spring-boot-starter-web</artifactId>
    </dependency>

    <dependency>
      <groupId>org.springframework.cloud</groupId>
      <artifactId>spring-cloud-starter</artifactId>
    </dependency>

    <dependency>
      <groupId>com.alibaba.cloud</groupId>
      <artifactId>spring-cloud-starter-alibaba-nacos-discovery</artifactId>
      <exclusions>
        <exclusion>
          <groupId>org.springframework.cloud</groupId>
          <artifactId>spring-cloud-starter-netflix-ribbon</artifactId>
        </exclusion>
      </exclusions>
    </dependency>

    <dependency>
      <groupId>org.springframework.boot</groupId>
      <artifactId>spring-boot-starter-actuator</artifactId>
    </dependency>

    <dependency>
      <groupId>org.springframework.boot</groupId>
      <artifactId>spring-boot-starter-test</artifactId>
      <scope>test</scope>
    </dependency>

<!--    消费者依赖-->
    <dependency>
      <groupId>org.springframework.cloud</groupId>
      <artifactId>spring-cloud-starter-openfeign</artifactId>
    </dependency>
    <dependency>
      <groupId>org.springframework.cloud</groupId>
      <artifactId>spring-cloud-starter-loadbalancer</artifactId>
    </dependency>
  </dependencies>

  <dependencyManagement>
    <dependencies>
      <dependency>
        <groupId>org.springframework.cloud</groupId>
        <artifactId>spring-cloud-dependencies</artifactId>
        <version>${spring-cloud.version}</version>
        <type>pom</type>
        <scope>import</scope>
      </dependency>

      <dependency>
        <groupId>com.alibaba.cloud</groupId>
        <artifactId>spring-cloud-alibaba-dependencies</artifactId>
        <version>${spring-cloud-alibaba.version}</version>
        <type>pom</type>
        <scope>import</scope>
      </dependency>
    </dependencies>
  </dependencyManagement>
  <build>
    <finalName>consumer</finalName>
  </build>
</project>
创建启动类并加入@EnableFeignClients注解
package com.yy;

import org.springframework.boot.SpringApplication;
import org.springframework.boot.autoconfigure.SpringBootApplication;
import org.springframework.cloud.openfeign.EnableFeignClients;

/**
 * TODO:
 *
 * @author yangyu
 * @date 2024/12/12 14:47
 */
@EnableFeignClients
@SpringBootApplication
public class Starter {
    public static void main(String[] args) {
        SpringApplication.run(Starter.class,args);
    }
}
创建HelloFeignService接口:接口的作用是声明访问的微服务名称与路径,调用生产者的方法,访问细节由框架自动实现,在注解中需要加入URL参数,因为新版本中会对URL进行判空
package com.yy.feignservice;

import org.springframework.cloud.openfeign.FeignClient;
import org.springframework.web.bind.annotation.PathVariable;
import org.springframework.web.bind.annotation.RequestMapping;
import org.springframework.web.bind.annotation.RequestMethod;

/**
 *
 * @author yangyu
 * @date 2024/12/12 14:54
 */
@FeignClient(value = "hello-provider-service")
public interface HelloFeignService {
    @RequestMapping(method = RequestMethod.GET,value = "/greet/{username}")
    String sayHello(@PathVariable String username);
}
开发一个消费者控制器通过Feign Service调用生产者
package com.yy.controller;

import com.yy.feignservice.HelloFeignService;
import org.springframework.beans.factory.annotation.Autowired;
import org.springframework.web.bind.annotation.GetMapping;
import org.springframework.web.bind.annotation.PathVariable;
import org.springframework.web.bind.annotation.RestController;

/**
 * TODO:
 *
 * @author yangyu
 * @date 2024/12/16 9:12
 */
@RestController
public class HelloConsumerController {

    @Autowired
    HelloFeignService helloFeignService;

    @GetMapping("/enter/{username}")
    public String sayHello(@PathVariable String username){
        return helloFeignService.sayHello(username);
    }
}
在application.yml中配置微服务
server:
  port: 8082
spring:
  application:
    name: hello-consumer-service
  cloud:
    nacos:
      discovery:
        server-addr: 127.0.0.1:8848
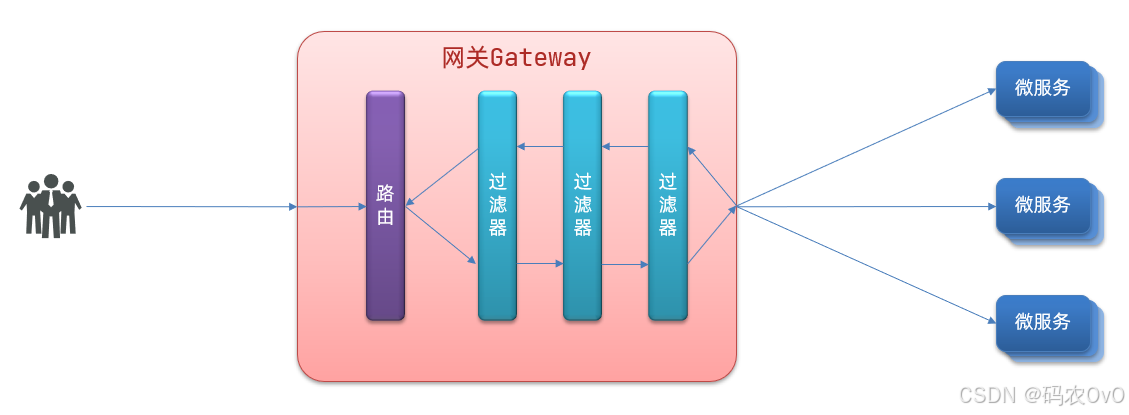
开发网关做网络层面的处理(网关需要使用其他微服务的注册信息,也是作为一个消费者)
依赖
<project xmlns="http://maven.apache.org/POM/4.0.0" xmlns:xsi="http://www.w3.org/2001/XMLSchema-instance"
  xsi:schemaLocation="http://maven.apache.org/POM/4.0.0 http://maven.apache.org/maven-v4_0_0.xsd">
  <modelVersion>4.0.0</modelVersion>
  <groupId>org.example</groupId>
  <artifactId>SMGateway</artifactId>
  <packaging>war</packaging>
  <version>1.0-SNAPSHOT</version>
  <name>SMGateway Maven Webapp</name>
  <url>http://maven.apache.org</url>
  <parent>
    <groupId>org.springframework.boot</groupId>
    <artifactId>spring-boot-starter-parent</artifactId>
    <version>2.6.3</version>
  </parent>
  <properties>
    <spring-cloud.version>
      2021.0.1
    </spring-cloud.version>
    <spring-cloud-alibaba.version>
      2021.0.1.0
    </spring-cloud-alibaba.version>
  </properties>
  <dependencies>
<!--    网关层-->
    <dependency>
      <groupId>org.springframework.cloud</groupId>
      <artifactId>spring-cloud-starter-gateway</artifactId>
    </dependency>

    <!--    消费者依赖-->
    <dependency>
      <groupId>org.springframework.cloud</groupId>
      <artifactId>spring-cloud-starter-loadbalancer</artifactId>
    </dependency>
    <dependency>
      <groupId>org.springframework.cloud</groupId>
      <artifactId>spring-cloud-starter-openfeign</artifactId>
    </dependency>

<!--    跨域问题-->
    <dependency>
      <groupId>javax.servlet</groupId>
      <artifactId>javax.servlet-api</artifactId>
      <version>4.0.1</version>
    </dependency>

<!--    nacos-->
    <dependency>
      <groupId>com.alibaba.cloud</groupId>
      <artifactId>spring-cloud-starter-alibaba-nacos-discovery</artifactId>
    </dependency>
  </dependencies>
  <dependencyManagement>
    <dependencies>
      <dependency>
        <groupId>org.springframework.cloud</groupId>
        <artifactId>spring-cloud-dependencies</artifactId>
        <version>2021.0.1</version>
        <type>pom</type>
        <scope>import</scope>
      </dependency>
      <dependency>
        <groupId>com.alibaba.cloud</groupId>
        <artifactId>spring-cloud-alibaba-dependencies</artifactId>
        <version>${spring-cloud-alibaba.version}</version>
        <type>pom</type>
        <scope>import</scope>
      </dependency>
    </dependencies>
  </dependencyManagement>
  <build>
    <plugins>
      <plugin>
        <groupId>org.springframework.boot</groupId>
        <artifactId>spring-boot-maven-plugin</artifactId>
        <version>2.6.3</version>
        <configuration>
          <executable>true</executable>
          <layout>WAR</layout>
        </configuration>
        <executions>
          <execution>
            <goals>
              <goal>repackage</goal>
            </goals>
            <configuration>
              <attach>false</attach>
            </configuration>
          </execution>
        </executions>
      </plugin>
    </plugins>
  </build>
</project>
配置
server:
  port: 8081

spring:
  application:
    name: SMGateway
  cloud:
    nacos:
      discovery:
        server-addr: 192.168.141.1:8848
        namespace: dev
    gateway:
      routes:
        - id: user_manager
          uri: lb://UserManager
          predicates:
            - Path=/UserManager/**
启动应用消费者应用,访问127.0.0.1:8082/enter/tom
参考
网关Gateway与Nacoshttps://blog.csdn.net/m0_46405589/article/details/115699151
https://developer.baidu.com/article/details/2783525
https://blog.csdn.net/m0_64294826/article/details/142139414
spring boot alibaba 微服务开发零基础入门到实操(清华大学出版社)
https://blog.csdn.net/weixin_50440603/article/details/141170818

 浙公网安备 33010602011771号