一 内置命令
hlep 命令 帮助
help test
help -s printf 显示内置命令的语法格式
echo 用来显示一行文字
echo "hello world" 默认会自动换行
echo -n "hello wrold" 不自动换行
echo -e 让字符串中的特殊字符起作用
echo -e "I AM THE King\nof the world" \n就不会作为输出来输出,而是作为换行来输出
printf 格式化输出
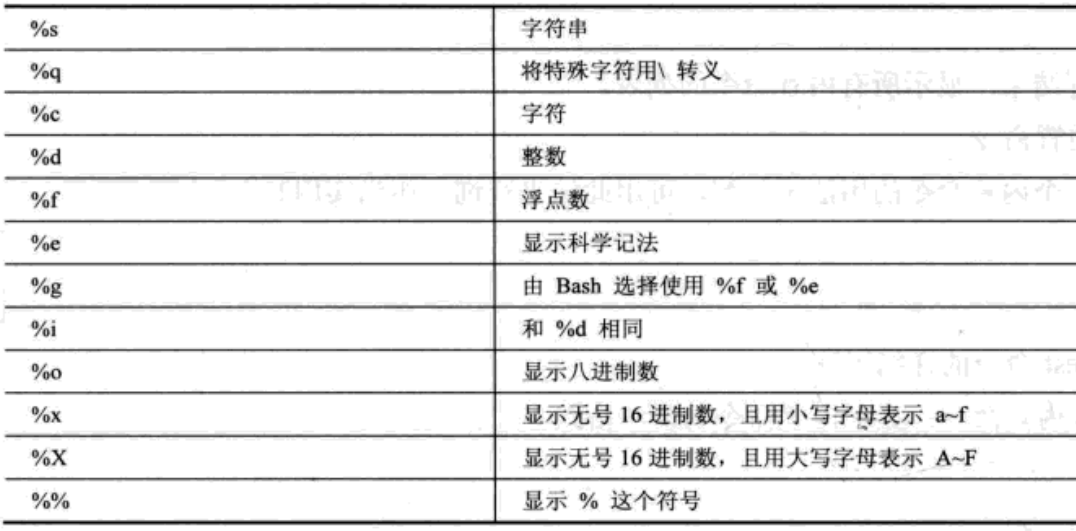


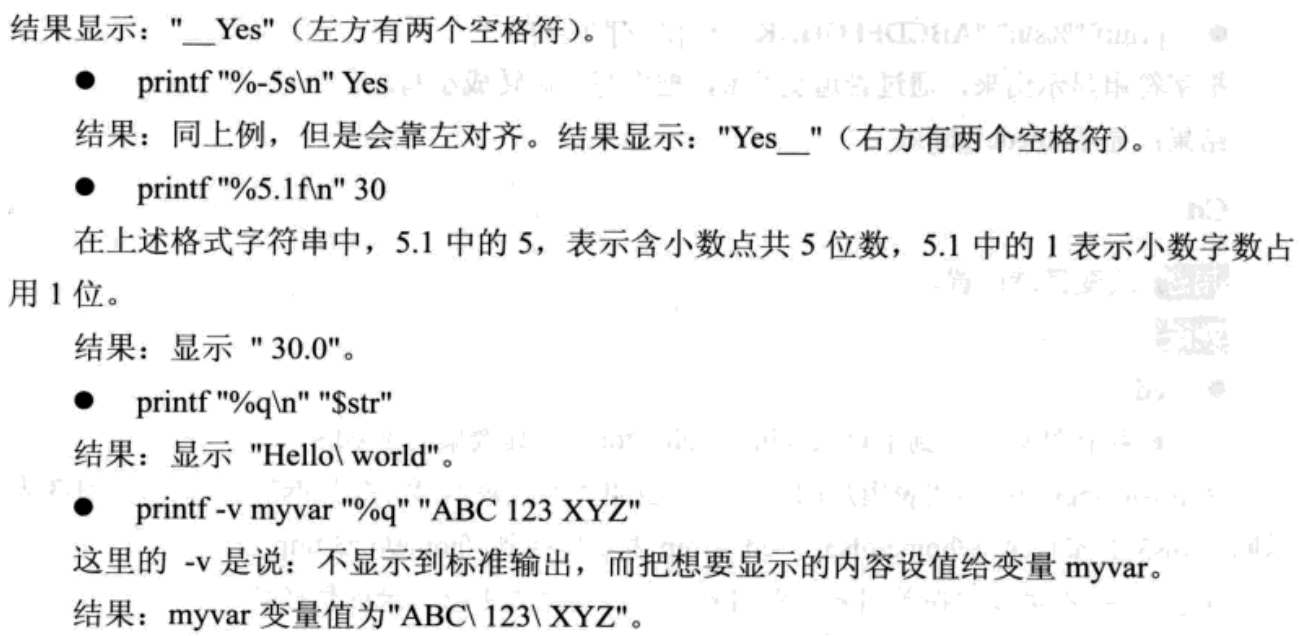
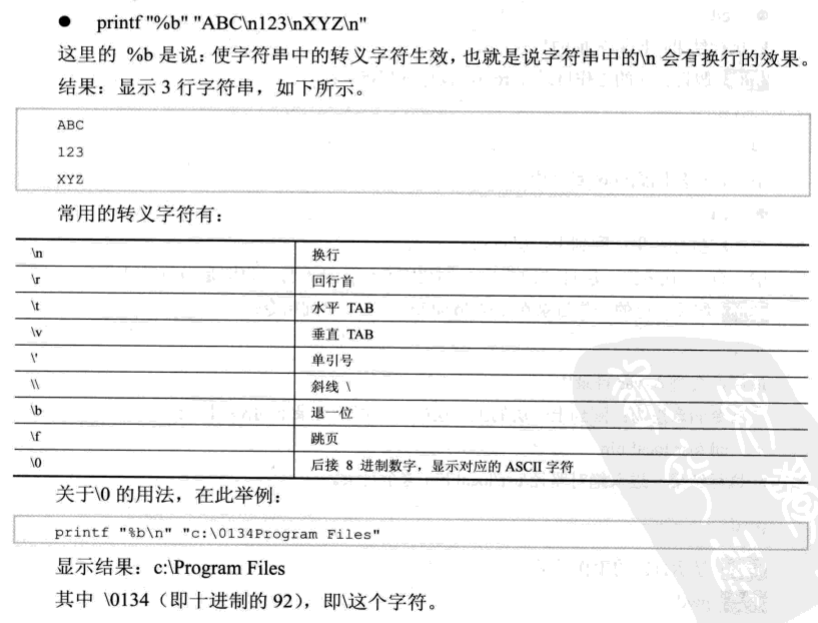
[root@localhost ~]# export str="hello world"
[root@localhost ~]# echo $str
hello world
[root@localhost ~]# printf "%d" "$str"
-bash: printf: hello world: 无效数字
0[root@localhost ~]# printf "%c" "$str"
h[root@localhost ~]# printf "%c\n" "$str"
h
[root@localhost ~]# printf "%d\n" 30
30
[root@localhost ~]# printf "%f\n" 30
30.000000
[root@localhost ~]# printf "%5s\n" "$str"
hello world
[root@localhost ~]# printf "%5s\n" "
> yes"

yes
[root@localhost ~]# printf "%5s\n" yes
  yes
[root@localhost ~]# printf "%-5s\n" yes
yes
[root@localhost ~]# printf "%-5.1f\n" ye
-bash: printf: ye: 无效数字
0.0
[root@localhost ~]# printf "%-5.1f\n" 30
30.0
[root@localhost ~]# printf "%q\n" $str
hello
world
[root@localhost ~]# printf -v myvar "%q" "ABC 123 XYZ"
[root@localhost ~]# echo $myvar
ABC\ 123\ XYZ
[root@localhost ~]# printf "%b" "ABC\n123\nXYZ\n"
ABC
123
XYZ

[root@localhost ~]# printf "%s\n" "ABCDEF" | tr '[A-Z]' '[a-z]'
abcdef
cd 目录进入命令
cd 路径 进入该目录
cd - 退回到之前目录
cd .. 返回上一级
pwd 显示当前工作目录
:(冒号) 传回真值(传回 0)
[root@localhost ~]# : >text.txt
[root@localhost ~]# cat text.txt   #创建一个空文件
.(半角句点) 和 Source 在当前Sheel环境下执行Shell程序
alias 显示,设定 程序的别名
[root@localhost ~]# alias
alias cp='cp -i'
alias egrep='egrep --color=auto'
alias fgrep='fgrep --color=auto'
alias grep='grep --color=auto'
alias l.='ls -d .* --color=auto'
alias ll='ls -l --color=auto'
alias ls='ls --color=auto'
alias mv='mv -i'
alias perlll='eval `perl -Mlocal::lib`'
alias rm='rm -i'
alias which='alias | /usr/bin/which --tty-only --read-alias --show-dot --show-tilde'
alias 新的别名='组合的命令' 设定程序新的别名
unalias 取消程序别名
exit 退出bash或script脚本
logout 注销loginshell
umask 显示或设定文件。目录建立时,文件权限的屏蔽值
用途:新建文件夹的权限一般都是777的权限,但这种权限是不安全的,为了安全起见,让文件管理者能够方便的创建文件及目录,又不必担心权限安全性的问题,才有了umask的机制
例如:
[root@localhost ~]# umask
0022
意思就是 0777-0022的权限,就是0755的权限。也就是说任何文件夹的建立,默认都是0755的权限设定。
这样在创建文件夹的时候,就不必考虑文件夹的权限问题了
history 显示过去曾执行过的Shell命令
HISTFILE root的历史脚本文件存储位置
HISTFILESIZE 指定历史脚本文件的行数大小
HISTSIZE 在一个互动模式的Shell中,可记住的历史指令数目
fc 列出登录主机后,最近执行过的指令
[root@localhost ~]# fc -l
1019     printf "%b" "ABC\n123\nXYZ\n"
1020     man tr
1021     printf "%s/n" "ABCDEF" | tr '[A-Z]' '[a-z]'
1022     printf "%s\n" "ABCDEF" | tr '[A-Z]' '[a-z]'
1023     cd /var/log
1024     cd -
1025     : >text.txt
1026     cat text.txt
1027     rm -y text.txt
1028     rm  text.txt
1029     alais
1030     alias
1031     ls -la
1032     ls -ld
1033     unmask
1034     umask
[root@localhost ~]# fc -l 497 #列出编号大于等于497的历史命令
497 wget http://linux.vbird.org/linux_basic/0520source/ntp-4.2.8p3.tar.gz
498 ls
499 man tar
500 cd /usr/local/src
501 ll
502 tar -zxvf /root/ntp-4.2.8p3.tar.gz
503 ls
504 cd ntp-4.2.8p3
505 ls
506 cat install
507 vi install
508 ls
509 cat INSTALL
510 cd ntp*
511 cd ntp-4.2.8p3
512 cd /root
513 cd ntp-4.2.8p3
514 ls
515 cd src
516 cd /usr/local/src
[root@localhost ~]# fc -l 497 499 #列出编号在497到499之间的历史命令
497 wget http://linux.vbird.org/linux_basic/0520source/ntp-4.2.8p3.tar.gz
498 ls
499 man tar
[root@localhost ~]# fc -ln
printf "%s\n" "ABCDEF" | tr '[A-Z]' '[a-z]'
cd /var/log
cd -
: >text.txt
cat text.txt
rm -y text.txt
rm text.txt
alais
alias
ls -la
ls -ld
unmask
umask
fc -l
fc -l 497
fc -l 497 499
[root@localhost ~]# fc -lrn
fc -ln
fc -l 497 499
fc -l 497
fc -l
umask
unmask
ls -ld
ls -la
alias
alais
rm text.txt
rm -y text.txt
cat text.txt
: >text.txt
cd -
cd /var/log
read 有标准输入读取一行数据
[root@localhost ~]# echo "输入名字"
输入名字
[root@localhost ~]# read name
lsq
[root@localhost ~]# echo "你的名字是"$name
你的名字是lsq
如果read输入没有接入变量,则会启用默认变量 $REPLY来接受输入
[root@localhost ~]# echo "输入名字"
输入名字
[root@localhost ~]# read
lsq
[root@localhost ~]# echo "你的名字"$REPLY
你的名字lsq
同样可以利用 -p来提示用户输入信息
read -p “请输入你的名字” echo $REPLY
read也可以一次读取一行数据放入数组中。
read -a arr <<(echo 123 23 45)
获取数组值的时候可以用
echo ${arr[2]} 来获取
默认都是用空格作为分隔符来讲文件或输入读取到变量中。如果要转换分隔符,就需要 IFS 这个命令
[root@localhost ~]# IFS=':'    #设置分隔符为:
[root@localhost ~]# read f1 f2 f3 f4 f5 f6 f7 </etc/passwd
[root@localhost ~]# echo f1
f1
[root@localhost ~]# echo f2
f2
[root@localhost ~]# echo $f2
x
[root@localhost ~]# echo $f1
root
[root@localhost ~]# echo $f3
0
[root@localhost ~]# echo $f4
0
注意:read 在读取数据时,默认会去掉转义字符的意义,及过滤掉\n中的\。只保留n。这样就失去了转义符的意义。如果要允许输入数据时保留转义字符\。需要用到 -r 选项
read -r TEST
echo $TEST
eval 命令 将指令放入到变量中,然后执行该变量中的指令
[root@localhost ~]# listlog="ls -la /var/log/*.log"     #将该变量放到listlog中
[root@localhost ~]# eval $listlog              #通过eval 执行变量中的命令
-rw-------. 1 root root     0 9月  26 09:35 /var/log/boot.log
-rw-r--r--. 1 root root   673 8月  19 11:05 /var/log/openlmi-install.log
-rw-r--r--. 1 root root  6575 9月  25 09:22 /var/log/vmware-network.1.log
-rw-r--r--. 1 root root  6575 9月  23 16:01 /var/log/vmware-network.2.log
-rw-r--r--. 1 root root  6575 9月  20 10:08 /var/log/vmware-network.3.log
-rw-r--r--. 1 root root   734 9月  19 11:13 /var/log/vmware-network.4.log
-rw-r--r--. 1 root root   756 9月  19 11:13 /var/log/vmware-network.5.log
-rw-r--r--. 1 root root  6575 9月  19 11:09 /var/log/vmware-network.6.log
-rw-r--r--. 1 root root  6575 9月  18 09:46 /var/log/vmware-network.7.log
-rw-r--r--. 1 root root  6575 9月  17 15:20 /var/log/vmware-network.8.log
-rw-r--r--. 1 root root  6575 9月  12 14:35 /var/log/vmware-network.9.log
-rw-r--r--. 1 root root   734 9月  26 08:45 /var/log/vmware-network.log
-rw-r--r--. 1 root root 43399 9月  26 08:45 /var/log/vmware-vmsvc.log
-rw-r--r--. 1 root root  6653 9月  19 11:09 /var/log/vmware-vmusr.log
-rw-r--r--. 1 root root   360 9月  19 11:14 /var/log/wpa_supplicant.log
-rw-r--r--. 1 root root 46347 9月  20 10:08 /var/log/Xorg.0.log
-rw-r--r--. 1 root lsq  33627 9月  19 11:16 /var/log/Xorg.1.log
-rw-r--r--. 1 root root 22681 8月  19 13:39 /var/log/Xorg.9.log
-rw-------. 1 root root 18030 9月  19 13:39 /var/log/yum.log
二 命令行程序
which 搜寻路径中,找出某一命令行程序的文件位置
[root@localhost ~]# which lsof
/usr/sbin/lsof
which -a 命令。找出所有符合条件的路径
locate 从文件名数据库中,找出包含关键词的文件路径
[root@localhost ~]# locate lsof
/usr/include/kde4/ksysguard/lsof.h
/usr/lib64/liblsofui.so
/usr/lib64/liblsofui.so.4
/usr/lib64/liblsofui.so.4.14.8
/usr/lib64/kde4/plugins/designer/ksysguardlsofwidgets.so
/usr/sbin/lsof
/usr/share/doc/lsof-4.87
/usr/share/doc/lsof-4.87/00.README.FIRST
/usr/share/doc/lsof-4.87/00.README.FIRST_4.87
/usr/share/doc/lsof-4.87/00CREDITS
/usr/share/doc/lsof-4.87/00DCACHE
/usr/share/doc/lsof-4.87/00DIALECTS
/usr/share/doc/lsof-4.87/00DIST
/usr/share/doc/lsof-4.87/00FAQ
/usr/share/doc/lsof-4.87/00LSOF-L
/usr/share/doc/lsof-4.87/00MANIFEST
/usr/share/doc/lsof-4.87/00PORTING
/usr/share/doc/lsof-4.87/00QUICKSTART
/usr/share/doc/lsof-4.87/00README
/usr/share/doc/lsof-4.87/00TEST
/usr/share/doc/lsof-4.87/00XCONFIG
/usr/share/doc/lsof-4.87/README.lsof_4.87
/usr/share/locale/zh_CN/LC_MESSAGES/ksysguardlsofwidgets.mo
/usr/share/man/man8/lsof.8.gz
date 显示,设定系统的日期和时间
常用的格式有
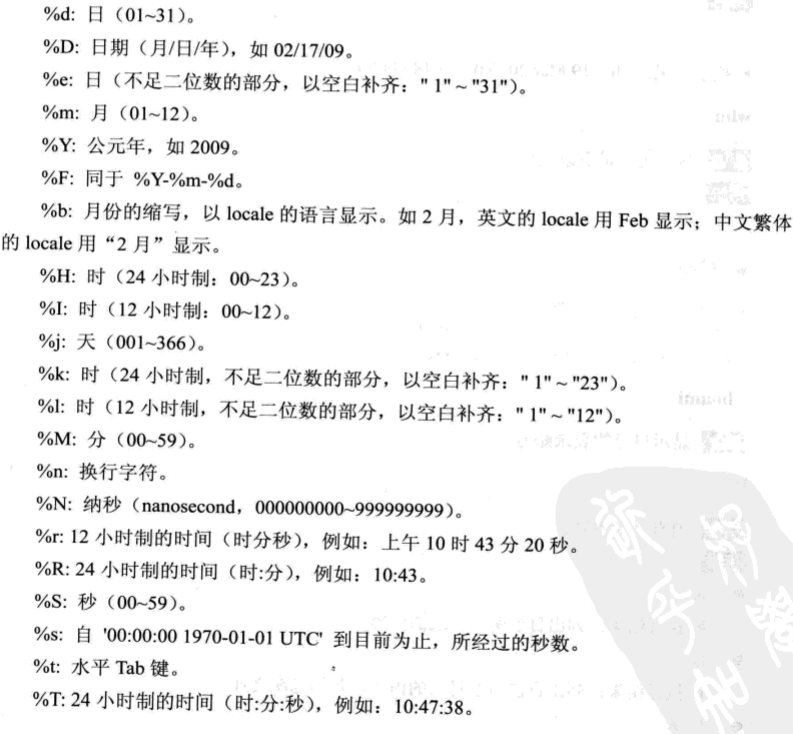

who 显示现在谁在登录主机
whoami 显示当前登录主机的账号
ls 列出目录内容
ls -a 列出所有目录内容,包含隐藏文件
ls -A 列出所有目录内容,包含隐藏文件,但不显示. 和 ..
[root@localhost ~]# ls -A    不显示 . 和 ..
alog.txt         .bash_history  .bashrc  cos_value.c  .esd_auth  hello.c        important.file        .local    nohup.out           perl5  shellscript  sorted.txt   .tcshrc   .Xauthority  视频  下载
anaconda-ks.cfg  .bash_logout   .cache   .cshrc       haha.c     hello.o        initial-setup-ks.cfg  main.c    ntp-4.2.8p3.tar.gz  .pki   sin_value.c  .ssh         test.sh   公共         图片  音乐
a.out            .bash_profile  .config  .dbus        hello      .ICEauthority  .lesshst              makefile  out.sh              .rnd   sleep500.sh  .subversion  .viminfo  模板         文档  桌面
[root@localhost ~]# ls -a   显示 . 和 .. 第一列中的两行
.         anaconda-ks.cfg  .bash_logout   .cache       .cshrc     haha.c   hello.o         initial-setup-ks.cfg  main.c     ntp-4.2.8p3.tar.gz  .pki         sin_value.c  .ssh         test.sh      公共  图片  音乐
..        a.out            .bash_profile  .config      .dbus      hello    .ICEauthority   .lesshst              makefile   out.sh              .rnd         sleep500.sh  .subversion  .viminfo     模板  文档  桌面
alog.txt  .bash_history    .bashrc        cos_value.c  .esd_auth  hello.c  important.file  .local                nohup.out  perl5               shellscript  sorted.txt   .tcshrc      .Xauthority  视频  下载
为啥要这样显示呢?
ls -la 长格式显示目录所有内容,包含隐藏文件
ls -ld 只显示目录信息,不显示目录内容
ls -F 在目录后面加上标识符
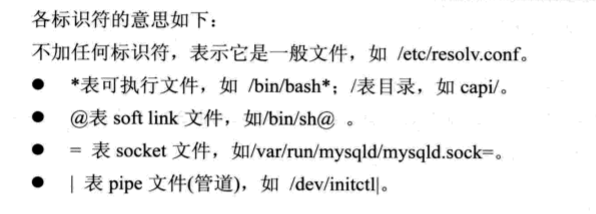
[root@localhost ~]# ls -lF
总用量 7012
-rw-r--r--. 1 root root       0 9月  25 14:39 alog.txt
-rw-------. 1 root root    2380 8月  19 11:19 anaconda-ks.cfg
-rwxr-xr-x. 1 root root    8440 9月   2 16:51 a.out*
-rw-r--r--. 1 root root     185 9月  12 15:22 cos_value.c
-rw-r--r--. 1 root root     102 9月  12 15:22 haha.c
-rwxr-xr-x. 1 root root    8440 9月   2 16:53 hello*
-rw-r--r--. 1 root root      63 9月   2 16:51 hello.c
-rw-r--r--. 1 root root    1496 9月   2 16:52 hello.o
-rw-r--r--. 1 root root       0 9月  17 15:35 important.file
-rw-r--r--. 1 root root    2428 8月  19 13:39 initial-setup-ks.cfg
-rw-r--r--. 1 root root     292 9月  12 15:23 main.c
-rw-r--r--. 1 root root     156 9月  12 15:35 makefile
-rw-------. 1 root root      93 8月  27 14:23 nohup.out
-rw-r--r--. 1 root root 7099575 6月  30 2015 ntp-4.2.8p3.tar.gz
-rw-r--r--. 1 root root      31 9月  25 11:20 out.sh
drwxr-xr-x. 2 root root       6 8月  19 13:42 perl5/
drwxr-xr-x. 2 root root      41 9月  19 16:58 shellscript/
-rw-r--r--. 1 root root     187 9月  12 15:23 sin_value.c
-rwxr-xr-x. 1 root root      65 8月  27 14:12 sleep500.sh*
-rw-r--r--. 1 root root       0 9月  25 11:27 sorted.txt
-rwxr-xr-x. 1 root root     330 9月  25 16:00 test.sh*
drwxr-xr-x. 2 root root       6 8月  19 15:17 公共/
drwxr-xr-x. 2 root root       6 8月  19 15:17 模板/
drwxr-xr-x. 2 root root       6 8月  19 15:17 视频/
drwxr-xr-x. 2 root root       6 8月  19 15:17 图片/
drwxr-xr-x. 2 root root       6 8月  19 15:17 文档/
drwxr-xr-x. 2 root root       6 8月  19 15:17 下载/
drwxr-xr-x. 2 root root       6 8月  19 15:17 音乐/
drwxr-xr-x. 2 root root       6 8月  19 15:17 桌面/
cat 链接文件内容并显示
[root@localhost ~]# cat test.sh
#!/bin/bash
#
#用途:简单的shell程序
#
#
#
function show_name()
{
        echo "今天是 $1 ,你 $2 大大,来自 $3"
}

name=$1
ip="192.168.1.16"
today=$(date +%F)

if [ $# != 1 ]; then
        echo "Usage: . /$0 [使用者名称]"
        exit
fi

show_name "$today" "$name" "$ip"

sleep 5

echo

echo "Bye-Bye ;-)"
[root@localhost ~]# cat hello.c test.sh
#include <stdio.h>

int main(void)
{
        printf("Hello world");
}
#!/bin/bash
#
#用途:简单的shell程序
#
#
#
function show_name()
{
        echo "今天是 $1 ,你 $2 大大,来自 $3"
}

name=$1
ip="192.168.1.16"
today=$(date +%F)

if [ $# != 1 ]; then
        echo "Usage: . /$0 [使用者名称]"
        exit
fi

show_name "$today" "$name" "$ip"

sleep 5

echo

echo "Bye-Bye ;-)"
[root@localhost ~]# cat sorted.txt
#没有任何内容
[root@localhost ~]# cat hello.c test.sh > sorted.txt
[root@localhost ~]# cat sorted.txt
#include <stdio.h>

int main(void)
{
        printf("Hello world");
}
#!/bin/bash
#
#用途:简单的shell程序
#
#
#
function show_name()
{
        echo "今天是 $1 ,你 $2 大大,来自 $3"
}

name=$1
ip="192.168.1.16"
today=$(date +%F)

if [ $# != 1 ]; then
        echo "Usage: . /$0 [使用者名称]"
        exit
fi

show_name "$today" "$name" "$ip"

sleep 5

echo

echo "Bye-Bye ;-)"
[root@localhost ~]# echo $FROM | cat - sorted.txt 将echo的命令和sorted.txt链接打印。注意到中间那个 - 了么?位补足,因为cat需要连接两个文档进行输出,所以,用 -来补足cat的参数位置
joe@sample.edu.cn
#include <stdio.h>
int main(void)
{
printf("Hello world");
}
#!/bin/bash
#
#用途:简单的shell程序
#
#
#
function show_name()
{
echo "今天是 $1 ,你 $2 大大,来自 $3"
}
name=$1
ip="192.168.1.16"
today=$(date +%F)
if [ $# != 1 ]; then
echo "Usage: . /$0 [使用者名称]"
exit
fi
show_name "$today" "$name" "$ip"
sleep 5
echo
echo "Bye-Bye ;-)"
head 输出文件默认为前10行,
head -100 输出文件的前100行
tail 输出文件的后面部分 默认为后10行
tail -100 输出后100行
wc 计算文件内涵的总字数和行数
wc -l 显示有多少行
wc -c 显示有多少字符
wc -w 显示有多少单词
ln 软硬链接
ln f1 f2 将f1 f2进行硬连接
ln -s f1 f3 将f3对f1进行软链接
ls -sf f1 f3 也是将f3对f1进行软连接,但是如果f3软连接已经存在的话,则会删除原来的f3,重新建立
软连接,硬连接不懂的,可以看以前的博客。鸟哥的书中讲的很详细
mkdir 建立目录
mkdir -p 如果子目录不存在,会同时建立相应级别的目录
rmdir 删除空目录
rm 删除文件
rm -f 强行删除文件。如果只执行rm的话,一般会提示你是否要删除。如果使用命令行-f 来执行的话,则不会提示,会直接删除
rm -Rf 目录
-R采用递归方式,将目录下的所有子目录和文件删除
find 在分层目录中寻找文件
find 路径 样式 操作
find / -name '*.txt' 从根目录往下查找所有后缀名为txt的文件
find . -name '*.txt' -exec rm -f {} \
会将工作目录中的所有txt文件删除
前半部分不讲了,后面的-exec部分。exec 执行后面的命令。{} 表示找到的文件 ; 是执行 -exec的终止符,因为;是bash shell的特殊字符,所以需要\来转义一下
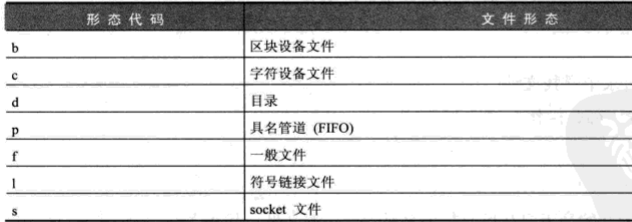
find /root -type d -print
选好文件形态是 目录 的文件。find 选项 -type 支持的种类有
tar 将文件或目录打包成一个文件(也可以反向解开),并保留目录结构和文件的权限属性
tar cvzf etc.tgz /etc
将/etc目录打包成etc.tar.gz
其中 c 代表建立tar文件,v表示详细显示过程,z代表呼叫gzip压缩tar 文件,f 指定文件名。
tar tvzf etc.tgz
t表示列出打包内容
tar xvzf etc.tgz
z表示呼叫gzip解压,x表示解包
tar xvzf etc.tgz -C test2 。 如果要切换目录解压缩,一定要用实际路径,而非虚拟路径,否则会出问题。这个已经做过实验,否则他会在虚拟目录中在将原压缩文件目录进行新建并解压缩
-C表示切换到某一目录。这个指令的意思是,把etc.tgz 放入到 test2目录中解压
tar cvf - test2 | gzip -9 >save.tgz
该方法是在不支持z选项的tar版本中。先用cvf把test2目录打包,- 表示将打包结果往标准输出丢,然后经由管道 交给gzip压缩,在转向文件save.tgz。其中 -9表示压缩比最高。
gzip -9dc save.tgz | tar xvf -
该方法也是在不支持z选项的tar版本中,解压缩。先用gzip解压缩save.tgz。其中 -d 表示解压之意, -c表示解压缩到标准输出,然后通过管道,交给tar解压。其中 最后一个 - 表示有标准输入读取数据
备份目录A到目录B
[root@localhost ntpFile]# tar cvf - . | tar xvf - -C /root/ntpFile2
这有两点要注意一下,首先要进入tar目录之中,然后后面的路径要实际路径。这样,就会将当前目录中的所有东西备份到ntpFile2中
basename 取得路径名称中最后的文件名部分
basename /usr/local/bin/sftp
显示结果就是sftp
dirname 取得路径名称中的目录部分
dirname /usr/local/bin/sftp 显示结果/usr/local/bin
sort 对文本文件的每一行做排序
sort dataf4 按照ascII 的字符排列做升序
sort -r dataf4 降序
sort -n dataf4 按照字符串的数值大小升幂排序
sort -k 2 dataf5 以 data5中的第二个字段做排序依据(以字符串比较的方式),如果使用-n 选项,则以数值大小的方式来比较
sort -nk 2 dataf5 以数值大小的方式从data5中的第二个字段作为排序依据进行排序
sort -n +2 dataf3 跳过前两栏,以dataf3中的第三栏以数值大小作为排序依据排序 【经检验,跨越行此操作无效】
sort -nr +2 -t: /etc/passwd -t 表示以:为分隔符,+2 跳过前两栏 ,以 /etc/passwd的第三栏作为降序牌系列,-n 表示sort以数值大小的方式进行比较,-r 降序排列【经检验,跨越行此操作无效】
[root@localhost ~]# sort -nr +2 -t: /etc/passwd
sort: cannot read: +2: 没有那个文件或目录
如果要实现上述的命令,只能先取第三行之后的数据,在排序,删除重复行
sed -n '2,$p' /et/passwd | sort -nr -t: | uniq
sort < data4 > sorted
从标准输入data4排序后,转存到sorted中
uniq 对以排序文件删除重复行
uniq dataf3 注:若重复列未连续摆在一起,则不会起任何作用。所以这就要求,先排序再删除重复行,否则会导致有些重复行无法删除
sort dataf3 | uniq
sort dataf3 | uniq -d 挑出重复行
sort dataf3 | uniq -c 计算每一行重复的次数
cut 对文件中的每一行抽取某一部分
cut -c2 dataf1 抽取dataf1中每一行的第2个字符
[root@localhost ~]# cut -c2 /etc/passwd
o
i
a
d
cut -c3-10 dataf1 从dataf1中每一行抽取3-10个字符
[root@localhost ~]# cut -c2-10 /etc/passwd
oot:x:0:0
in:x:1:1:
aemon:x:2
dm:x:3:4:
p:x:4:7:l
cut -c1-3 ,22- dataf1 从dataf1中抽取1-3和22到之后的所有字符
cut -d: -f1 /etc/passwd -d 是以:为分隔符 -f1 是取第一个字段的意思
[root@localhost ~]# cut -d: -f1 /etc/passwd
root
bin
daemon
adm
lp
cut -d: -f3,4 /etc/passwd 以:为分隔符,取第三,第四行的数据
[root@localhost ~]# cut -d: -f1,3 /etc/passwd
root:0
bin:1
daemon:2
adm:3
lp:4
sync:5
[root@localhost ~]# cut -d: -f1,3- /etc/passwd #3-表示从第3行开始到最后所有的数据全部重现
root:0:0:root:/root:/bin/bash
bin:1:1:bin:/bin:/sbin/nologin
daemon:2:2:daemon:/sbin:/sbin/nologin
adm:3:4:adm:/var/adm:/sbin/nologin
lp:4:7:lp:/var/spool/lpd:/sbin/nologin
paste 对文件以行和行的方式合并
paste dataf1 dataf2 将dataf1的每一行和dataf2的每一行合并。默认以tab分隔
paste -d'#' dataf1 dataf2 将dataf1每一行与dataf2每一行合并。默认以#分割
paste -s dataf4 将dataf4每一行自己合并起来。并默认以tab分割
tr 转换或删除字符
tr k K <dataf1 将dataf1中的k 转换成 K
tr ',' '\n' <ttt 将ttt文件中的逗号 转换成 \n
tr -d k 将k字符全部删除
cut -d: -f1-6 /etc/passwd | tr :'+' 将etc/password的1-6栏中的所有改成 + 分割
[root@localhost ~]# cut -d: -f1-6 /etc/passwd | tr : '+'
root+x+0+0+root+/root
bin+x+1+1+bin+/bin
daemon+x+2+2+daemon+/sbin
adm+x+3+4+adm+/var/adm
lp+x+4+7+lp+/var/spool/lpd
sync+x+5+0+sync+/sbin
shutdown+x+6+0+shutdown+/sbin
halt+x+7+0+halt+/sbin
mail+x+8+12+mail+/var/spool/mail
tr '[A-Z]' '[a-z]' <dataf1 将dataf1中的所有大写字母改成小写字母
tr -s '''' < dataf1 将多余的空白删除,只剩一个 (-s 是挤压的意思)
grep 显示符合样式的行
grep A* 将所有包含A的文件及行显示出来
grep -i A* 将所有包含A或a的文件及行显示出来 -i 是不区分大小写的意思
grep -v La data3 将不包含La的文件及行显示出来 -v 是不包含的意思
grep -l La* 只显示包含La的行
grep -n La* 同上,但也显示出行号
dmesg | grep eht0 将含有eth0的这个关键词的信息显示出来。
Linux 命令 dmesg 用来显示开机信息,kernel 会将开机信息存储在 ring buffer 中。若是开机时来不及查看信息,可利用 dmesg 来查看。开机信息亦保存在 /var/log 目录中,名称为 dmesg 的文件里。通过 grep 使用管道查看 dmesg 的输出,可以更容易找到待查信息。
grep -q keyword filename 若filename包含keyword则返回0(真),否则,返回非0
每个命令或Script,在执行完毕后,其执行结果会以一个数值传回,成为离去状态。他的传回值会放在 $? 这个变量中,只要echo $?,便可得知起执行结果与否。请记住0 成功,非0失败
grep -A 200 -e 'XXXX‘ filename
-e 表示后面接的是欲比较的样式
-A 200表示找到该样式后再显示接下来的200行数据
tee 读取标准输入,然后由标准输出显示,并把这些数据存储在指定的文件
tee test.log 若test.log存在,则会清空,若不存在,则会创建新文件。欲结束输入,按ctrl +d .输入的数据回储存在test.log中
tee -a filename 以附加的形式,将输入的内容添加到filename文件中
diff 比较两个文件的差异
diff hello.sh hello2.sh
comm 以列和列的方式,比较两个已排序好的文件
第一个文件存在的内容会放在第一列
第二个文件存在的内容会放在第二列
两个文件都存在的内容会放在第三列

xargs 有标准输入,安排要执行的命令和参数
find . -name '*.txt' | xargs -n 2 diff
由现在的工作目录,寻找扩展名为 .txt的文件,然后丢给xargs来处理。-n 2 表示执行指令的参数之多2个,也就是说把找到的txt文件。以两个一组的方式,丢给diff去比较差异
diff: missing operand after './.subversion/README.txt'
diff: Try 'diff --help' for more information.
[root@localhost ~]# find -name '*.txt' | xargs -n 2 diff

#如果包含的文件为奇数,就会报错。因为只有一个参数,而diff 需要两个参数
三 执行多个命令的方法
命令行中,可以一次执行多个命令,其方式有一下几种
1 各命令用 , 分割 解析:各命令互不干扰,前面的命令执行失败,后面的命令也会继续执行
2 每个命令之间用 && 分割 解析:各命令依次为条件。前面的命令执行成功,后面的命令才会执行。常用在自行安装的script中
文中给了一个自动安装apache和php的脚本。这个脚本的用途在于下载源代码包文件后的自行安装。现在一般都用yum源来安装,如果没有,你就只能用这个脚本文件来操作。
#! /bin/bash


#解压缩   这个要改成你自己的apache版本和php版本。而且这个版本很低,还需要根据最新的configure的要求进行设定。也就是说你直接用不一定好用。最新的我直接用yum安装的,所以我就不测试了
tar -xvzf httpd-2.2.11.tar.gz &&
tar -xvzf php-5.3.0.tar.gz &&

#设定apache
echo ' Configure apache .....' &&
cd httpd-2.2.11 &&
./configure --prefix=/usr/local/apache2 --enable-so &&
make &&
make install &&

#设定/编译/安装php
cd ../php-5.3.0 &&
./configure \
                --with-apxs2=/usr/local/apache2/bin/apxs\
                --with-mysql=/usr/local/mysql && make && make install &&

#复制php.ini到/usr/local/lib
cp -f php.ini-production /usr/local/lib/php.ini &&

echo

echo 'Done!'

echo
~
3 || 命令1 || 命令2 || 命令3 解析:当命令1执行成功的时候,就会退出。如果命令1失败,才执行命令2.同理命令3
4 将命令弄成一组,整体执行命令
(命令1;命令2;命令3) 解析 新开一个shell窗口来执行。这样就可以通过 & 来拖到后台执行
{ 命令1;命令2;命令3 } 解析 在当前shell总体执行所有命令。在大括号的左右两侧,各需要间隔至少一个空格,而且每个命令都需要一个;来做为结束
四 记录命令执行过程
Script工具程序 /usr/lib/script目录中
如果不提供自定义日志文件,默认会将数据存储在 typescript 文件中
script log.txt 就会将执行命令所产生的信息记录下来,存放在Log.txt中,执行script之后,就可以执行各种操作了。script会记录下所有的输出信息,如果要结束操作,exit 便可以离开script
[root@localhost ~]# script log.txt
Script started, file is log.txt
[root@localhost ~]# ls -la /tmp/
总用量 1028
drwxrwxrwt. 24 root root   4096 10月  8 16:13 .
dr-xr-xr-x. 18 root root    239 8月  28 17:26 ..
drwx------.  2 root root     20 9月  19 11:09 .esd-0
drwx------.  2 lsq  lsq      20 9月  19 11:14 .esd-1000
drwxrwxrwt.  2 root root      6 8月  19 11:03 .font-unix
drwxr-xr-x.  2 root root      6 9月  18 14:15 hsperfdata_root
drwxrwxrwt.  2 root root     44 9月  19 11:14 .ICE-unix
drwx------.  2 lsq  lsq      25 9月  19 11:14 ssh-8c8E8ZoTR6JT
drwx------.  3 root root     17 9月  26 08:45 systemd-private-2f2a7500abcf4dba99ce9b179eae6d57-httpd.service-3n0xvq
drwx------.  3 root root     17 9月  26 08:45 systemd-private-2f2a7500abcf4dba99ce9b179eae6d57-systemd-machined.service-sWIVg8
drwx------.  3 root root     17 9月  19 13:42 systemd-private-32b42b88babe40ff91a8f886ef37c4de-colord.service-JTClM4
drwx------.  3 root root     17 9月  20 10:08 systemd-private-32b42b88babe40ff91a8f886ef37c4de-fwupd.service-j3e8ab
drwx------.  3 root root     17 9月  19 11:13 systemd-private-32b42b88babe40ff91a8f886ef37c4de-httpd.service-CTIPHR
drwx------.  3 root root     17 9月  19 11:13 systemd-private-32b42b88babe40ff91a8f886ef37c4de-rtkit-daemon.service-1cRAUO
drwx------.  3 root root     17 9月  19 11:13 systemd-private-32b42b88babe40ff91a8f886ef37c4de-systemd-machined.service-TIRI3p
drwx------.  2 lsq  lsq       6 9月  18 16:40 Temp-e6f811a6-1f8e-4f3a-b10c-847129fbefbc
drwxrwxrwt.  2 root root      6 8月  19 11:03 .Test-unix
drwx------.  2 root root      6 9月  19 11:09 tracker-extract-files.0
drwx------.  2 lsq  lsq       6 9月  18 16:40 tracker-extract-files.1000
drwx------.  2 root root      6 9月  19 11:13 vmware-root_7008-2831224237
drwx------.  2 root root      6 9月  26 08:45 vmware-root_7029-3854406118
drwx------.  2 root root      6 9月  17 15:19 vmware-root_7031-3845951588
drwxrwxrwt.  2 root root     26 9月  19 11:14 .X11-unix
drwxrwxrwt.  2 root root      6 8月  19 11:03 .XIM-unix
-rw-------.  1 root root 523044 9月  19 11:10 yum_save_tx.2019-09-19.11-10.BH4F6D.yumtx
-rw-------.  1 root root 523044 9月  20 10:54 yum_save_tx.2019-09-20.10-54.ZDRbv2.yumtx
[root@localhost ~]# exit
exit
Script done, file is log.txt
[root@localhost ~]# cat log.txt
脚本启动于 2019年10月08日 星期二 16时19分43秒
[root@localhost ~]# ls -la /tmp/
总用量 1028
drwxrwxrwt. 24 root root   4096 10月  8 16:13 .
dr-xr-xr-x. 18 root root    239 8月  28 17:26 ..
drwx------.  2 root root     20 9月  19 11:09 .esd-0
drwx------.  2 lsq  lsq      20 9月  19 11:14 .esd-1000
drwxrwxrwt.  2 root root      6 8月  19 11:03 .font-unix
drwxr-xr-x.  2 root root      6 9月  18 14:15 hsperfdata_root
drwxrwxrwt.  2 root root     44 9月  19 11:14 .ICE-unix
drwx------.  2 lsq  lsq      25 9月  19 11:14 ssh-8c8E8ZoTR6JT
drwx------.  3 root root     17 9月  26 08:45 systemd-private-2f2a7500abcf4dba99ce9b179eae6d57-httpd.service-3n0xvq
drwx------.  3 root root     17 9月  26 08:45 systemd-private-2f2a7500abcf4dba99ce9b179eae6d57-systemd-machined.service-sWIVg8
drwx------.  3 root root     17 9月  19 13:42 systemd-private-32b42b88babe40ff91a8f886ef37c4de-colord.service-JTClM4
drwx------.  3 root root     17 9月  20 10:08 systemd-private-32b42b88babe40ff91a8f886ef37c4de-fwupd.service-j3e8ab
drwx------.  3 root root     17 9月  19 11:13 systemd-private-32b42b88babe40ff91a8f886ef37c4de-httpd.service-CTIPHR
drwx------.  3 root root     17 9月  19 11:13 systemd-private-32b42b88babe40ff91a8f886ef37c4de-rtkit-daemon.service-1cRAUO
drwx------.  3 root root     17 9月  19 11:13 systemd-private-32b42b88babe40ff91a8f886ef37c4de-systemd-machined.service-TIRI3p
drwx------.  2 lsq  lsq       6 9月  18 16:40 Temp-e6f811a6-1f8e-4f3a-b10c-847129fbefbc
drwxrwxrwt.  2 root root      6 8月  19 11:03 .Test-unix
drwx------.  2 root root      6 9月  19 11:09 tracker-extract-files.0
drwx------.  2 lsq  lsq       6 9月  18 16:40 tracker-extract-files.1000
drwx------.  2 root root      6 9月  19 11:13 vmware-root_7008-2831224237
drwx------.  2 root root      6 9月  26 08:45 vmware-root_7029-3854406118
drwx------.  2 root root      6 9月  17 15:19 vmware-root_7031-3845951588
drwxrwxrwt.  2 root root     26 9月  19 11:14 .X11-unix
drwxrwxrwt.  2 root root      6 8月  19 11:03 .XIM-unix
-rw-------.  1 root root 523044 9月  19 11:10 yum_save_tx.2019-09-19.11-10.BH4F6D.yumtx
-rw-------.  1 root root 523044 9月  20 10:54 yum_save_tx.2019-09-20.10-54.ZDRbv2.yumtx
[root@localhost ~]# exit
exit

Script done on 2019年10月08日 星期二 16时19分56秒
五 命令行编辑方法
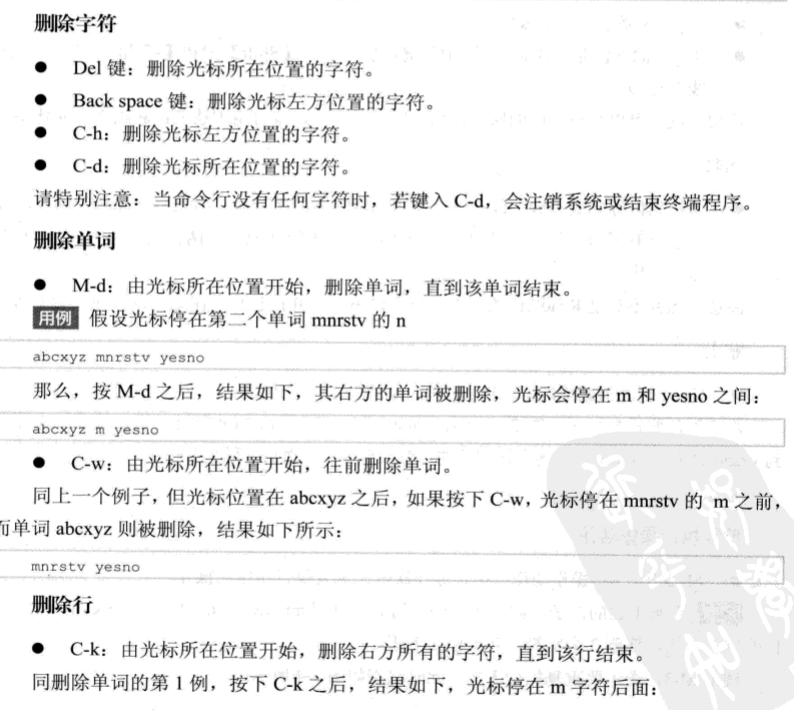
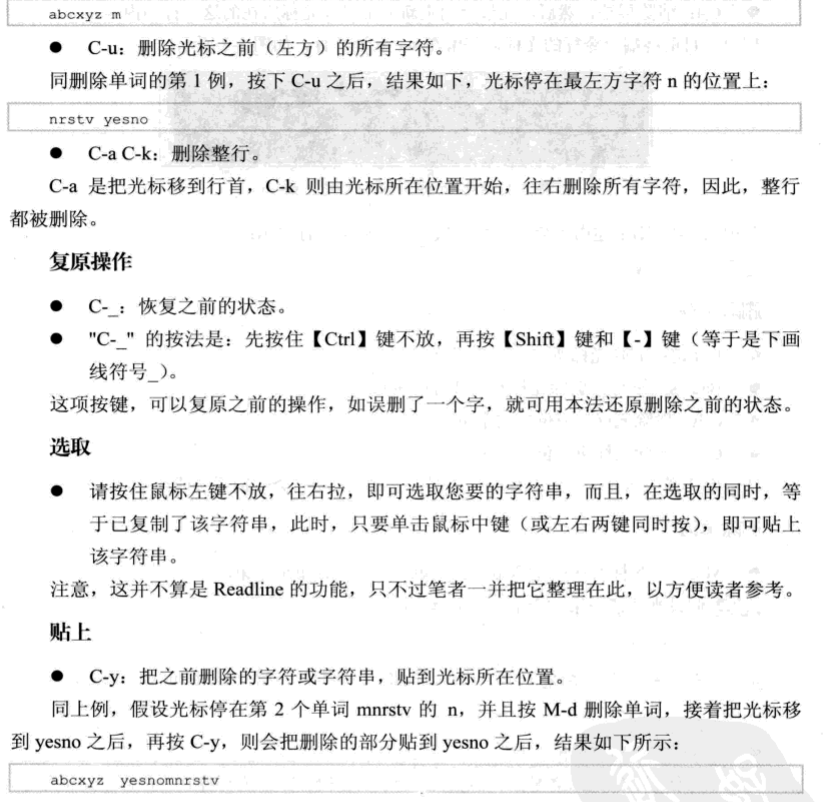
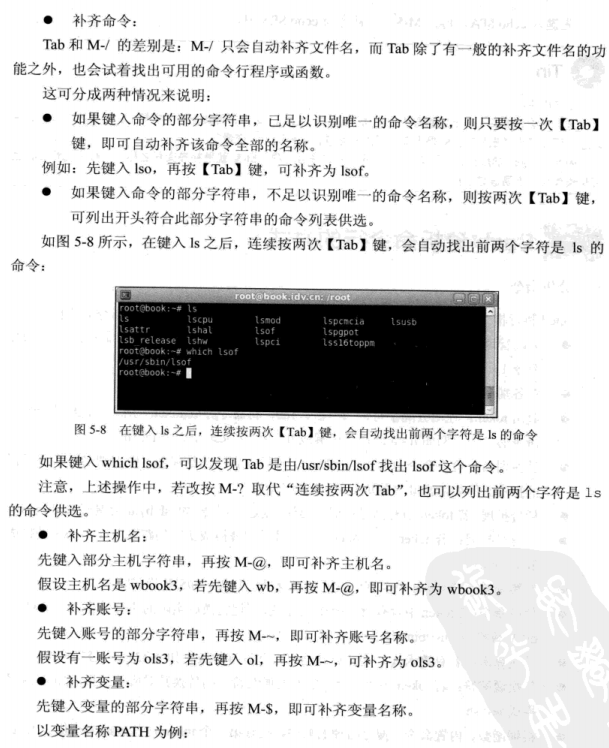
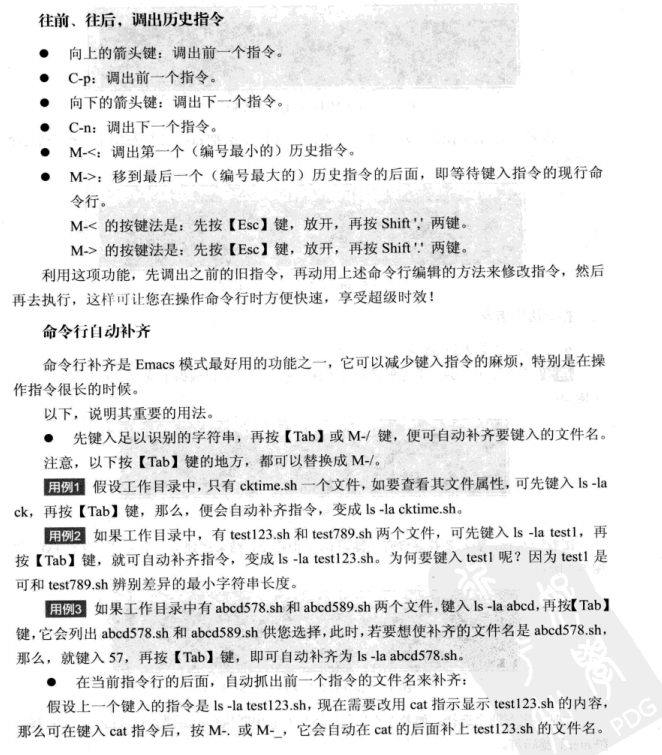
Bash支持命令行编辑,也就是如果打错了某个命令,可以移动光标对指令进行修改。Bash之所以有这个功能是因为GNU的Readline函数库。Readline函数库支持 Emacs和vi两种编辑模式。文中推荐Emacs模式
首先检查编辑模式是否位Emacs模式
[root@localhost ~]# set -o | grep emacs
emacs           on    #我这里是打开的
#如果是关闭的,则用下面命令打开
[root@localhost ~]# set -o emacs




六 Bash 分析命令行的方式
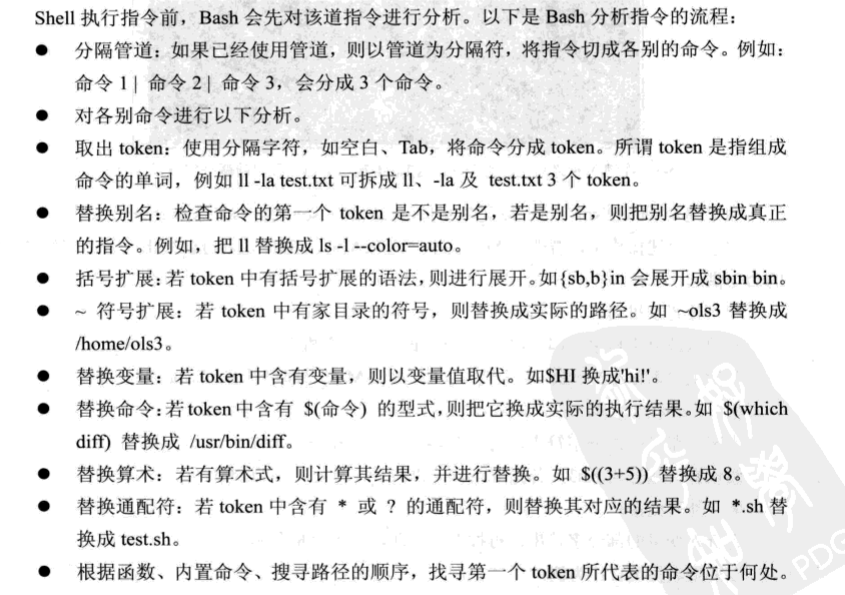
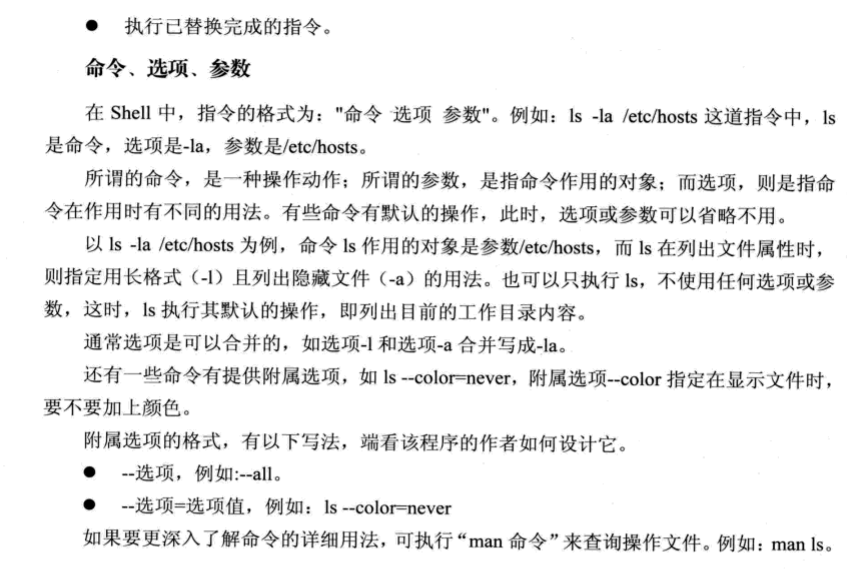
分割管道=》对各命令进行分析=》取出token(使用分隔符,如空白 tab 将命令分割成组成命令的单词) =》替换别名 =》括号扩展 ({a,b}in 扩展成 ain,bin)=> ~ 符号扩展 (如果有家目录符号,扩展成实际路径) => 替换变量 =》 替换命令 =》 替换算术 =》 替换通配符
=》 根据函数,内置命令,搜寻路径顺序,找寻第一个token所代表的命令位于何处 =》 执行替换完成的指令


【推荐】国内首个AI IDE,深度理解中文开发场景,立即下载体验Trae
【推荐】编程新体验,更懂你的AI,立即体验豆包MarsCode编程助手
【推荐】抖音旗下AI助手豆包,你的智能百科全书,全免费不限次数
【推荐】轻量又高性能的 SSH 工具 IShell:AI 加持,快人一步
· 开发者必知的日志记录最佳实践
· SQL Server 2025 AI相关能力初探
· Linux系列:如何用 C#调用 C方法造成内存泄露
· AI与.NET技术实操系列(二):开始使用ML.NET
· 记一次.NET内存居高不下排查解决与启示
· Manus重磅发布:全球首款通用AI代理技术深度解析与实战指南
· 被坑几百块钱后,我竟然真的恢复了删除的微信聊天记录!
· 没有Manus邀请码?试试免邀请码的MGX或者开源的OpenManus吧
· 园子的第一款AI主题卫衣上架——"HELLO! HOW CAN I ASSIST YOU TODAY
· 【自荐】一款简洁、开源的在线白板工具 Drawnix